What Are Advertising Features in Google Analytics?
Analytics advertising features were a set of optional features in Google’s now-discontinued Universal Analytics (UA) platform.
They offered access to useful data you could use to understand and improve the results of paid advertising campaigns.
Advertising features in Google Analytics UA allowed you to:
- Create remarketing audiences based on on-site behavior or user demographic data and export the lists to use in Google Ads
- See user demographic and interests in reports and create audience segments with the data to analyze user acquisition or behavior in new ways
- Integrate Campaign Manager 360 to view and analyze Campaign Manager 360 data in their Google Analytics reports
- View Google Display Network (GDN) impression reports to view how many impressions your display ads received in Google Analytics reports
Google Analytics 4 (GA4) replaced Universal Analytics in July 2023, so you can’t access the previous Analytics advertising features anymore.
However, GA4 offers similar features for the needs of digital marketing advertisers.
Google doesn’t refer to the features by a single name anymore. But, just like their predecessors, these features can make your advertising campaigns more effective.
4 GA4 Features for Advertisers
Almost all of GA4’s features can help advertisers understand how their campaigns perform.
But the following four analytics features in Google Analytics are particularly useful:
- Audience segments
- Custom events
- Google Ads link
- Google Signals and User IDs
Here’s a simple guide to help you configure and use each one:
1. Audience Segments
The audiences feature allows you to create custom user segments in GA4. This means you can categorize your users in ways that matter to your business.
Categorizing audience segments makes it easier to analyze their on-site behavior and target them in Google Ads campaigns.

You can create audiences based on diverse conditions. This gives you a lot of options.
For example, you can use Audiences to create segments of users who have:
- Visited your site three or more times
- Viewed a specific blog post, product page, or landing page
- Clicked on your contact page but left without taking an action
- Purchased something from your ecommerce website
- Signed up for your newsletter
And you can modify all these conditions with a time span.
For instance, you can create an audience of people who viewed a certain product page within the last seven days. This modification helps ensure your audiences are relevant—not filled with past users who’ve already moved on.
And, with Audiences set up, you can see them in standard GA4 reports.
These reports help you focus on valuable user segments to see how you acquire them and what they do on your website.
You can also access your custom audiences in any linked Google Ads accounts.
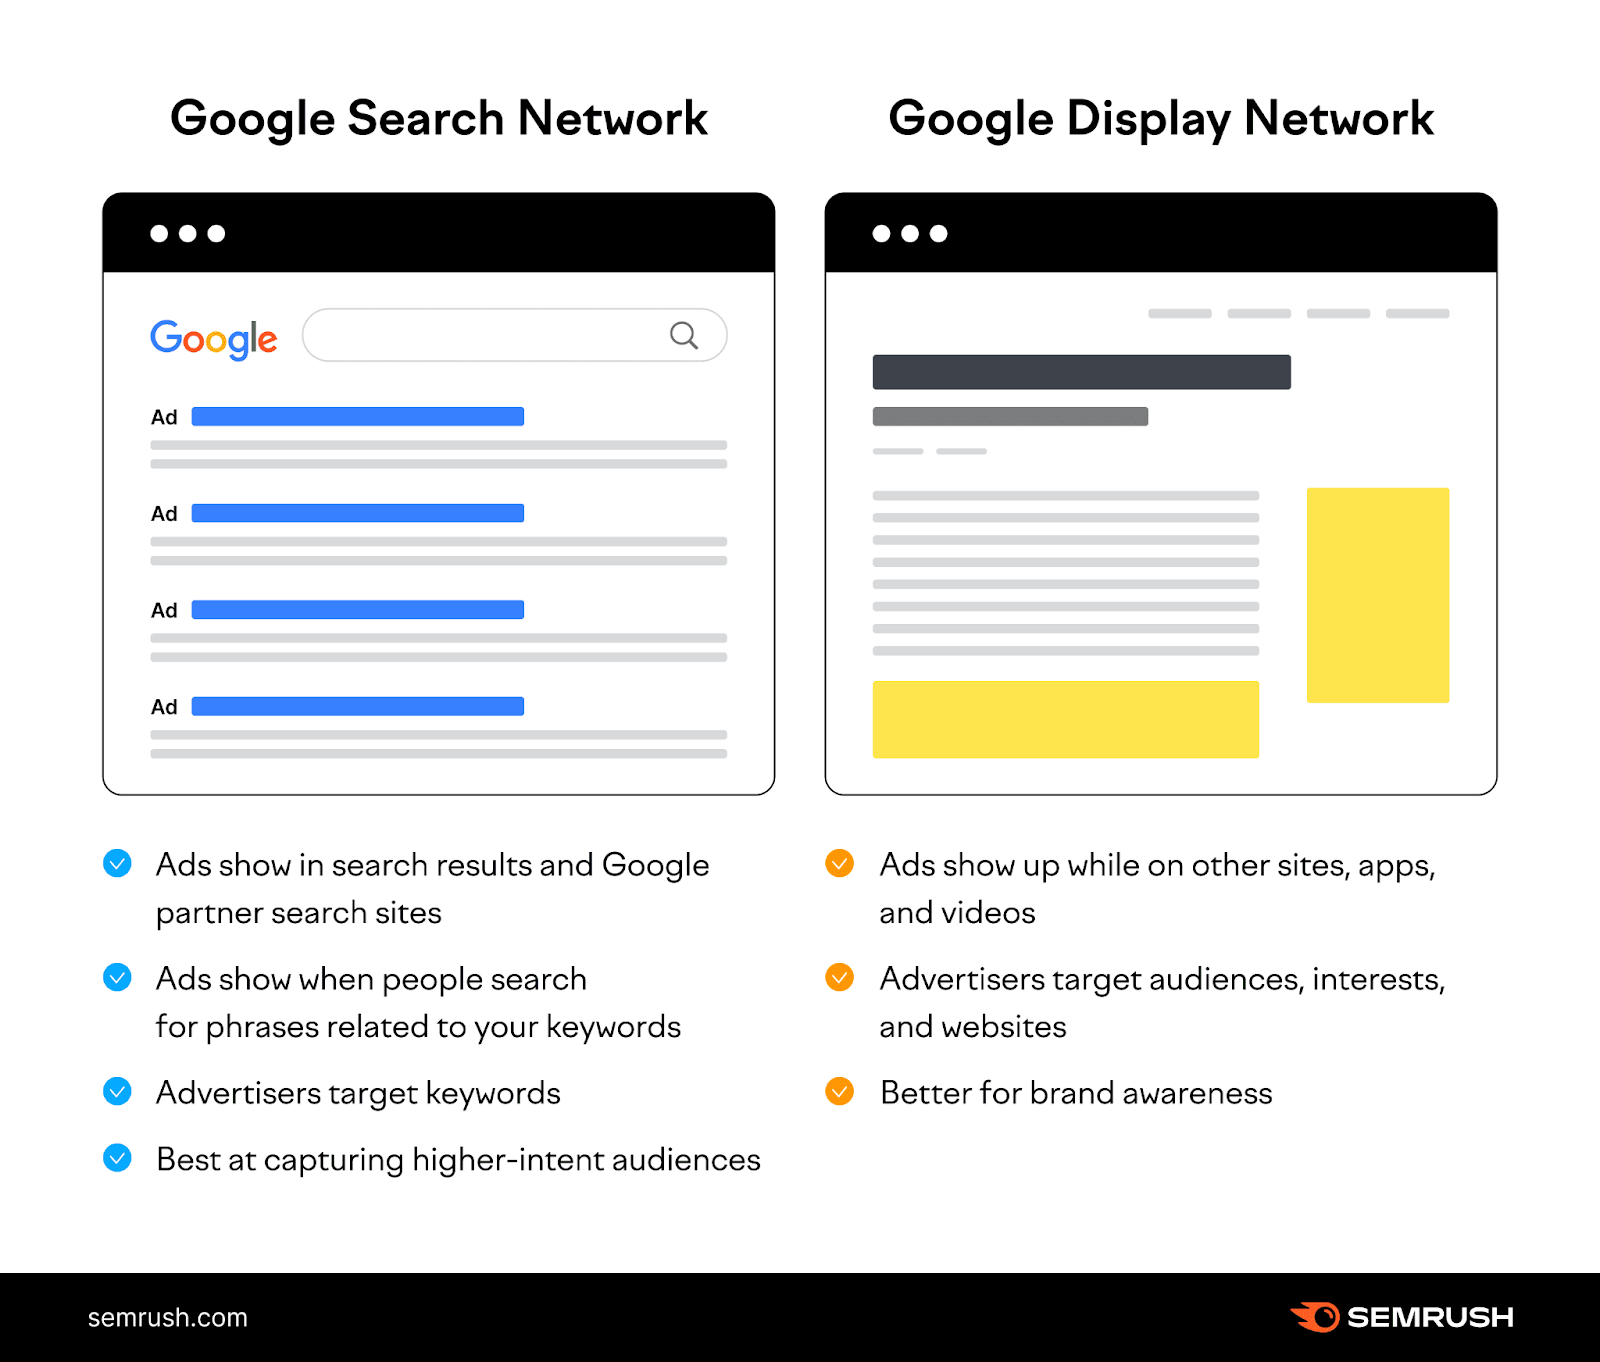
With this integration, you can use them in retargeting campaigns, serving ads elsewhere on the Google Search Network or the Google Display Network to reactivate lapsed users.
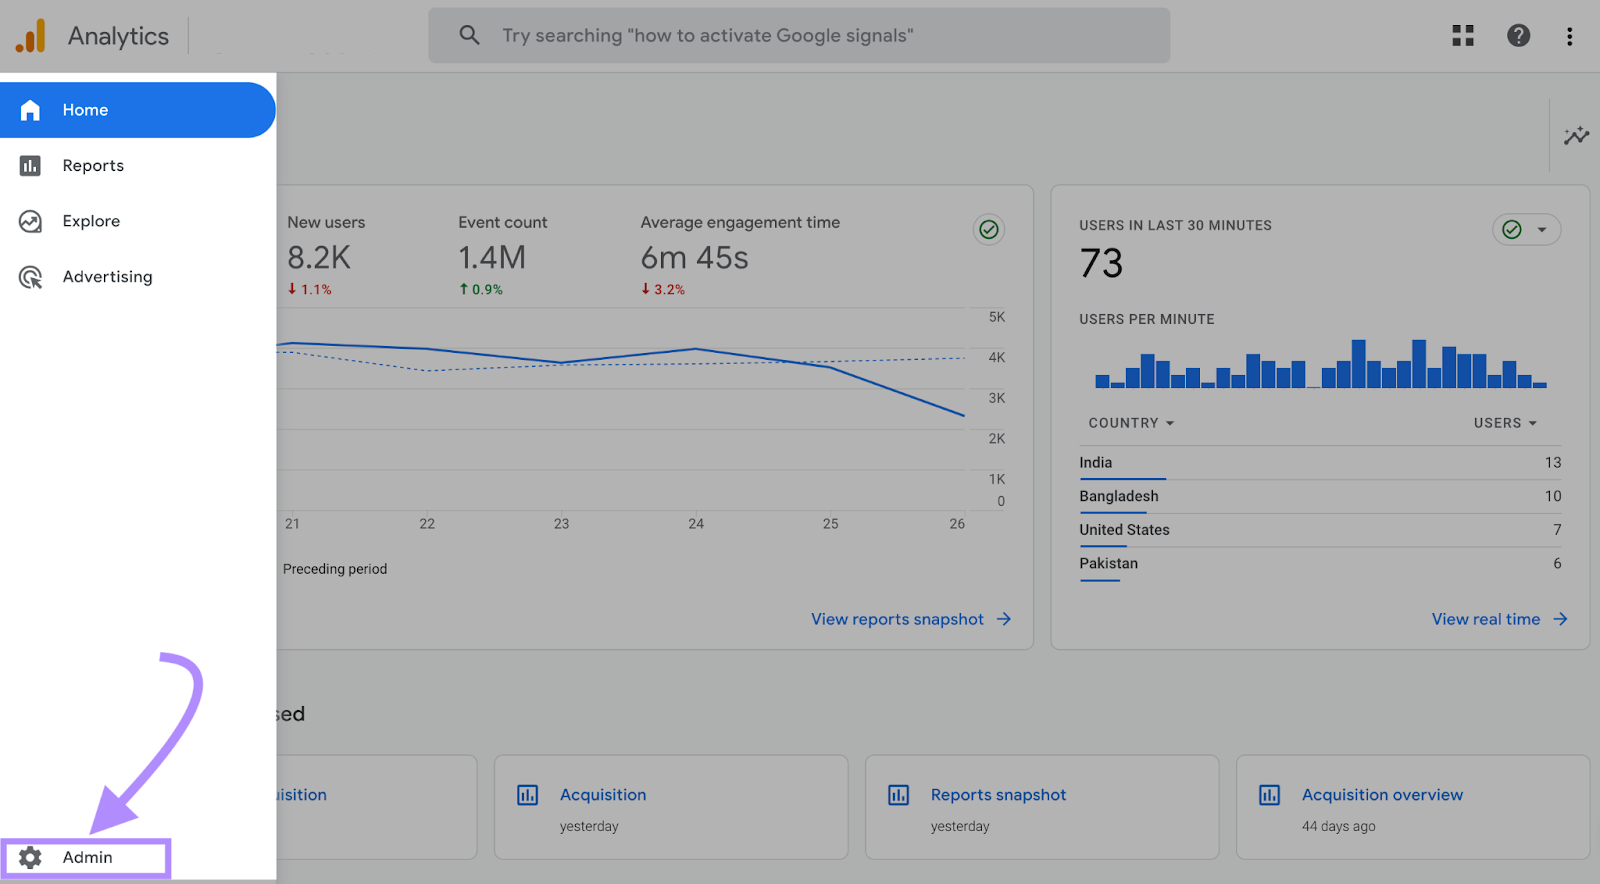
To create a new Audience in GA4, first click the “Admin” button in the menu on the left side of your screen.
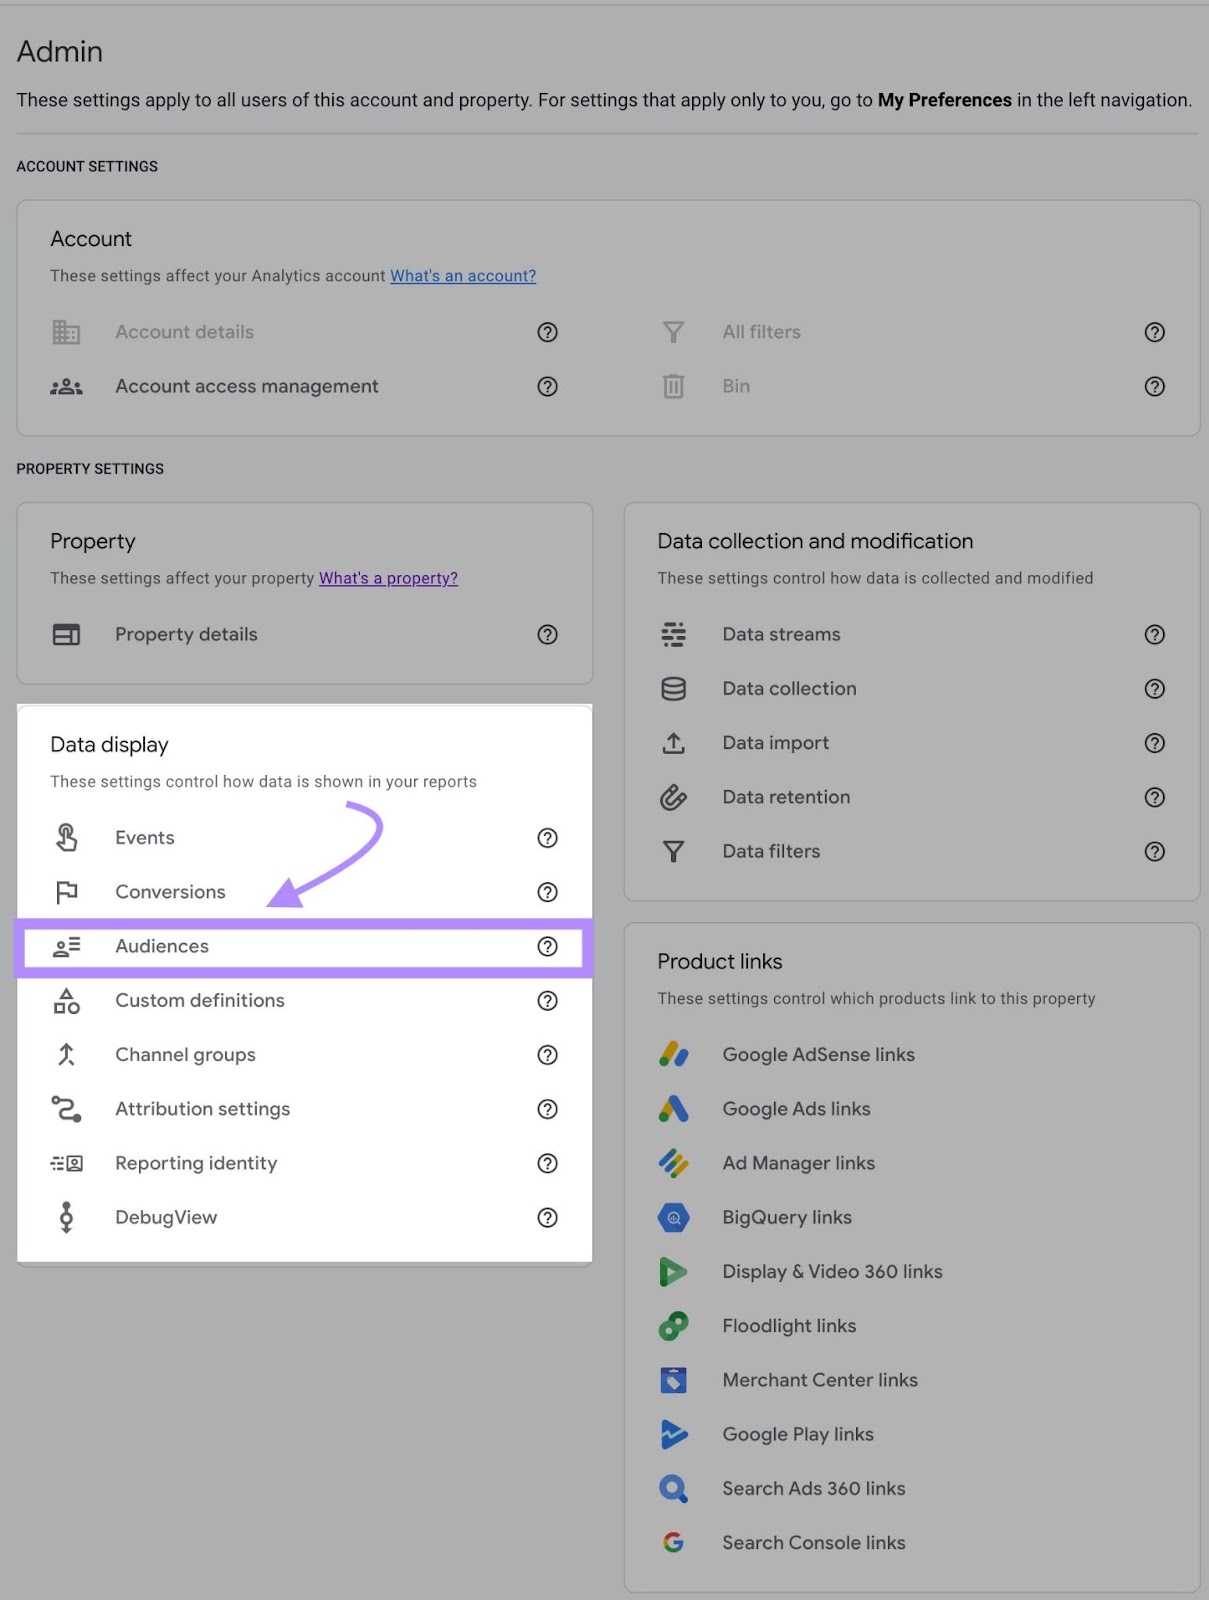
On the next screen, click “Audiences” in the Data display column.
There, you’ll see a list of your existing audiences.
Even if you’ve never set one up yourself, you should see All Users and Purchasers listed.
Click the “New audience” button to move on.

The next screen offers options for how to create a new audience.
You can choose an audience category pre-built by Google, like “7-day inactive users,” or select a template to simplify the process.
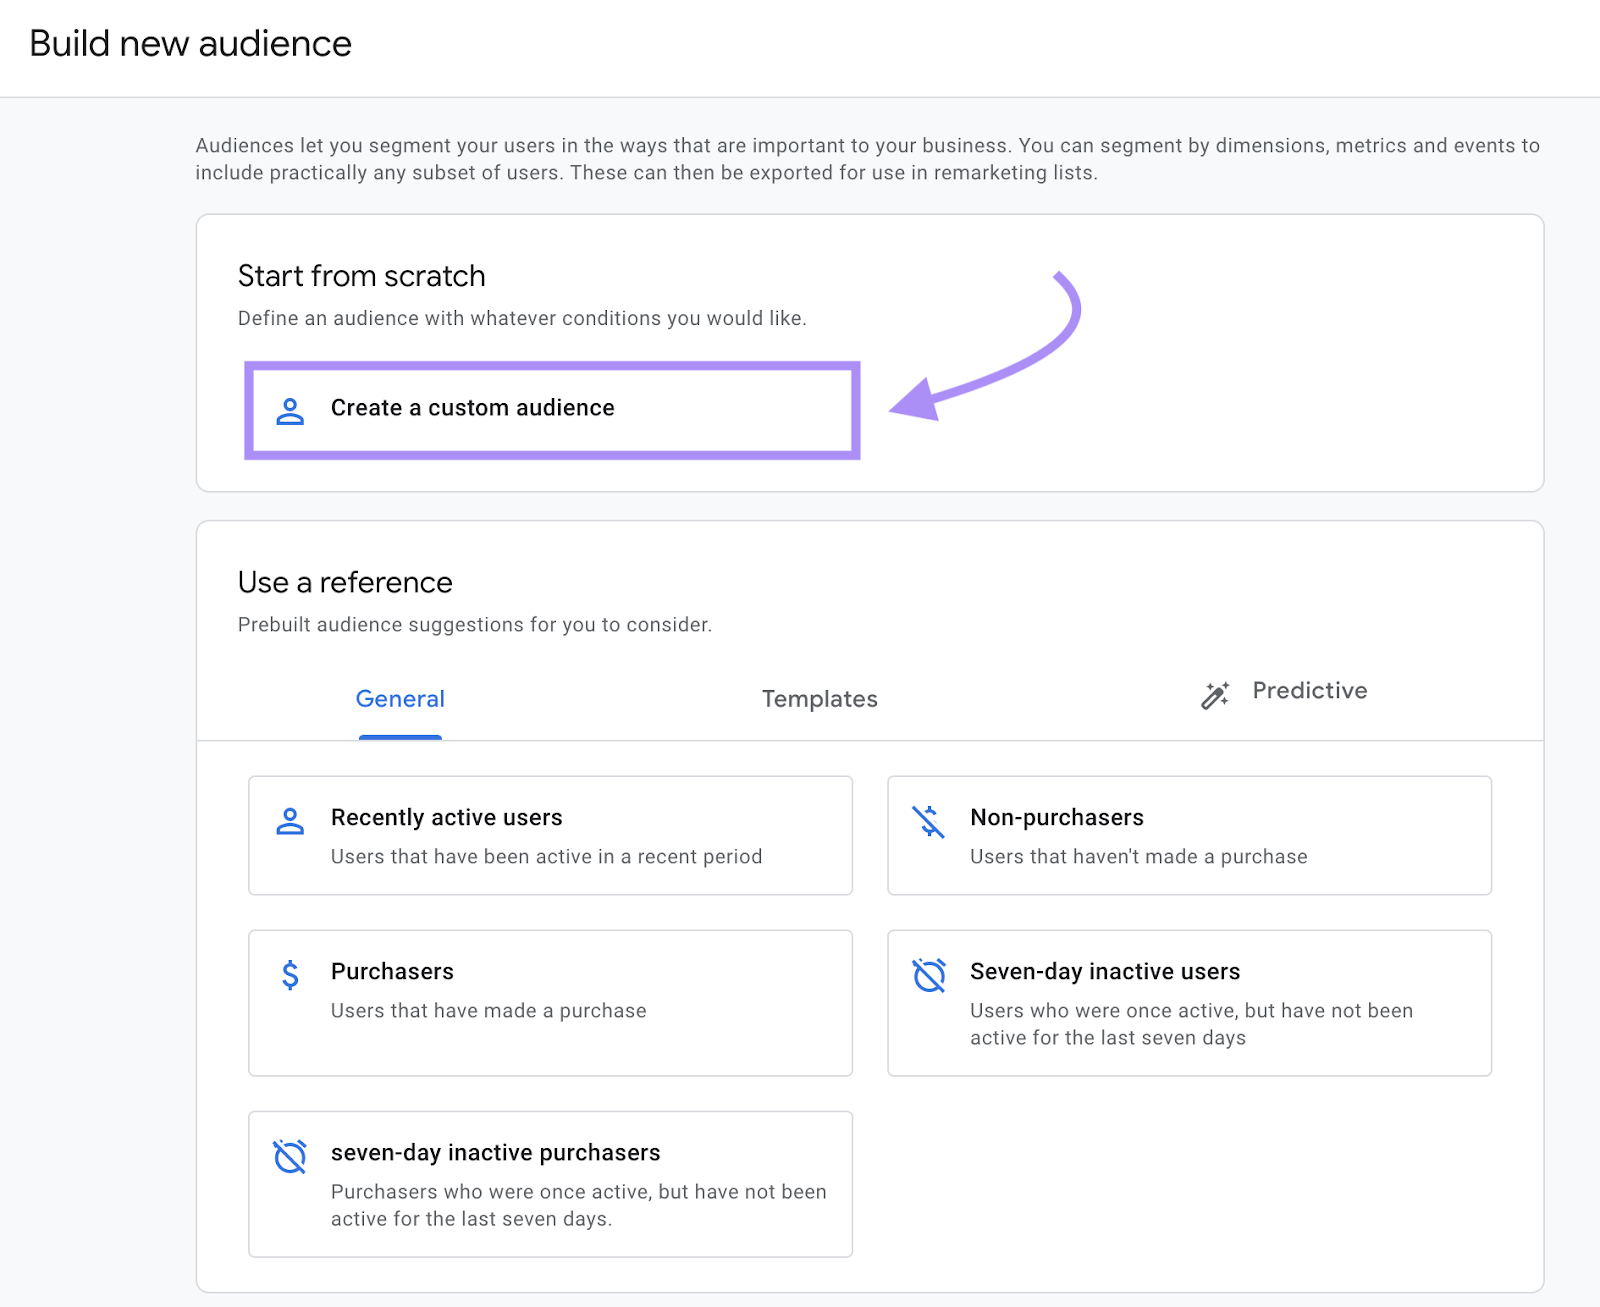
If you want to do it from scratch, click “Create a custom audience.”
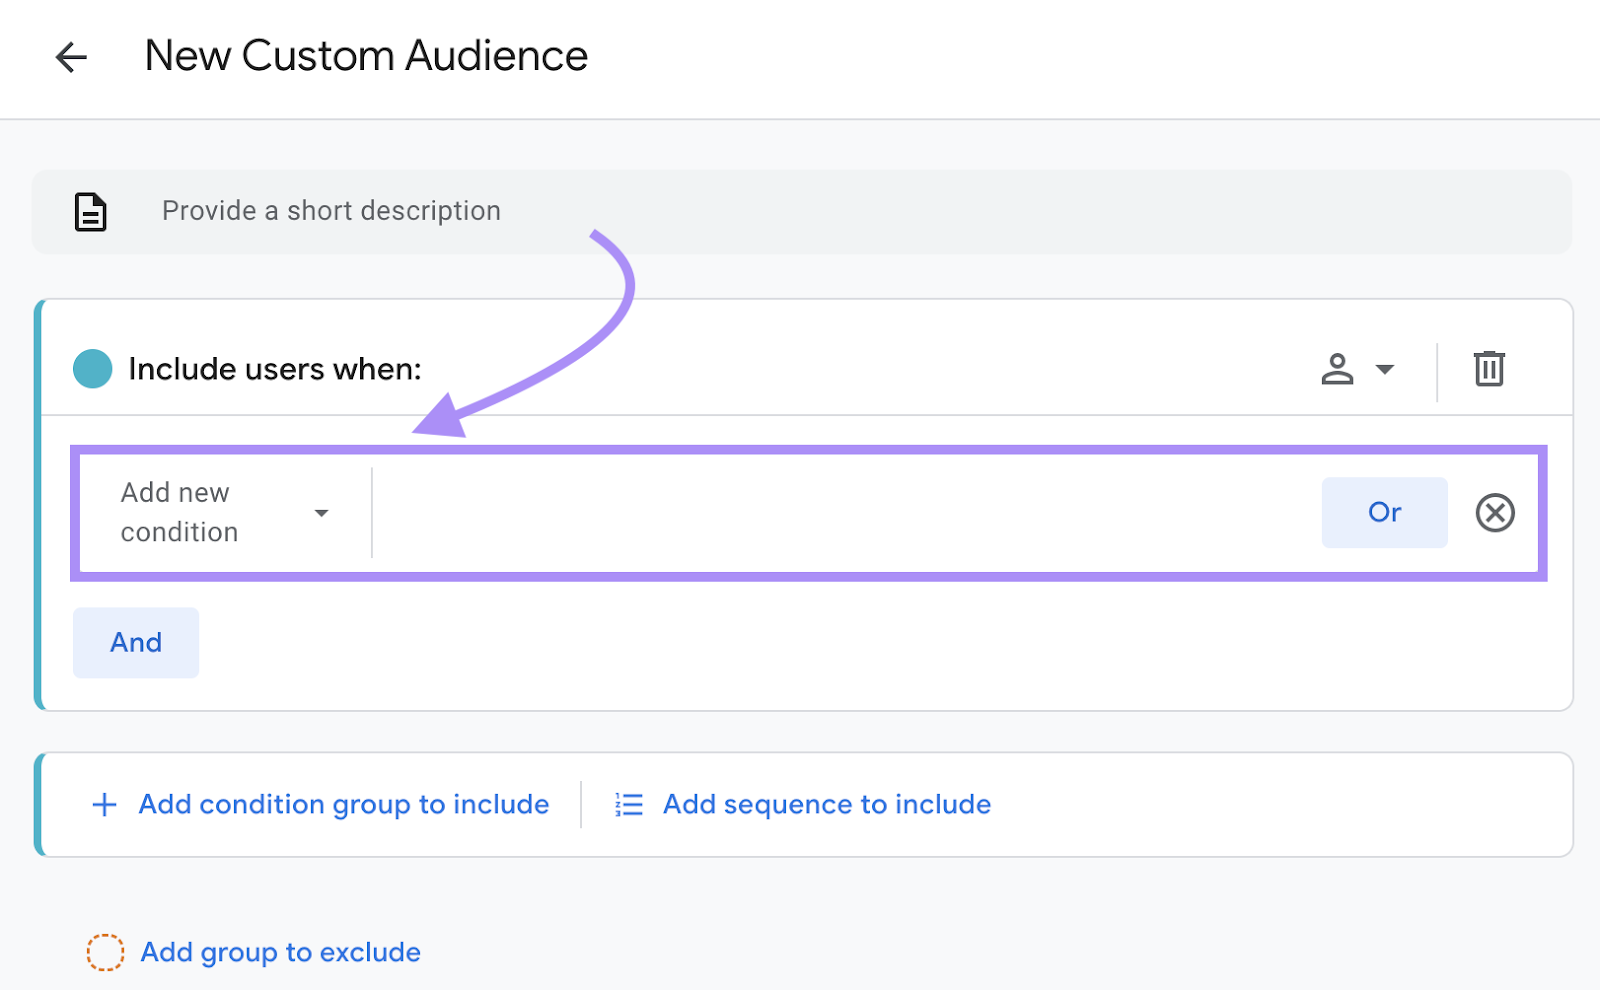
You can then add conditions for your audience.
To define your conditions, click “Add new condition” to reveal a drop-down menu. Then, browse through the options or use the search bar to find the right parameter.
For example, the combination of conditions in the screenshot below would create an audience tracking users aged between 18 and 24, acquired organically, who spent 60 seconds or more on your site.
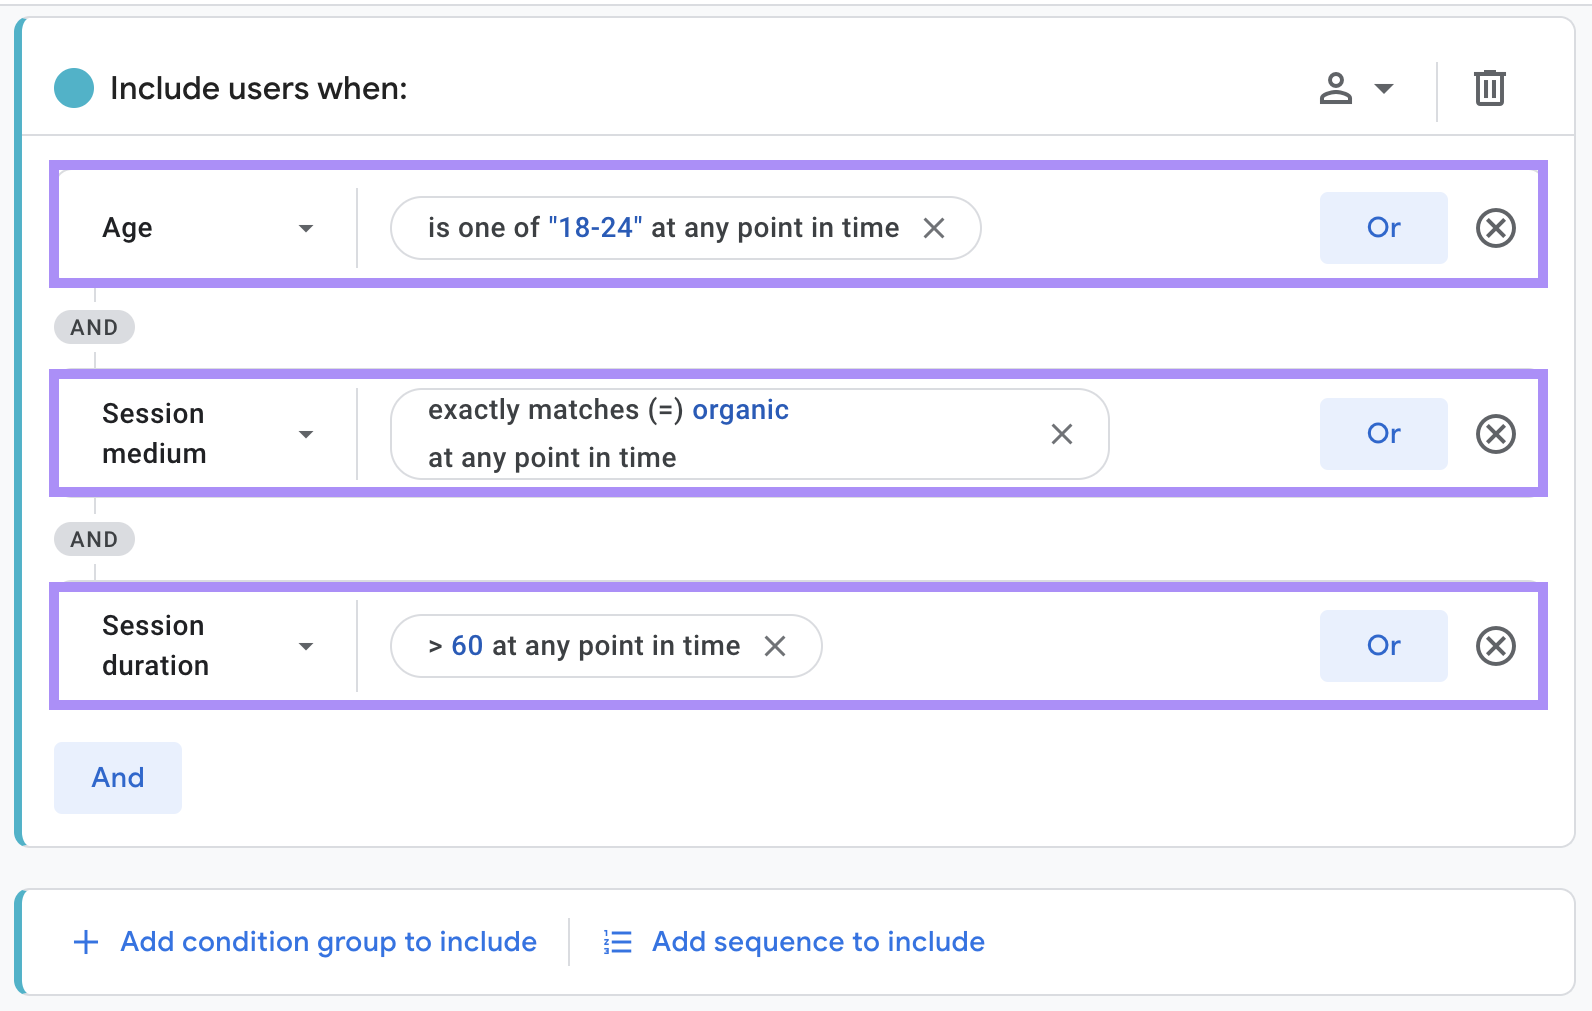
There are countless combinations of parameters to choose from. This means you can create and track highly specific audiences.
And you can also add parameters to exclude certain users. This includes people from a certain country or who use a specific device type.
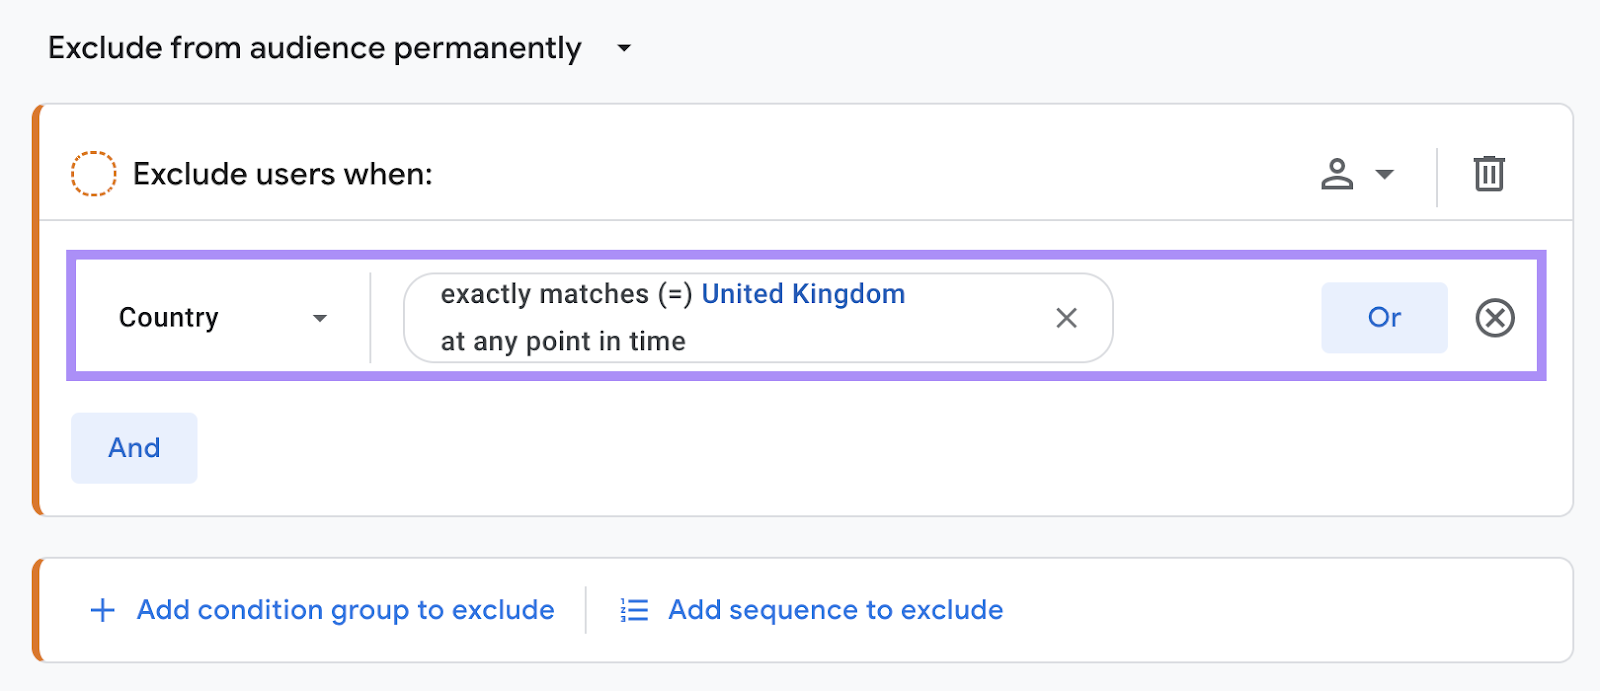
When you’ve established your audience’s parameters, add an audience name and write a short description.
Then, click the “Save” button to complete the process.
2. Custom Events
Custom events in GA4 allow you to track and record specific user actions across your website. The flexibility of GA4’s custom events is one of the biggest upgrades over UA.
They’re an addition to the events that GA4 tracks automatically. This lets you tailor the advertising features in Google Analytics’s platform to deliver detailed insights that can improve your advertising campaigns.

GA4 automatically records a range of events, including:
- Page views
- Engaged users
- First visits
- File downloads
- Video views
To track anything beyond these actions, you need to use custom events.
What can you track with custom events?
Just about anything you can think of.
The event builder offers a lot of customizability, with a huge range of parameters to choose from.
This means you can set events up to track actions like:
- Internal link clicks
- Product purchases
- Newsletter sign-ups
- Live chat interactions
- Website search queries
Some of these are available as recommended events in GA4, meaning setting them up is relatively simple.

Other events, particularly those that track complex user actions, you’ll have to build from scratch.
To start the process, open up the admin menu by clicking “Admin” in the menu on the left of your screen.
Then, click the “Events” option in the Data display menu.
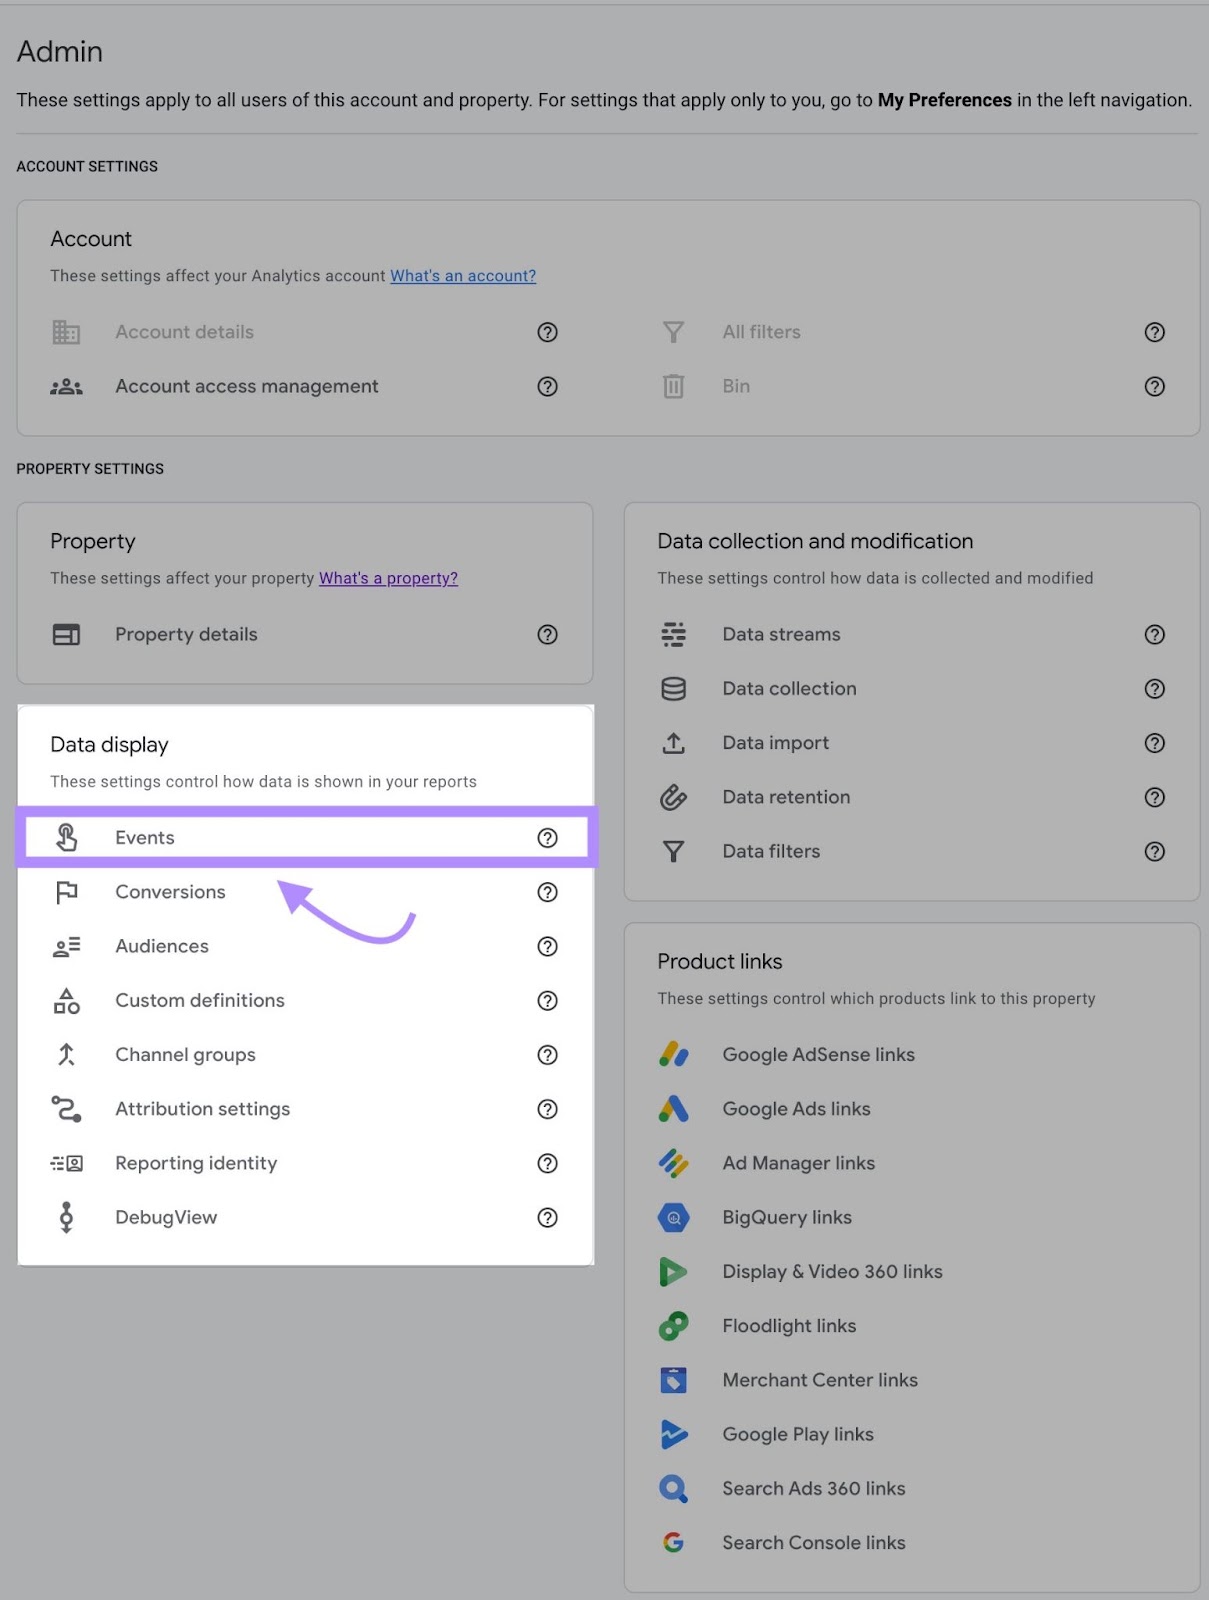
On the next screen, you’ll see all your existing events. If you’ve never set one up manually, these will be GA4’s automatically created events.

Click “Create event” to start creating a custom event.
On the next page, give your event a name, bearing in mind that you can’t exceed 40 characters. Then, you can start adding conditions.
The parameters you can choose from offer practically limitless opportunities.
The screenshot below shows a custom event setup that would record the number of times users visit a URL containing the phrase “thank-you,” for example.
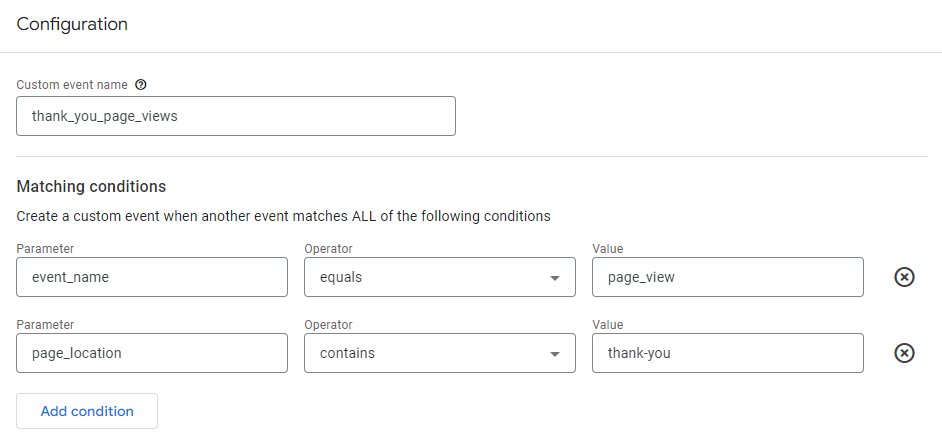
Once you’re done adding parameters, click the “Create” button to complete the custom event setup process.
You’ll have to inject an event analytics tag into your website’s code for more complicated events that existing parameters or events in GA4 don’t cover.
There are several ways to do this using Javascript, including through the gtag.js API or Google Tag Manager.
When your custom events are all set up, test them manually so they work how you expect.
3. Google Ads Link
You can link GA4 with a Google Ads account to allow data to flow between the two platforms.
This makes analyzing Google Ads campaign performance easier. You can learn more from the data in GA4, and make improvements that lead to better results.

The benefits of linking your Google Analytics property and Google Ads account include unlocking the ability to:
- Analyze Google Ads campaign performance in the Google Ads campaigns report in GA4
- Use Google Ads dimensions like cost-per-click in the user acquisition reports in GA4
- Import GA4 conversion events into Google Ads for cross-platform conversion tracking
- Use custom audiences from GA4 in Google Ads remarketing campaigns
These benefits make both platforms more useful in advertising campaigns. GA4 becomes a central hub for all the most important acquisition and user behavior data. Google Ads offers more opportunities for reaching your audience.
Linking the two platforms is easy. Here’s how you do it:
First, click “Admin” in the navigation menu on the left of your screen.
Then, under the Product Links subheading, click “Google Ads Links.”
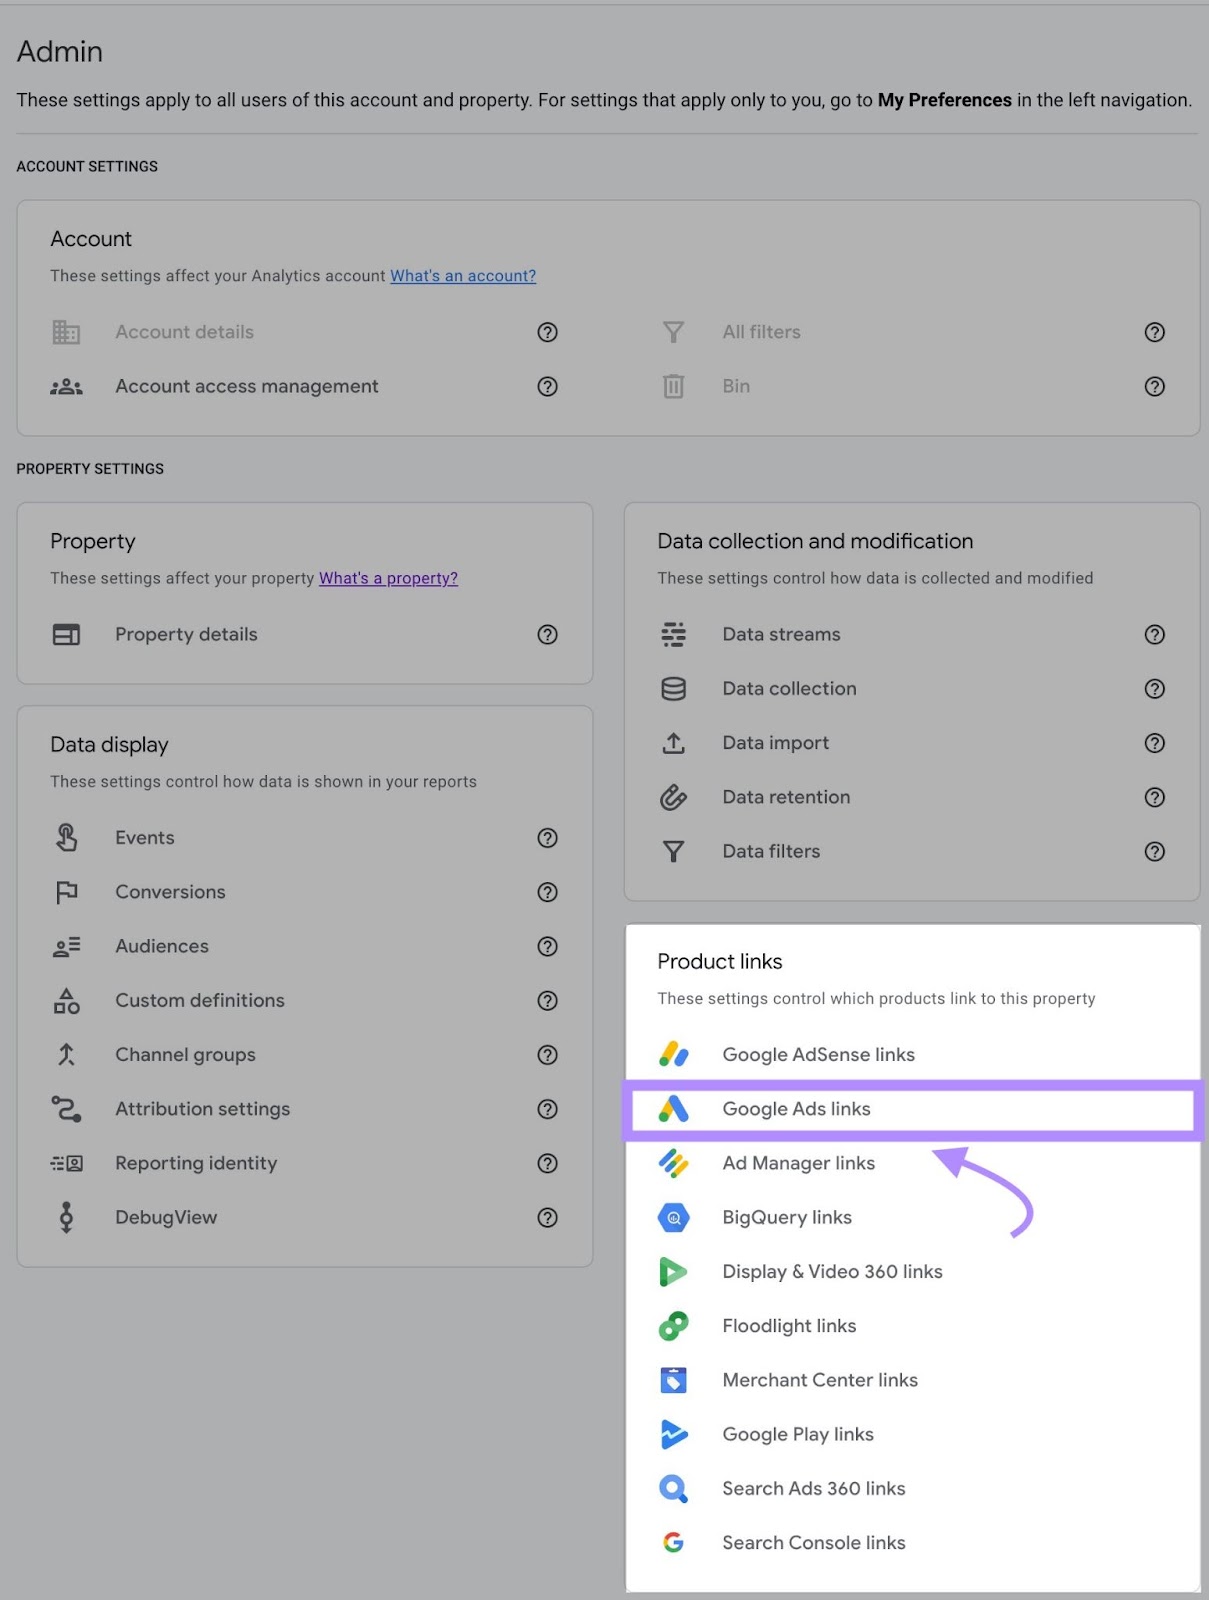
You’ll see any existing Google Ads links listed in the table. Click the blue “Link” button in the top-right to create a new link.

On the next menu, click “Choose Google Ads accounts.”
A sidebar will open, showing all of the Google Ads accounts you can access through your Google account.
Select the accounts you want to link, and click the “Confirm” button in the top right.

The next page will show some configurable settings.
Personalized advertising, which enables the sharing of audiences and conversion events between GA4 and Google Ads, is on by default.
Auto-tagging automatically allows Google to generate UTM parameters for your search ads’ landing pages, which makes attribution of performance to certain campaigns easier.
You can review your choices and finalize the process when you’ve chosen your preferred settings.
You should see Google Ads data start appearing in your GA4 property within 48 hours of creating the link.
Further reading: How to Optimize Your PPC Campaign with Semrush
4. Google Signals and User IDs
Google signals and User IDs are two ways to get more information about your website users and track them across different devices and platforms.
These advertising features in Google Analytics give you a unified view of entire user journeys instead of seeing them fragmented into individual sessions.
Both user tracking methods offer the same benefits but use different tracking methods.
Here’s how each one works:
- Google signals tracks users based on their Google account, provided ads personalization is on. It also collects data, including the user’s location and Google search history.
- User IDs are identifiers you can assign manually to users with an account on your website. They allow you to track these users persistently across devices and separate sessions, as long as they’re signed in.
You can use both types of user tracking together to get as complete a view as possible of your recurring users’ interactions with your website.
Why is this important?
These advertising features in Google Analytics offer valuable insights, like showing you how many times a user visited your website before converting, regardless of what devices they used in their journey.
It also helps remove duplicates from your GA4 data, with tracked users only appearing as one user rather than each session appearing as a separate user.
This is particularly useful for advertisers because users will often make multiple visits to your website before completing a conversion action.
The concept of the marketing funnel covers this idea.
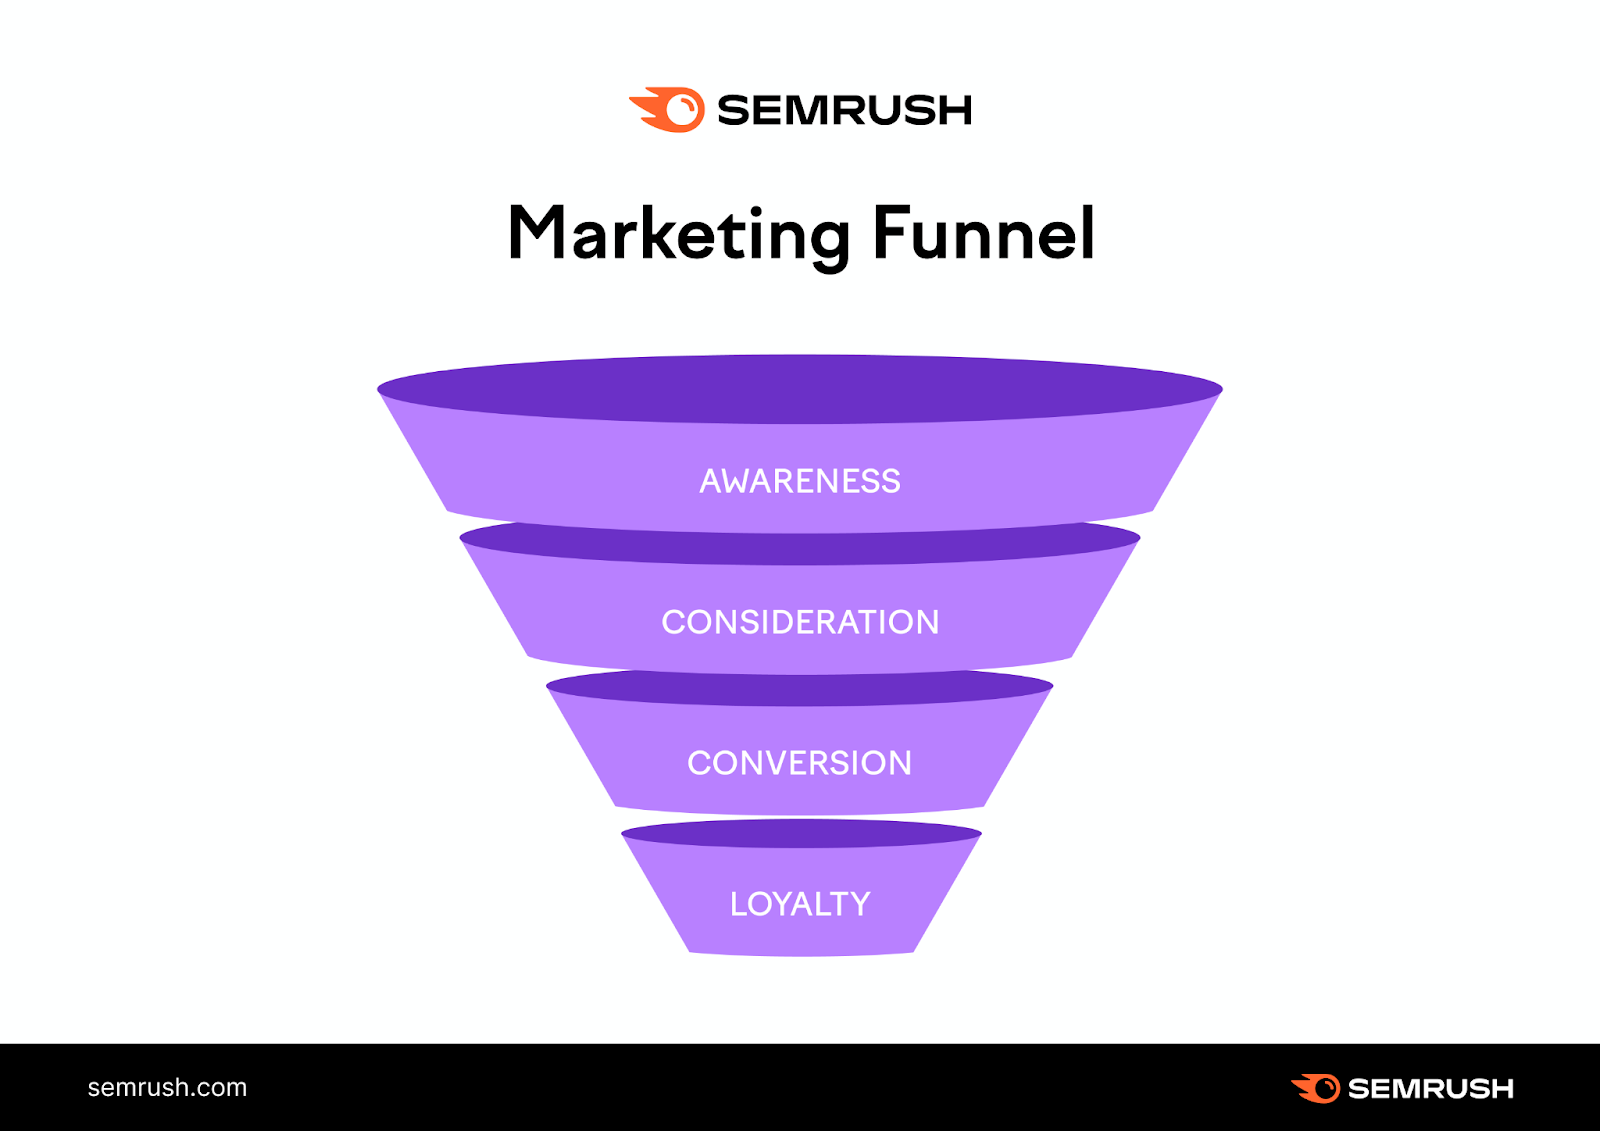
A user might first visit your site when they’re in the awareness stage, looking for product information. They might return several times as they consider their options. They’ll hopefully convert on their final visit.
Without user tracking through Google Signals or User IDs, it’s impossible to see users complete this entire journey. But with it, you get complete visibility over the steps that led to their conversion.
This makes it easier to tailor your advertising campaigns to target users at critical points in their buying journey.
The process of enabling Google Signals is easy.
Here’s how:
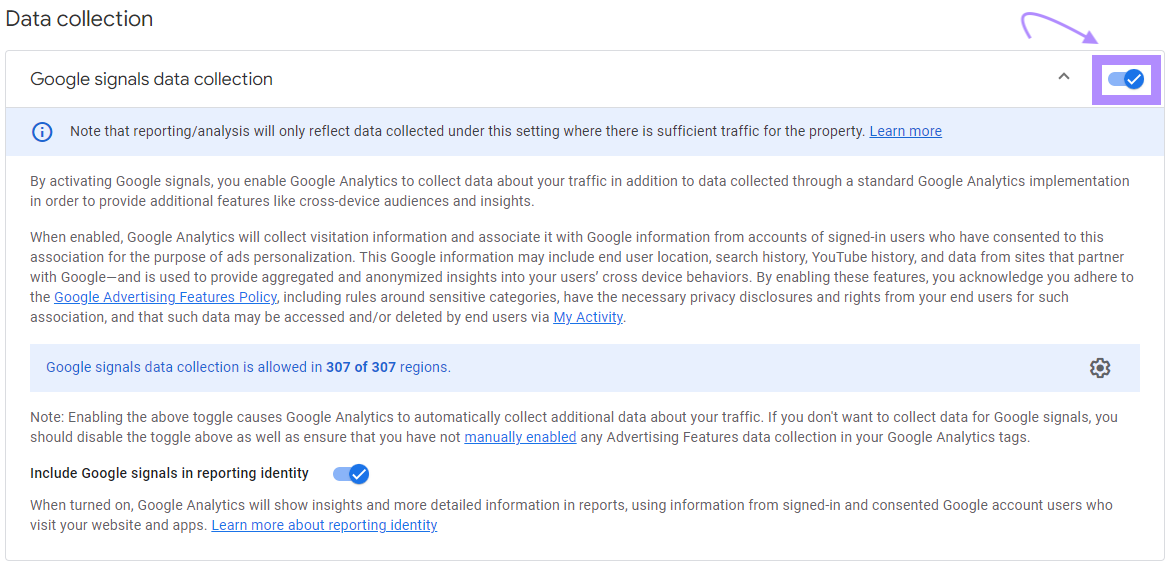
Go to the admin section of GA4, under the Data collection and modification menu, click “Data Collection.”
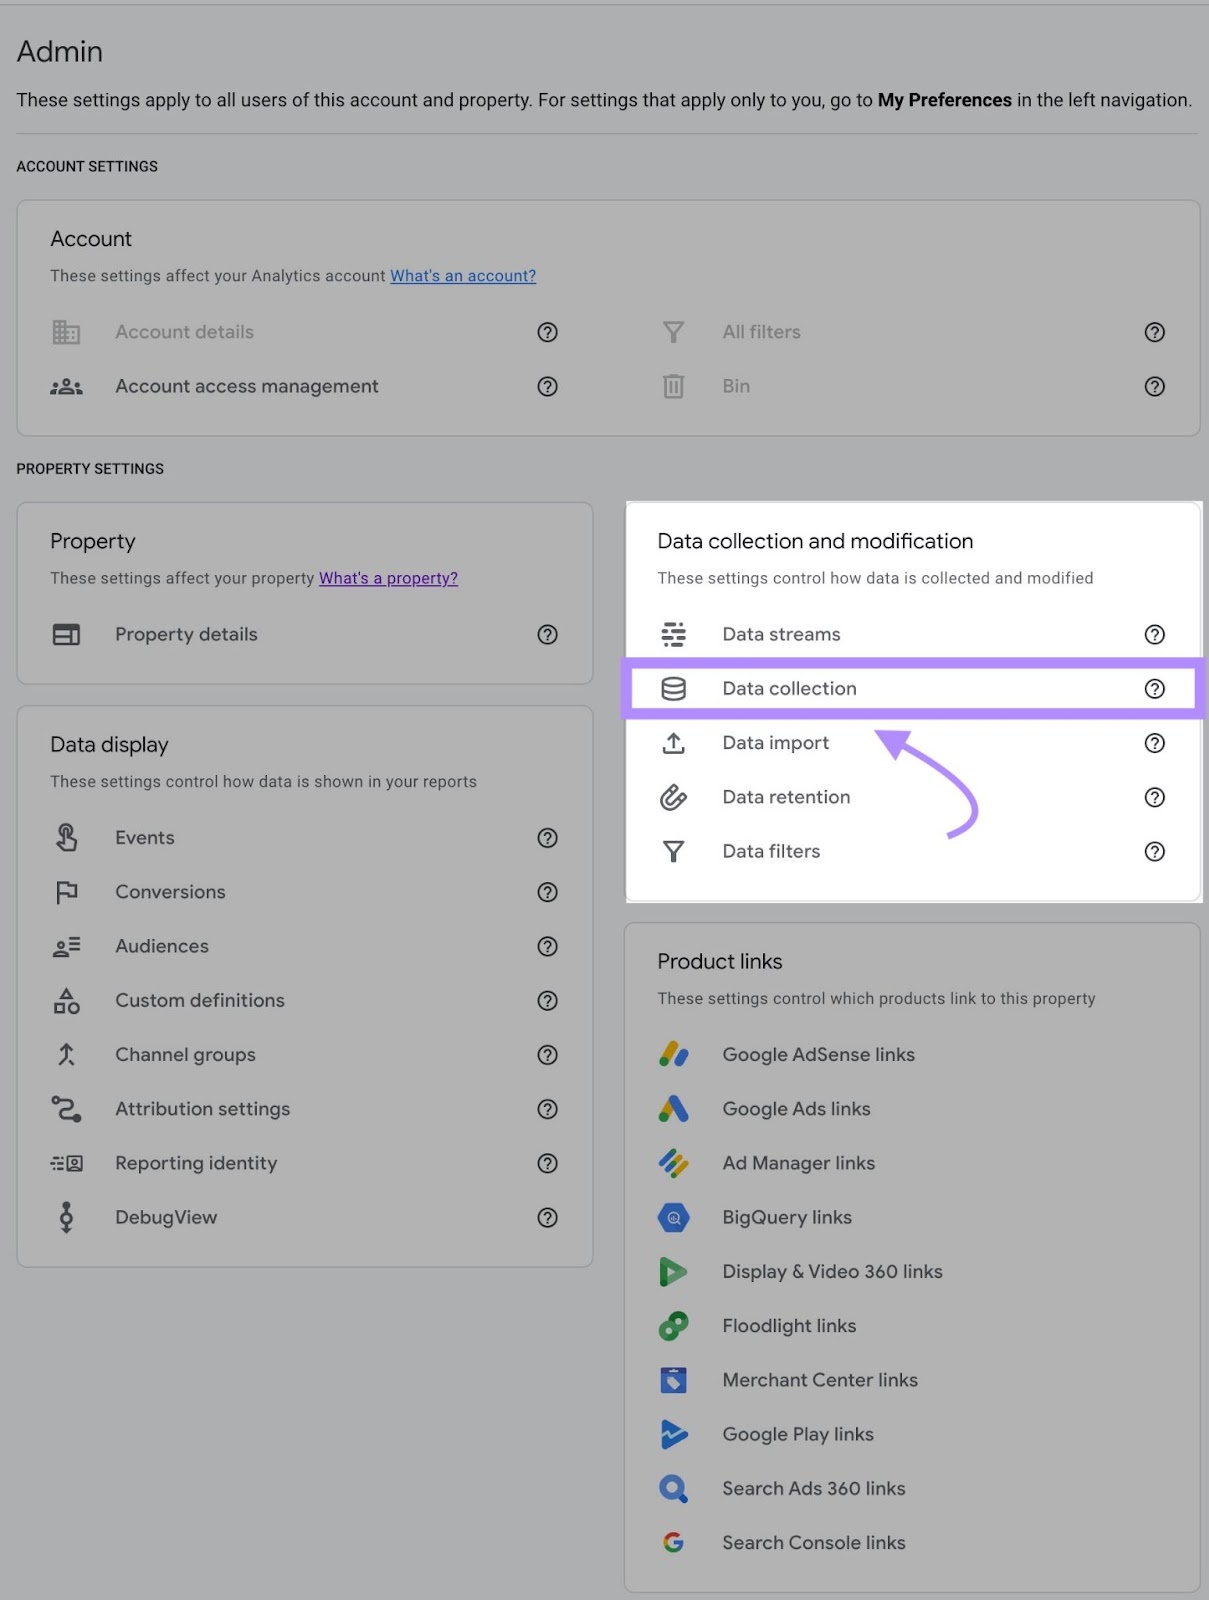
You’ll see a toggle in the Google signals data collection box.
Click it to turn Google Signals on.
Adding user IDs is a little more complicated. To start with, you need to create unique IDs for users with an account on your website.
Then, you have to ensure the user IDs get sent to GA4. This involves adding a code snippet to the config command in the Google Analytics tracking code installed across your website.
Google has a short guide to carrying out this part of the process.
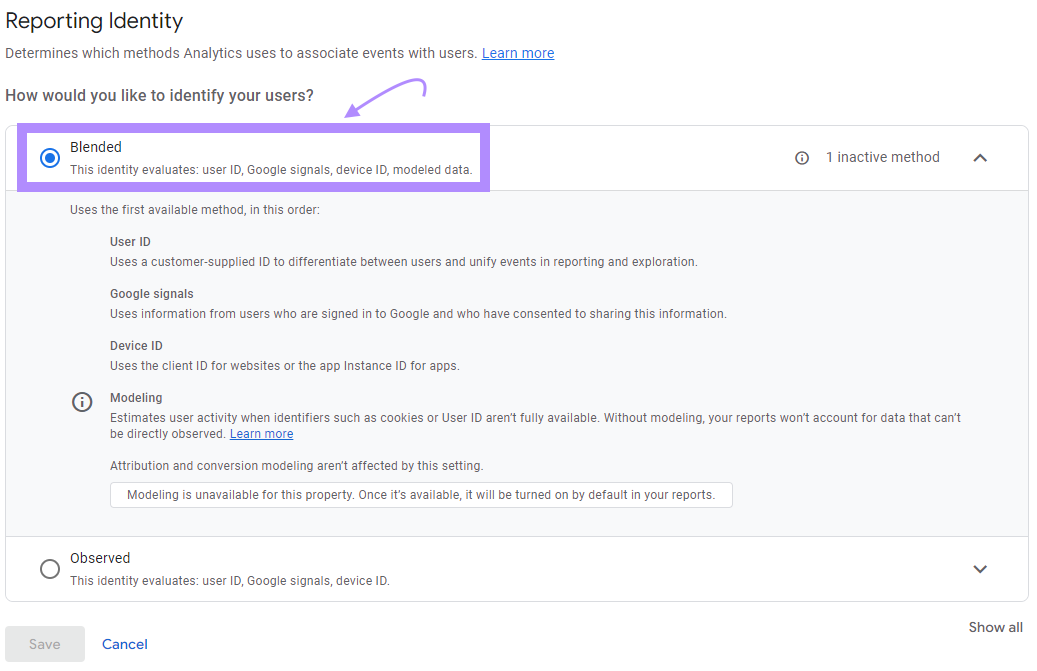
Finally, back in GA4, you need to verify the identity reporting. Click “Reporting Identity” in the Property settings menu in the admin section and select the blended option.
With both user tracking methods set up, you can do new things with the data in GA4.
This includes comparing signed-in users’ behavior to non-signed-in users, creating audiences based on more granular demographic data, and generating remarketing lists to export to Google Ads.
Other Ways to Boost Your Advertising Campaigns
GA4 is a great platform for advertisers, offering lots of ways to collect, analyze, and share data. But it’s not the only platform that can add value to advertising campaigns.
Semrush Advertising Research can round out your advertising software toolbox.
However, there’s a key difference between GA4 and Semrush.
GA4 only offers data from your website, meaning it can only tell you about your advertising campaign performance.
Semrush, on the other hand, allows you to analyze your competitors. This makes it a perfect tool for complementing GA4 data.
There are lots of ways to use Semrush Advertising Research to improve your advertising campaign results.
Firstly, you can assess the competitive landscape by analyzing your competitors’ ad budgets and target keywords.
Here’s how:
Open the Semrush Advertising Research dashboard, enter the domain you want to analyze into the search bar, and click “Search.”

On the next page, you’ll see a list of the keywords your competitor has paid search positions for, along with data estimating the amount of traffic they receive and how much it costs them.

Use the list of keywords to get direct inspiration for keywords you can bid on, too. The columns indicating search volume, CPC, and estimated traffic can help you choose the best opportunities.
Click on the “Competitors” tab at the top of the page to see a data visualization showing other domains that compete with your competitor.
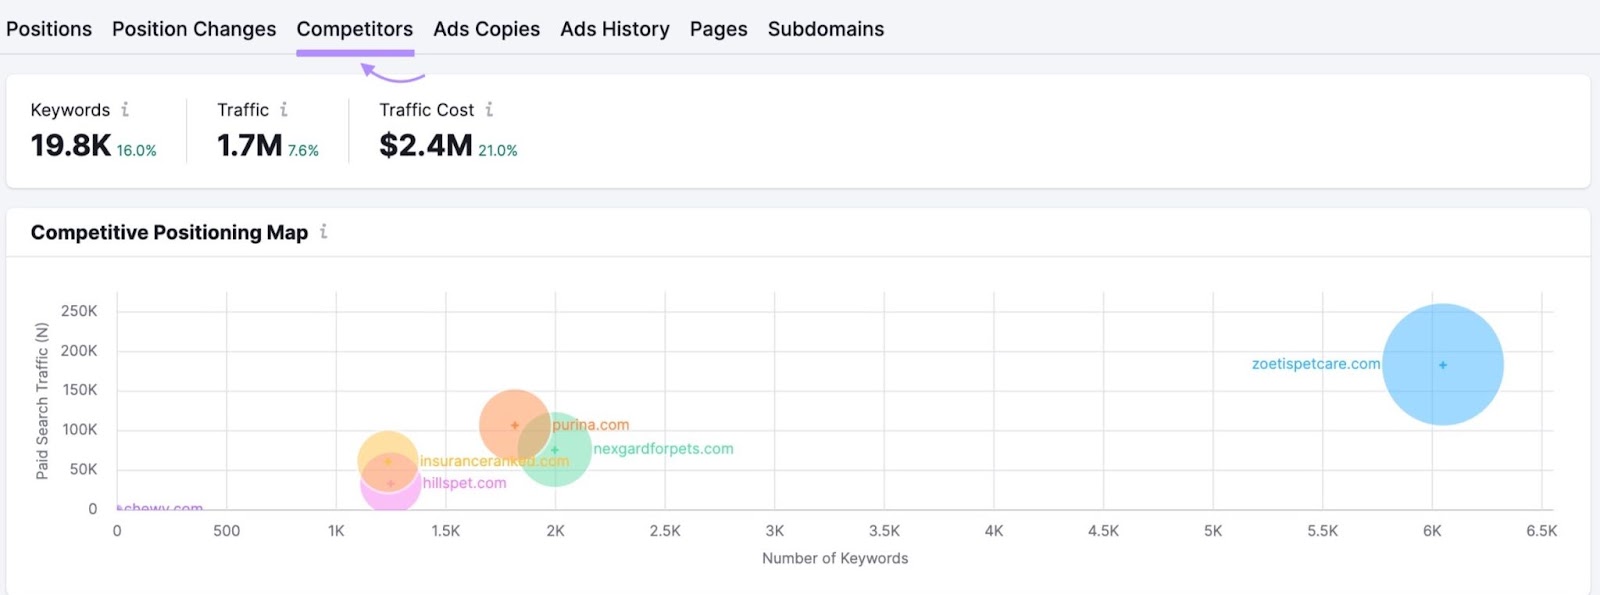
This helps you discover more about the market you compete in, including who the biggest players are, how many keywords they target, and what they spend on ads.
After you’ve picked new keywords to target, you can move on to analyzing how your competitor targets them.
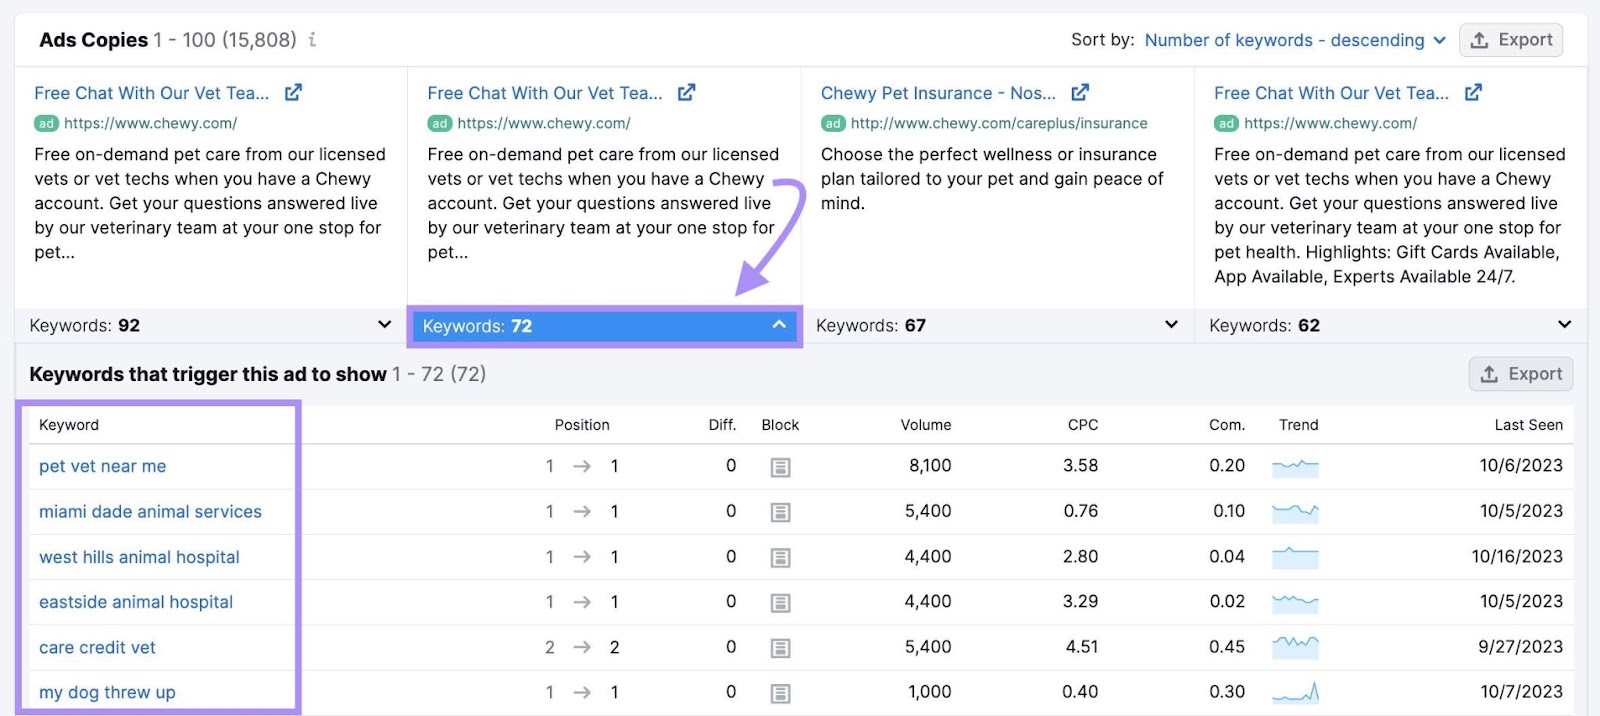
Click on the “Ads Copies” tab at the top of the page to see all their ad creatives.
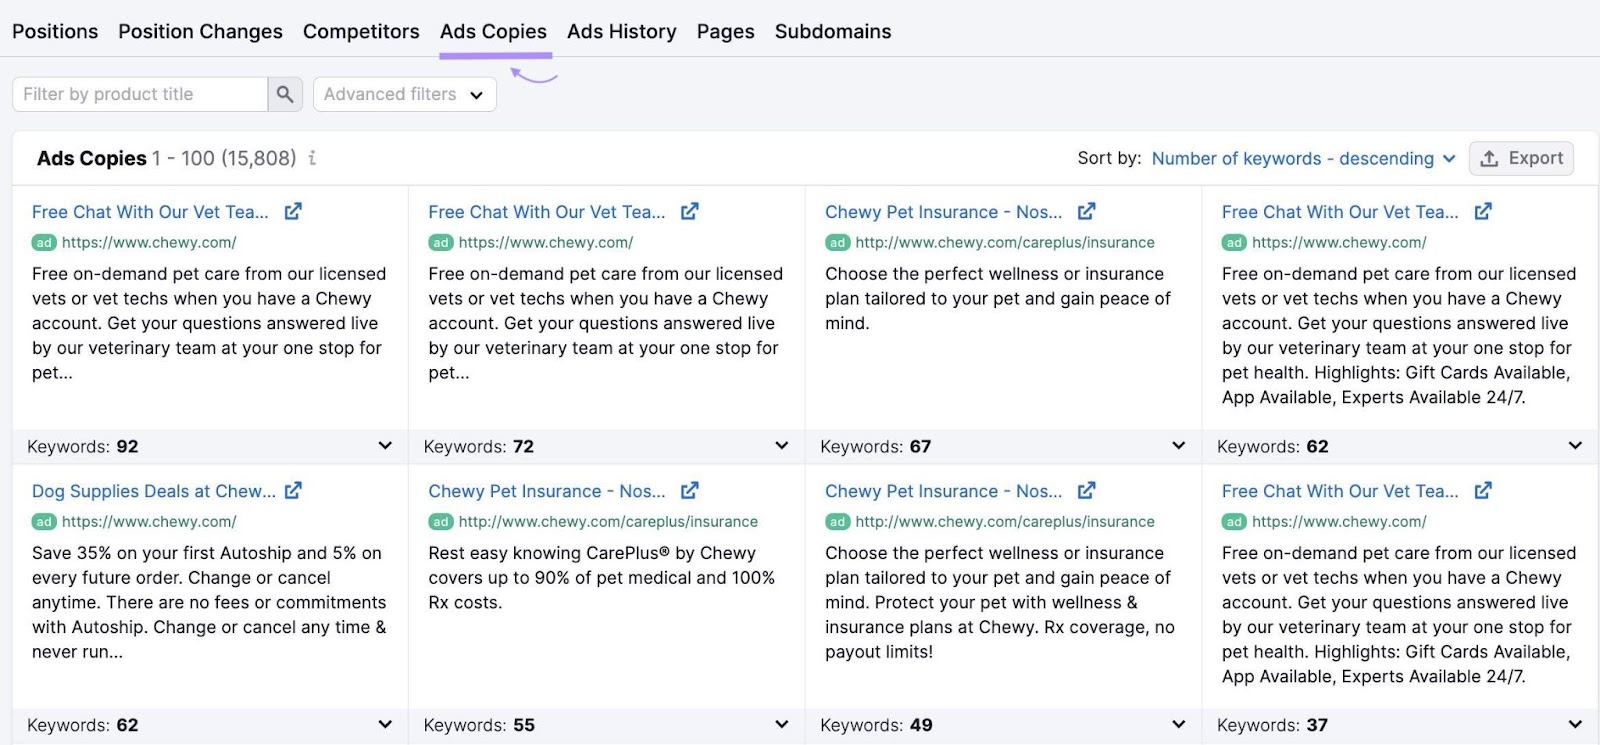
The keywords bar reveals a drop-down that shows the keywords for each ad. This helps you get even more information to fuel your ad campaigns.
Then, you can see what landing pages they drive traffic to with their ads when you click on the “Pages” tab.
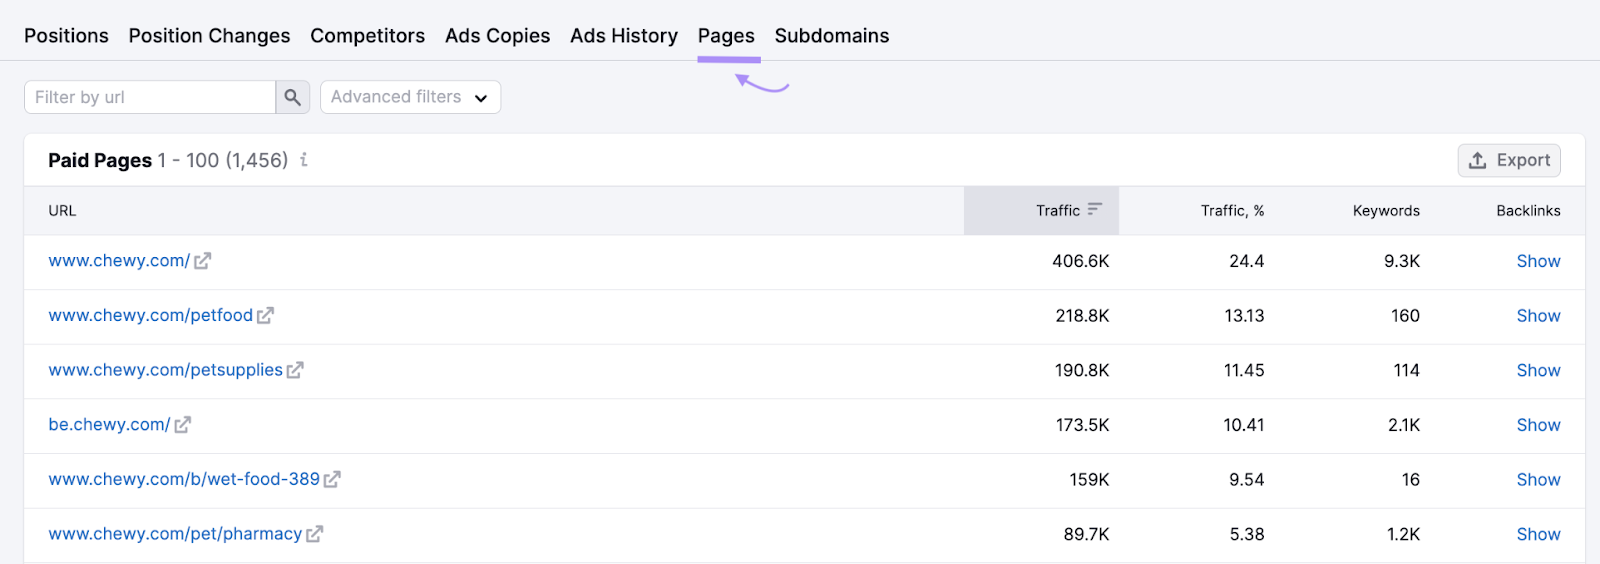
This is a great way to speed up the process of analyzing what the landing pages in successful ad campaigns look like. You can draw inspiration from your competitors’ approach to copy and design and re-optimize your landing pages to out-compete them.
Further Reading: Online Advertising: All You Need to Know
Get More From Your Advertising Spend
The data offered by GA4 and Advertising Research can make your advertising and digital marketing campaigns more efficient, meaning they generate more revenue per dollar spent.
To get started, review your setup and ensure you have all the relevant advertising features in Google Analytics turned on and set up properly.
Then, take full advantage of these features in your advertising process. Create audience segments that represent your key demographics, track conversions with custom events, and analyze how users move from the search engine results placement (SERP) you target them on through to conversion.
And don’t forget to review your data regularly. The more you analyze your advertising results, the quicker you can act on inefficiencies and make positive transformations.
Get started on improving your advertising results today with Semrush Advertising Research.
