Google Ads is a marketing and advertising staple for a wide range of online and brick-and-mortar businesses. But a lot of Google Ads advertising spend goes to waste due to poorly managed campaigns, suboptimal ads, and various other issues you can easily avoid.
In this guide, we go over the top Google Ads best practices you should follow to ensure you get a positive return on your ad spend.
1. Install Conversion Tracking
How will you know if your ad campaigns are turning a profit if you don’t track conversions? Installing Google Ads conversion tracking helps you get a better understanding of your return on ad spend (ROAS) and allows you to further optimize your campaigns.
Here’s how to set up conversion tracking:
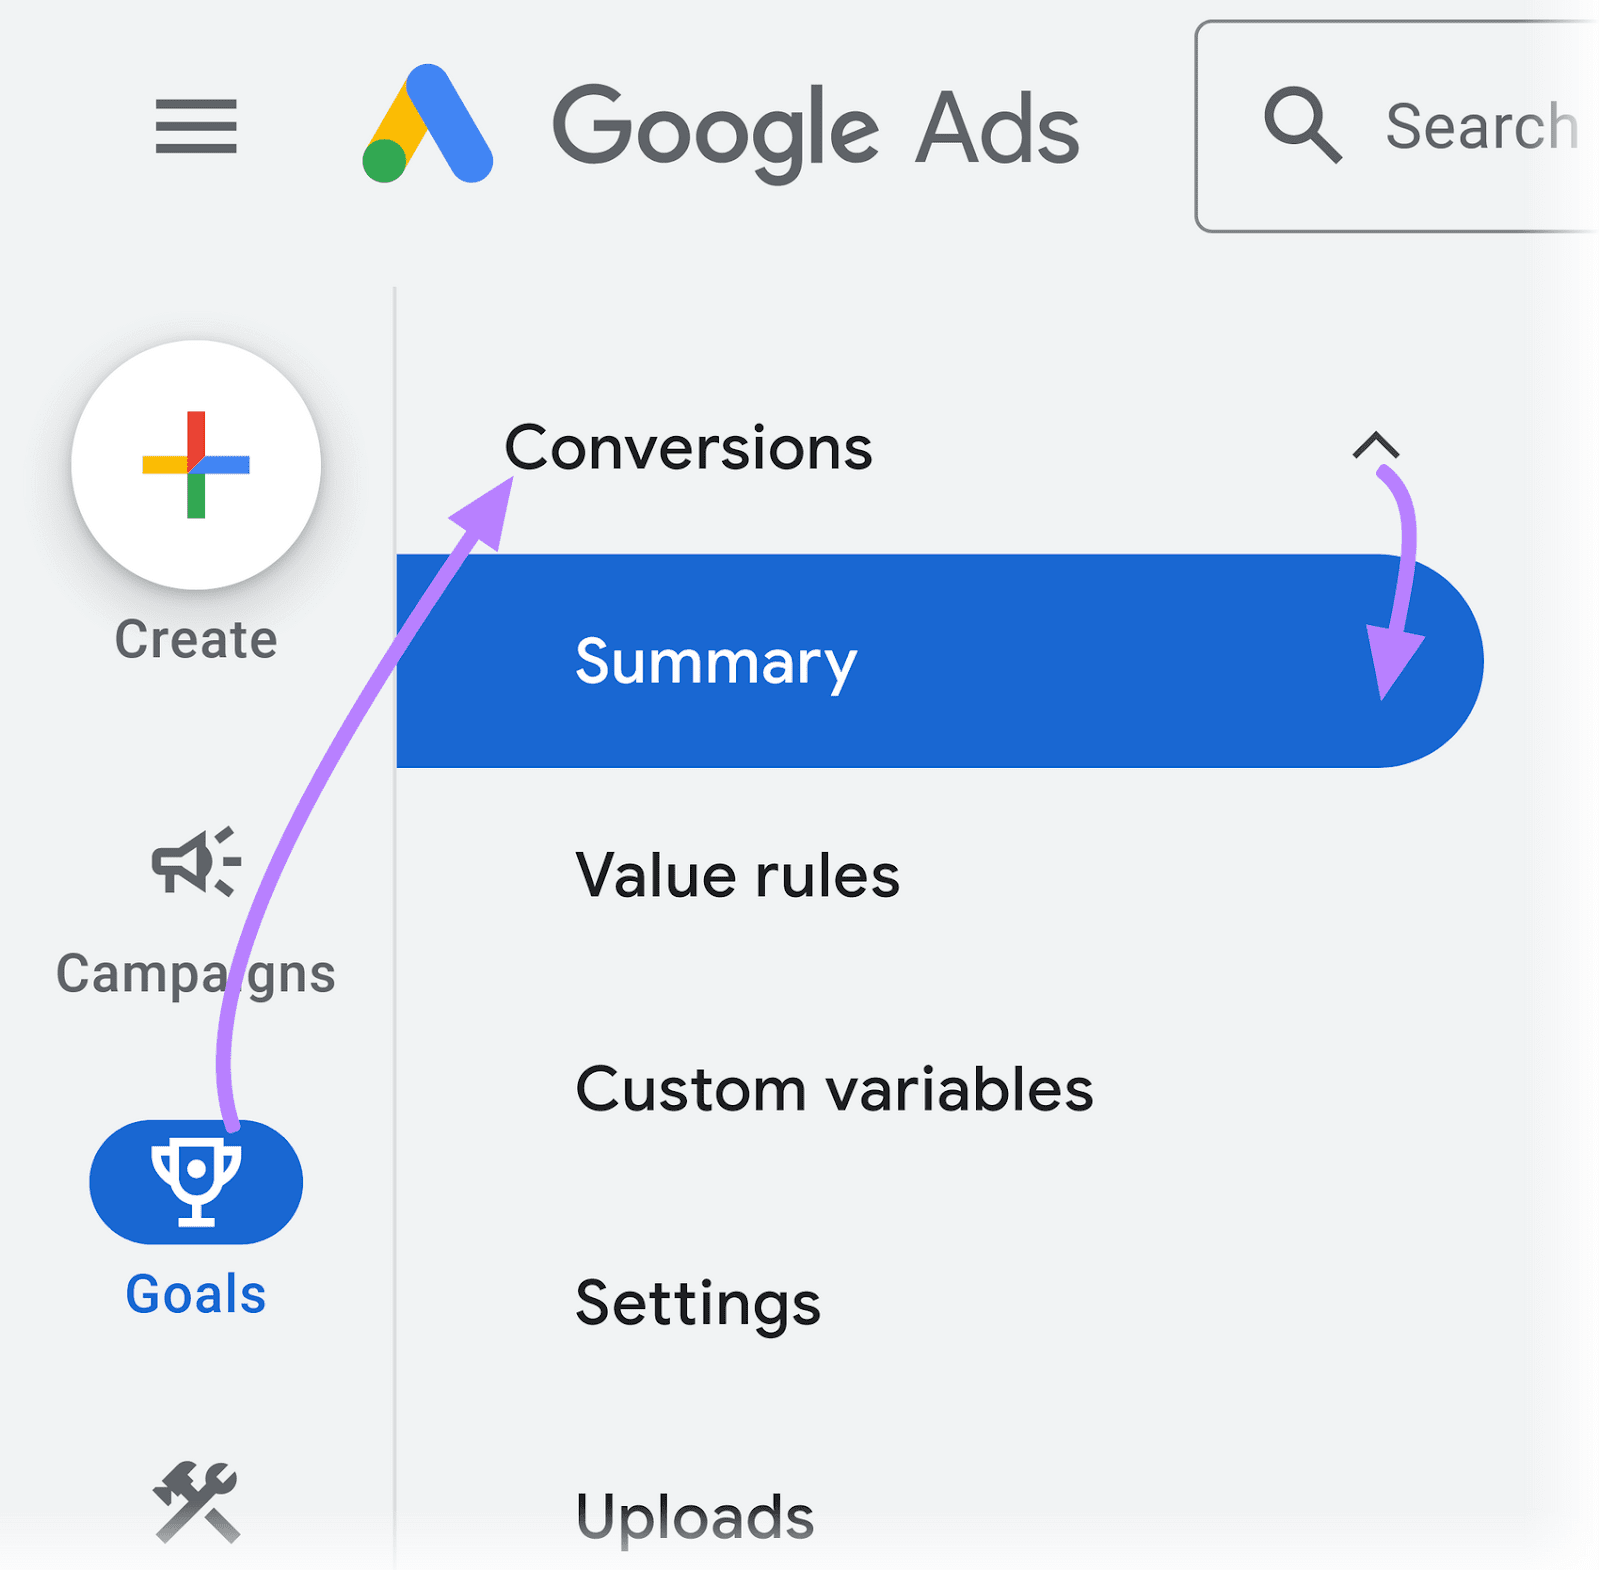
First, you need to create a conversion action (e.g., a purchase, form submission, or phone call). From your Google Ads account, go to “Goals” > “Conversions” > “Summary.”
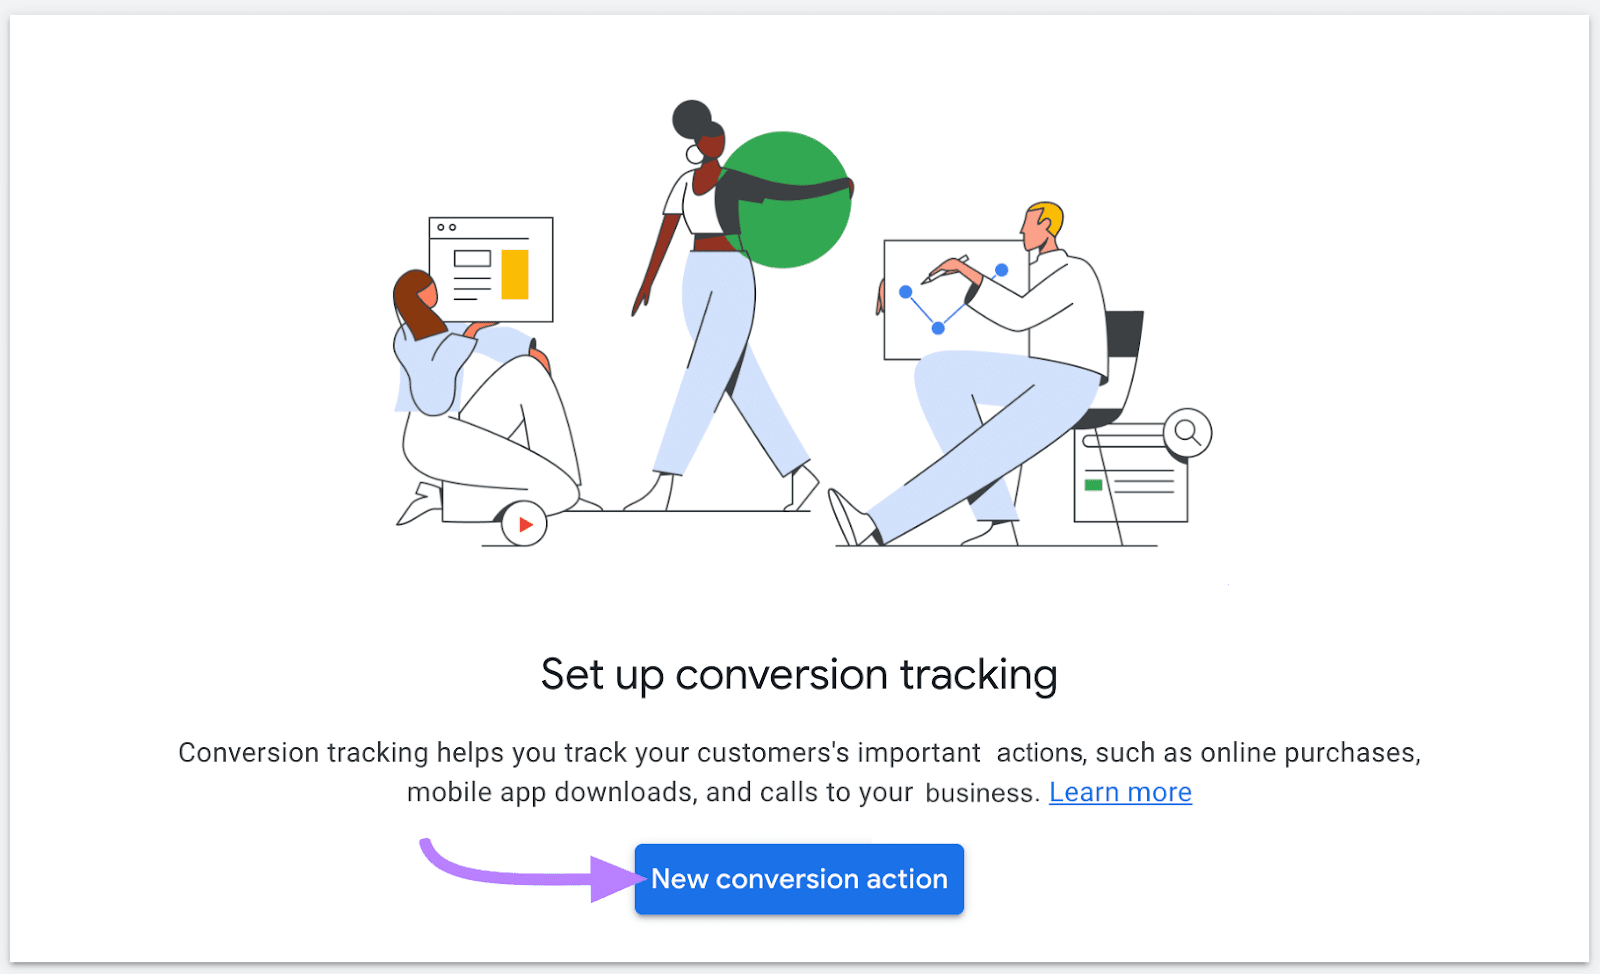
Click the blue “New conversion action” button in the middle of the screen.
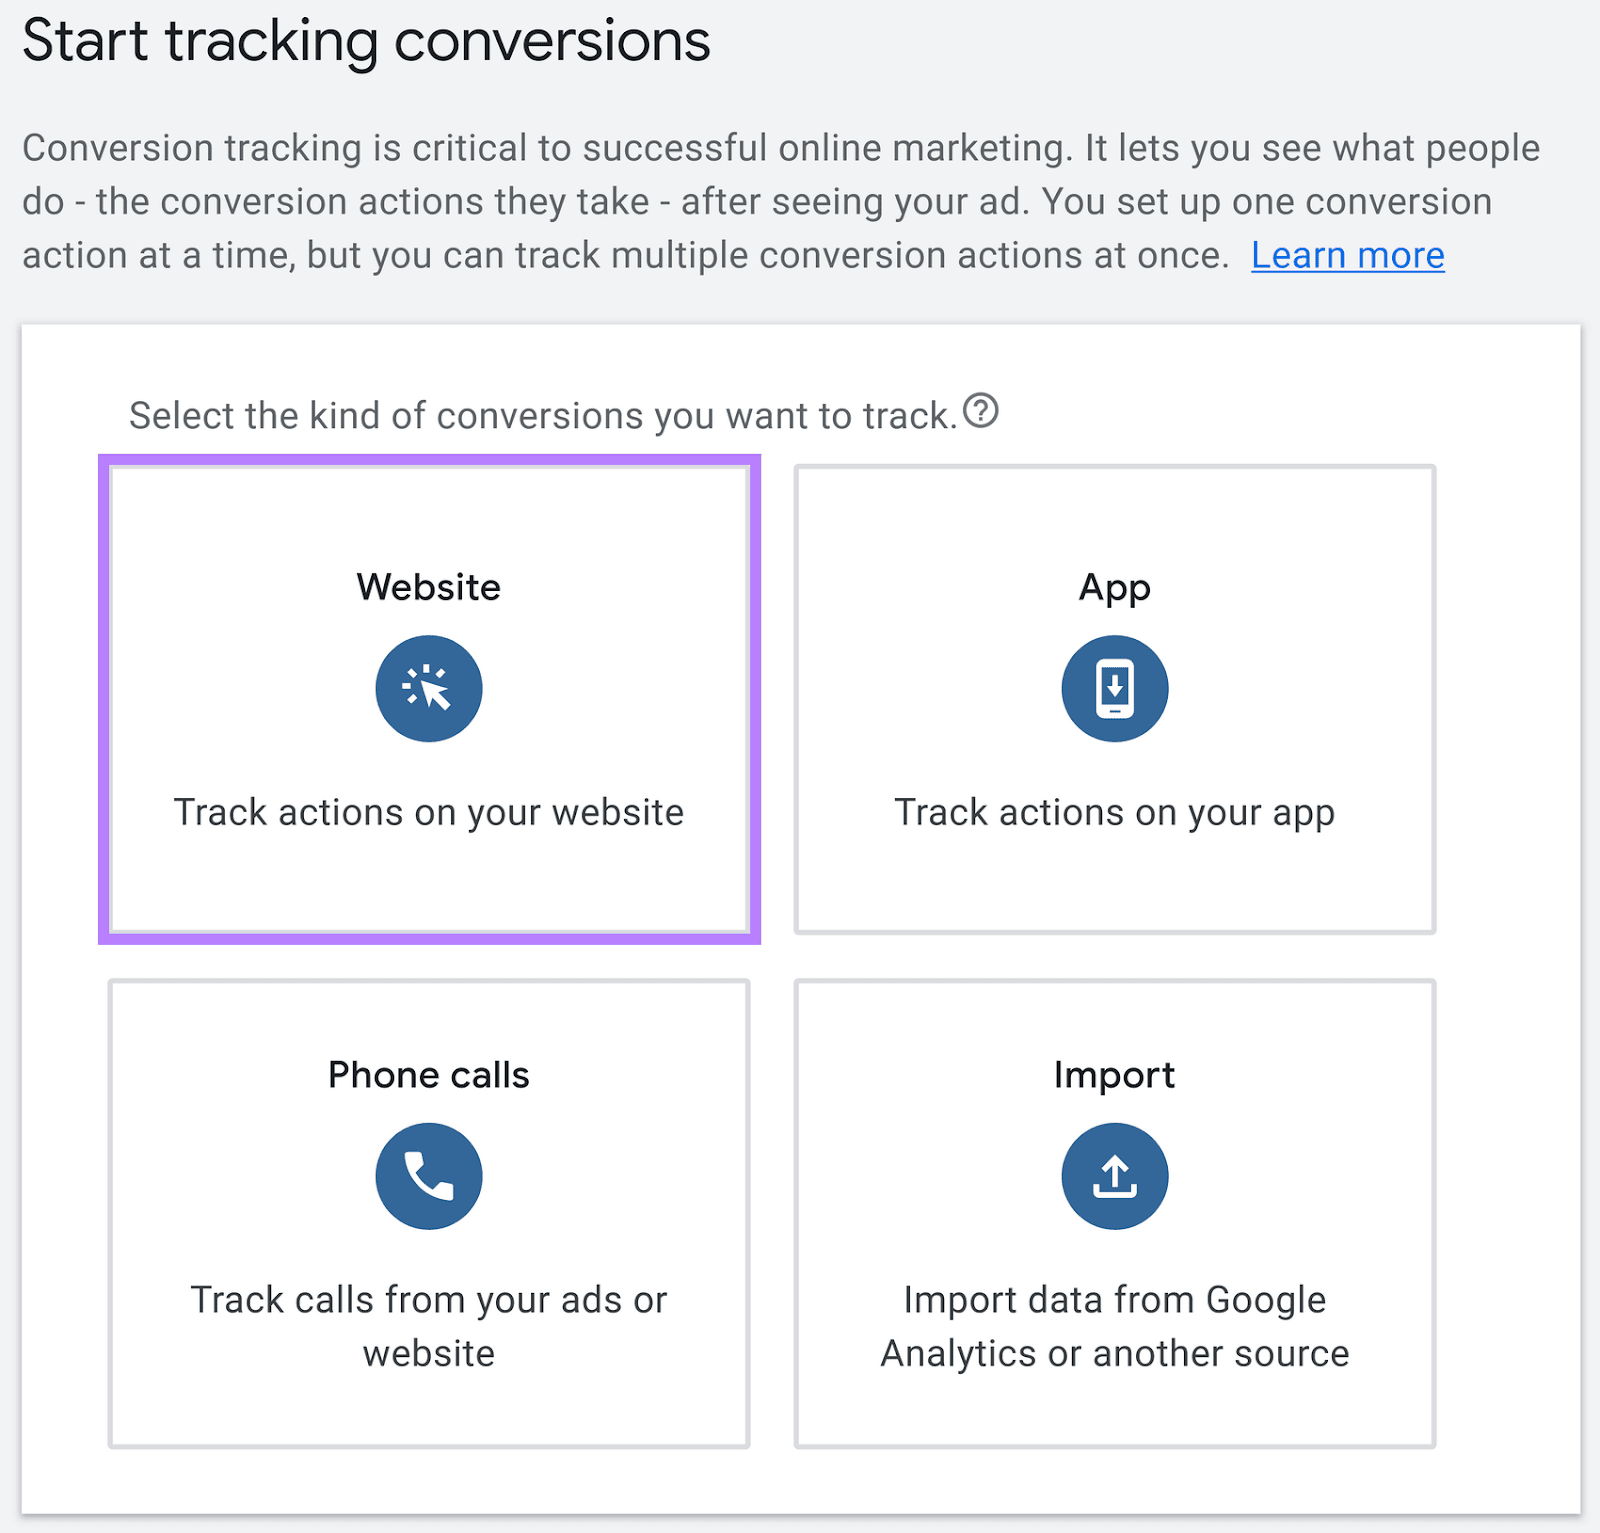
On the next screen, select the “Website” option.
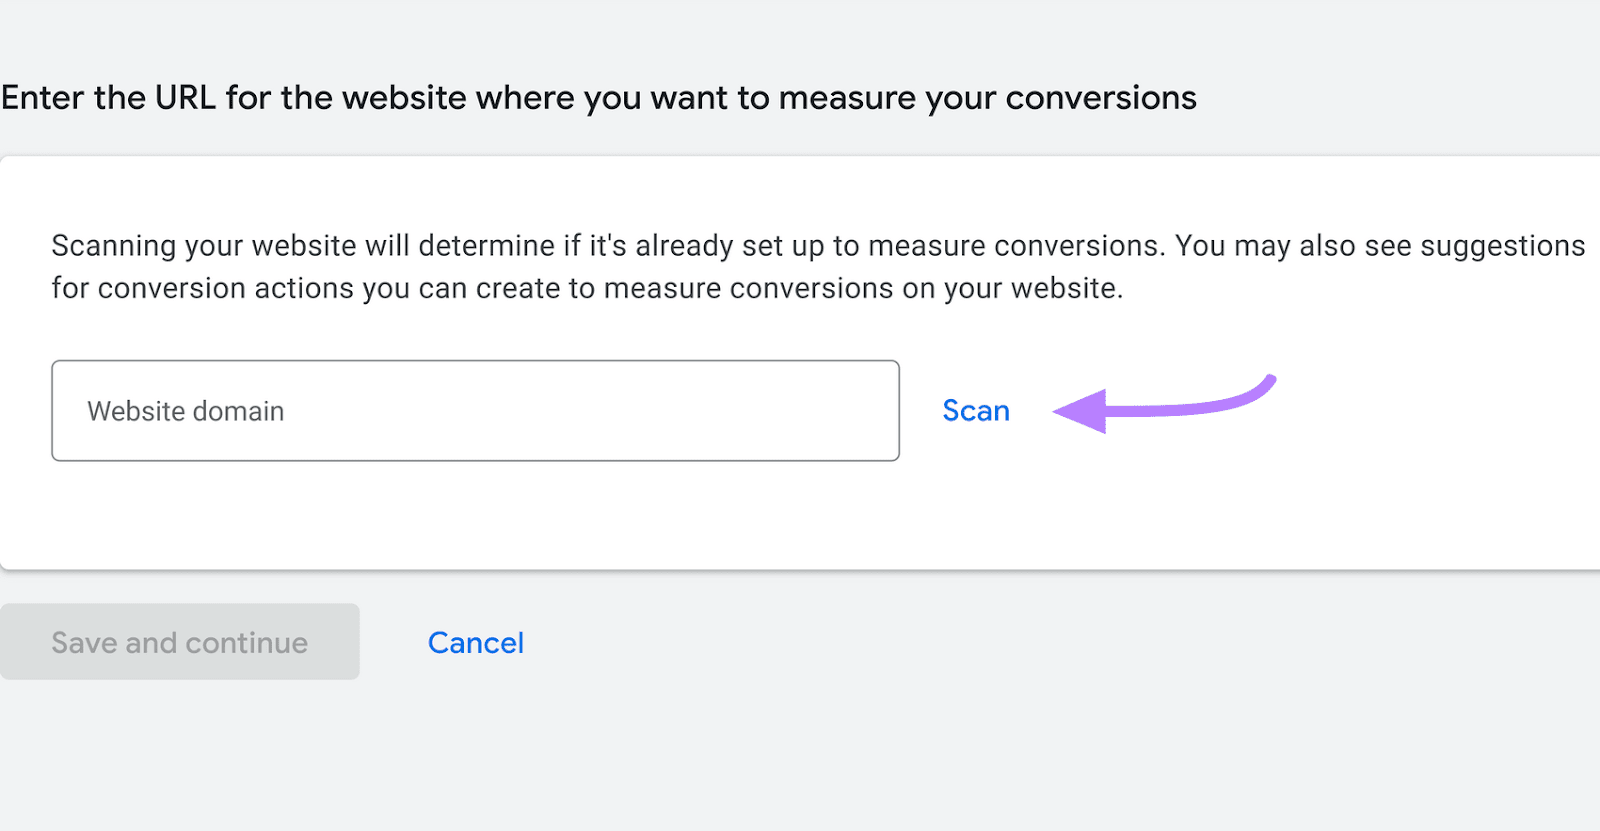
Enter your website’s URL and click “Scan.”
Next, click “Add a conversion action manually.”
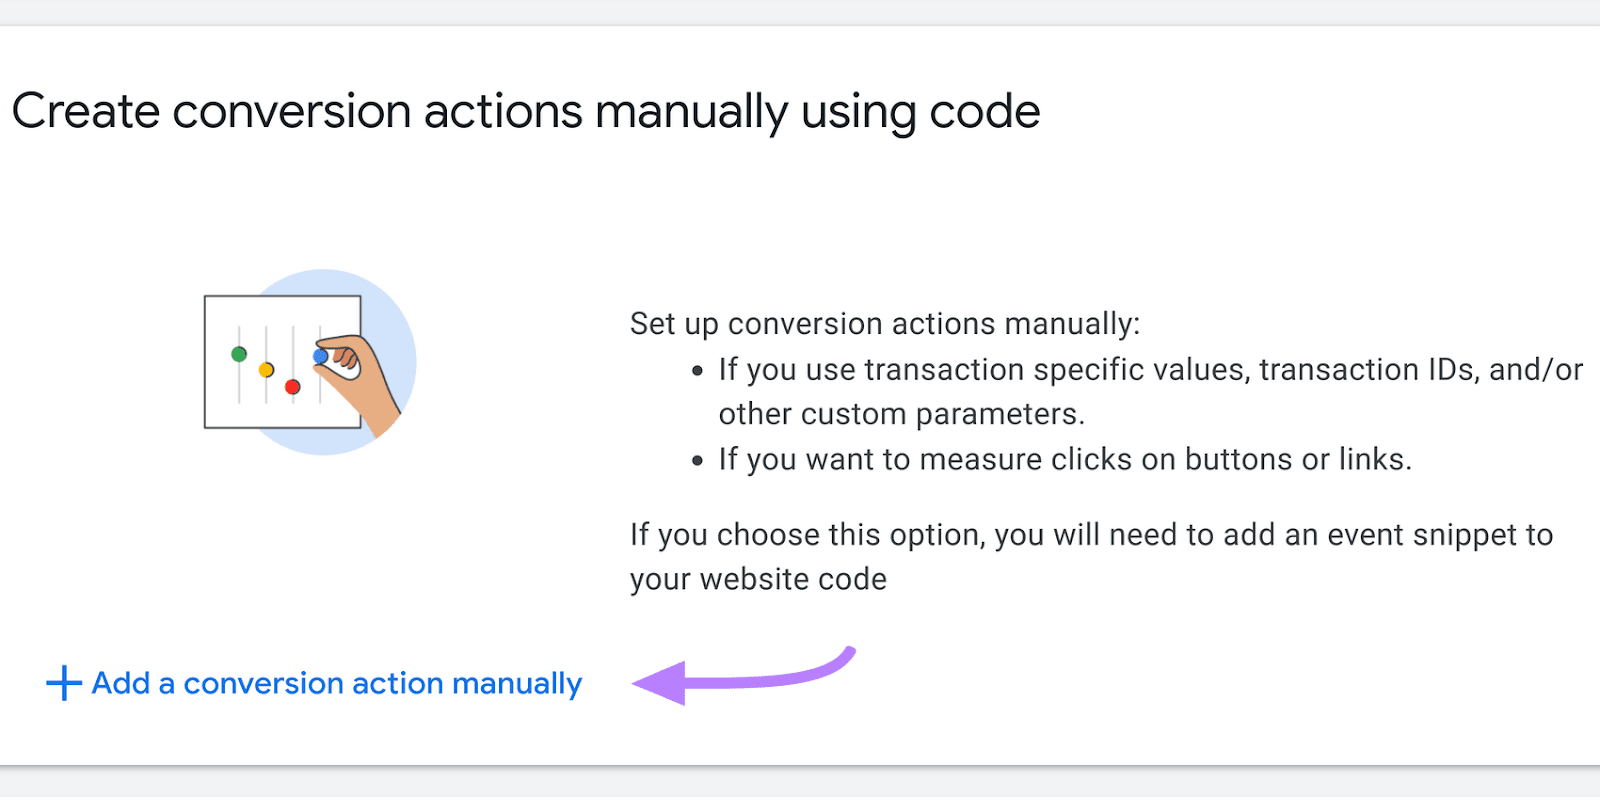
Here, you’ll need to enter some additional details and customize a few settings:
- Goal and action optimization: The goal category for your conversion action (e.g., purchase, add to cart, subscribe, submit lead form, etc.)
- Conversion name: A descriptive name for your conversion action
- Value: The value of the conversion action. You can use the same value for each conversion or set up dynamic conversion values.
- Count: How many conversions Google Ads should track per click or interaction
- Click-through conversion window: Visitors will sometimes convert several days after interacting with your ad. Here, you can select the maximum number of days that can pass between an interaction and a conversion for Google Ads to associate the conversion with your ad. Note that the best number to use here will depend on your specific business and industry.
- Engaged-view conversion window: How many days after a user interacts with your video ad should their conversion be attributed to the ad?
- View-through conversion window: Visitors can also see your ad but not interact with it (called an impression), and then convert later. This is known as a view-through conversion. Here, you can set the maximum number of days that can pass between a user viewing your ad and their conversion for it to count as a view-through conversion.
- Attribution: The attribution model you’d like Google Ads to use for conversion tracking. The two available options include data-driven and last-click attribution.
Then, click “Done” at the bottom of this window. Finally, click on “Agree and continue” on the next screen.
You’ll then need to add a Google tag so you can start measuring conversions.
To do this, click “Set up” on the next screen.
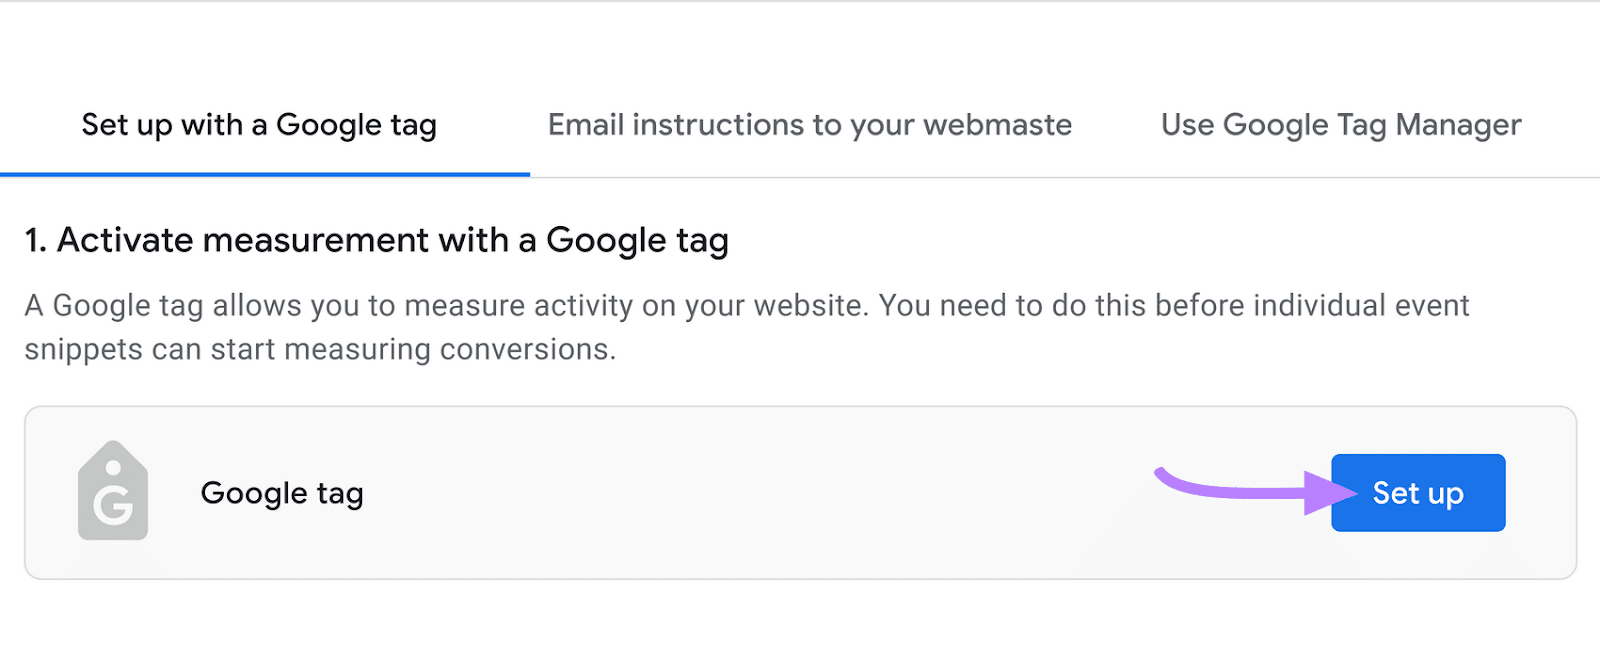
You’ll then get a snippet of code that you’ll need to add to your website. (You may also get an option to use a Google tag detected on your website, meaning you won’t need to make changes to your site’s code.)
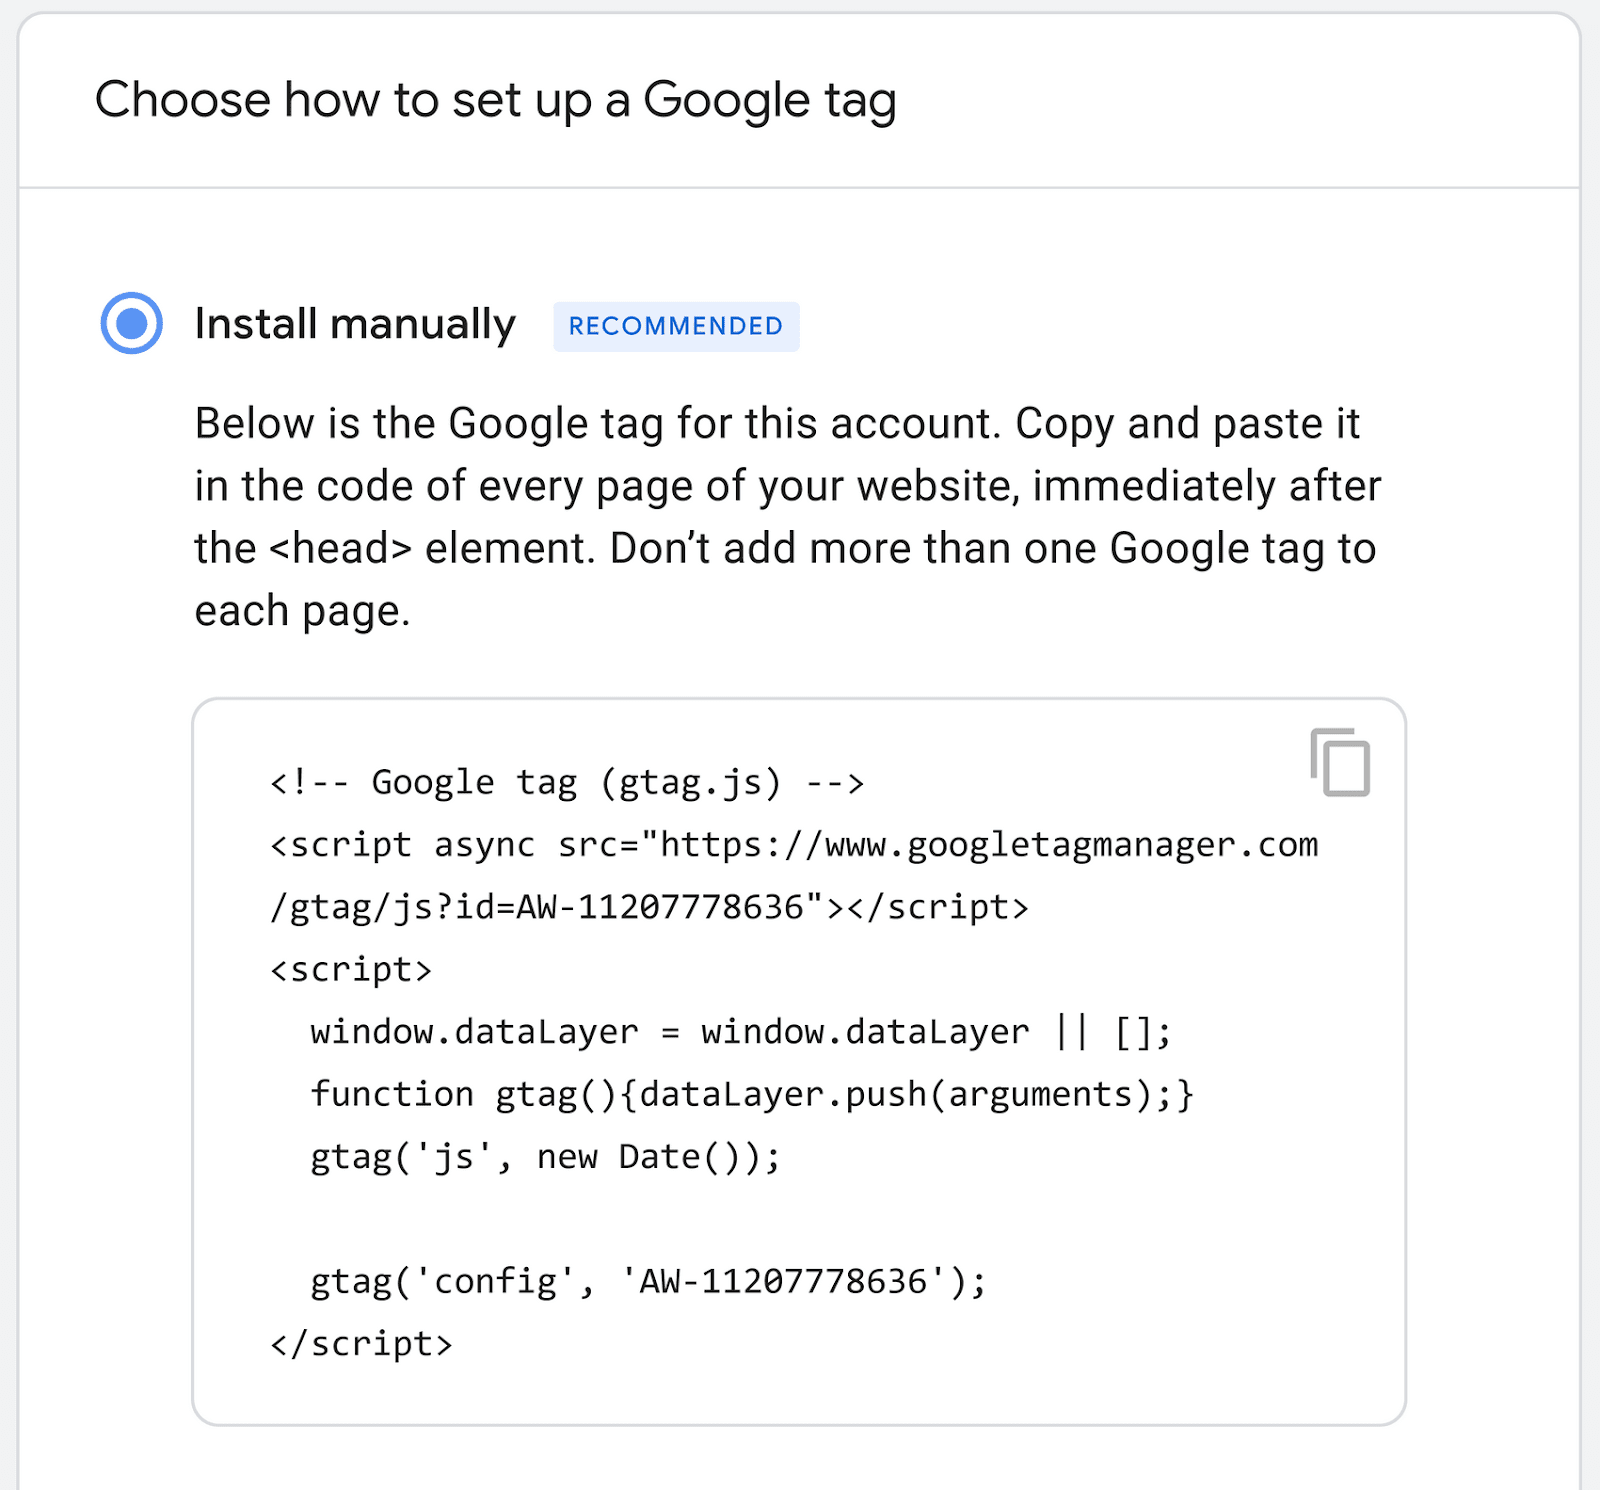
Once you add the code to your website, go back and click the “Test installation” button.
If Google Ads detects the code on your website, you’ve successfully set up conversion tracking.
2. Organize Your Google Ads Account
To manage and optimize your ad campaigns efficiently, you need to keep your Google Ads account organized.
Follow these guidelines when structuring your account:
- Campaigns: Organize your campaigns by business goals, product or service lines, or location. Add a descriptive name for all your campaigns and use a consistent naming structure.
- Ad groups: Create ad groups based on themes (e.g., specific keywords, audience segments, intent, or promotions). Try not to go over 10 ad groups per campaign to keep things tidy.
- Ads: Use at least three ads per ad group so you can test out different variations of ad copy
Structuring your account using the tips above will allow you to review your Google Ads performance at a glance. It will also help you find specific ad groups and ads quickly so you can modify them for improved performance.
3. Analyze the Competition
Analyzing your competitors’ ads and landing pages can give you inspiration for your own ad campaigns. It can also help you understand what kind of ads work best for your target audience.
Here’s how to do a quick analysis of your competitors’ Google Ads:
Identify Competitors
The first step is to identify your main Google Ads competitors.
Start by listing all your known competitors—you can probably name five to 10 competitors yourself. Then, type in a few of your main keywords into Google and check out the ad sections to see which companies are advertising there.
You can use Semrush’s Advertising Research tool to find and learn more about your Google Ads competitors. Simply type in your domain and click “Search.”
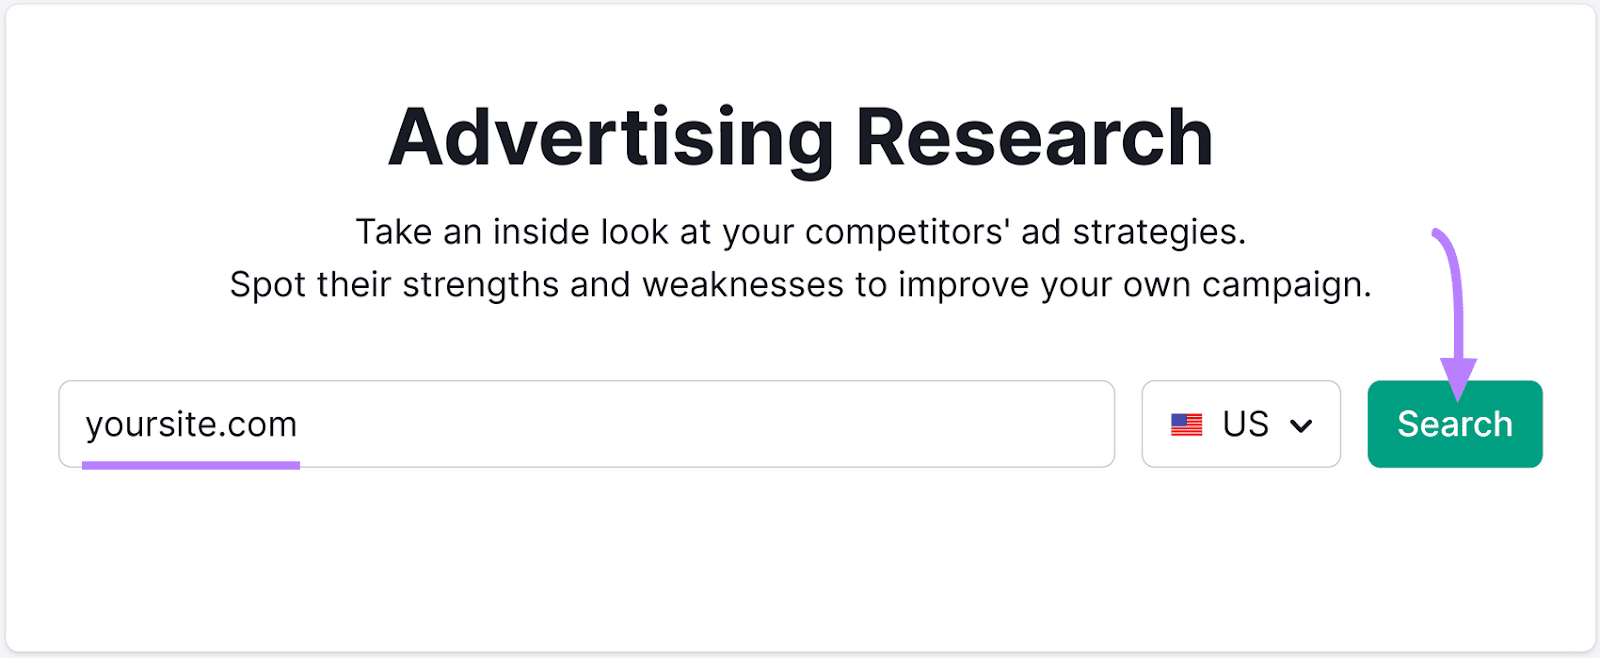
Then, click on the “Competitors” tab on the next screen.

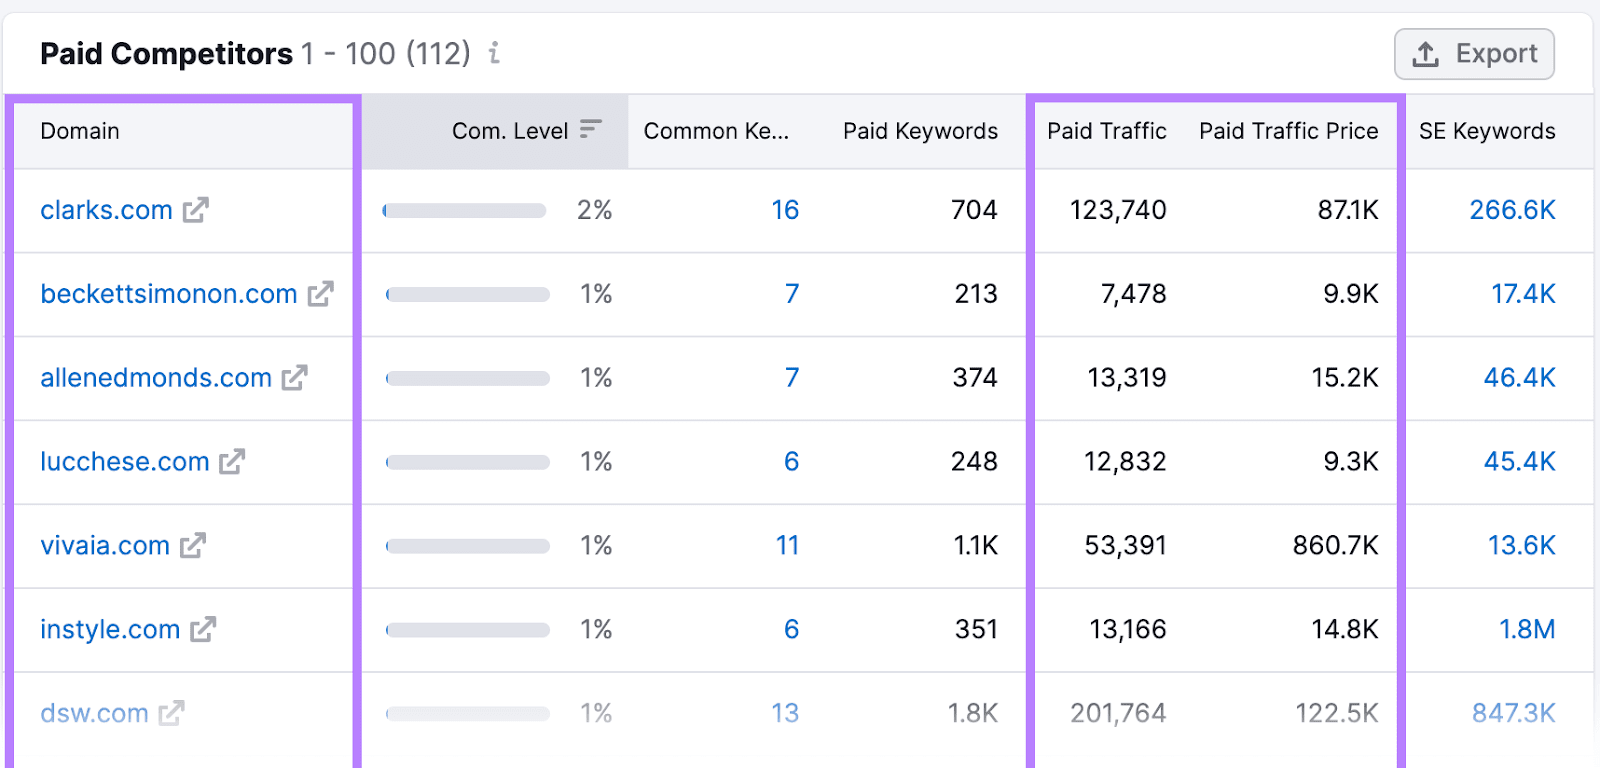
Scroll down to the “Paid Competitors” section. Here, you’ll be able to see:
- The websites you’re competing with for Google Ads placements
- How much they’re spending on paid ads
- What kind of traffic they generate from paid advertising
Stay on this page. We’ll use it in the next step.
Find Out Which Keywords Your Competitors Are Bidding on
Next, you’ll want to find out which keywords your competitors are bidding on. If they’re bidding on specific keywords consistently, it’s likely that those keywords are resulting in profitable ad campaigns.
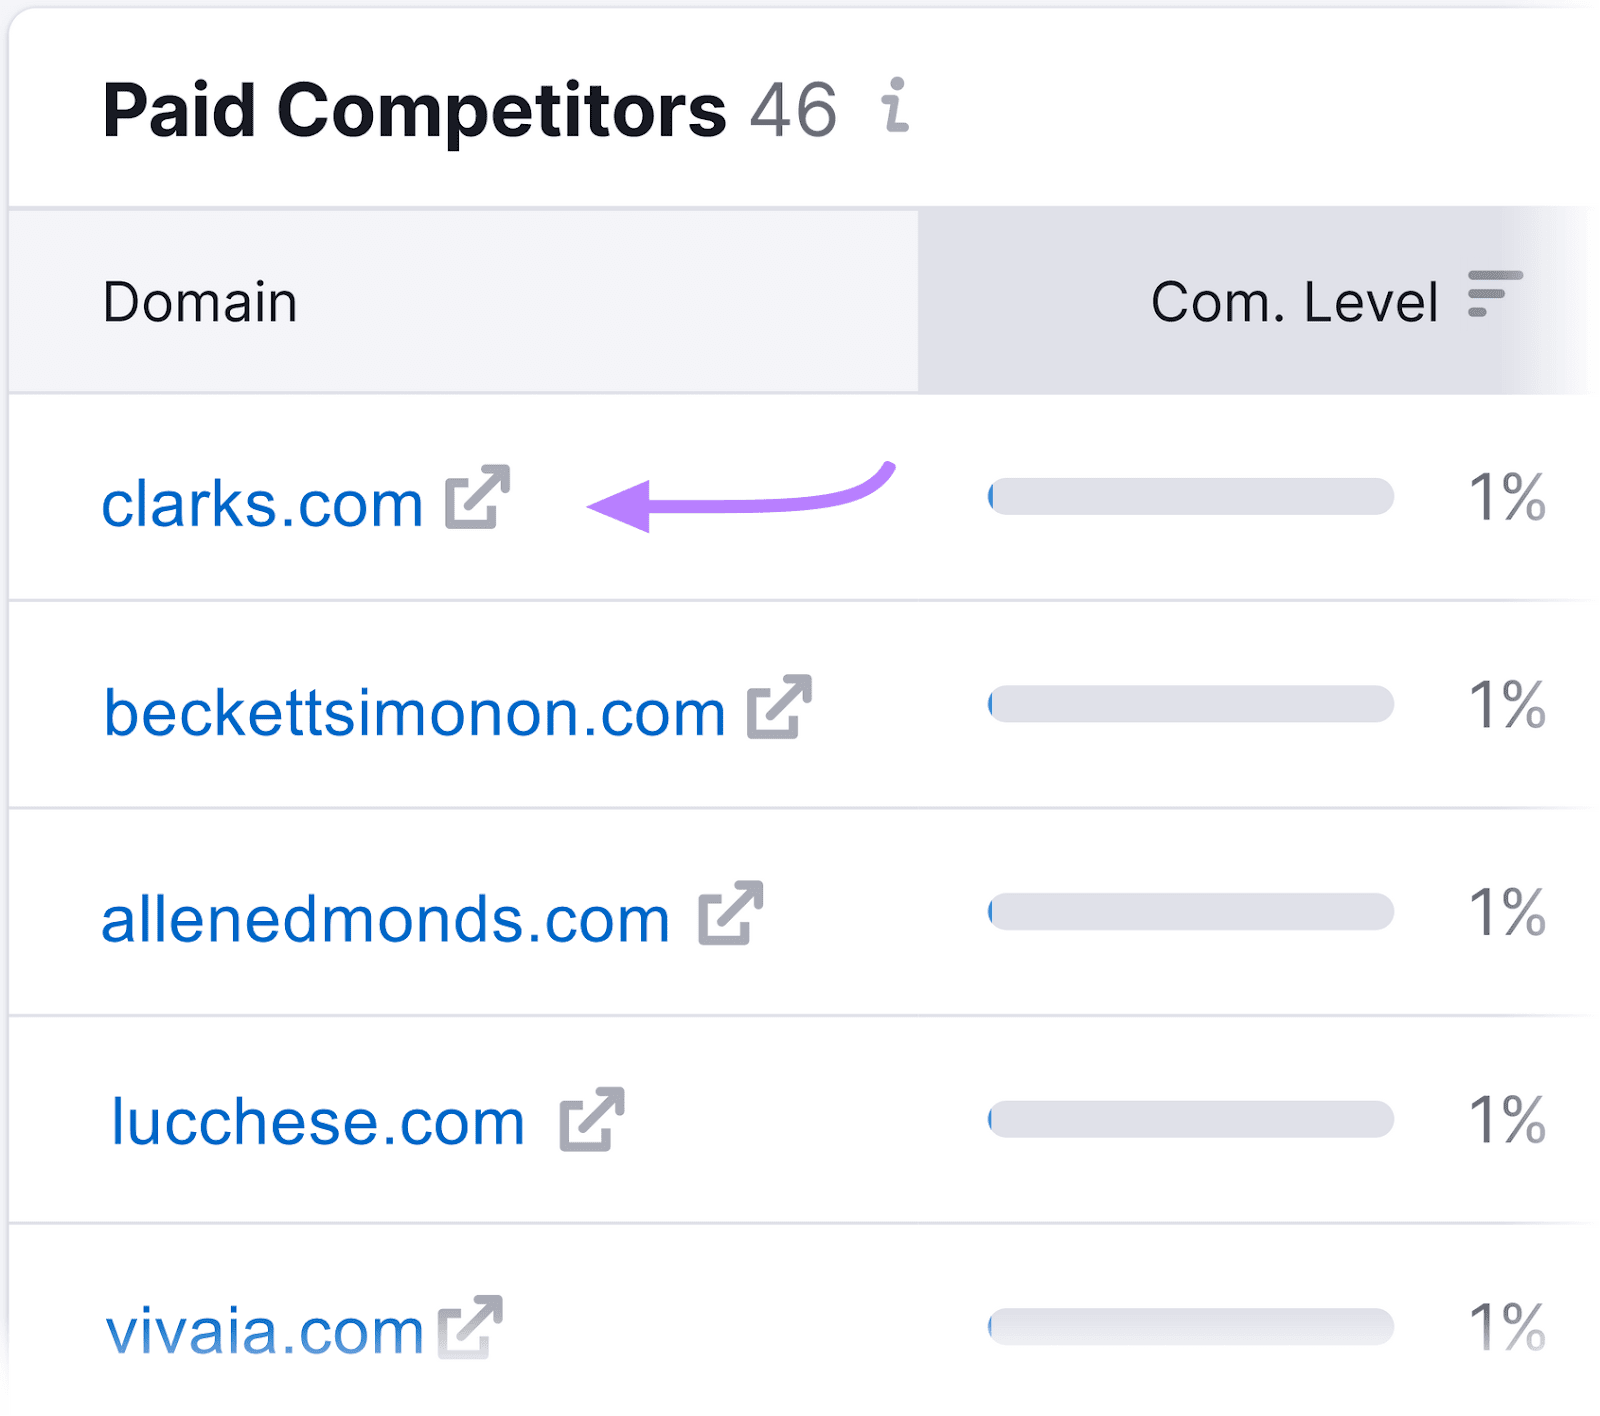
The Advertising Research tool can also show you exactly which keywords your competition is bidding on. From the “Paid Competitors” section, click on the domain name of a competitor.
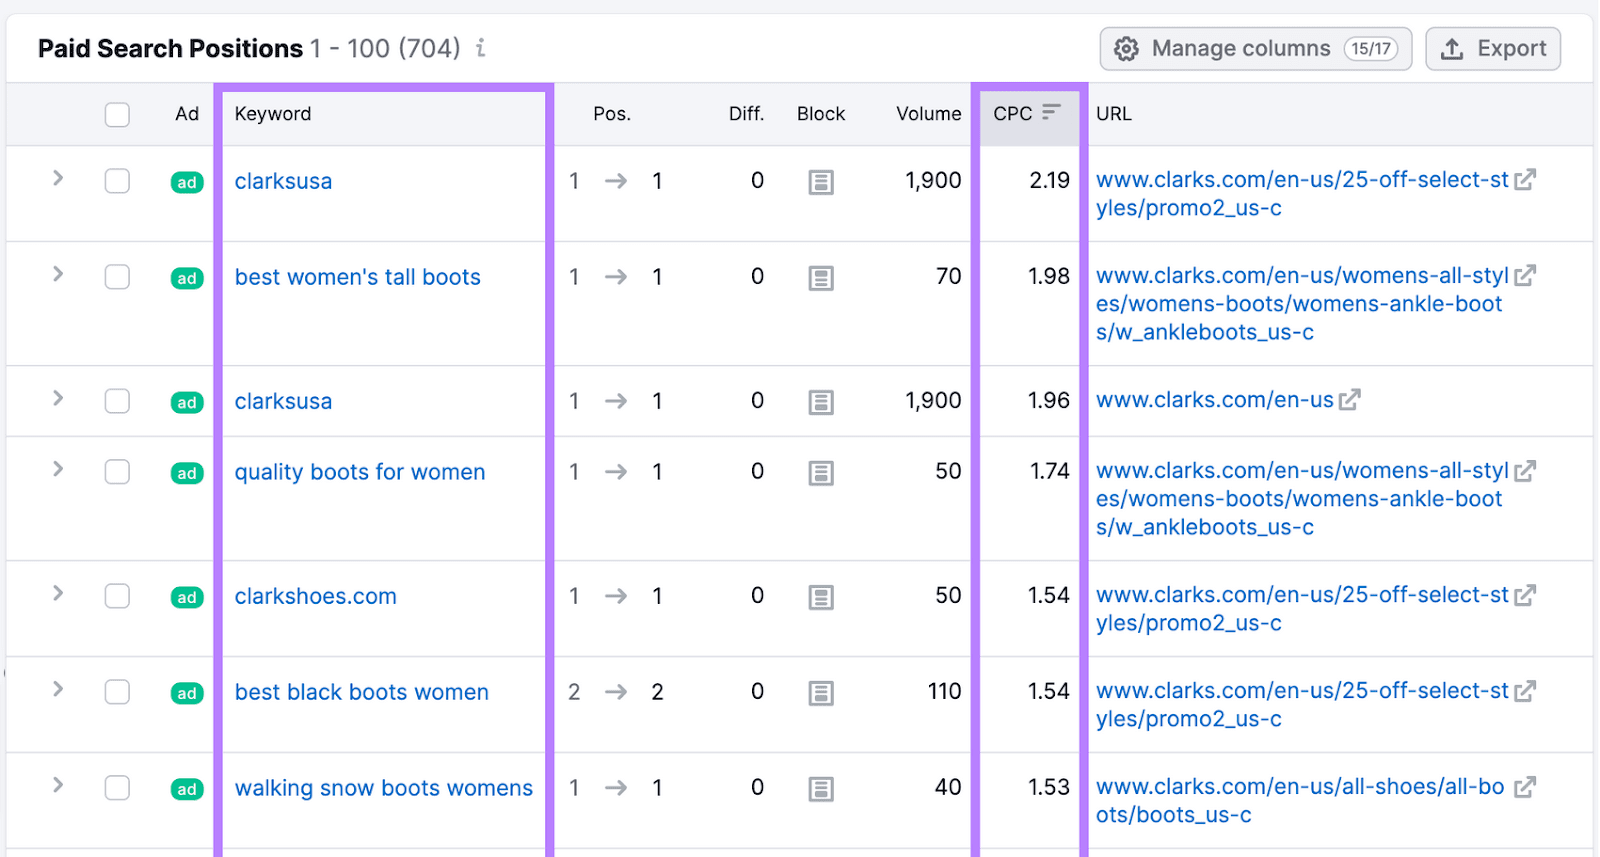
Next, scroll down to the “Paid Search Positions” section (staying on the “Positions” tab).
Here, you’ll be able to see all the keywords they’re bidding on and the average cost per click (CPC) for each keyword.
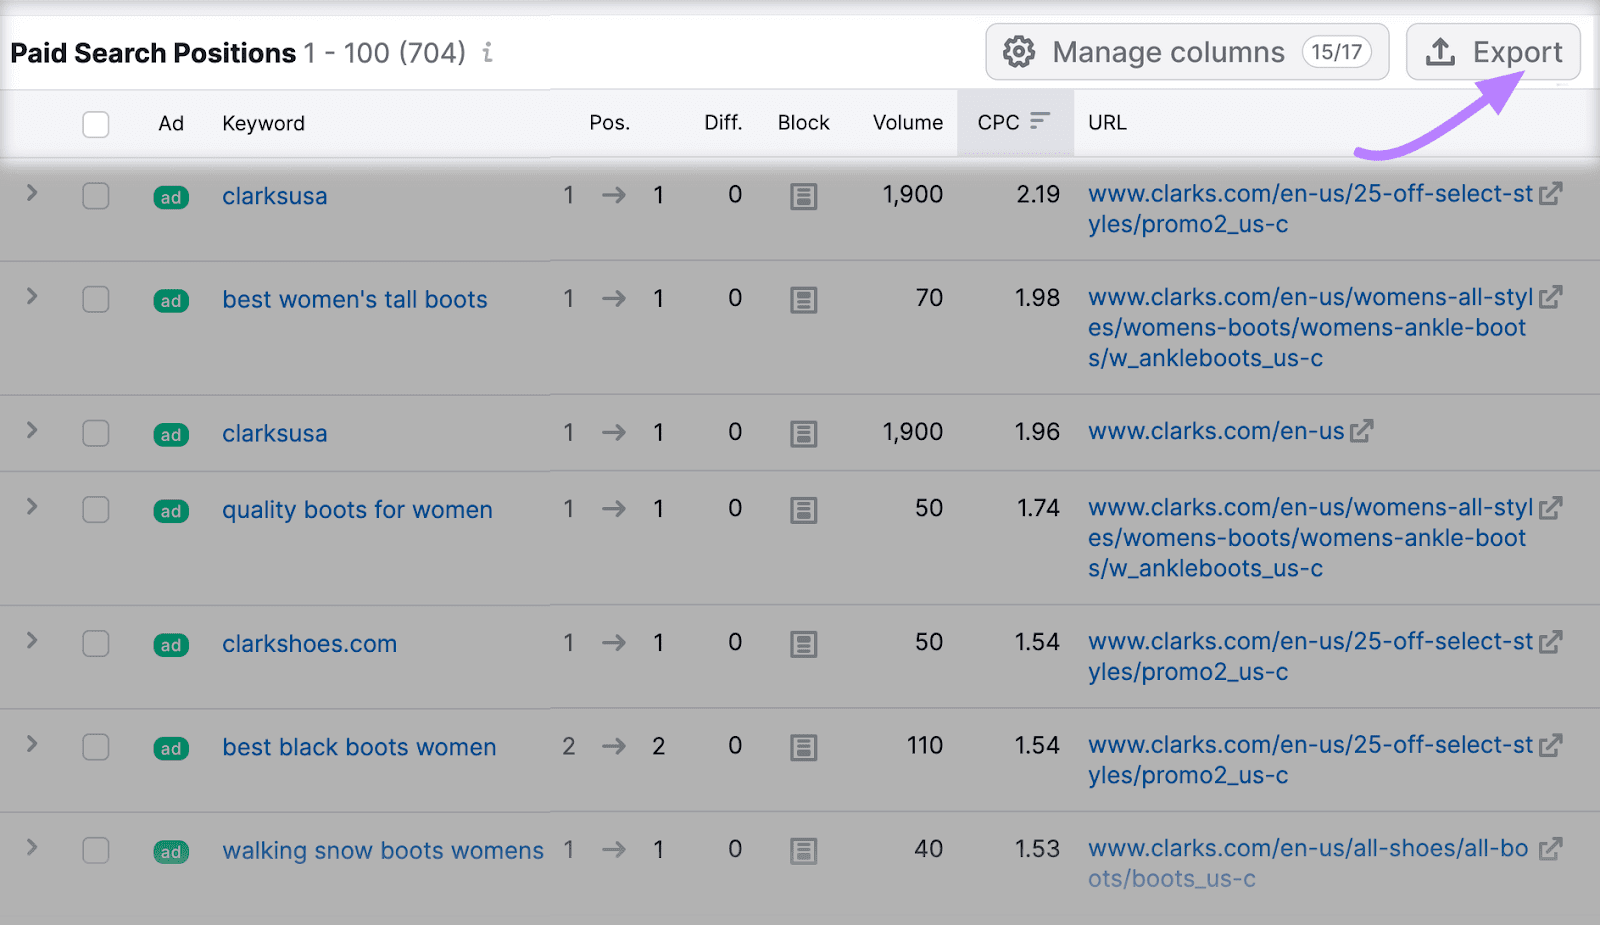
From here, you can export all the keywords by clicking the “Export” button.
Review Ad Copy and Landing Pages
Apart from analyzing the keywords competitors are bidding on, you’ll also want to have a look at their ad copy and landing pages. This can provide insights you can use to improve your own ads and landing pages (which we’ll cover in the next two sections).
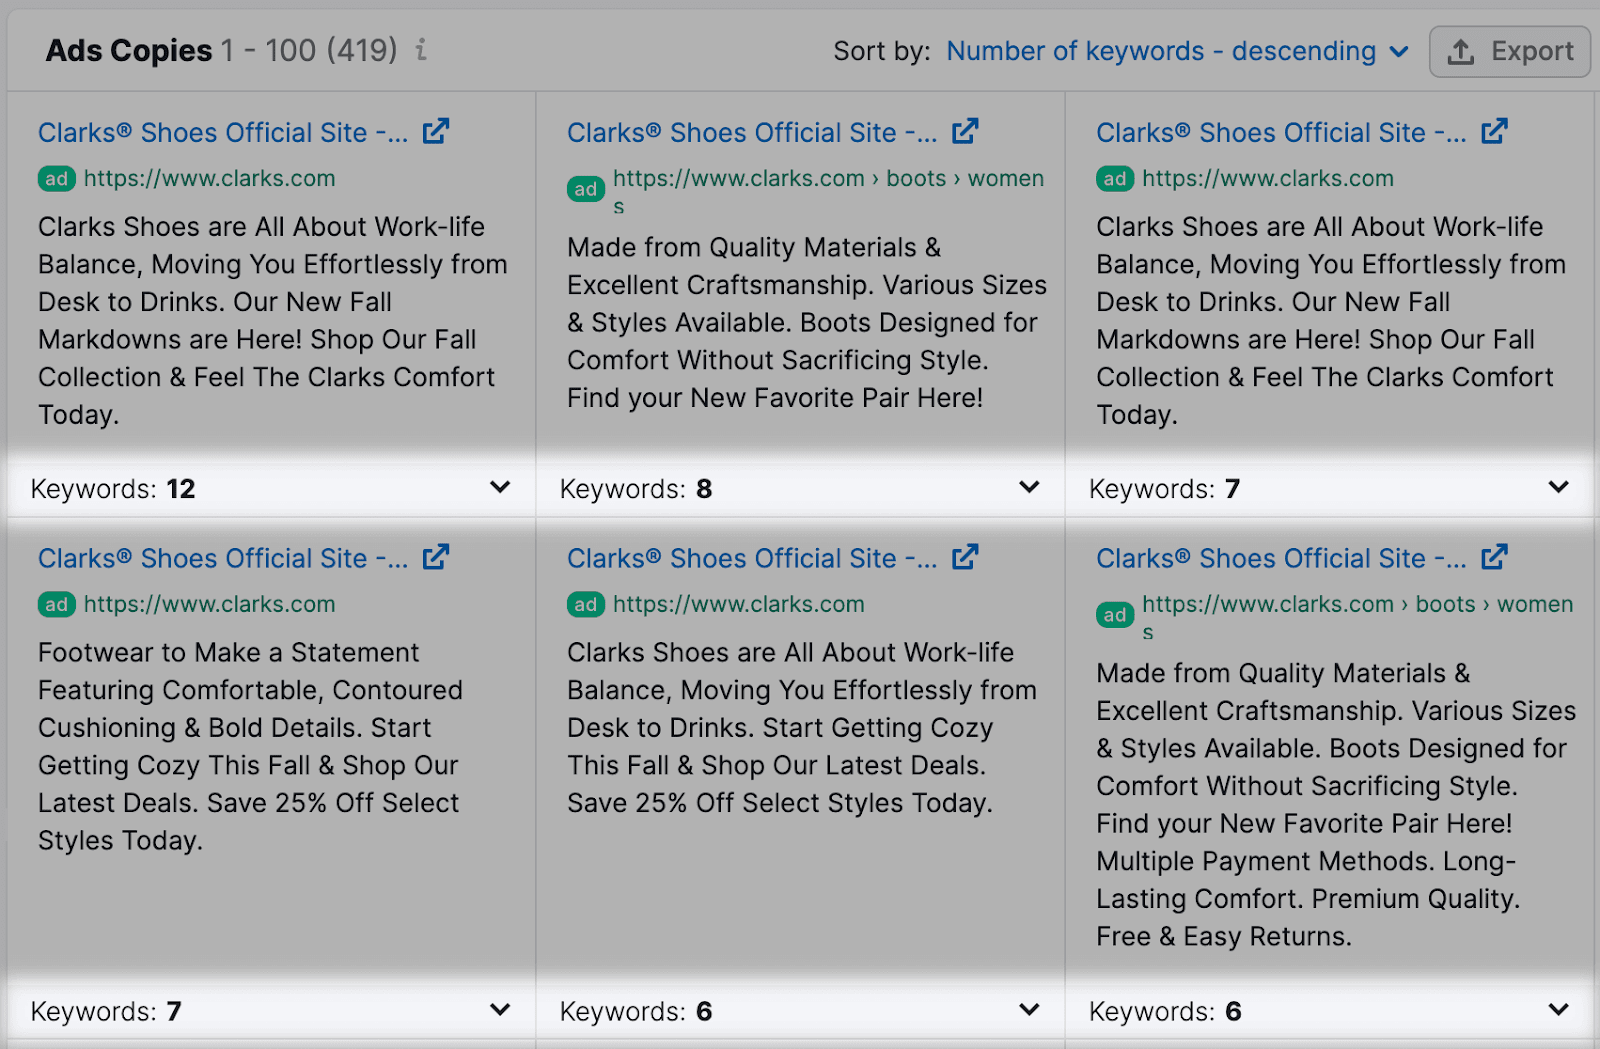
The Advertising Research tool can help here as well. After clicking on a competing domain from the “Paid Competitors section,” go to the “Ads Copies” tab.

Here, you’ll be able to see the ad copy that a specific competitor uses for their ads. It’ll also show you the number of keywords that trigger those ads in search results.
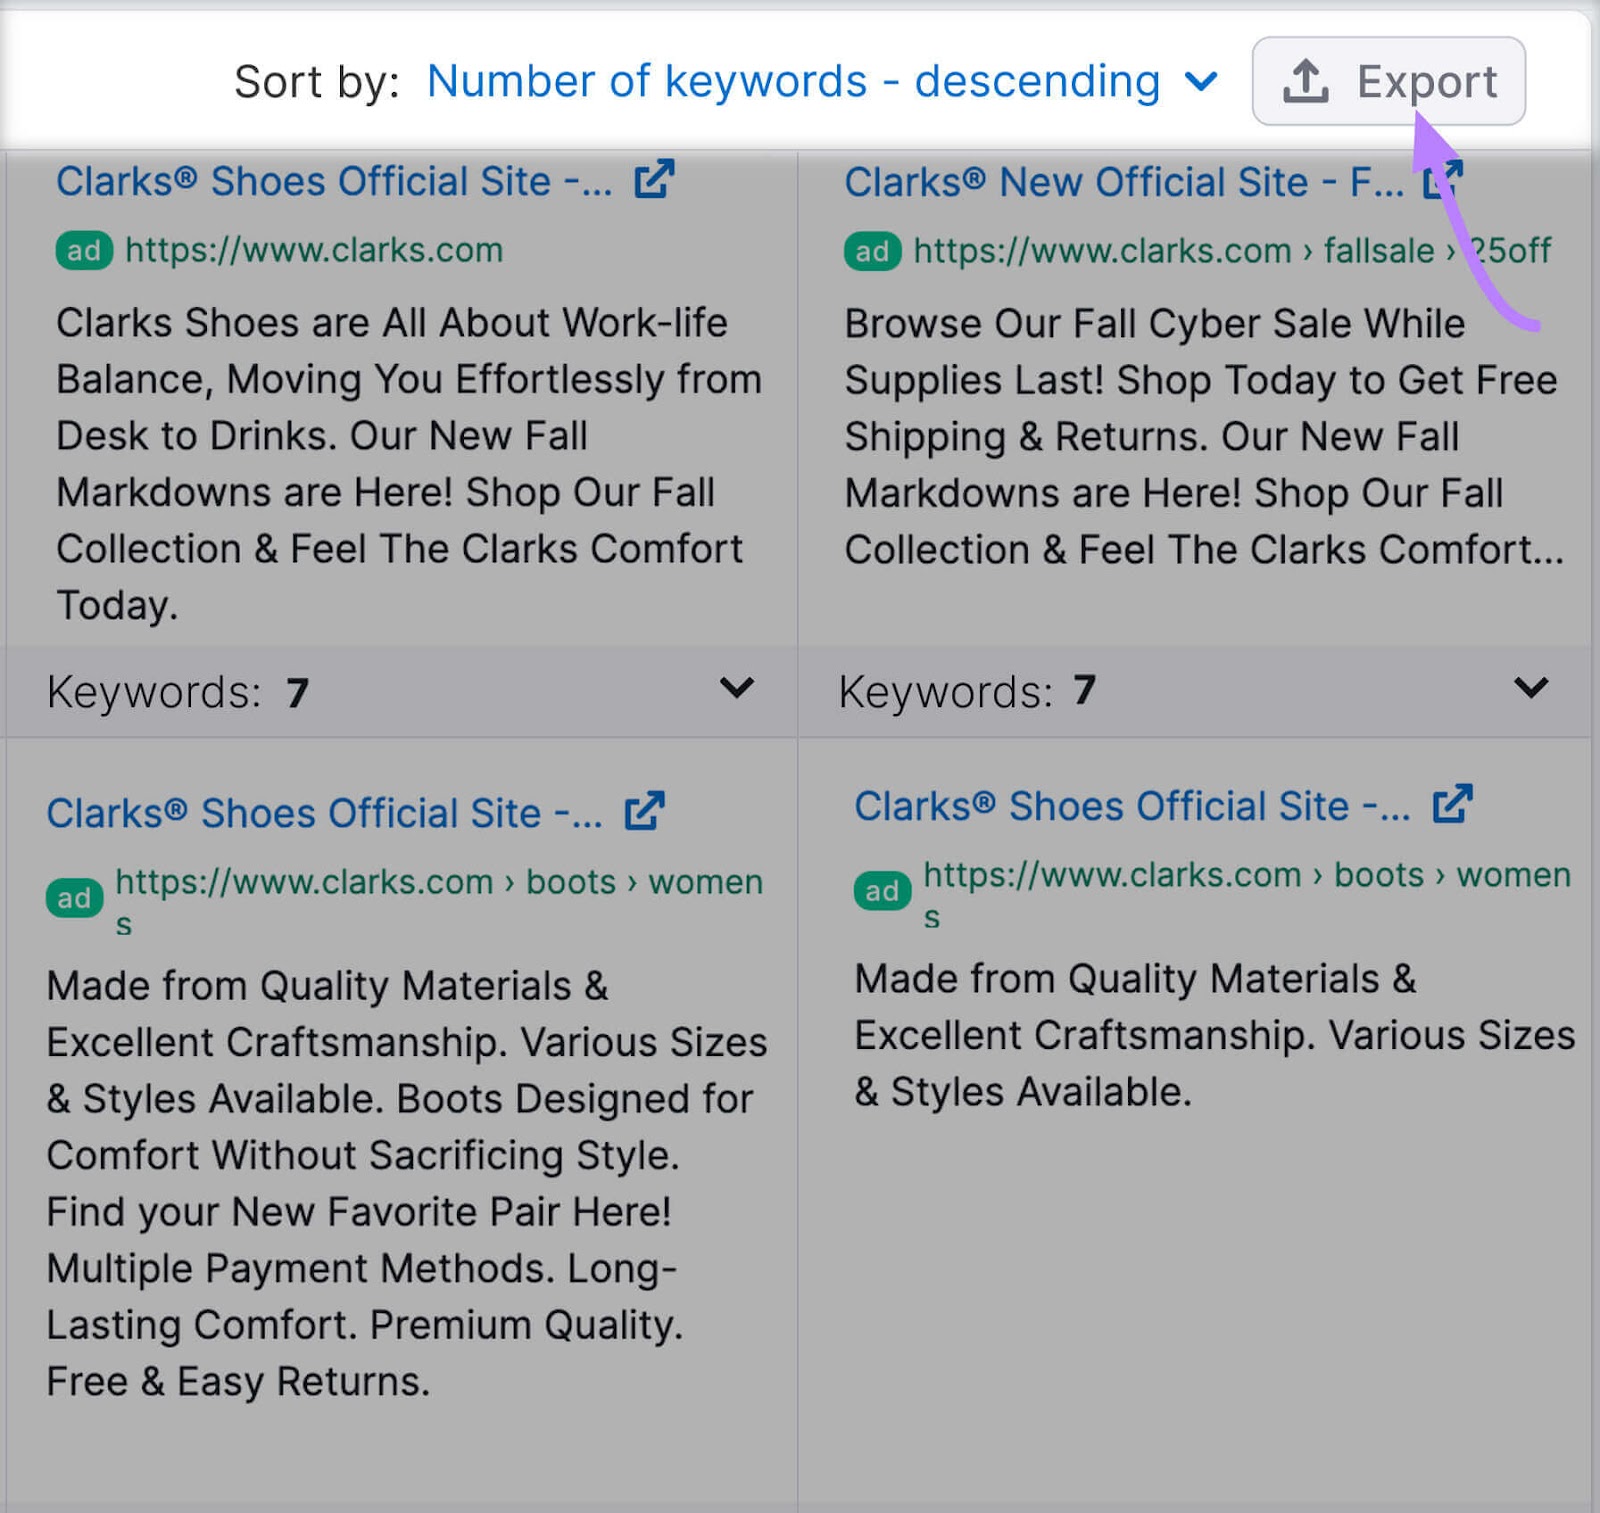
You can also export the copy for all their ads by clicking the “Export” button.
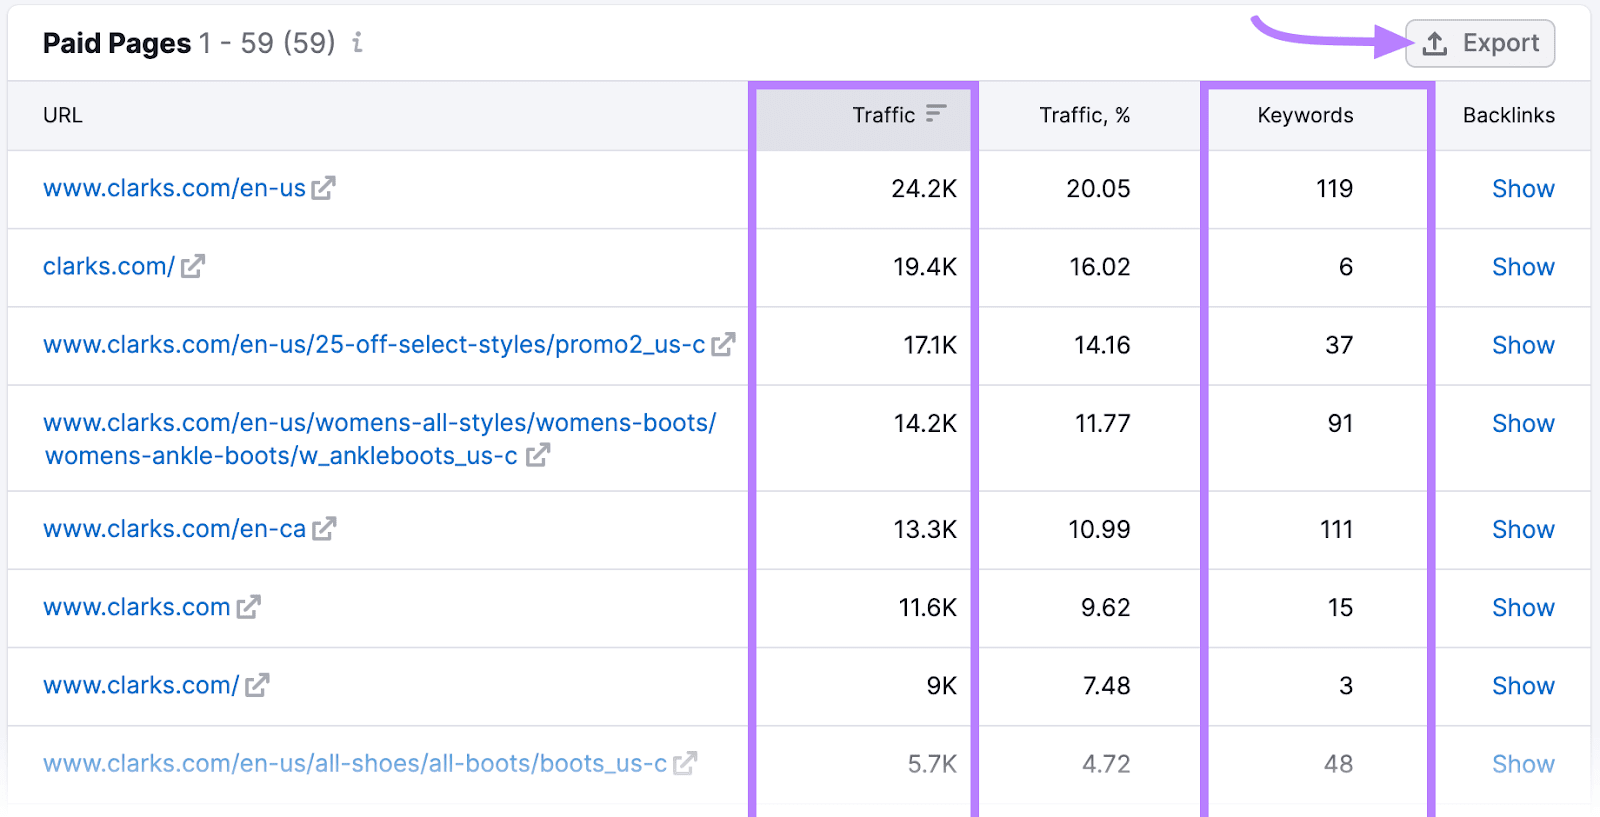
If you’d like to take a look at the landing pages for the ads, simply click on the “Pages” tab.

Here, you’ll see a list of all the landing pages they use for their ads. Along with estimated traffic, the number of keywords each one ranks for in paid search results, and more.
You can then examine these one by one or export them as a list of URLs.
4. Improve Your Ad Copy
Your ad copy can have a huge impact on how your ads will perform. Follow these Google ad copy best practices to get better results from your ads:
Be Specific
Your ad copy should be specific to the search query.
For example, let’s say you run an online clothing store. And, you want to create an ad targeting women looking to buy summer dresses.
In this case, you want your ad copy to focus on summer dresses specifically. Don’t use generic copy that says you sell a variety of women’s clothing or mention other types of products you also sell (e.g., accessories).
This will help to show shoppers that you sell exactly what they’re looking for, making it more likely that they will click on your ad.
Include Keywords
Include keywords searchers are likely using within your ad copy. This will make your ads seem more relevant to searchers and will increase the chances of your ads getting clicks. Like the Upwork ad below, which is clearly targeting those looking to hire freelancers:

Image Source: Google Ads Transparency
Make sure not to overdo it, though. Adding one to two keywords to the ad copy should be more than enough.
The goal here is to show prospective customers that your ad is relevant. Don’t stuff keywords into your copy in an unnatural way.
Add a Clear Call to Action
Remember to add a call to action (CTA) to your ad copy to entice users to take action.
Your CTA should tell searchers what you’d like them to do after seeing your ad (like make a purchase, start a free trial, or book a consultation).
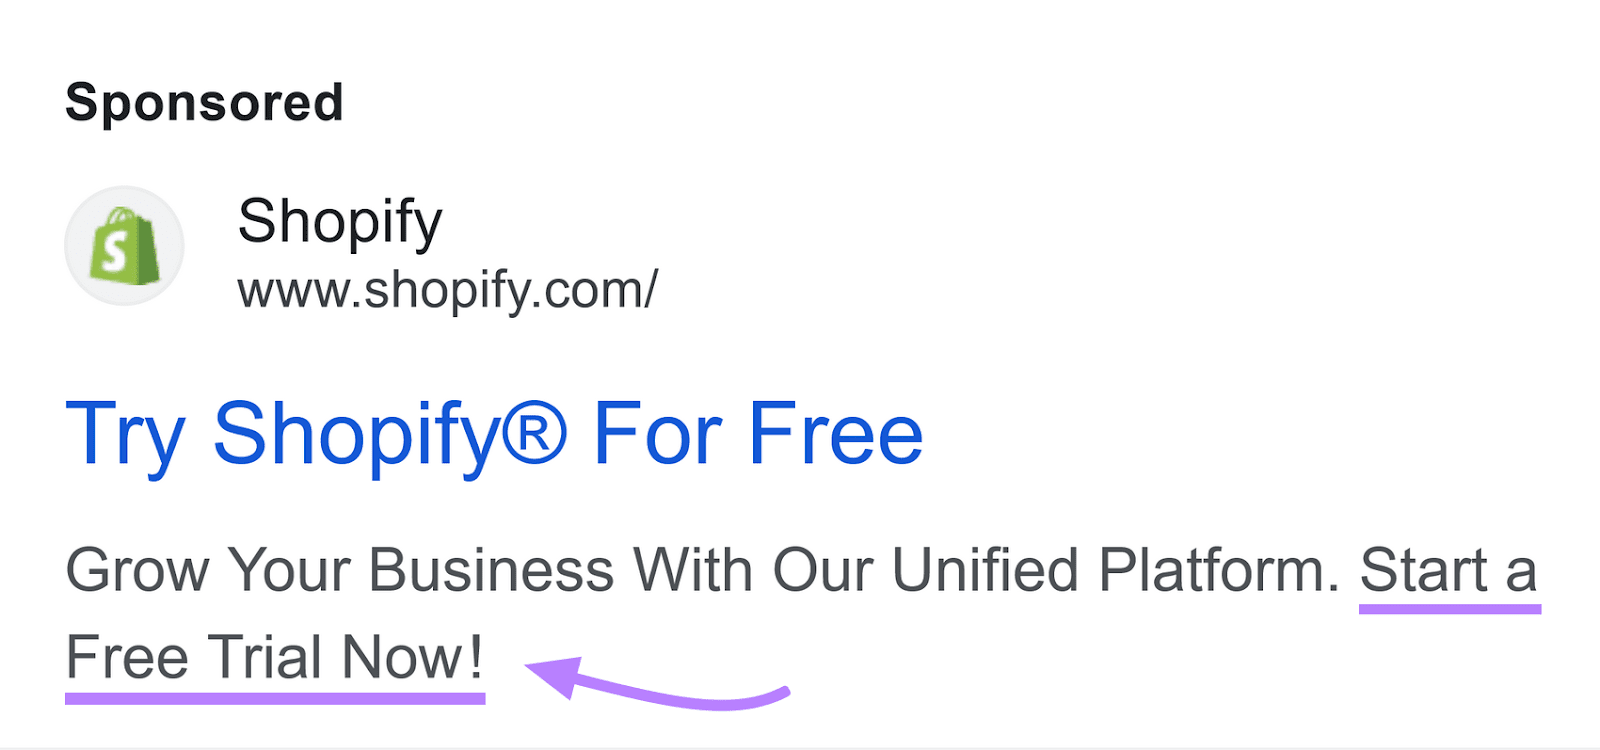
Image Source: Google Ads Transparency Center
Here are a few examples of CTAs you can use in your ad copy:
- Buy now
- Sign up
- Call now
- Learn more
- Get a quote
Make Sure Your Ad Copy Is Error-Free
This one may seem obvious, but it’s worth stating:
You need to make sure your ad is free of grammatical and spelling errors.
Seems easy enough, but you’d be surprised by how many ads out there fail to follow one of the simplest Google Ads best practices.
Ads with grammatical and spelling errors can seem spammy to searchers and make them feel uneasy about clicking on them. Avoid this by double-checking your ad copy for any errors.
5. Optimize Your Landing Pages
You can have the best ads in the world, but you won’t generate any conversions if your landing pages are of poor quality.
Also, providing a poor landing page experience can reduce your ad’s Quality Score. This, in turn, can result in poorer ad performance and higher costs.
Here are a few tips you can use to optimize your landing pages for conversions:
Match Your Landing Pages to Your Ads
Perhaps the most important thing you need to do to improve your landing pages is make sure they match your ads.
The offer and the messaging you use need to be consistent across your ads and landing pages. If you promise something in your ad (like a discount), you must deliver on that promise on the landing page.
Otherwise, you’ll get people clicking on your ads, but they’ll likely never convert.
Focus Your CTAs on a Single Goal
Do you have multiple CTAs on your landing page?
Don’t worry—that’s fine.
But you need to make sure they all ask visitors to do the same thing.
Imagine seeing multiple CTAs on a page, with one asking you to buy a product, another one asking you to sign up for a newsletter, and a third one requesting that you call to get in touch.
You’d be confused. And you wouldn’t know where to focus your attention. Right?
The same is true for your website visitors.
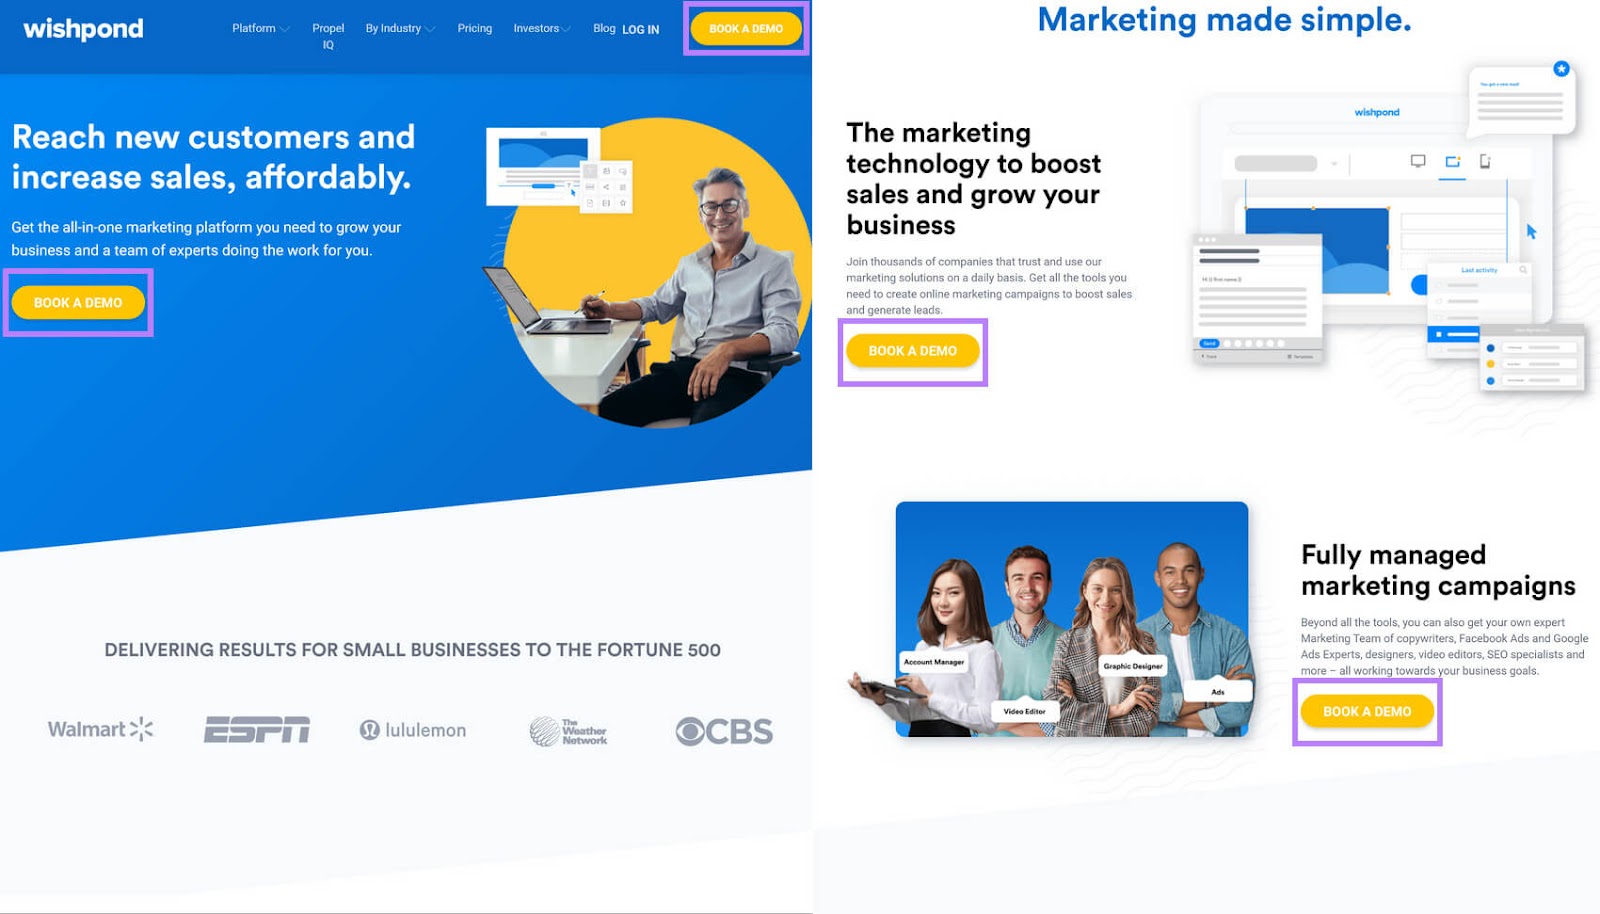
So, if you want to have multiple CTAs on your landing page, first decide on the main thing you’d like visitors to do (e.g., make a purchase or book a call). Then, make sure all your CTAs are focused on pushing visitors toward that goal.
Here’s a good example, showing the consistency of CTAs as you scroll down the landing page:
Use Trust Signals
A lack of trust is one of the main reasons people don’t convert on a landing page.
If it’s their first time visiting your website, they might feel uneasy about entering their personal information or trusting you with their credit card details.
Here are a few different types of trust signals you can consider adding to your landing page:
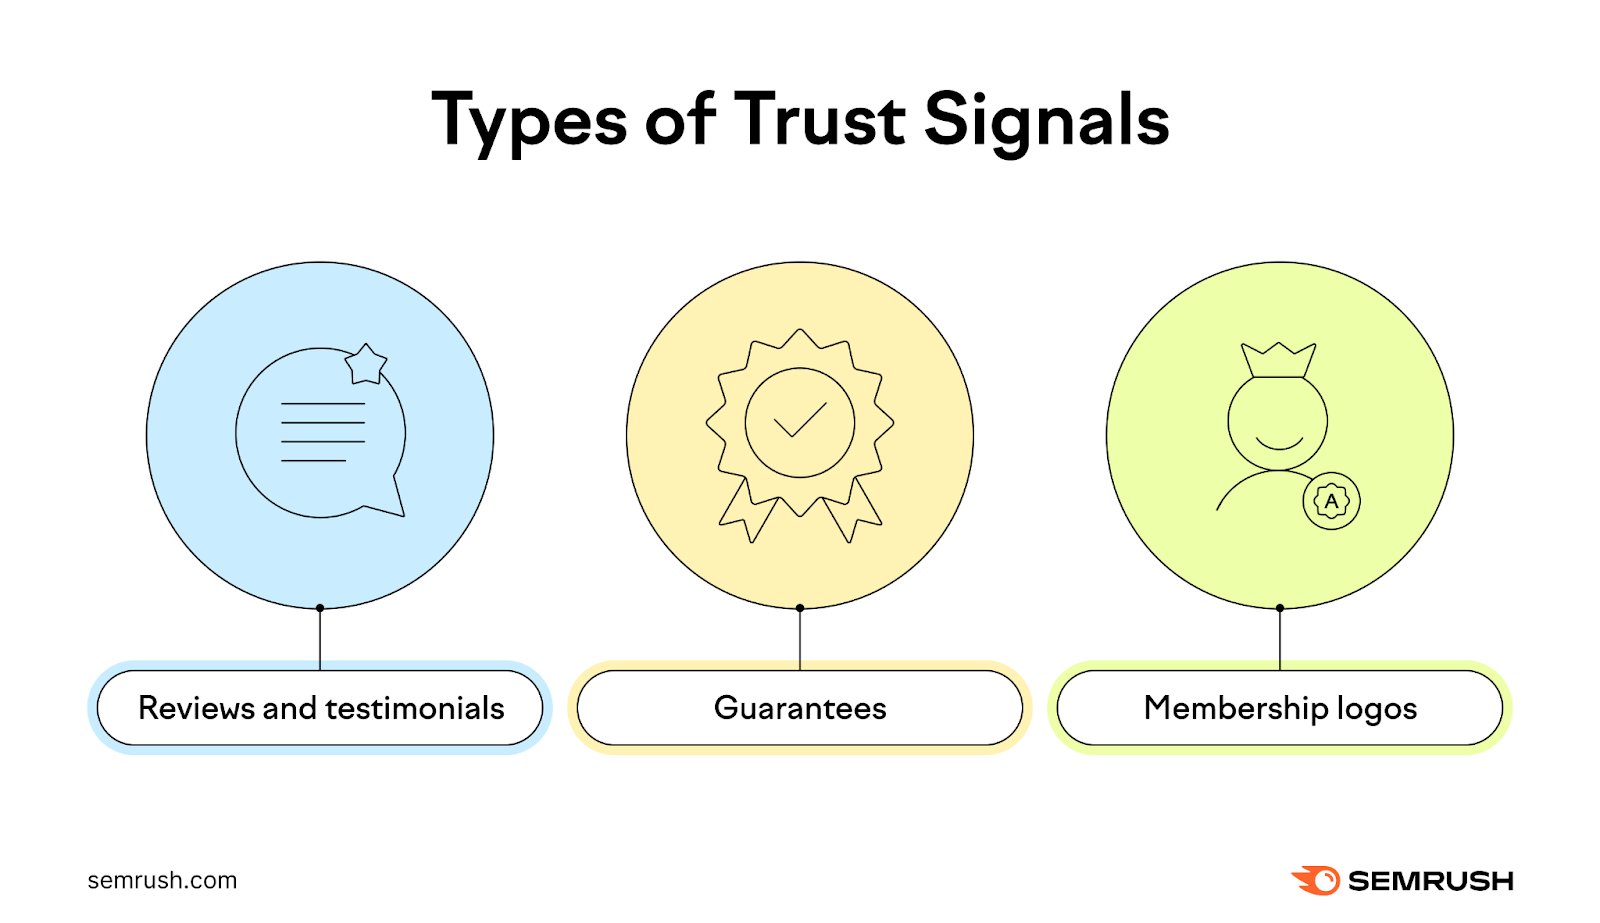
- Reviews and testimonials: Seeing satisfied customers post about how happy they are with your company can make visitors feel much more confident about making a purchase
- Guarantees: Offering a satisfaction or money-back guarantee can also help make visitors feel at ease when entering their personal or payment details on your landing page
- Membership logos: Is your company a member of a reputable organization, such as the Better Business Bureau (BBB)? Try displaying the organization’s logo on your landing page to signal to visitors that your company can be trusted.
Improve Page Speed
People typically won’t wait more than a couple of seconds for a website to load. The longer it takes, the higher the chances of them leaving without engaging with your content (known as a bounce).
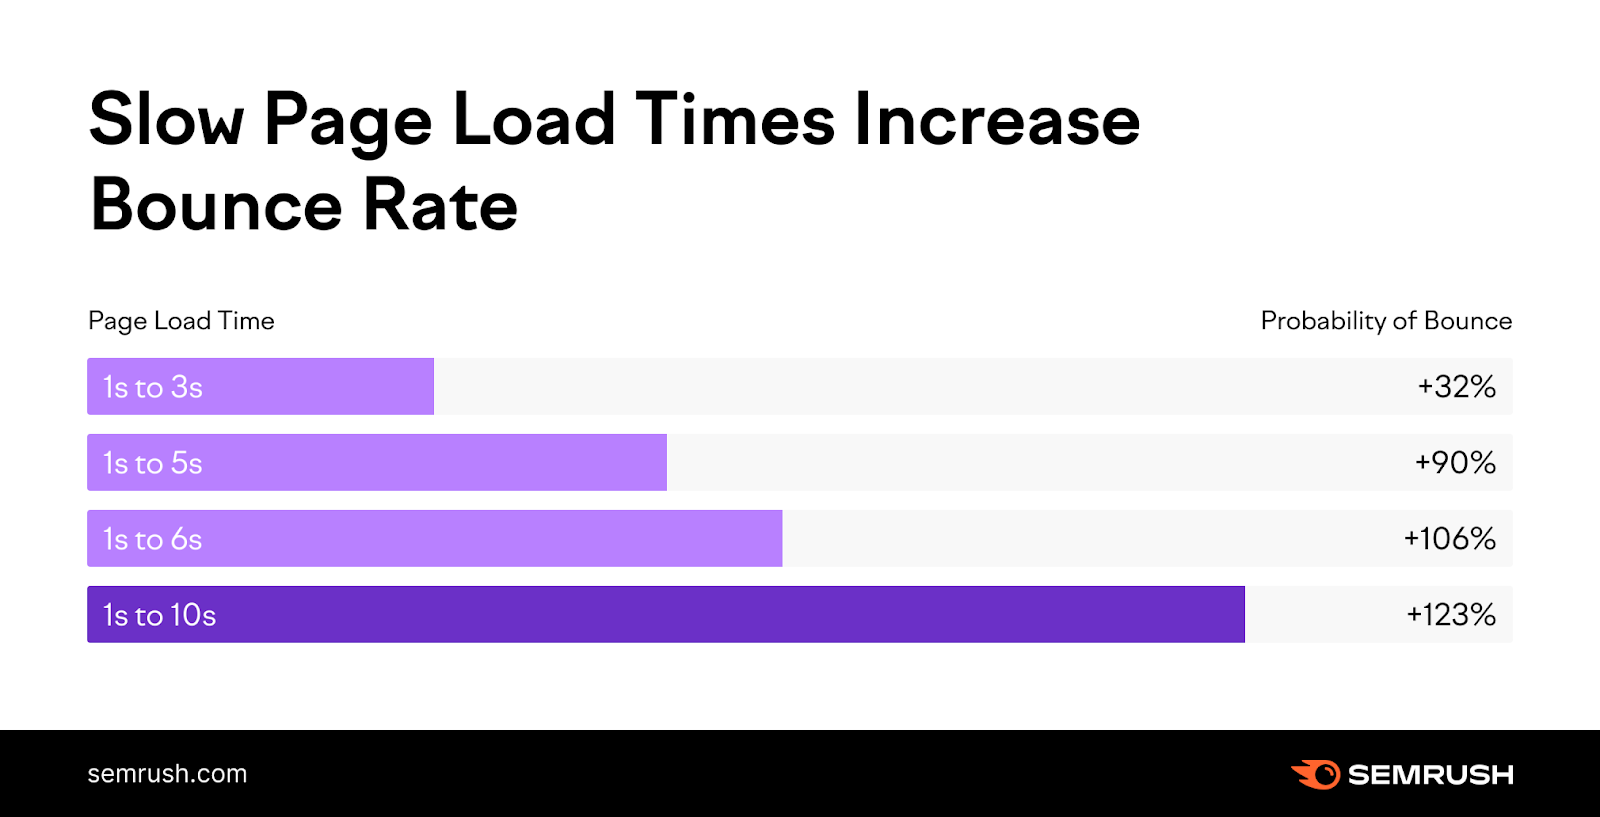
If you want your landing pages to convert, you need to make sure they load fast.
Here are a few things you can do to speed up your landing pages:
- Upgrade your web hosting: Are you still using shared hosting? Upgrade to dedicated server hosting or use a better hosting provider to help speed up your website.
- Use a CDN: With a content delivery network (CDN), your website content is served to visitors from the servers that are physically closest to them. This can result in significant increases in page load speed.
- Compress images: Images can be slow to load, especially if they have a high resolution (and high file size). Use a web-friendly image format like WebP to get images to load faster, and you can compress your JPEG and PNG images with tools like Optimizilla or Kraken.
- Minify JavaScript and CSS files: JavaScript and CSS files can be bloated with comments, line breaks, and unnecessary spaces, which increases their size. You can use a tool like Minifier to optimize your JavaScript and CSS files.
- Remove any unnecessary scripts: Check if you have any unnecessary scripts running on your website (e.g., an unused tracking code snippet). Remove any scripts you don’t absolutely need so that they don’t slow down your website.
Further reading: What Is Page Speed & How to Improve It
6. Maintain a Negative Keyword List
Google Ads gives you a way to prevent your ads from showing for irrelevant searches by allowing you to add negative keywords. These are keywords you don’t want your ads to show up for.
If you’re running Google Ads campaigns, using negative keywords is a must.
By adding negative keywords to your campaign settings, you can improve your ads’ click-through rates and reduce your overall advertising costs.
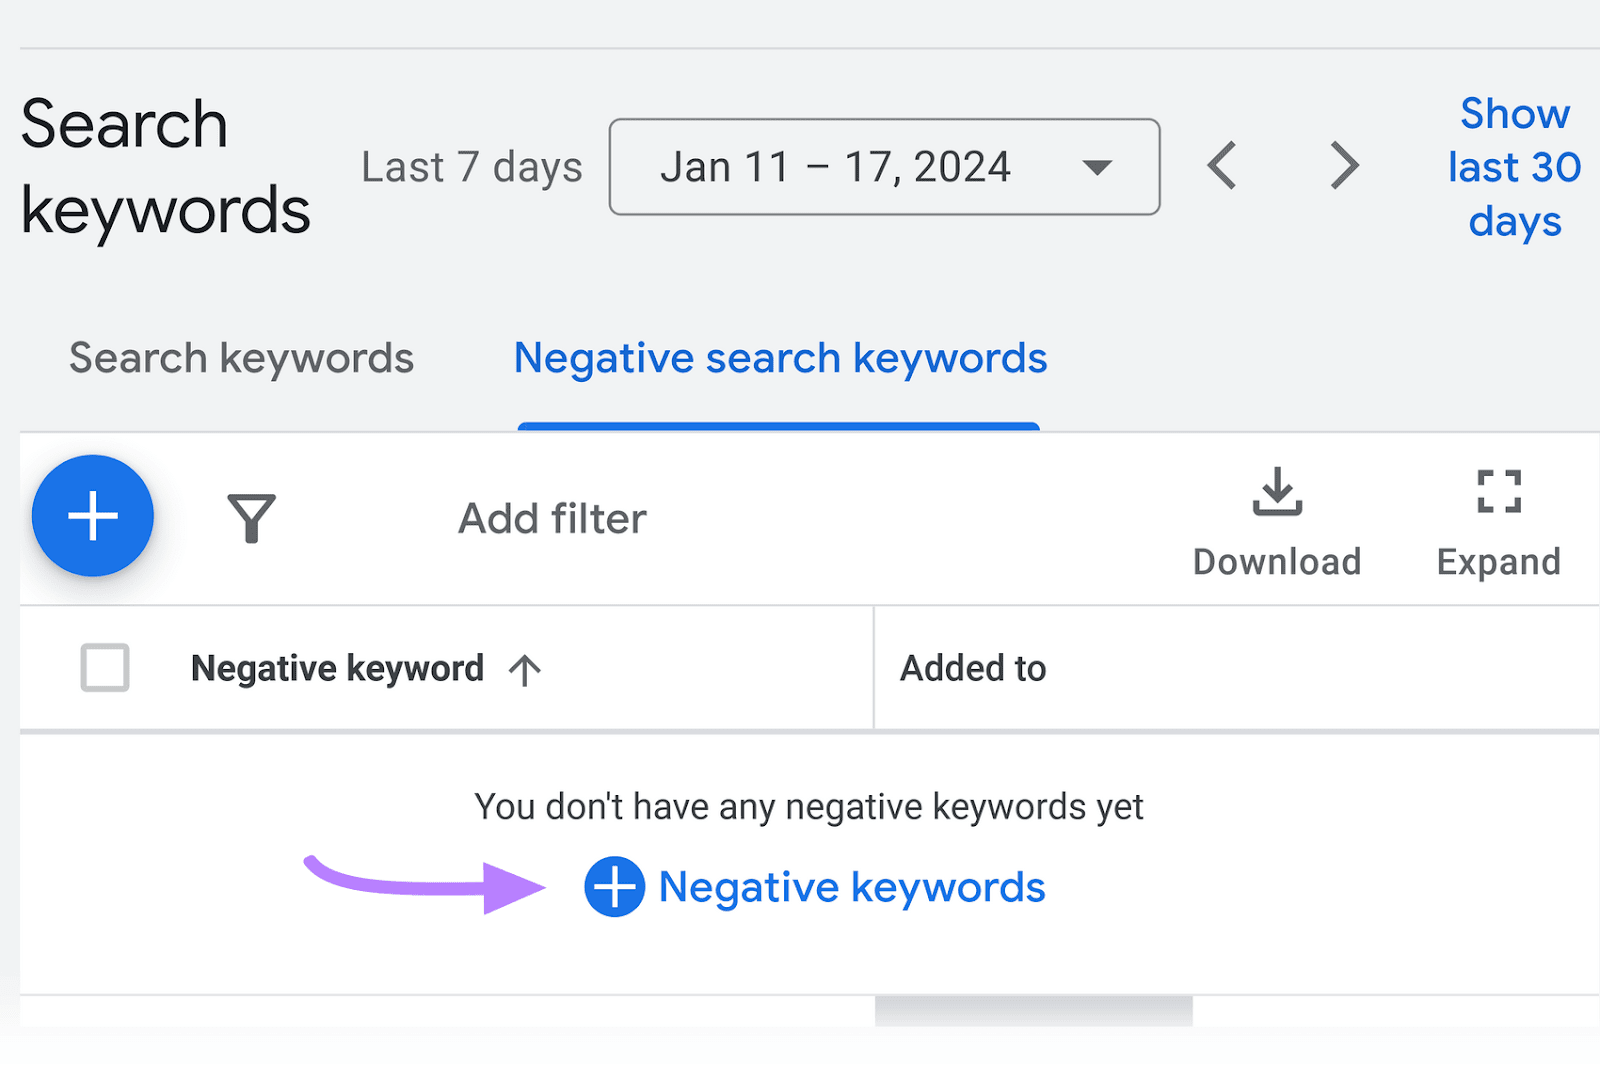
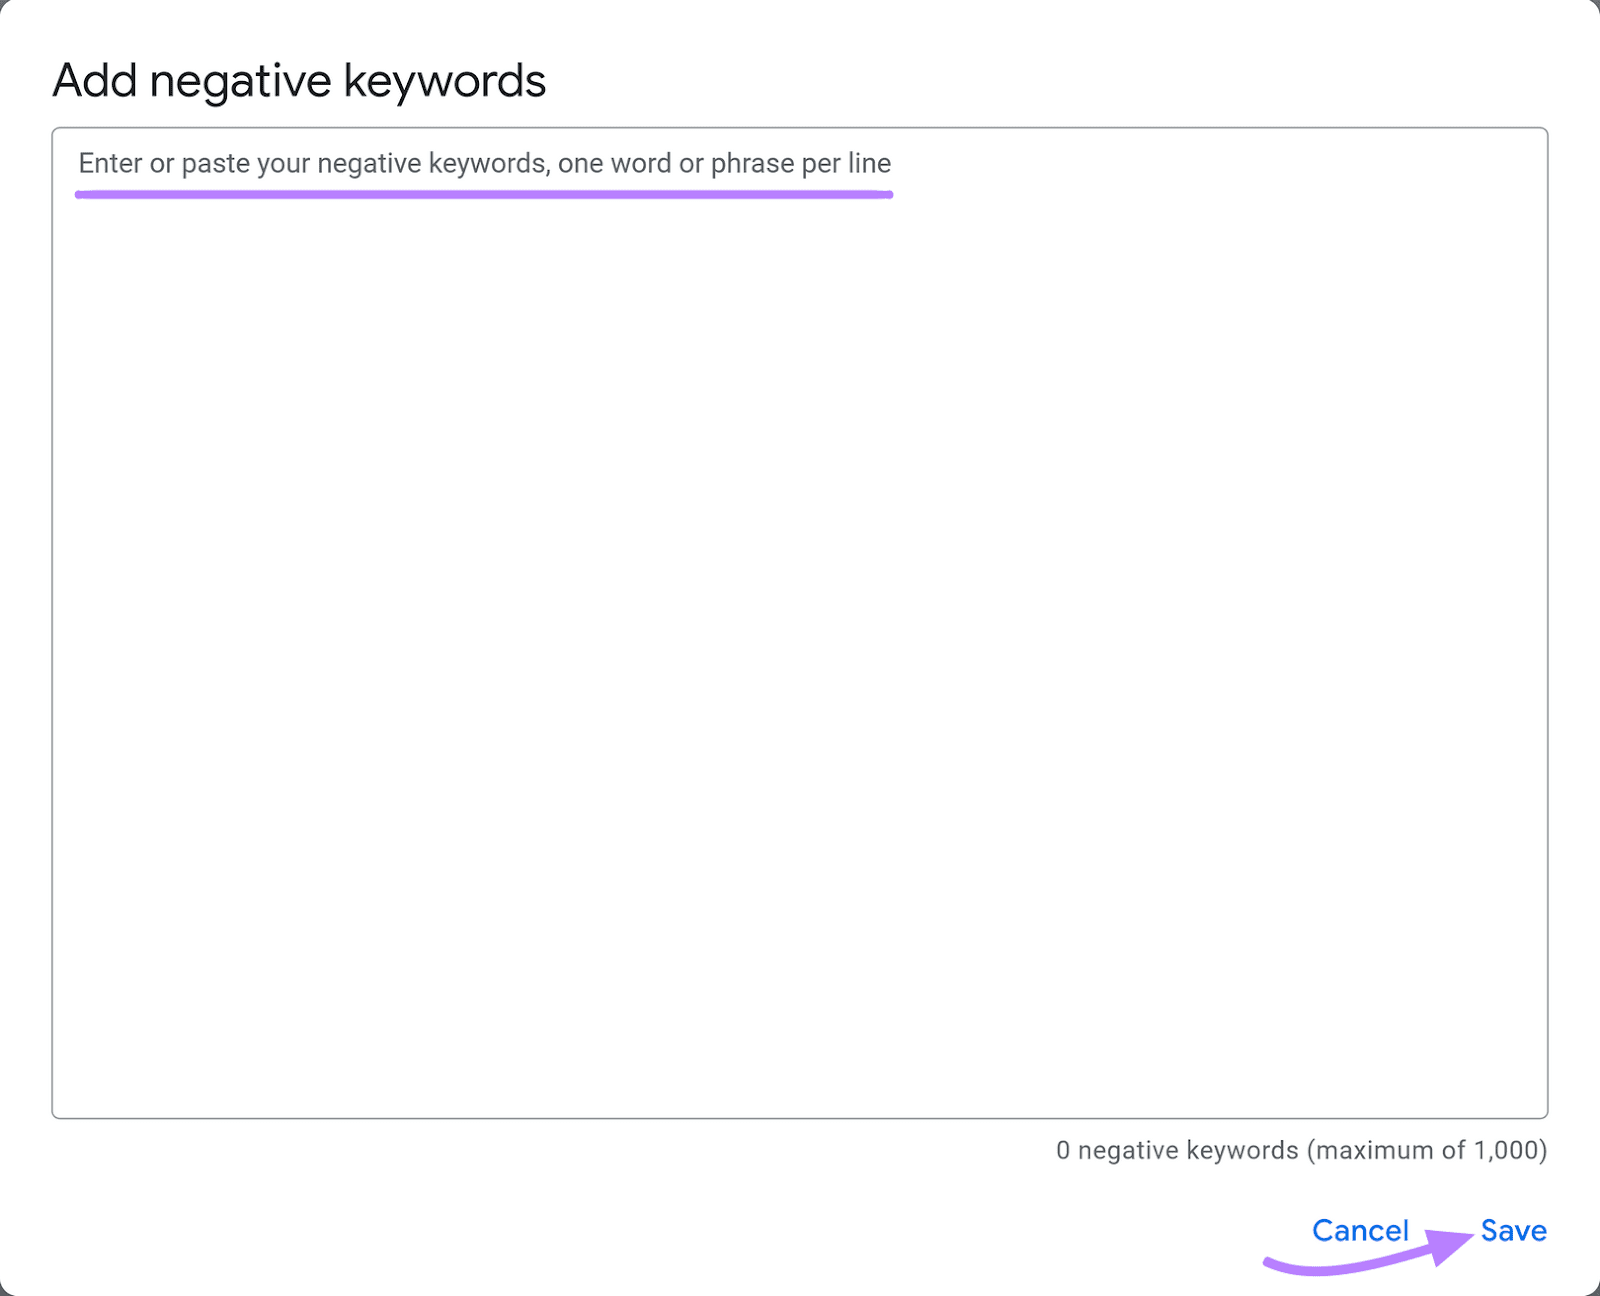
To add negative keywords, go to “Campaigns” > “Audiences, keywords, and content” > “Search keywords.” Then click on the “Negative search keywords” tab.
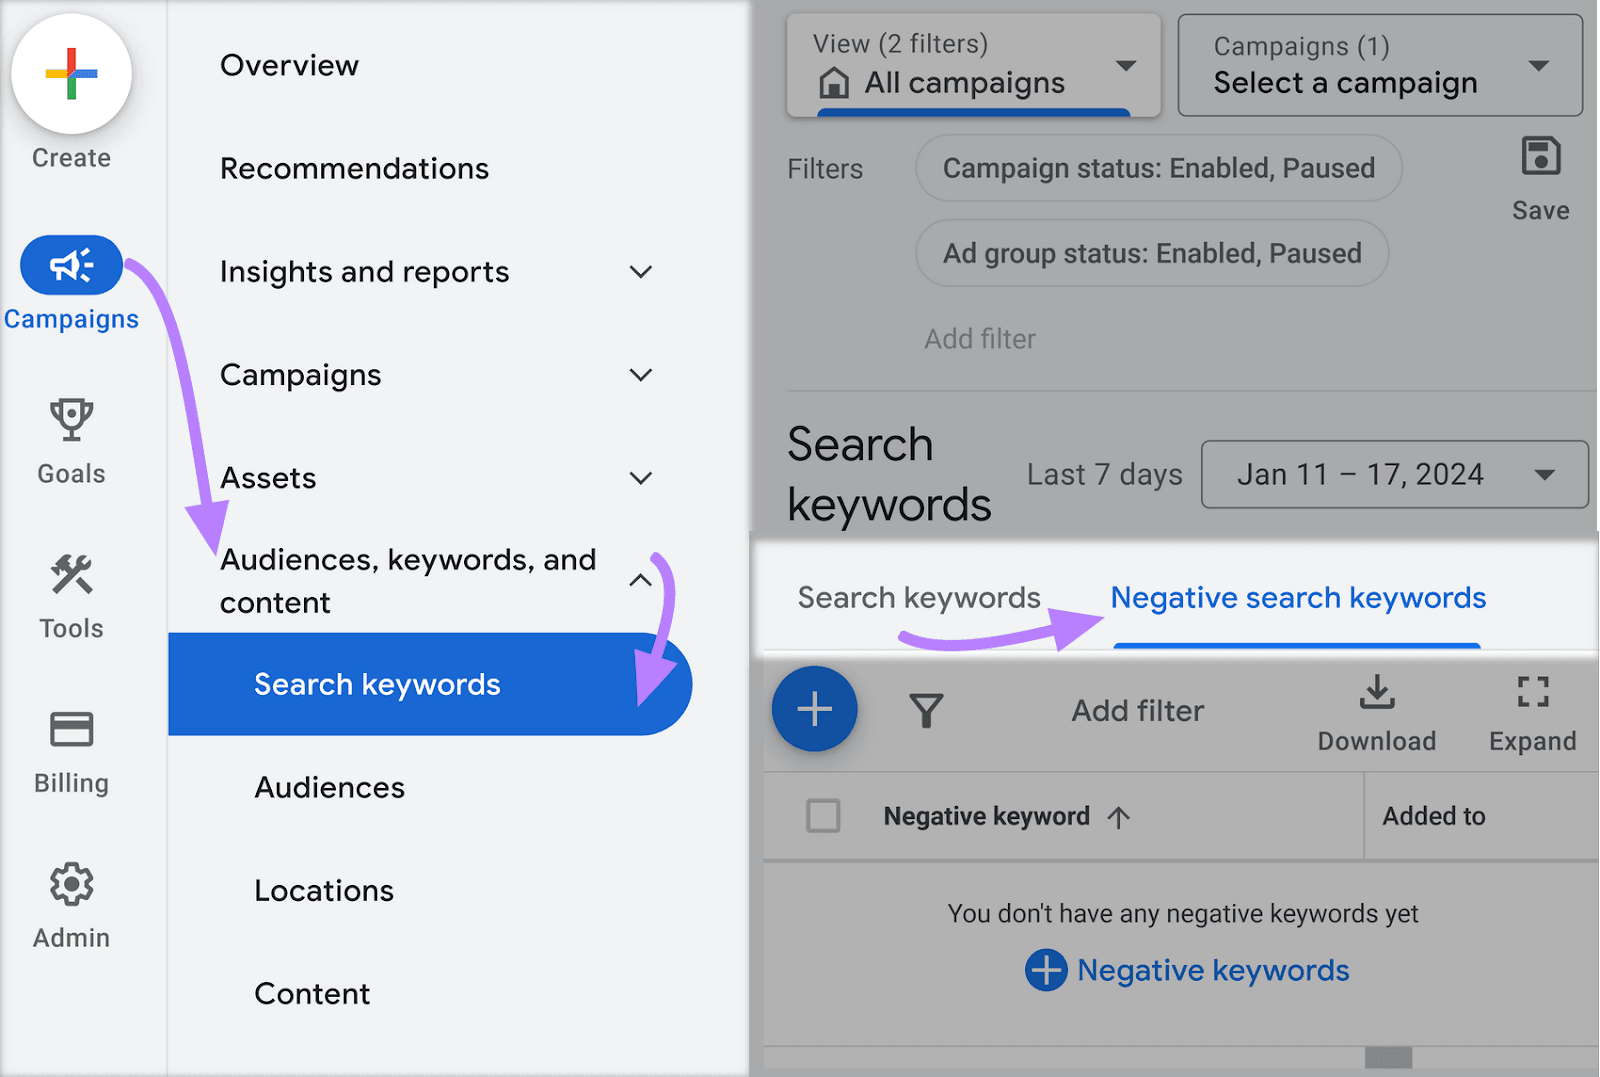
From here, click the “+ Negative keywords” button.
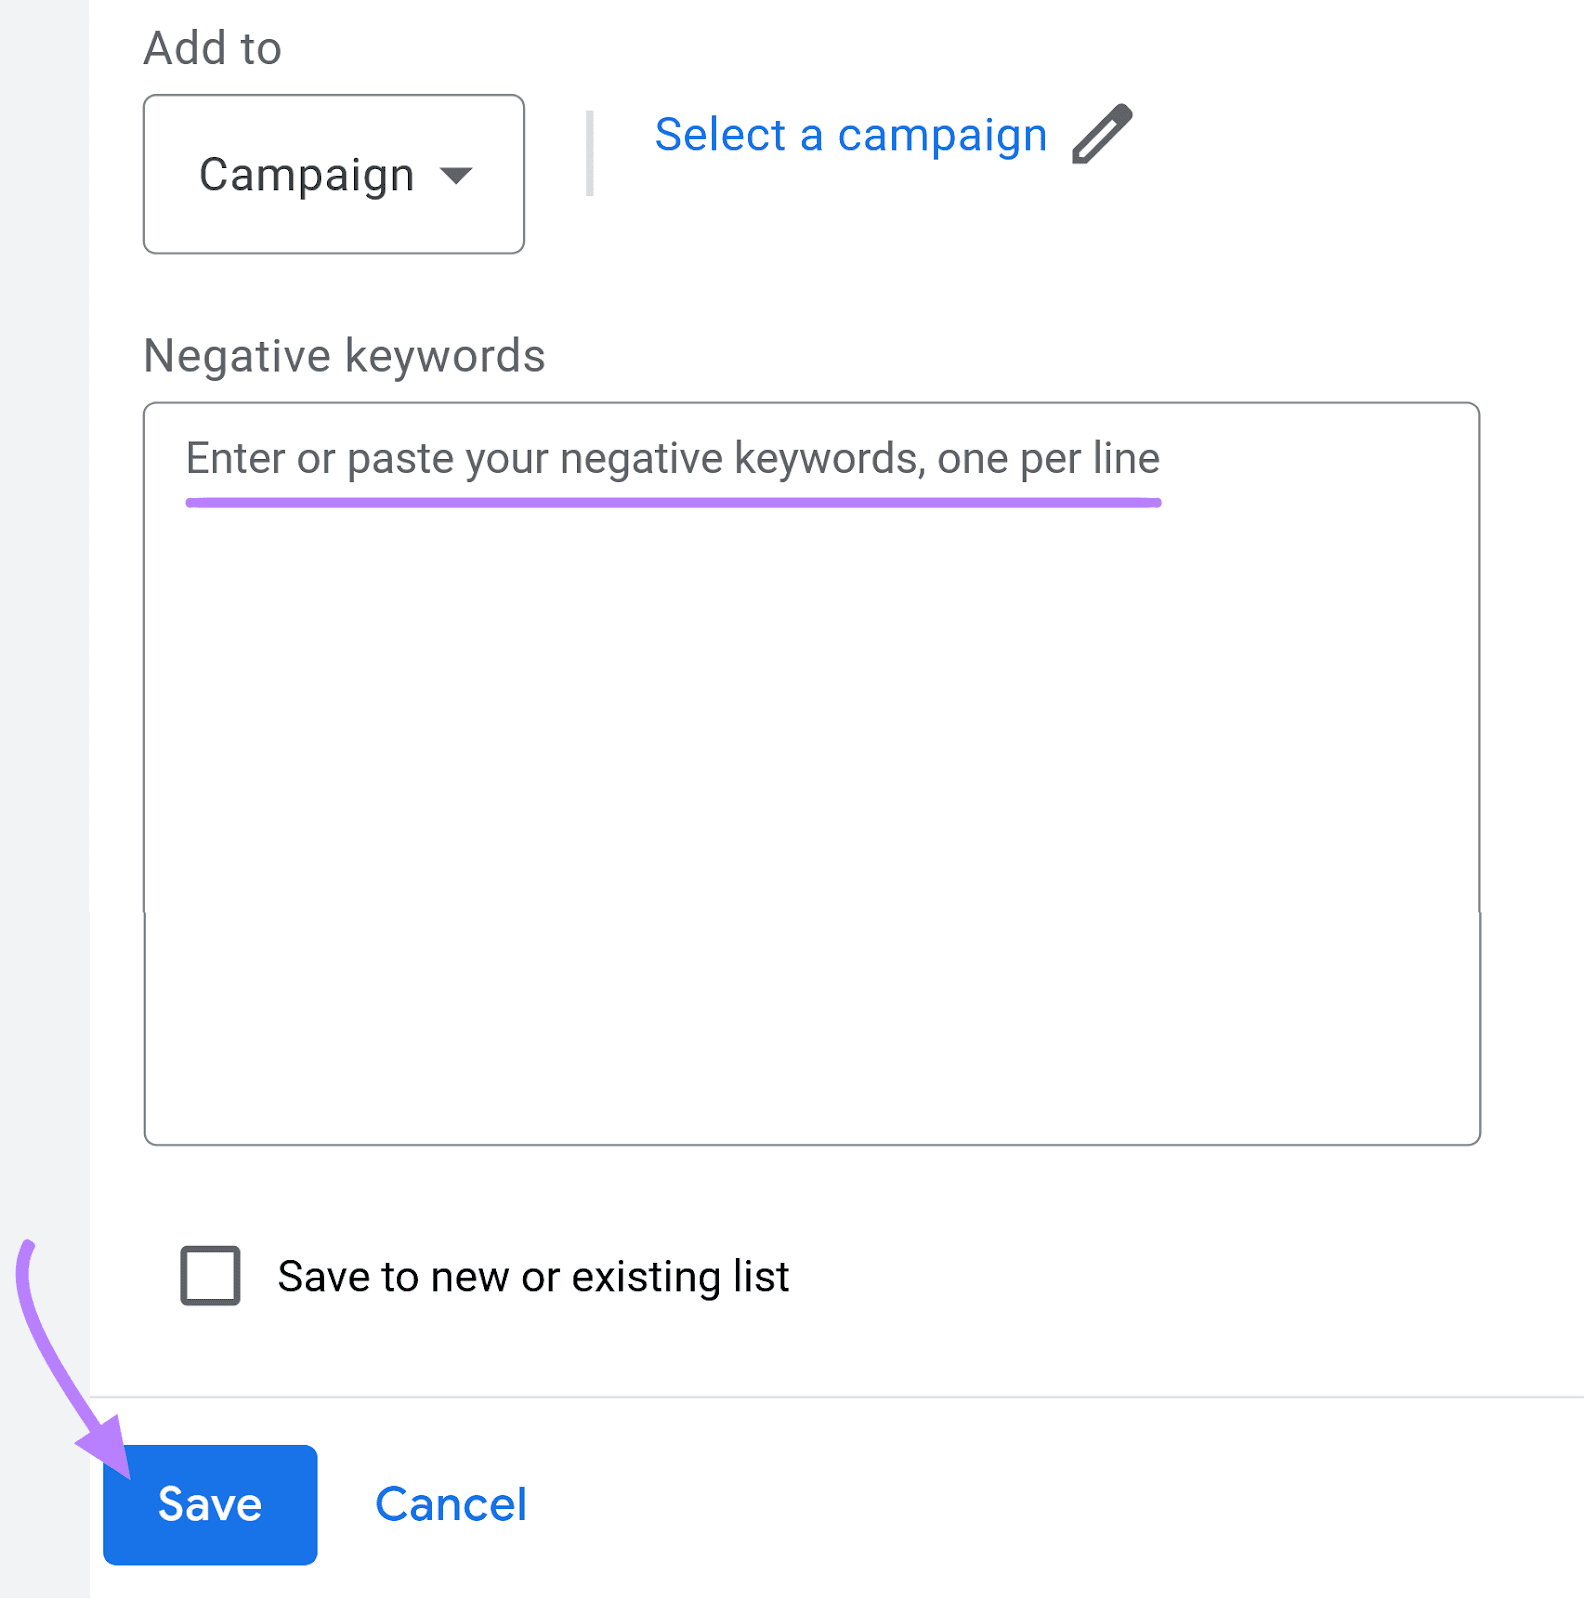
Choose whether you want the negative keywords to apply to an entire campaign or just a single ad group. And then enter or paste your negative keywords.
Click the “Save” button at the bottom once you’ve added all the keywords.
Not sure which keywords to exclude? Check out the “Search terms” report by going to “Campaigns” > “Insights and reports” > “Search terms.”
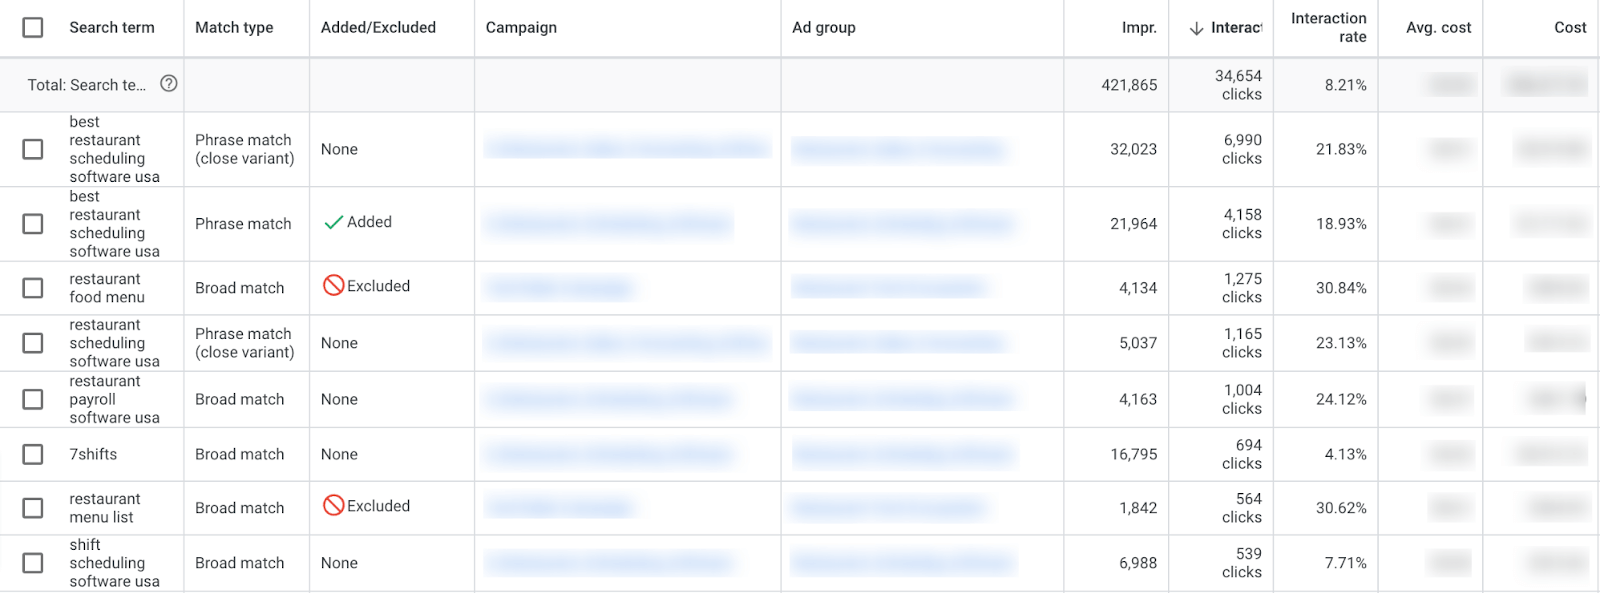
Here, you’ll want to look for two types of keywords:
- Any keywords that aren’t relevant to your business
- Relevant keywords with a lot of clicks but no conversions
Take note of any keywords that fit into the above categories and add them to your negative keyword list to reduce wasted ad spend.
Apart from adding negative keywords to individual campaigns and ad groups, you can also create an account-level negative keyword list that will apply across all your campaigns.
Here’s how:
From your Google Ads dashboard, go to “Admin” > “Account settings” > “Negative keywords.”
Click the “+” button.
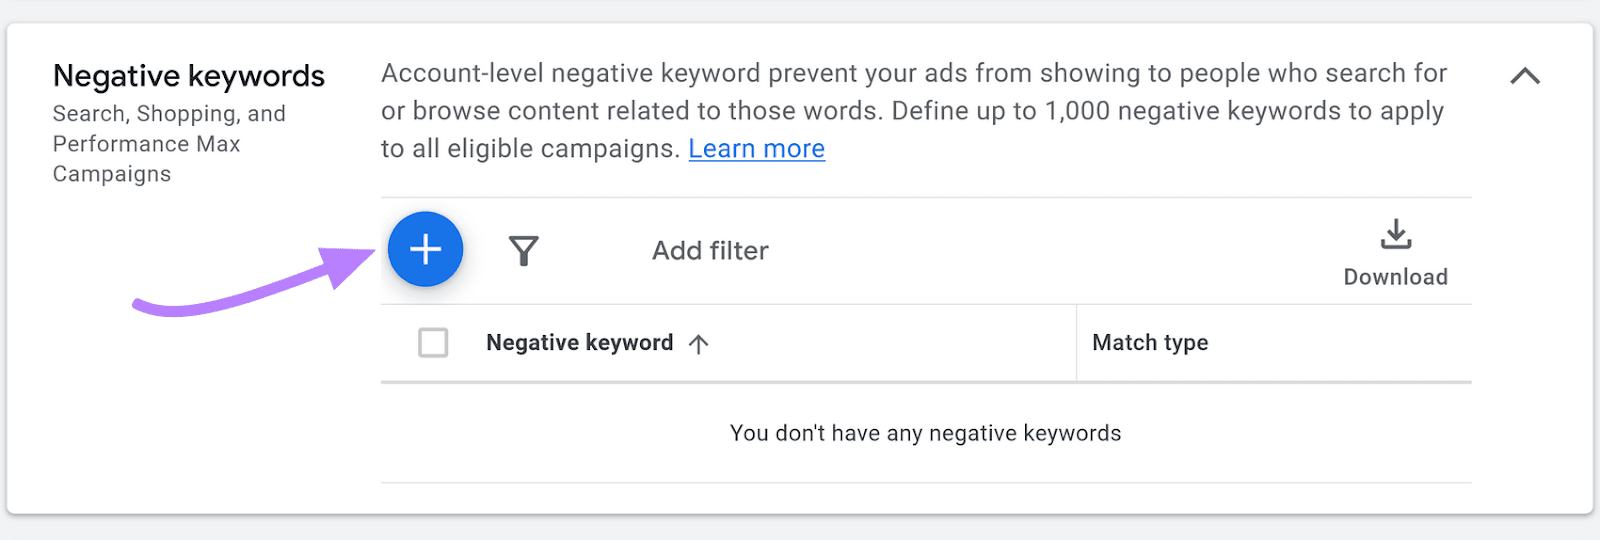
Add your negative keywords and click “Save.”
7. Take Advantage of Ad Assets
Google Ads offers different assets (formerly known as ad extensions) you can attach to your ads. These help provide more information about your offer or company.
They can also increase your visibility in the search engine results pages (SERPs) by taking up more visual real estate. This, in turn, can improve your ad click-through rate and lower your cost per click.
Consider taking advantage of these types of Google Ads assets:
Location
The location asset lets you list your business’ address on a separate line in search results. It looks like this:
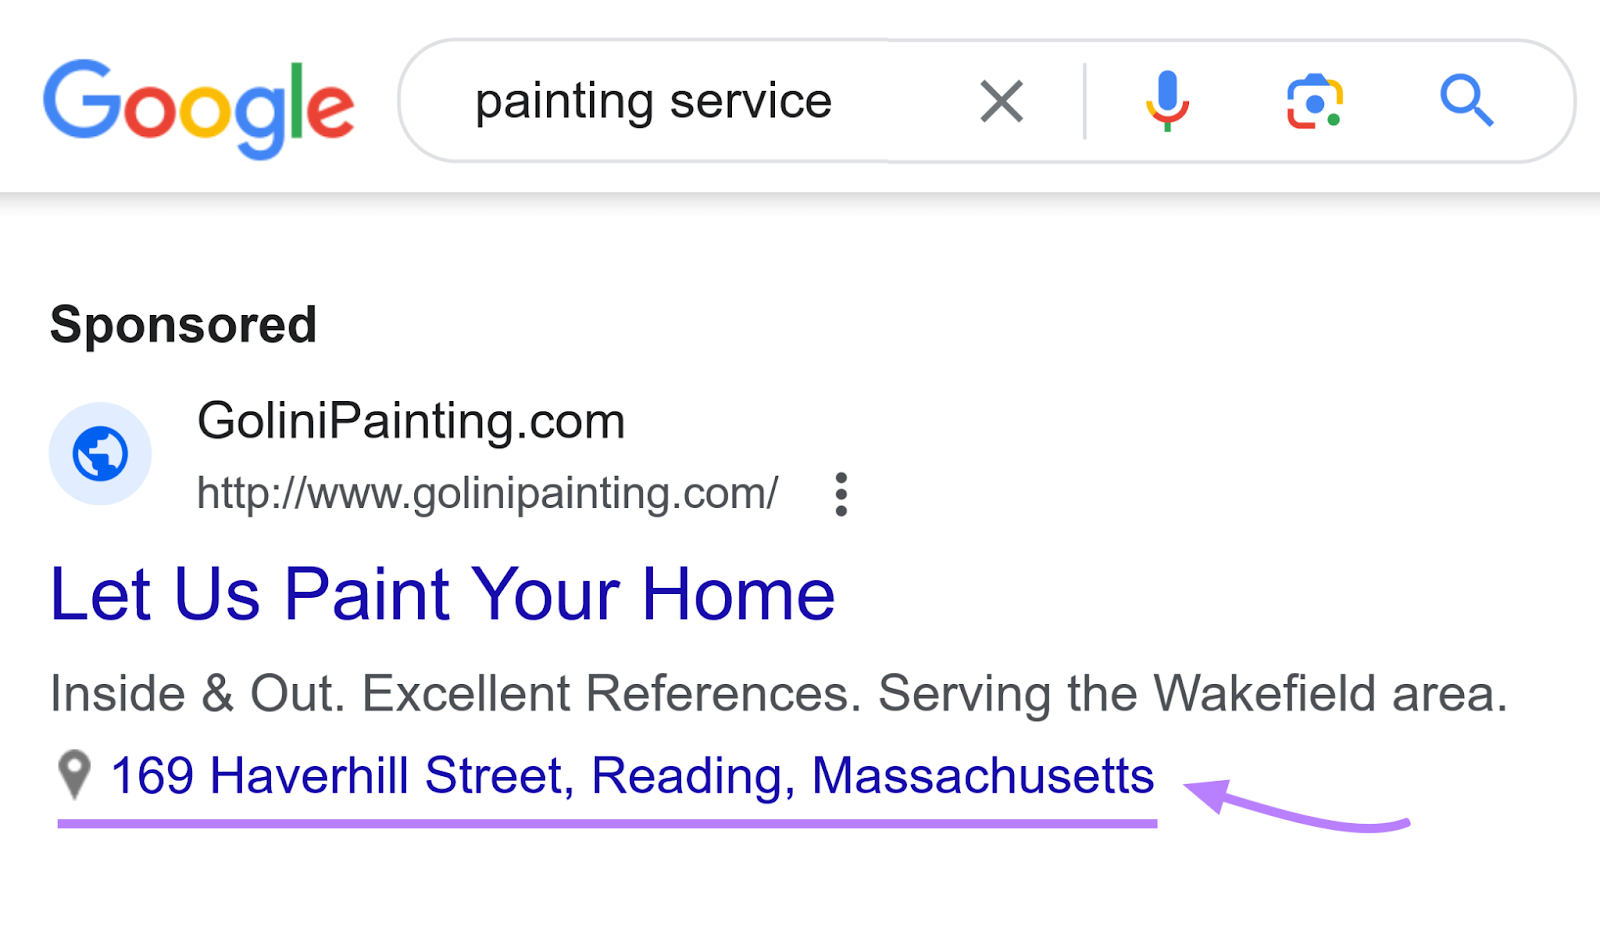
This is a very useful ad asset if you run a brick-and-mortar business that relies on in-person visits. Because it helps people find your physical location more easily. Users can simply click on the address and get directions on how to reach it.
Sitelinks
The sitelink asset lets you specify other pages you’d like to direct users to apart from your main landing page.
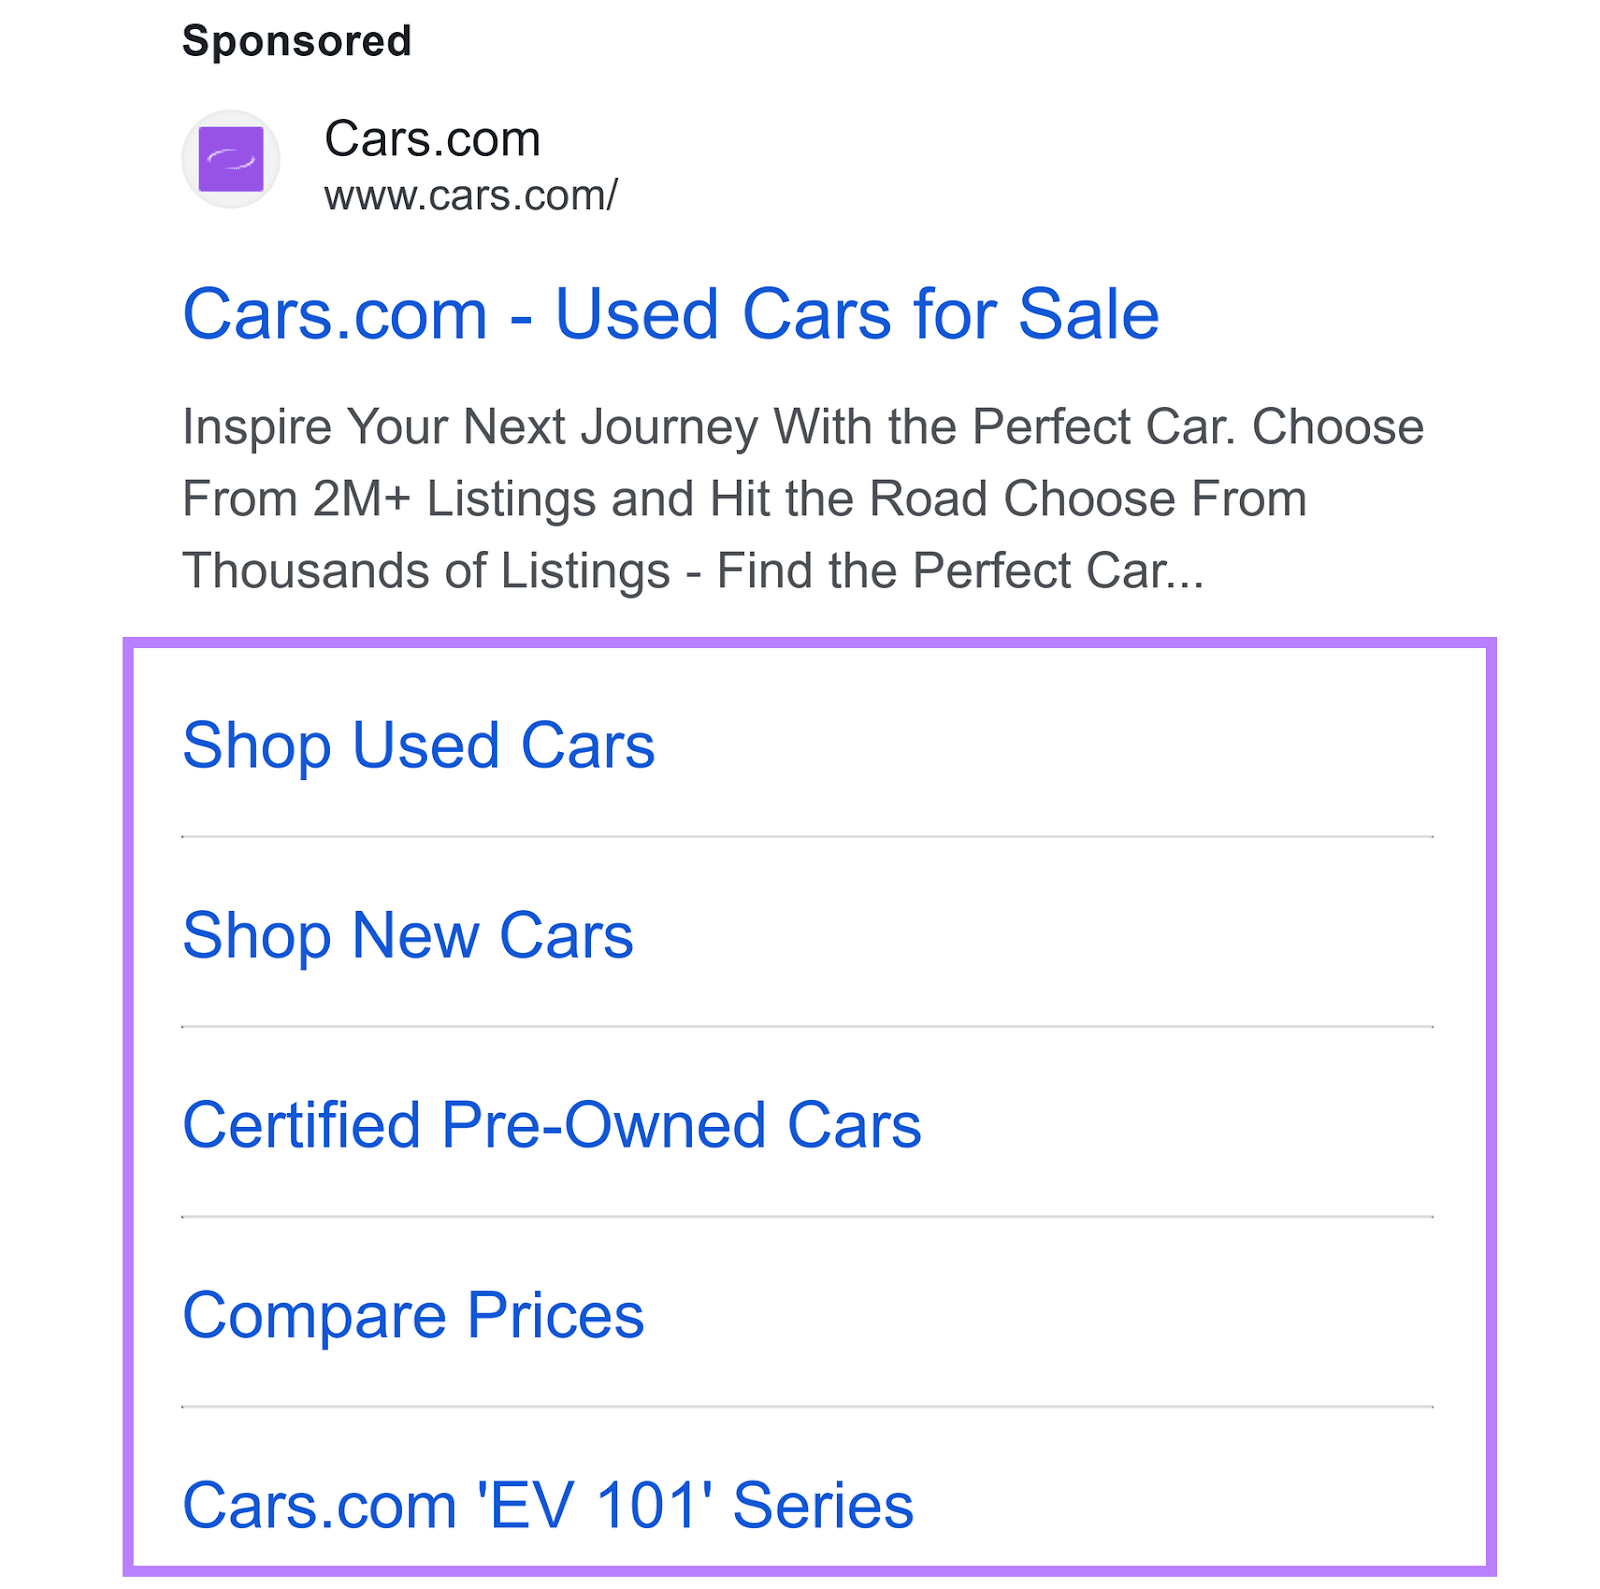
Image Source: Google Ads Transparency Center
You can use this as an opportunity to link to category pages, an FAQ page, pages with reviews or testimonials, or any other page you’d like potential customers to see.
Seller Ratings
With the seller ratings asset, you get the option to display a rating for your business based on reviews Google gathers from various online sources.
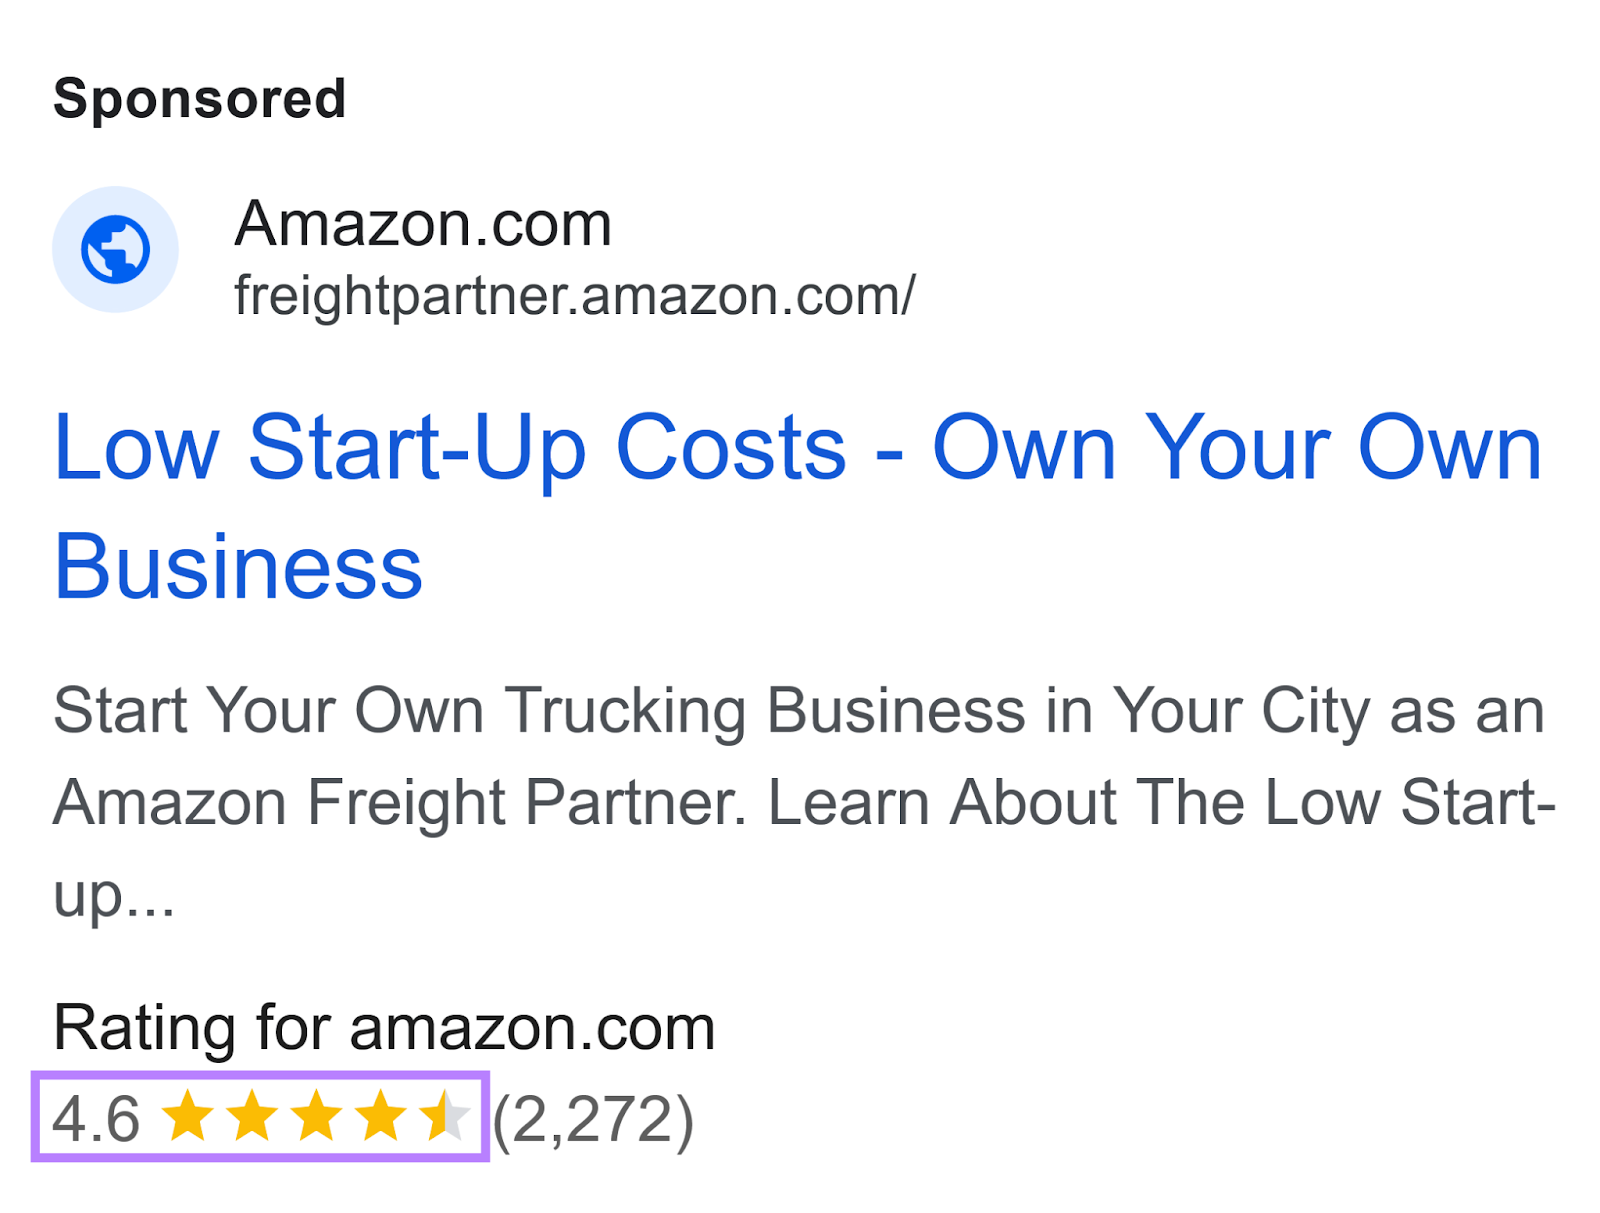
Image Source: Google Ads Transparency Center
This can be a great way to show visitors that your business is trustworthy.
Callouts
You can use the callout asset to highlight important information, such as your best-selling products, a free shipping offer, or your unique selling point (USP).
They’re added after your description text, and it’s a useful way to add important information you couldn’t fit within the description character limit.
Here’s what an ad with a callout asset looks like:
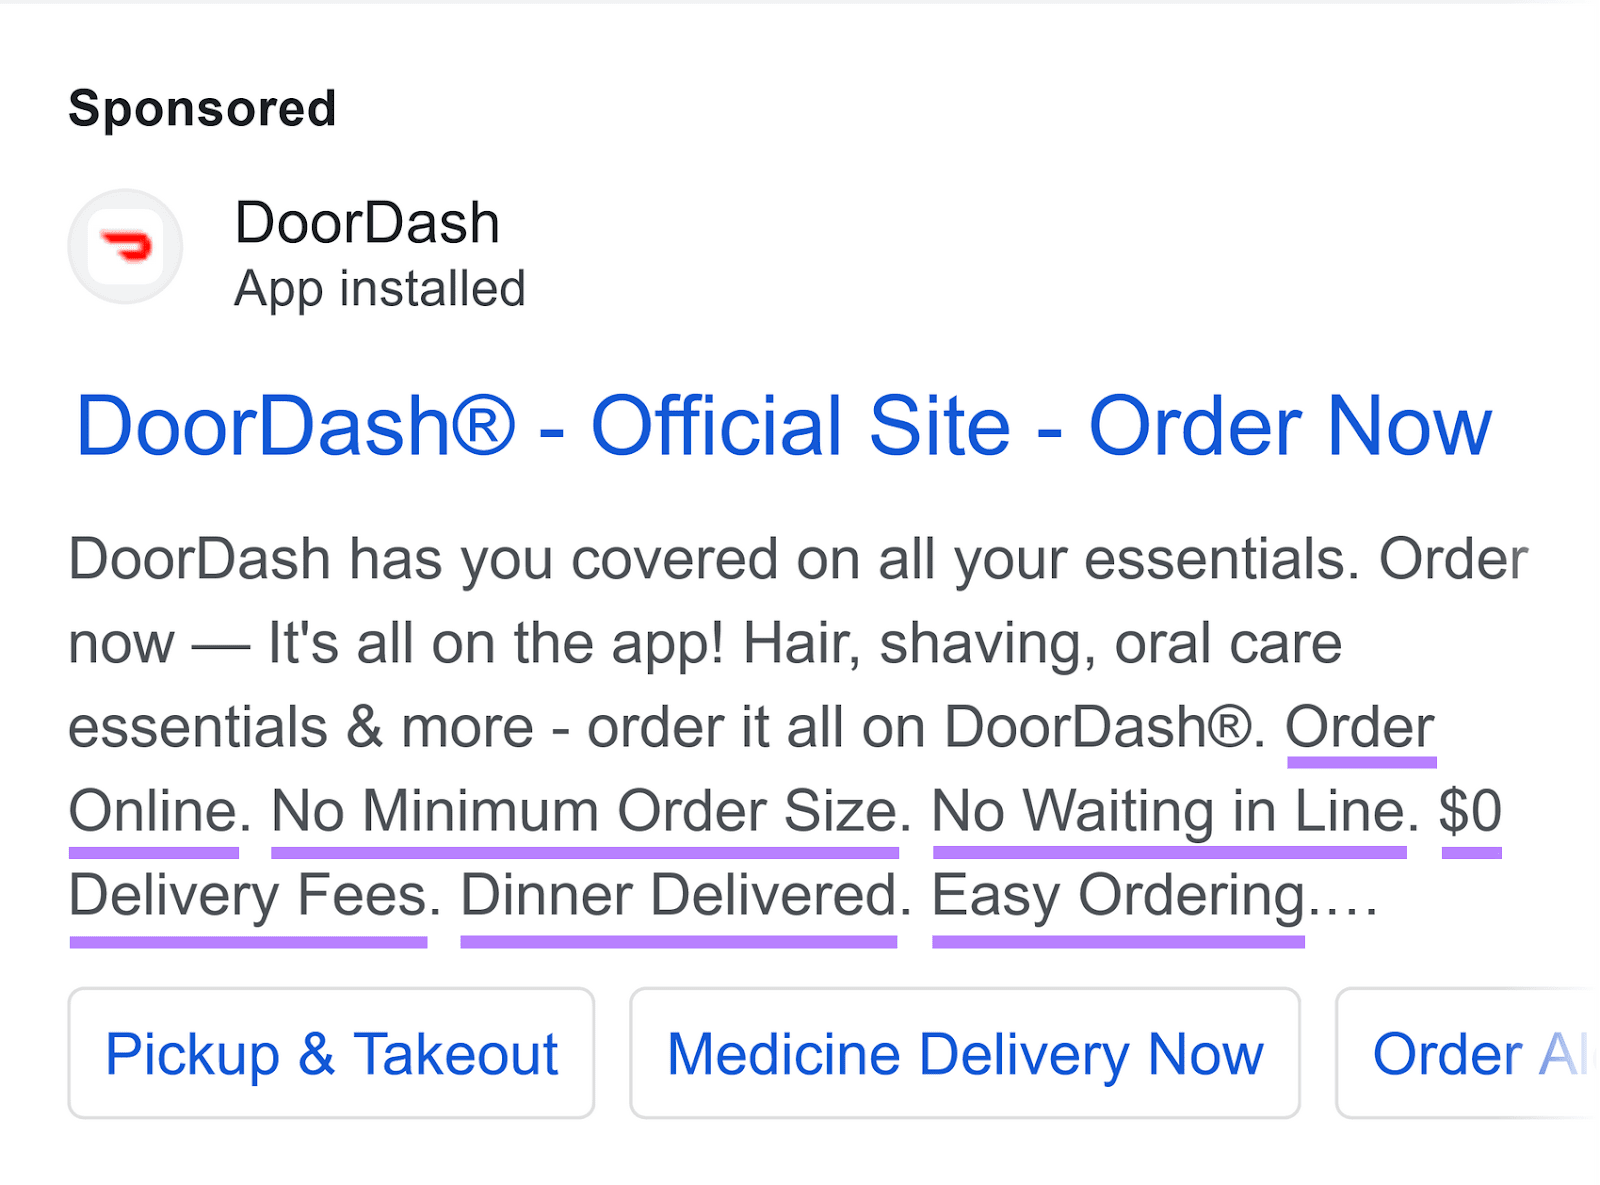
Image Source: Google Ads Transparency Center
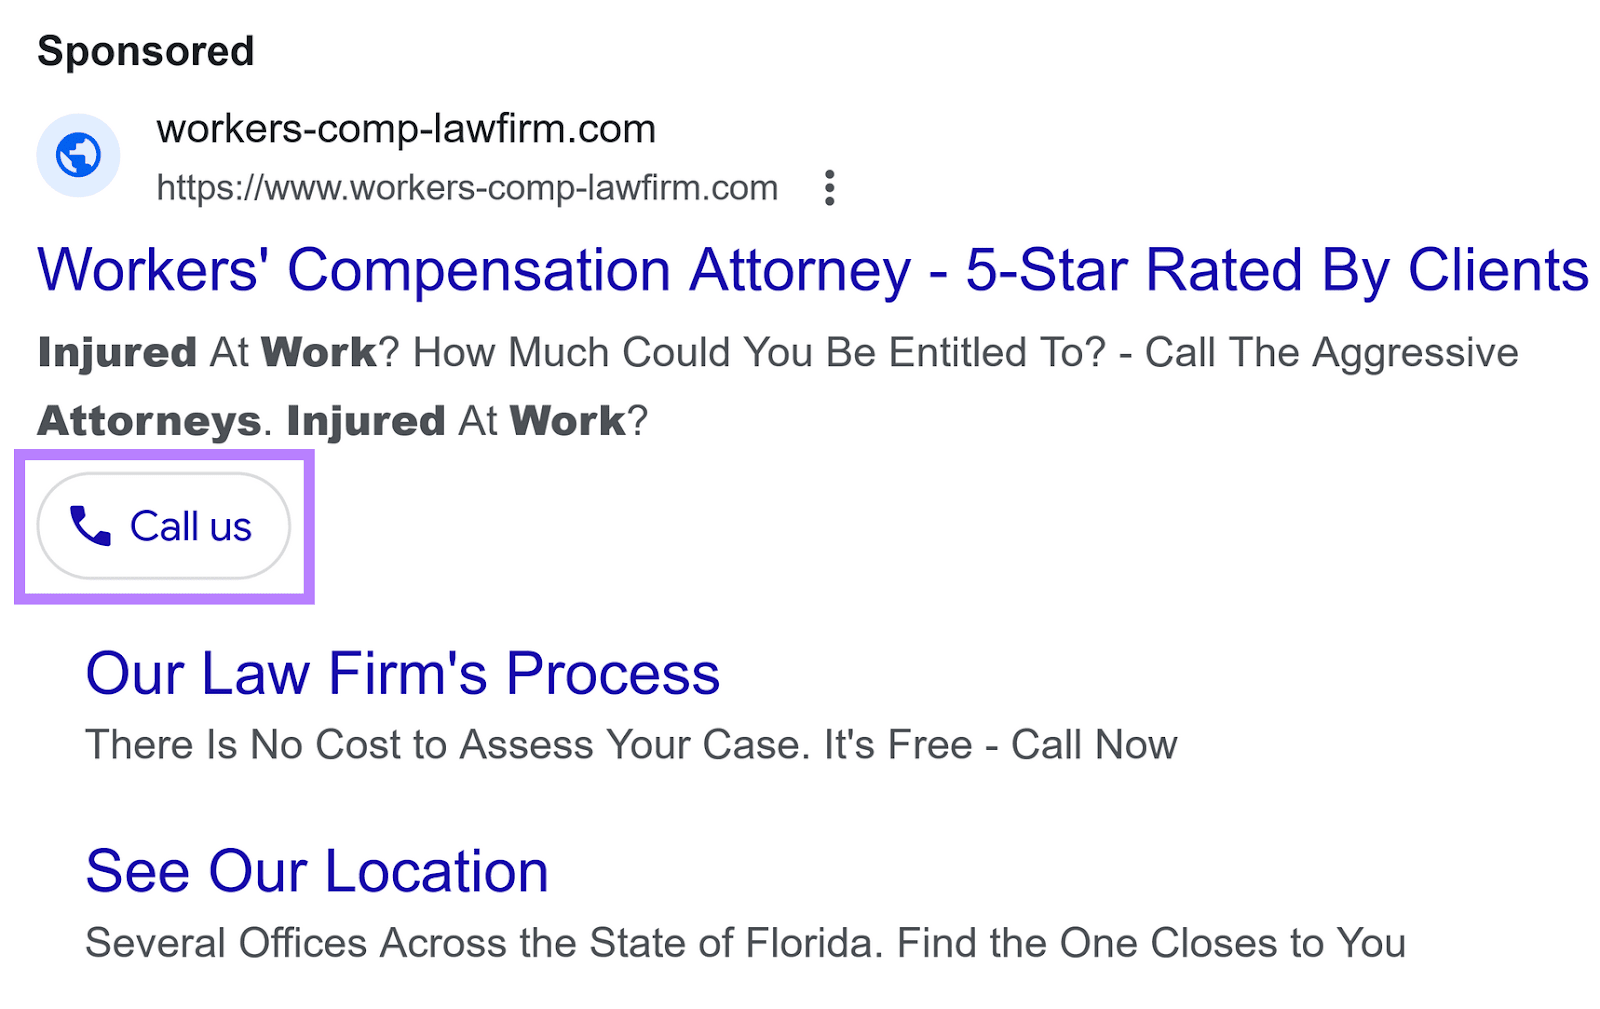
Calls
If your business relies on customers making a phone call to book an appointment or ask for a quote, you can use the calls asset to make it easy for them to get in touch with you.
This way, potential customers will be able to call your business directly from the ad:
8. Test Location Targeting and Ad Scheduling
Before we wrap up, we need to go over two more tactics that can help you get better results with your Google Ads campaigns: location targeting and ad scheduling.
Keep in mind that these tactics won’t always result in improved performance—you need to test and see if they produce results for your business.
Location Targeting
Google gives you the option to target specific locations with your ads. If you use location targeting, your ads will only be shown to people in locations you specify.
This can be useful for a number of situations:
- If you own a physical business, such as a hardware store, you may want to only advertise to people in your area
- Ecommerce businesses that only ship to specific locations might want to avoid advertising to users in other locations to reduce ad spend
- If you sell any type of high-end or luxury products or services, you might want to focus on advertising to people in more affluent areas
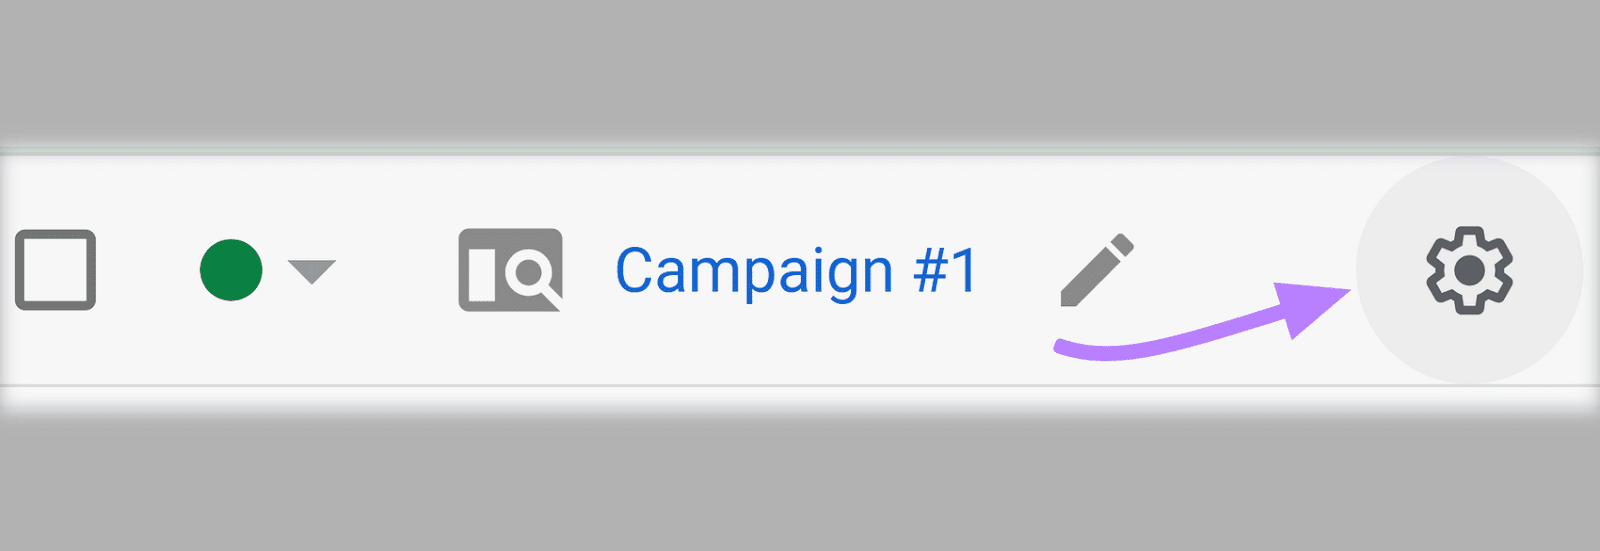
To set up location targeting for a campaign, go to the “Campaigns” section in your Google Ads dashboard and click on the cog icon next to the campaign name to access the campaign settings.
In the “Settings” pop-up, click on the “Locations” drop-down and enter the location you’d like to target in the search box. You can target countries, cities, regions, or ZIP/postal codes. Once you add all the locations you want to target, click “Save.”
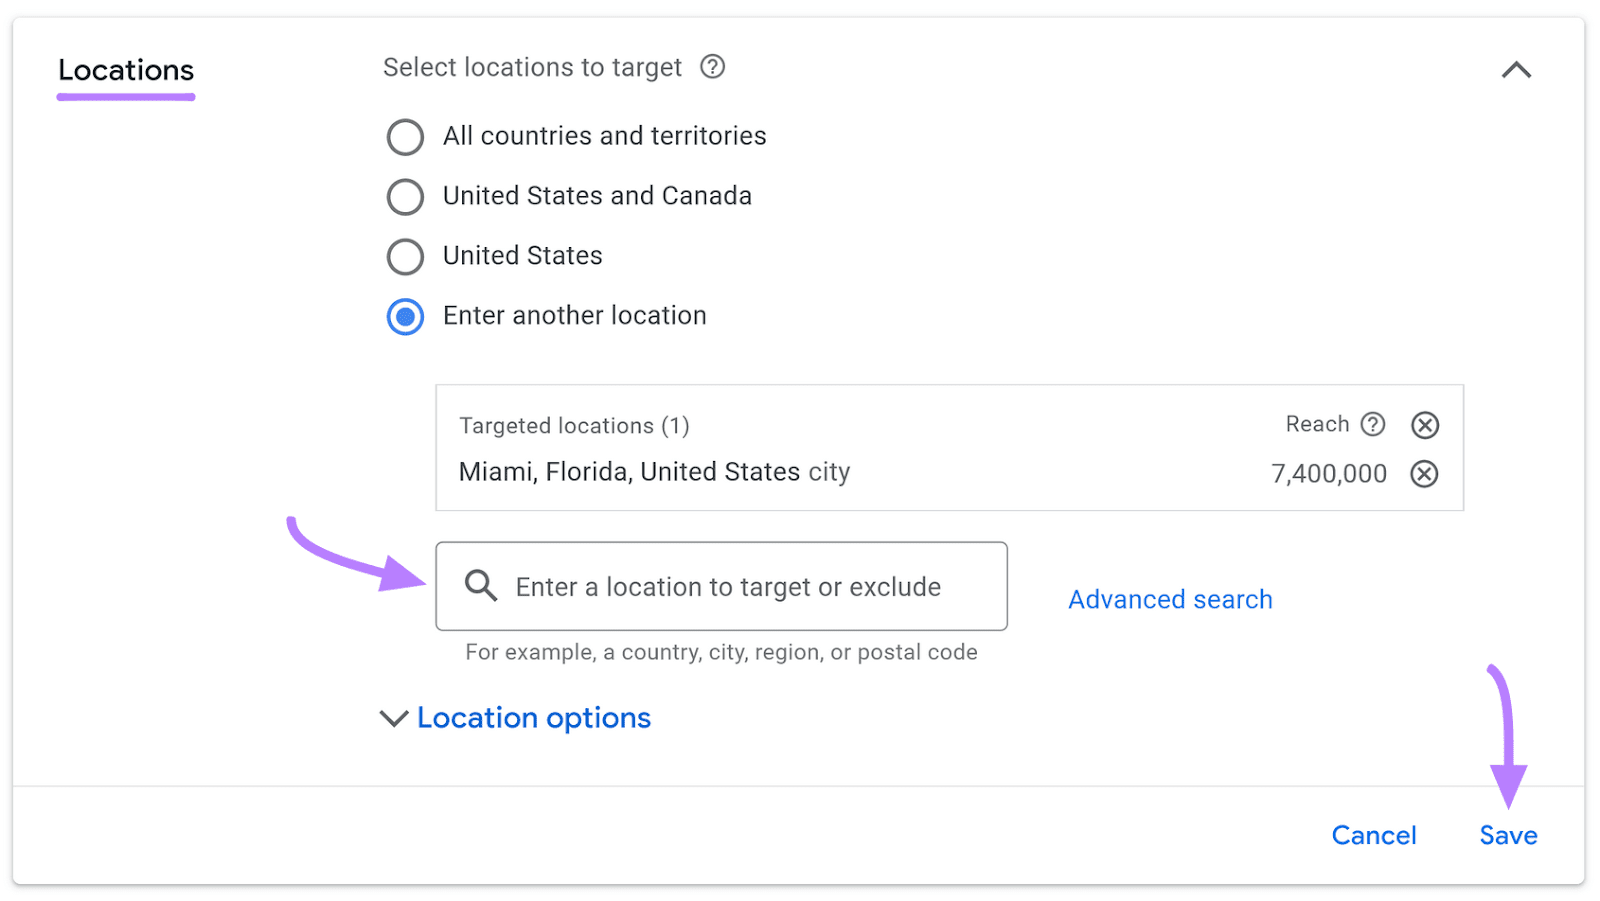
That’s it. Your ads will now be shown only to people in the locations you specified.
Ad Scheduling
With Google Ads, you have the option to schedule ads to only run on specific days or during certain times of the day. This is sometimes referred to as dayparting.
Ad scheduling isn’t necessarily useful for every type of business. As a rule of thumb, if you see that your cost per conversion is relatively even across different days of the week or times of the day, there may be no need for you to use ad scheduling.
But if your business experiences peak times or days where you usually experience spikes in clicks or conversions, you should consider ad scheduling.
For example, imagine you operate a kayak rental business. You notice that the number of ad clicks and bookings usually increases on Thursdays and Fridays (perhaps because people are looking to rent a kayak for the weekend).
In this case, it would be wise to set up an ad schedule to have your ads run on Thursdays and Fridays only, since these days are when your click-through rate and conversion rate are the highest.
Or you could set up bid adjustments to increase your bids during those two days of the week.
Here’s how to set up ad scheduling in Google Ads:
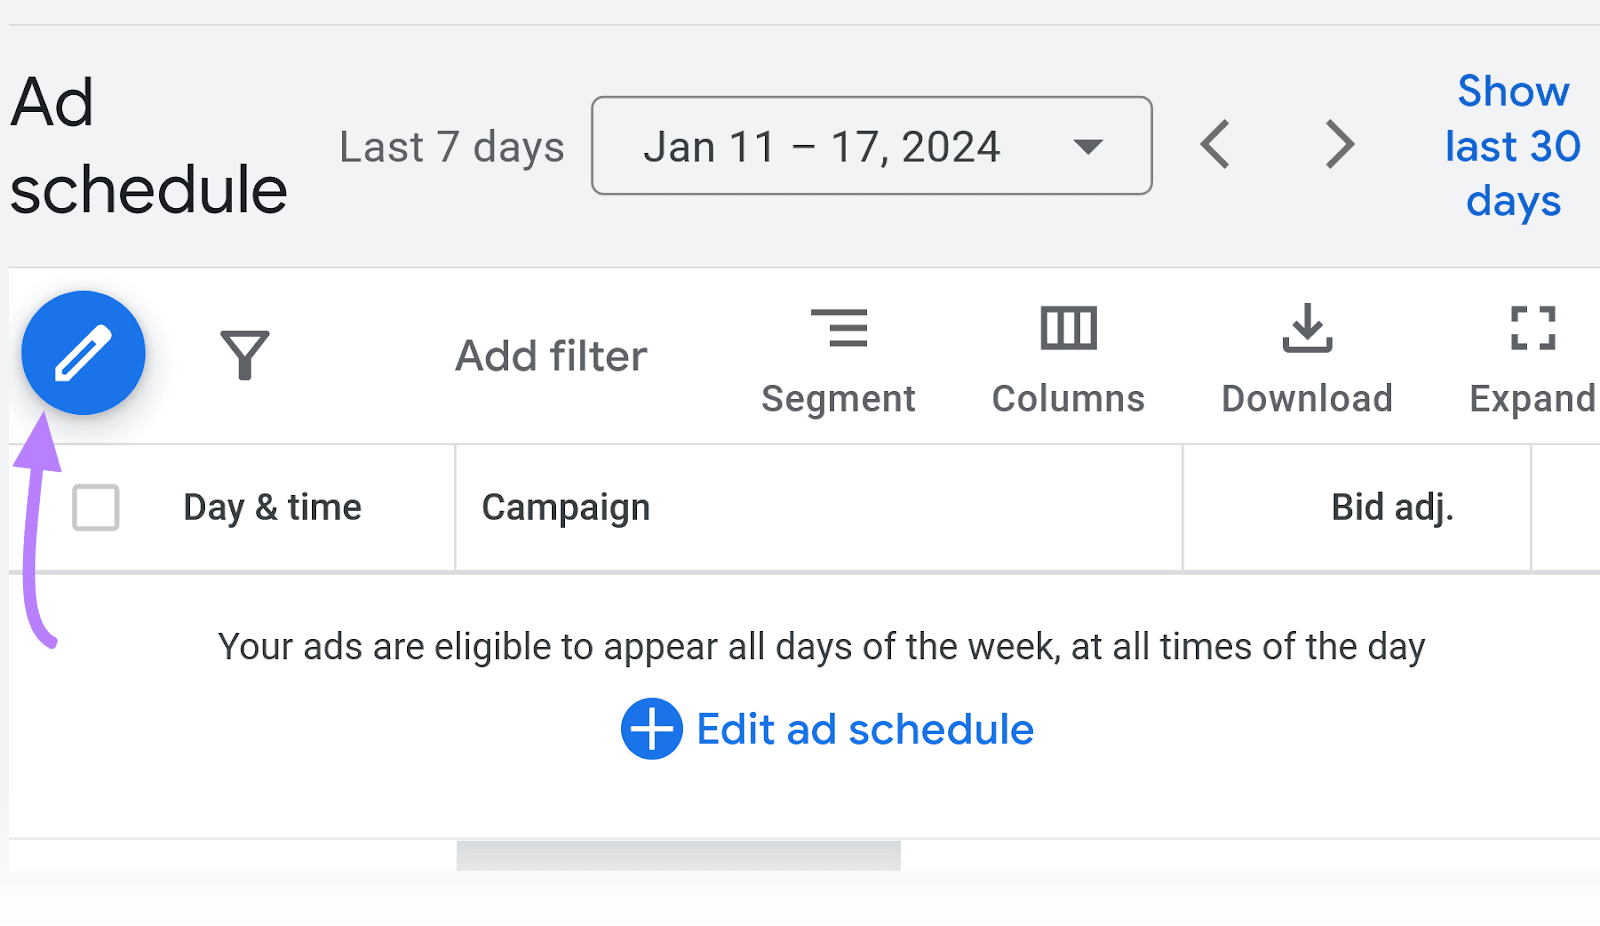
From your Google Ads account, go to “Campaigns” > “Audiences, keywords, and content” > “Ad schedule.”
Click on the pencil icon and select the campaign for which you’d like to create a schedule.
Then, select when you’d like your ads to run and click “Save.”
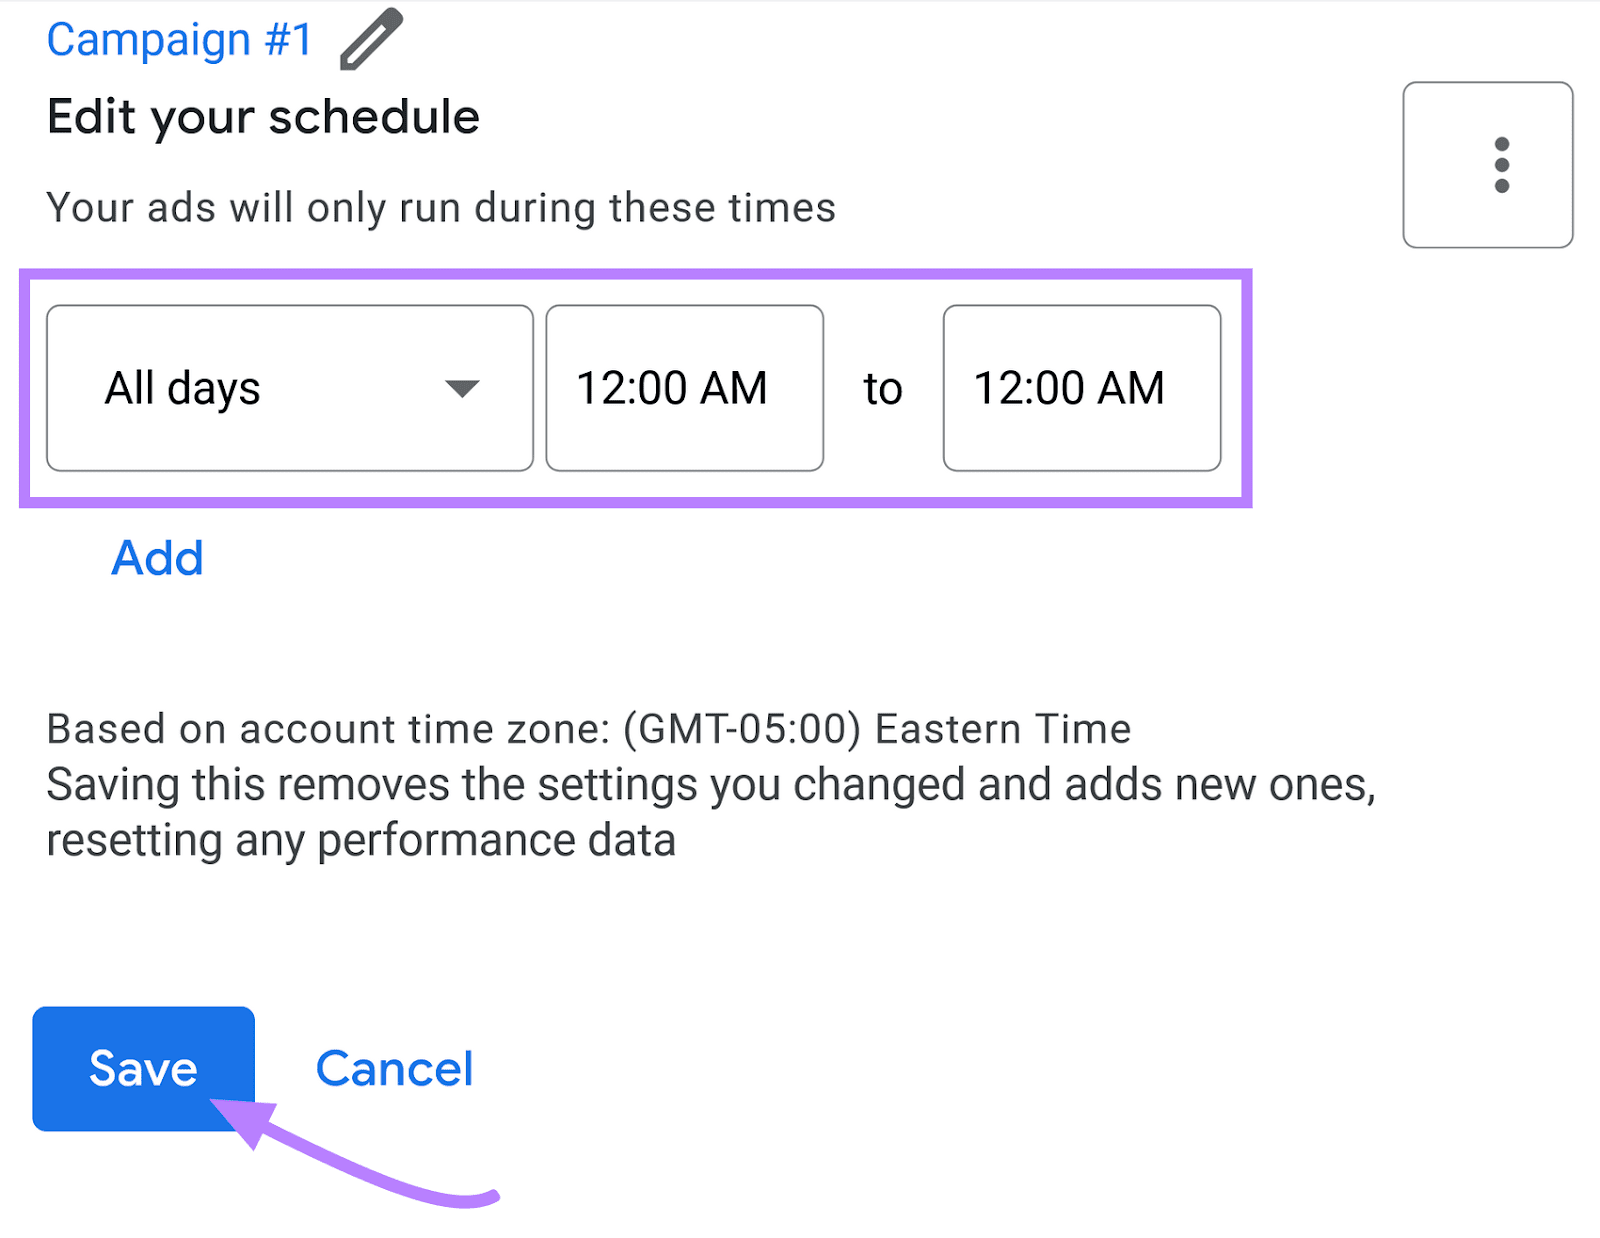
That’s it. You’ve created your ad schedule. You can also test out different ad schedules and see which ones yield the best results.
Maximize Your Return on Ad Spend with These Google Ads Best Practices
When done right, Google Ads campaigns can consistently drive customers and revenue for your business.
Follow the best practices for Google Ads we outlined above to ensure your campaigns are a success.
You can also use Semrush’s tools to make things easier:
- Advertising Research can help you find out which keywords your competitors are bidding on and show you the ad copy and landing pages they’re using for their campaigns
- Keyword Magic Tool shows you keyword metrics like CPC and level of competition
- EyeOn allows you to monitor your competitors’ ad activity
- PPC Keyword Tool makes it easy to plan and organize your Google Ads campaigns
You can access each of these tools and more with a free trial.
