Looking to drive more sales for your ecommerce business through Google Shopping ads?
Read our guide to learn how Google Shopping ads work and how to set up your first campaign. Plus, find out our top strategies for improving your Google Shopping ads campaigns for optimal results.
What Are Google Shopping Ads?
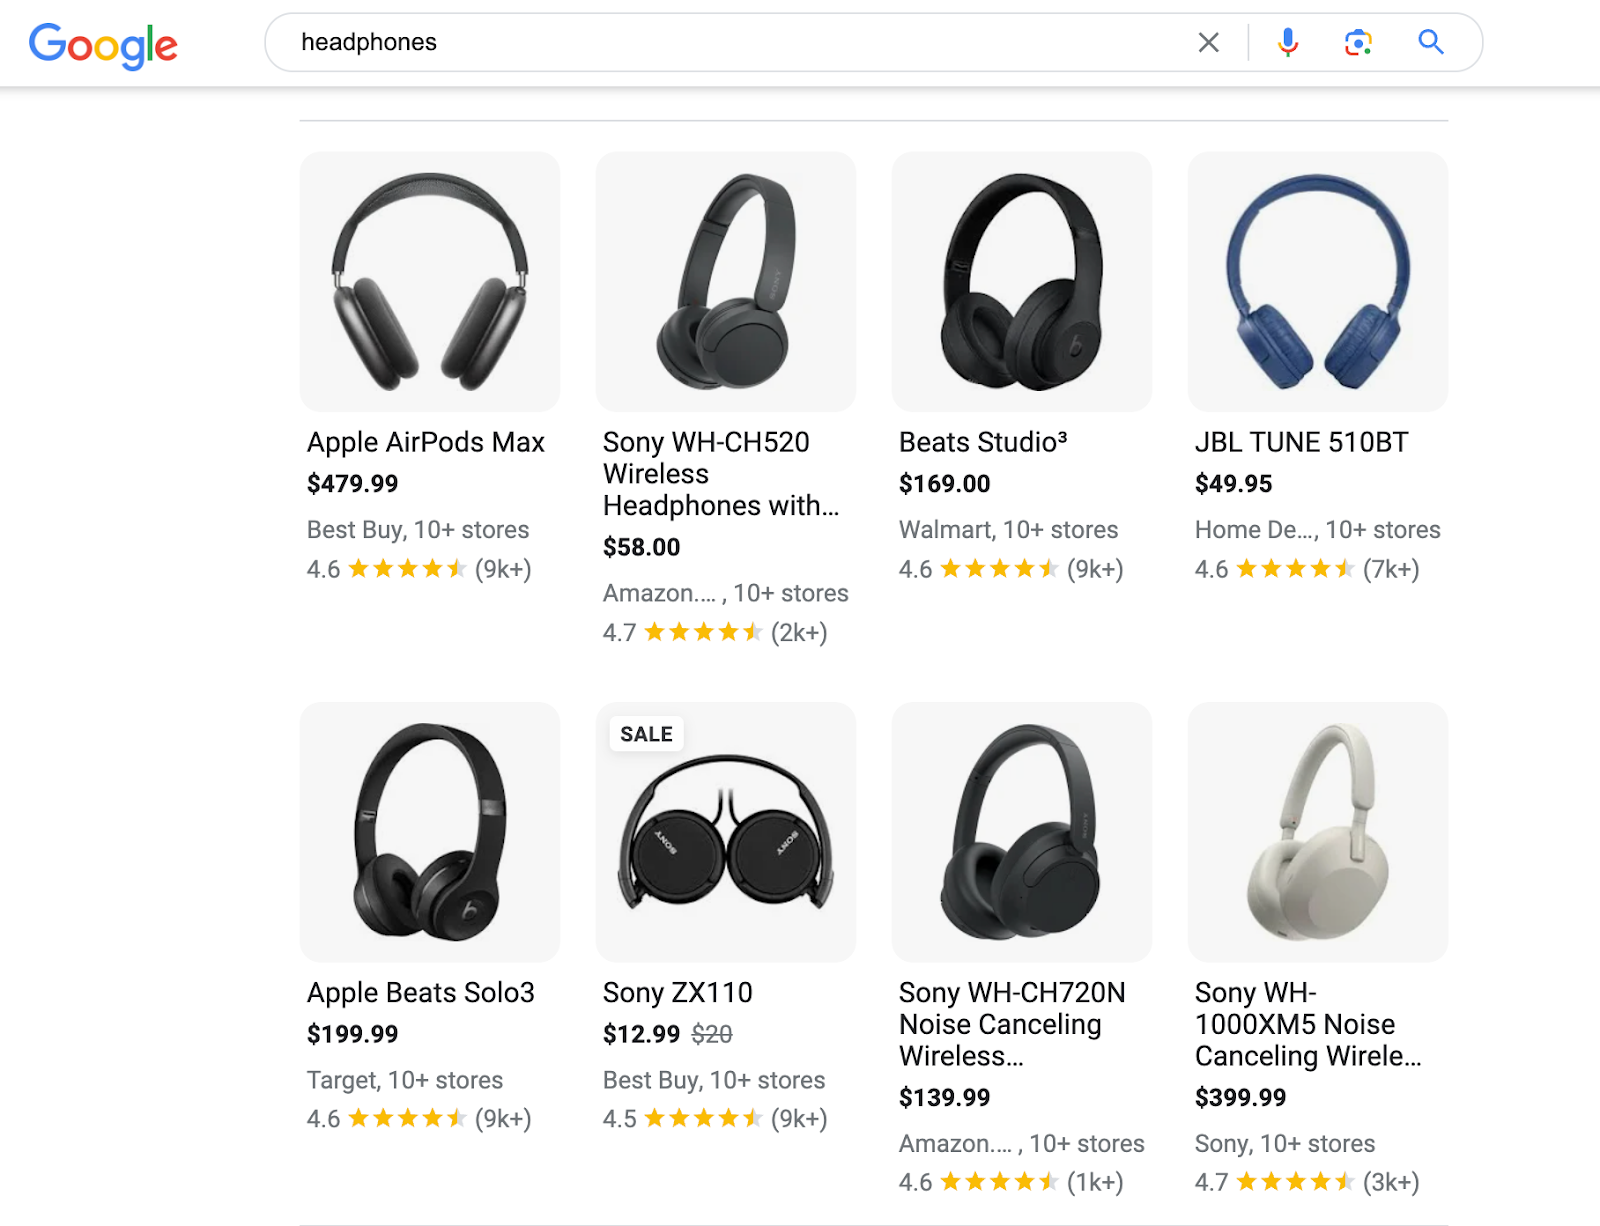
Google Shopping ads are ads for product-related keywords that are usually displayed at the top of Google’s search results.
These ads can also be seen in Google’s Shopping tab, YouTube, the Google Display Network, and Gmail.
Here’s a Google Shopping ads example you might have seen before:
How Google Shopping Ads Work
With traditional search ads, you bid on keywords (search terms) that you want your ads to appear for.
With Google Shopping ads, you upload a spreadsheet containing all your product information. Then, Google displays your ads for searches where it deems your products to be relevant.
Google Shopping ads uses a cost-per-click (CPC) bidding system. Which means you’re charged only when a user clicks on your ad.
Google Shopping Ads vs. Google Search Ads
There are three main differences between Google Shopping ads and regular Google Search ads:
- Targeting: With Google Search ads, advertisers can bid on specific keywords. This isn’t possible with Google Shopping ads.
- Offer: You can promote both products and services with search ads. Google Shopping ads are designed for product promotion only.
- Appearance: Google Search ads are displayed as links accompanied by text. Google Shopping ads are more visually appealing because they include an image of the product.
Which of these two ad formats is best for your needs?
To put it simply, both Google Search ads and Google Shopping ads are suitable for promoting physical products.
If you’re an ecommerce business selling physical products, experiment with both ad formats to see where you’re able to get better results. Keep in mind that Google Search ads and Google Shopping ads can be displayed at the same time for a search query.
If you sell something other than physical products (e.g., professional services, digital products, etc.), you’ll need to go with Google Search ads since your offering isn’t eligible for advertisement through Google Shopping ads.
What Are the Benefits of Google Shopping Ads?
You might be asking yourself—are Google Shopping ads worth it?
They certainly can be. Using Google Shopping ads can help you:
- Reach the top of the SERPs: With Google Shopping ads, you don’t have to work hard to outrank your competition in organic search results—your products can be displayed at the very top of the search results page by default.
- Get a better return on your advertising spend: Google Shopping ads tend to get better click-through rates and conversion rates compared to other types of ads.
- Reach a broader range of customers: Google Shopping ads are displayed in other places compared to regular ads (e.g., on search results pages, the Shopping tab, YouTube, and the Google Display Network). This allows you to promote your products to a broader range of customers.
How to Set Up Google Shopping Ads
In this section, we’re going to go over the process of creating and launching a Google Shopping ads campaign.
Step 1: Create a Google Merchant Center Account
You’ll need a Google Merchant Center account to create a Google Shopping ads campaign. If you don’t have one already, you can create one here.
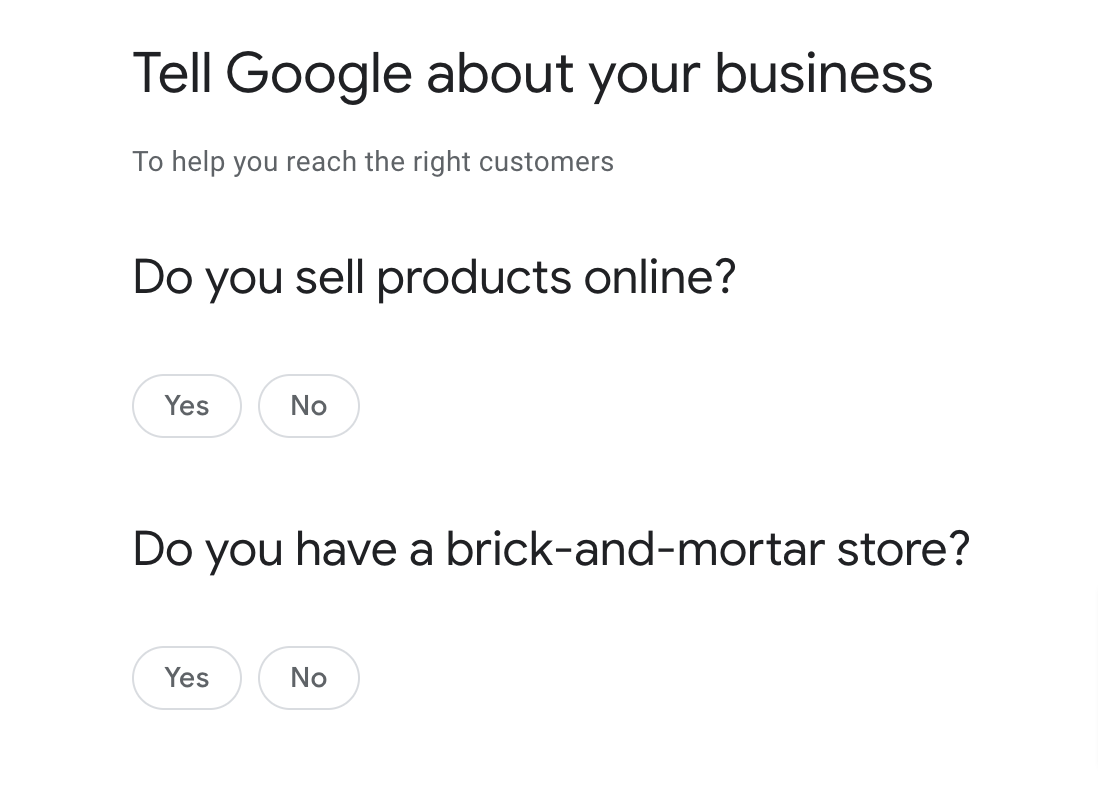
Start the process by clicking the “Sign up for free” button. You’ll then need to answer a few questions about your business.
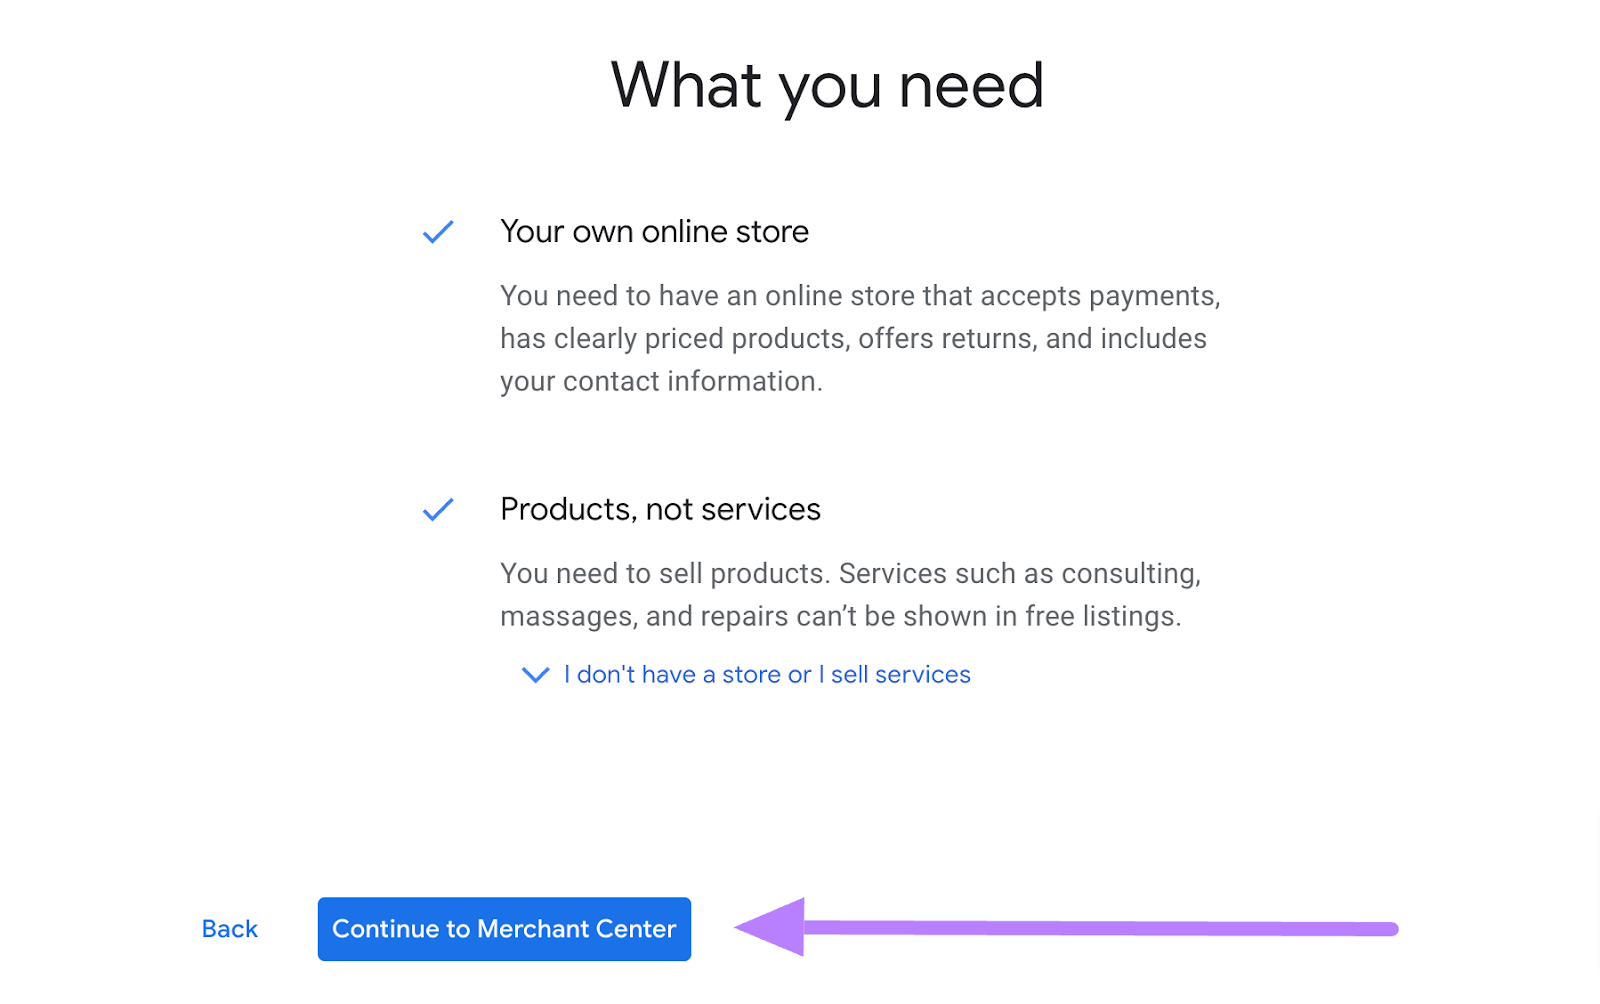
On the next page, click on “Continue to Merchant Center.”
Enter your business’ name and the country where it’s registered.
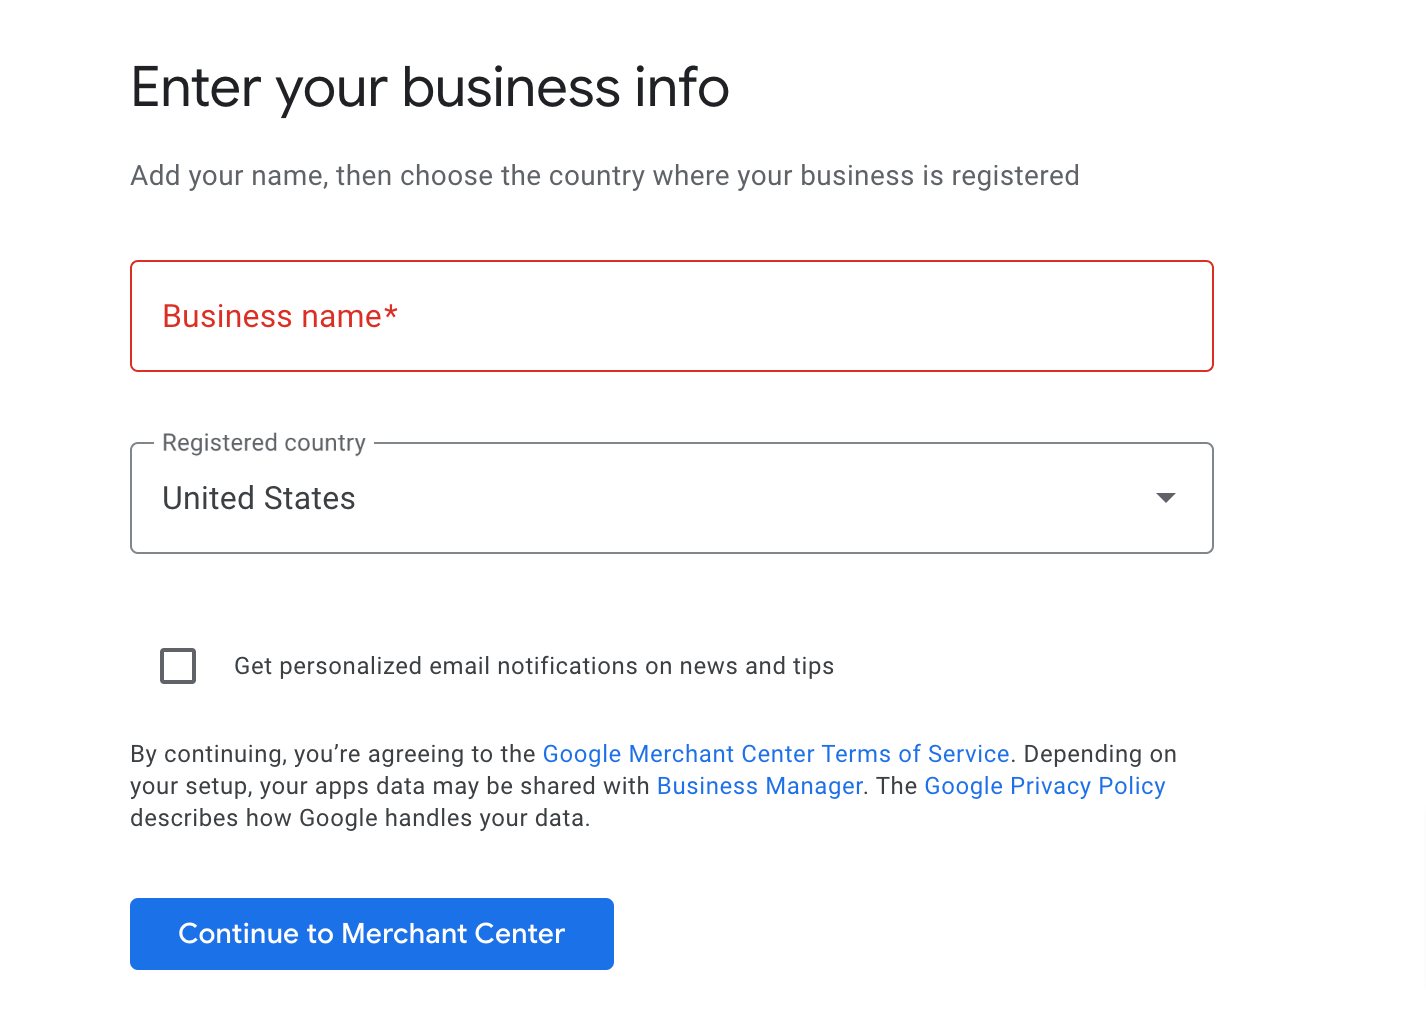
Click on “Continue to Merchant Center.”
That’s it—you’ve created your Merchant Center account. You’ll need to do a few more things, though.
These include:
- Adding your business address
- Verifying your phone number
- Confirming the online store of your business
- Adding details to show how you ship products
- Setting up sales tax
Step 2: Create a Product Feed
Next, you’ll need to create a product feed to upload to the Merchant Center. A product feed is essentially a spreadsheet that contains all your product data.
Most ecommerce platforms offer a way to automate the process of creating a product feed through tools, apps, or plug-ins.
Here are a few options for some of the most popular platforms:
- Shopify: Google & YouTube app
- WooCommerce: Google Product Feed extension
- Adobe Commerce: Google Shopping extension
- BigCommerce: Google Shopping Feed & Ads app
For those looking to create a product feed manually, you can use the product data specification provided by Google.
Step 3: Upload Your Product Feed to Google Merchant Center
Once you’ve created your product feed, it’s time to upload it to the Google Merchant Center.
In the Google Merchant Center, click on the “Products” menu item in the left-hand menu and then on the “Add products” button.
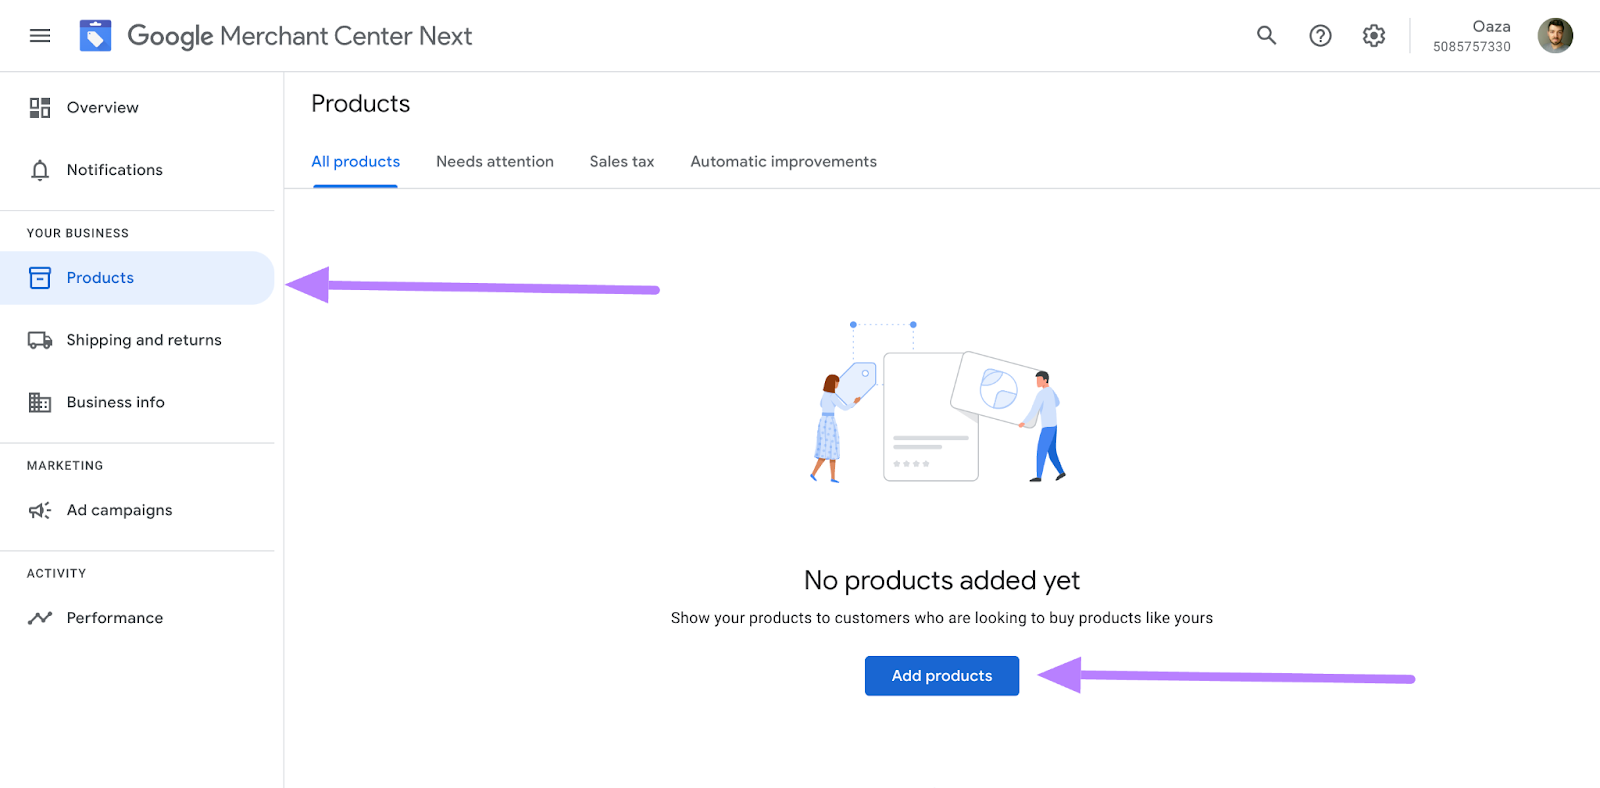
On the next screen, choose the “Add products from file” option and then click “Continue.”

You can choose the country and language you’d like your product ads to be shown in.

Then, either enter the URL of your product feed file or upload it from your computer.
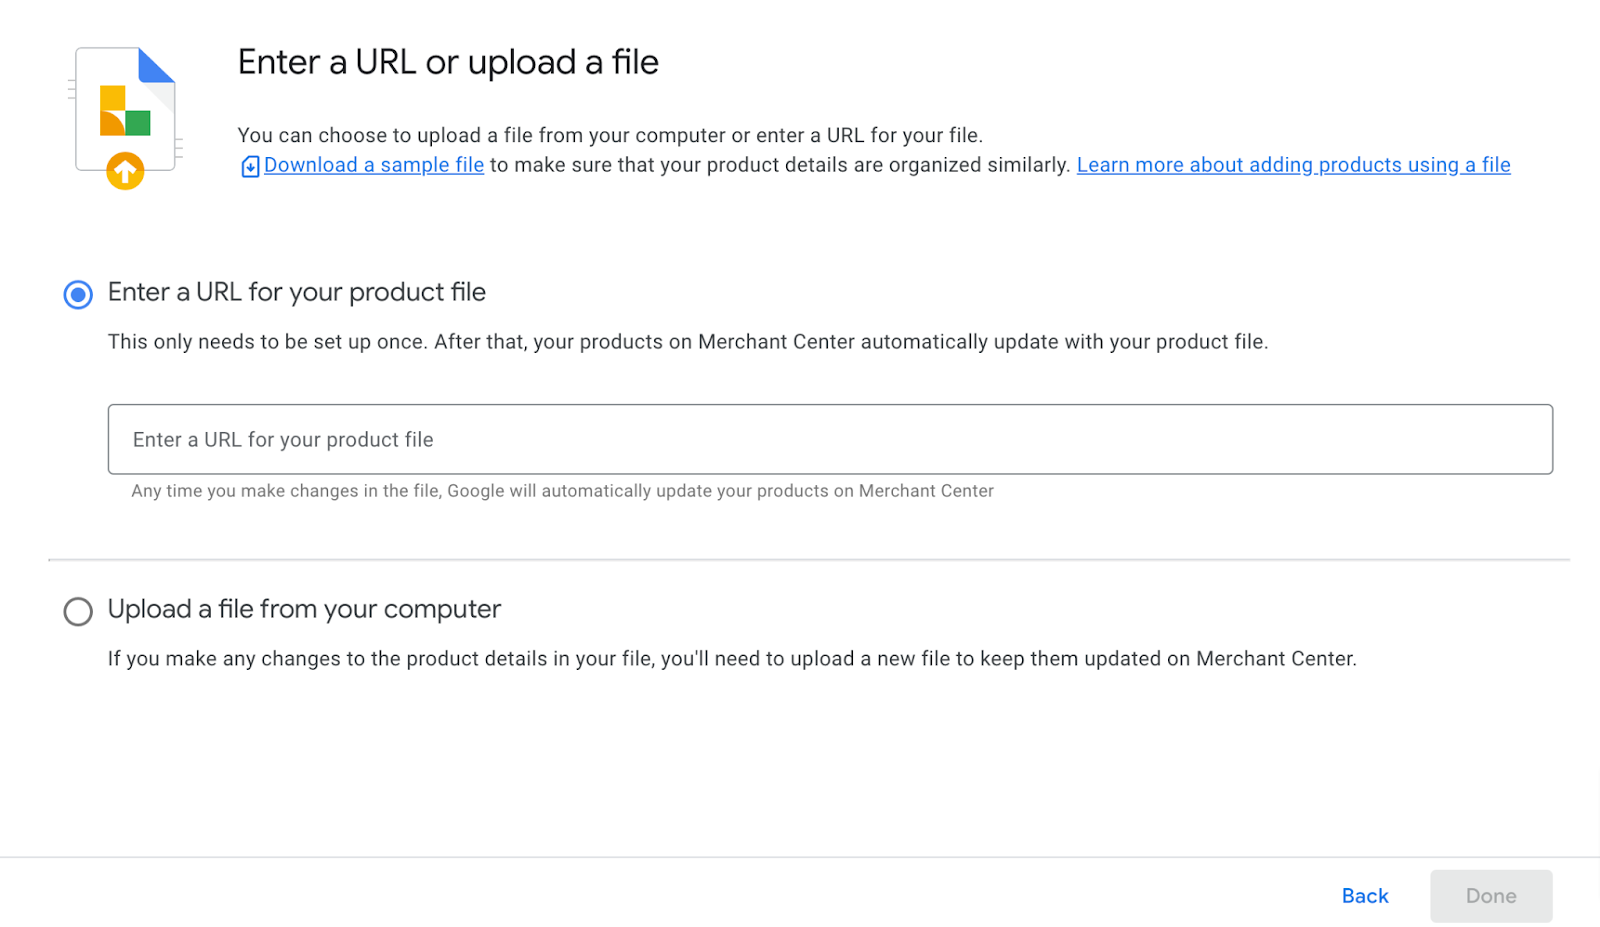
Choose an option, add your product feed file, and then hit “Done.”
Your products will then be added to the Google Merchant Center automatically.
Ensure your products are optimized for Google Shopping ads by using Semrush’s Product Feed Health Checker. The tool will analyze your product listings’ titles, descriptions, keywords, and more.
Then, it will give you a list of things you can do to optimize your product listings.
Here’s how to use it:
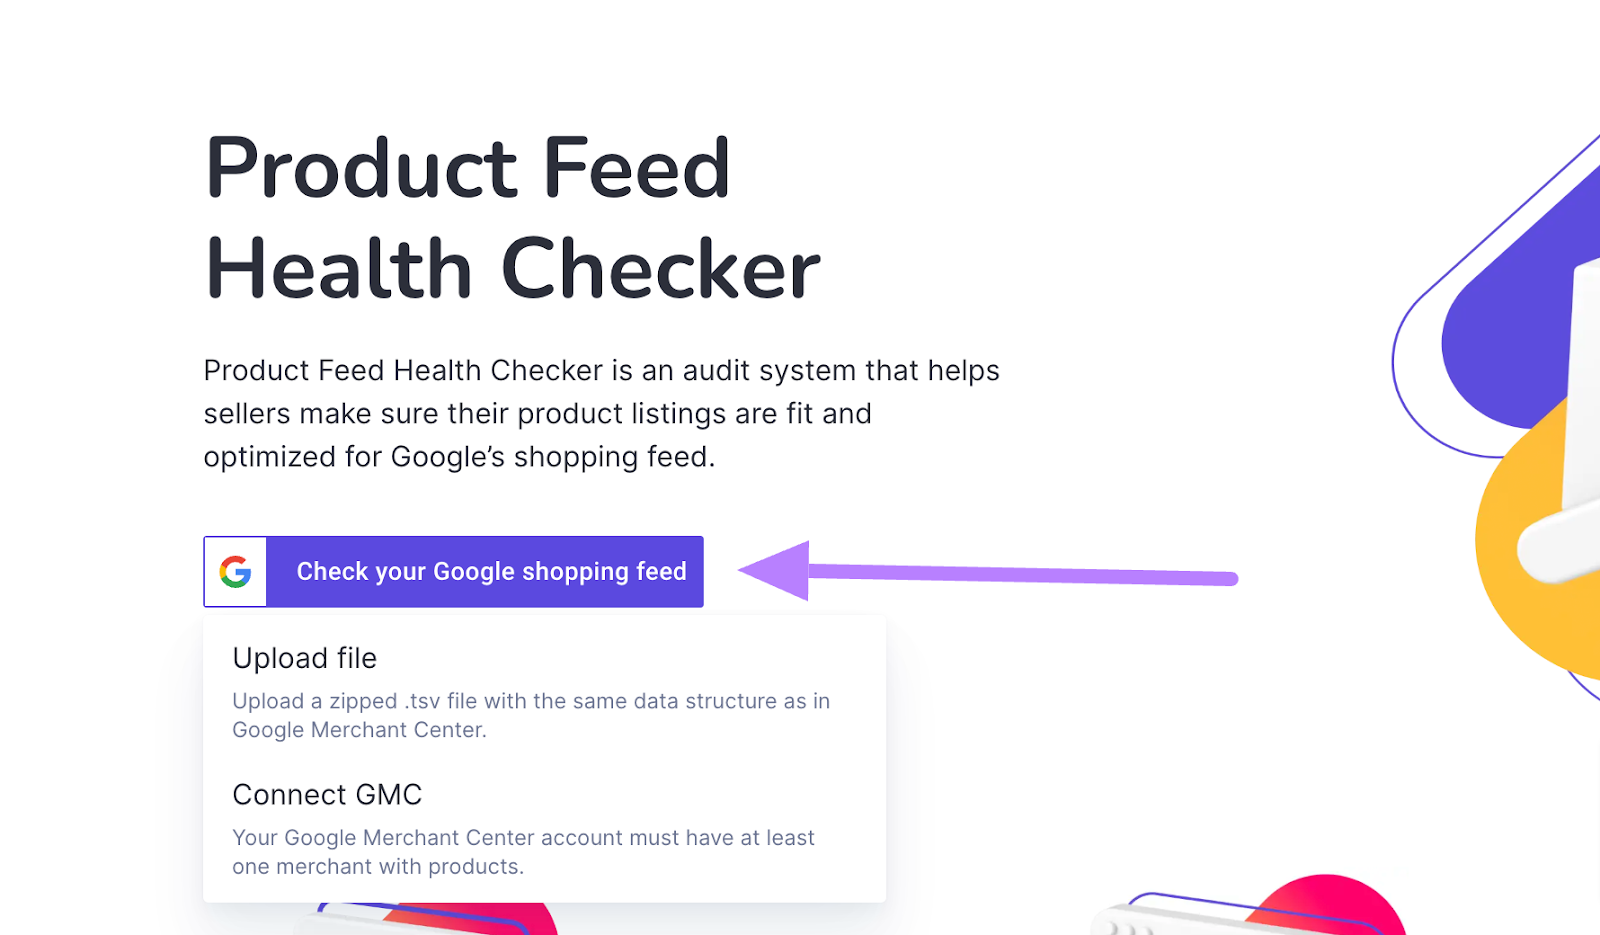
Go to the Product Feed Health Checker page, click on “Check your Google Shopping feed,” and then either upload your product feed file or connect your Google Merchant Center account.
The tool will then analyze your product feed and provide you with a report showing how well your product listings are optimized for Google Shopping.
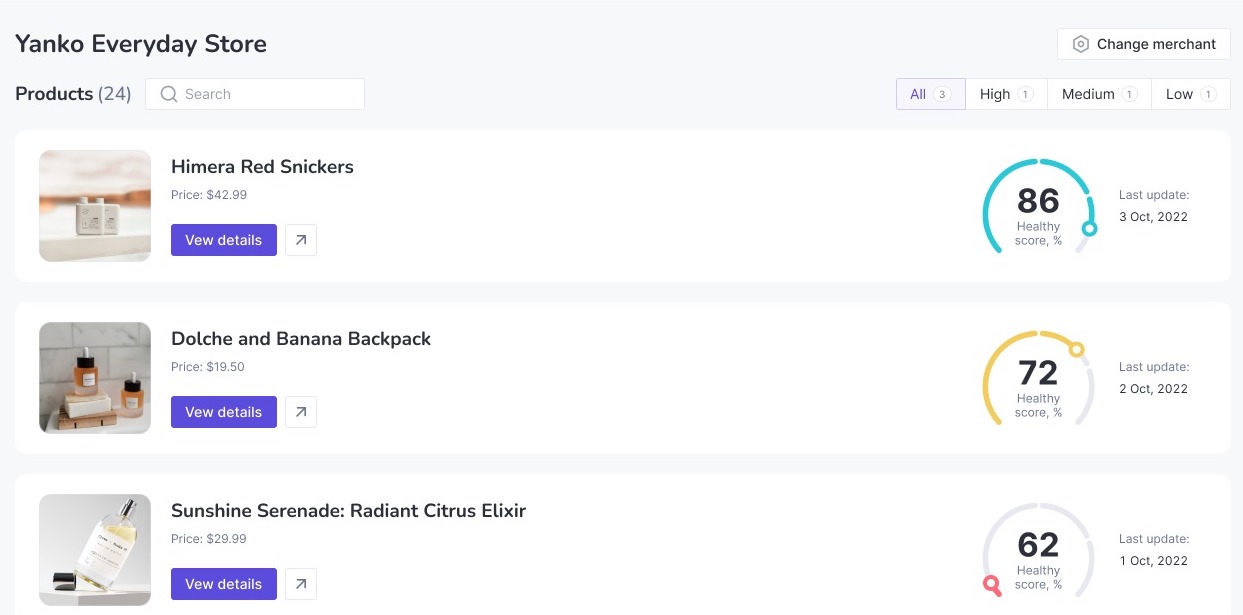
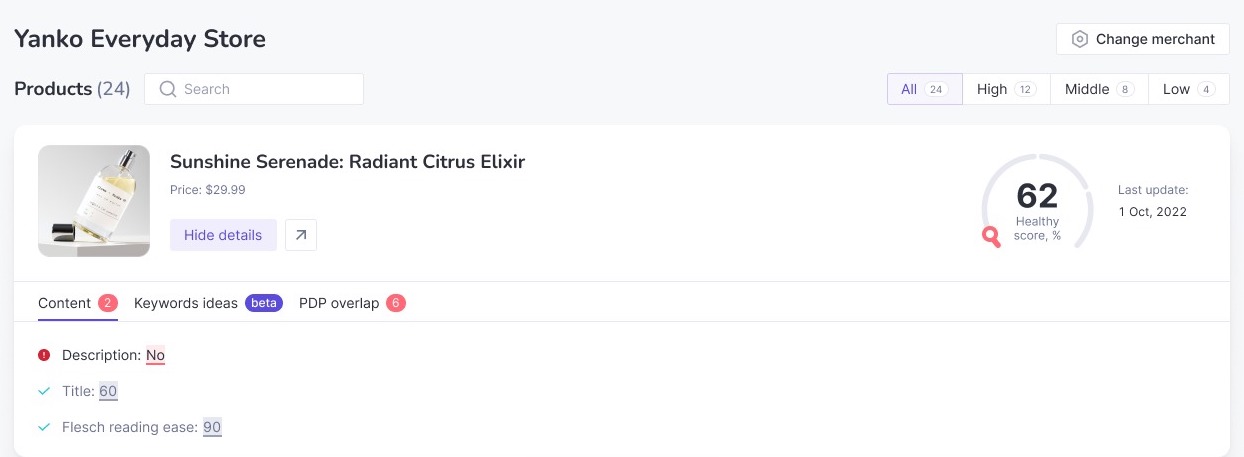
Click on each product to see more details about issues you might need to fix.
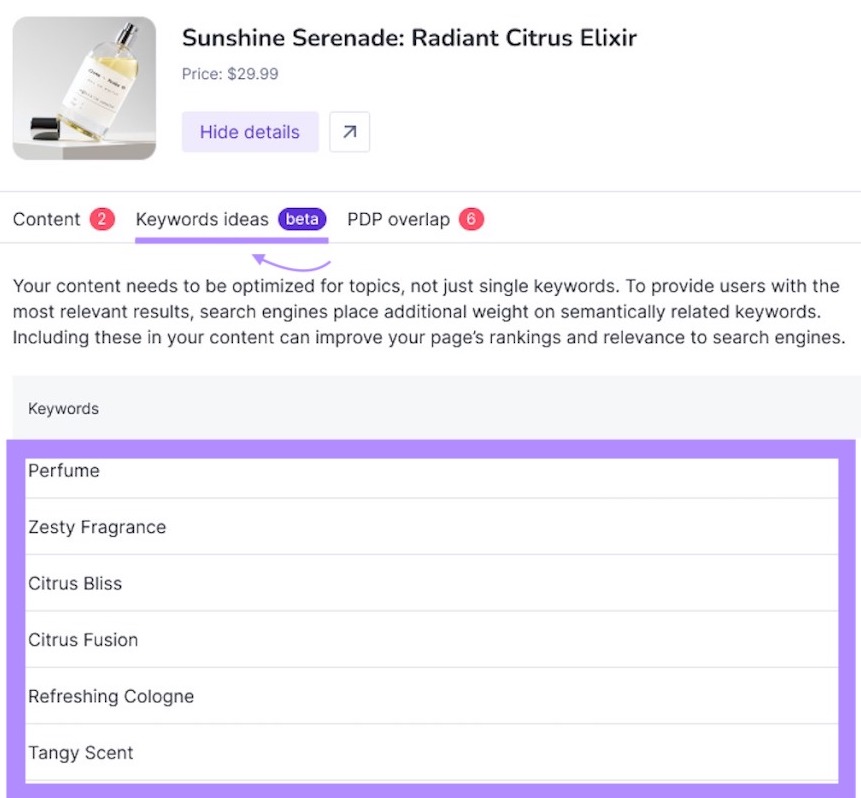
Click on the “Keywords ideas” tab to see a list of recommended keywords you should include in your product title or description.
Step 4: Create and Launch Your Google Shopping Ads Campaign
Now that you’ve uploaded your products to the Google Merchant Center, you can move on to creating your Google Shopping ads campaign.
To do this, you’ll need a Google Ads account. If you don’t have one, you can create it here.
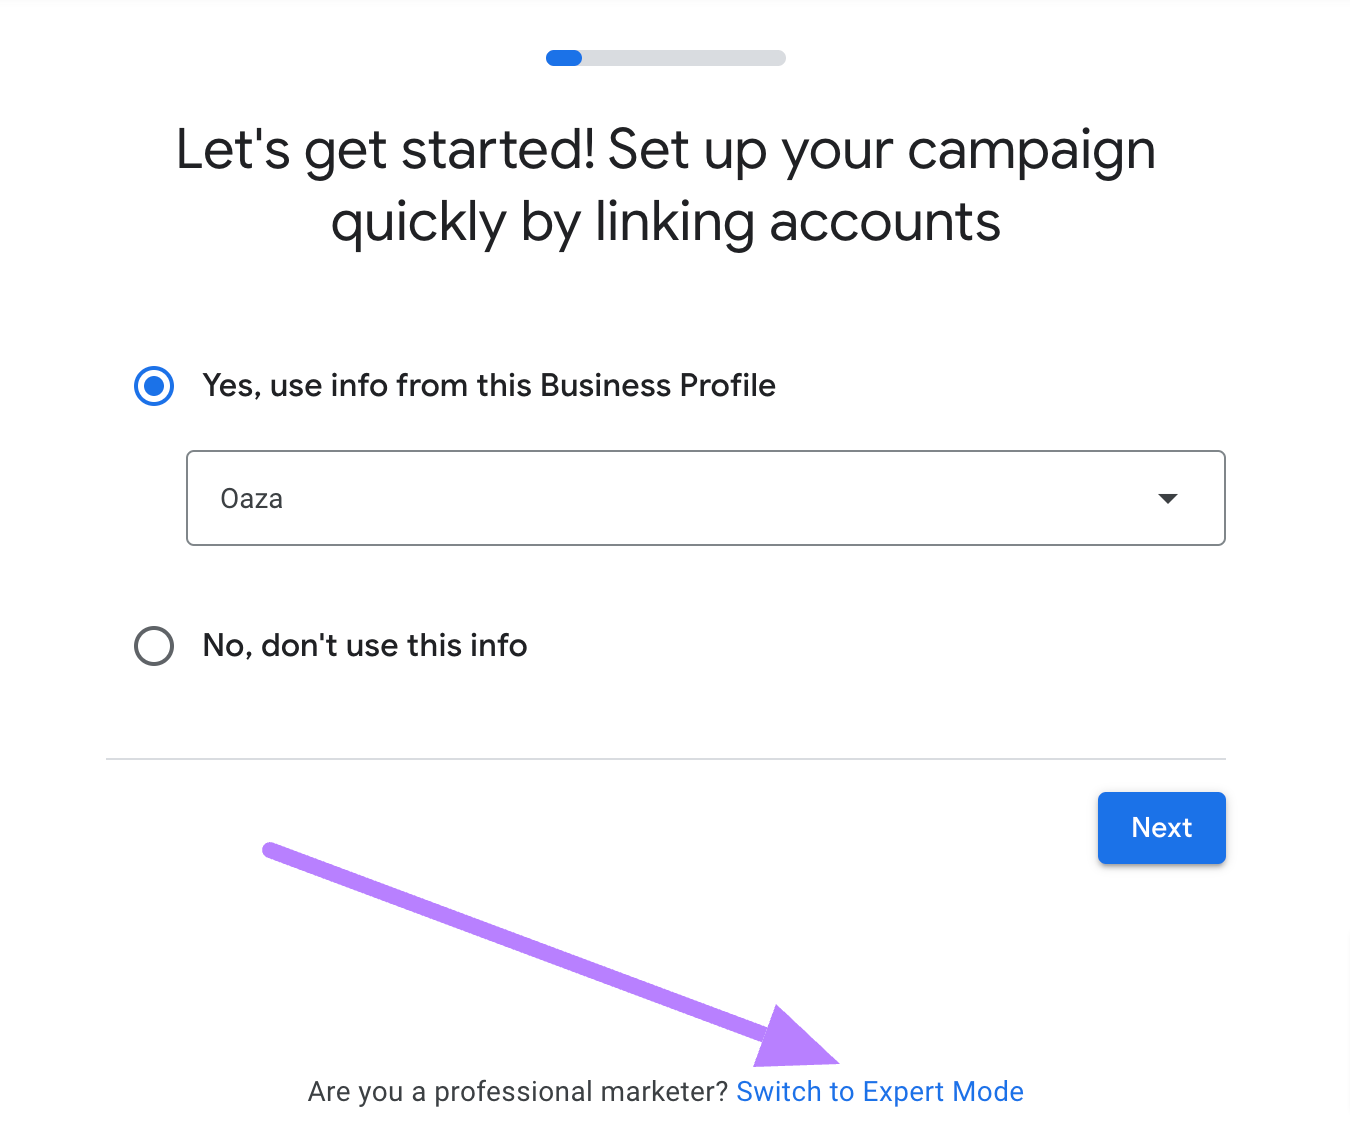
Once you create an account and log in for the first time, you’ll be presented with Google Ads’ default onboarding flow. To speed things up, click on the “Switch to Expert Mode” link.
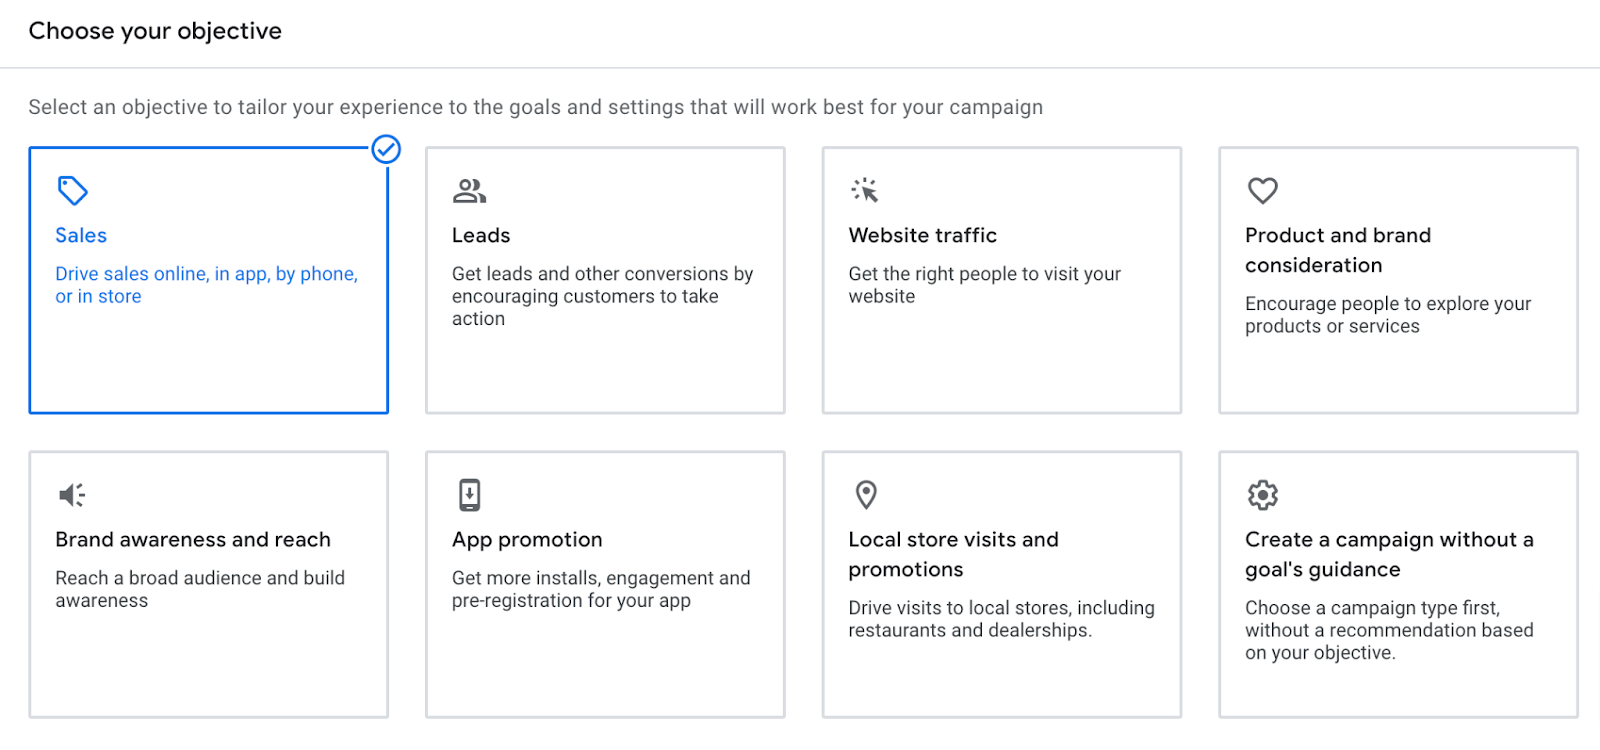
On the next page, select “Sales” as the campaign objective.
Google Ads will then prompt you to choose a campaign type. Click on the “Shopping” option.
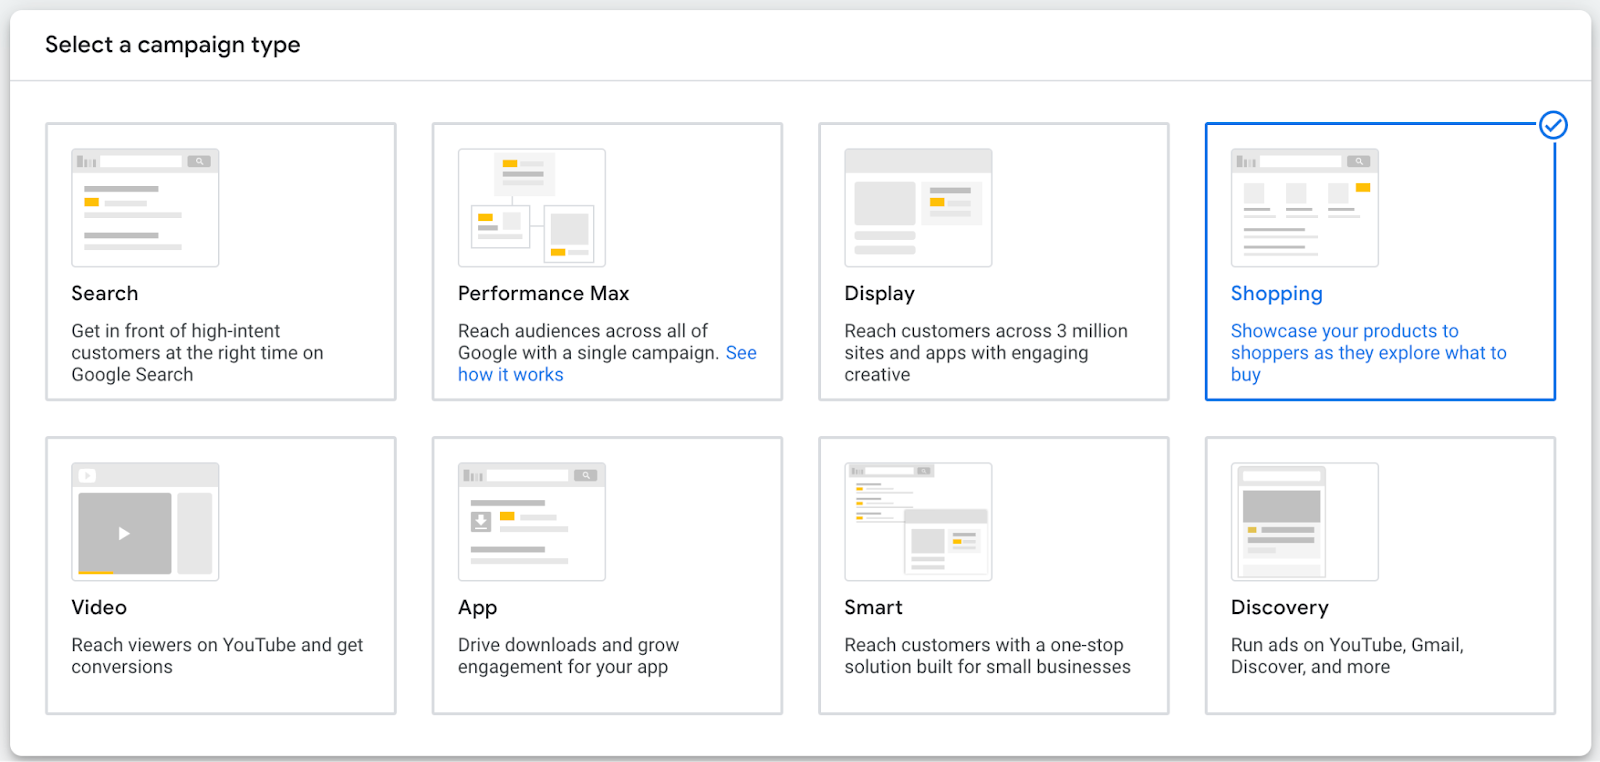
Directly below the "Select a campaign type" module, select your Google Merchant Center account.

You’ll then need to choose between the two available campaign subtypes:
- Standard Shopping: Allows advertisers to promote their products across Search, the Shopping tab, Google Images, Maps, and Google Search Partner websites
- Performance Max: Uses Smart Bidding to help advertisers drive more conversions across Search, YouTube, Gmail, and more

In our case, let’s go with a Standard Shopping campaign. Finally, add a name for your campaign and hit “Continue.”

On the next page, you’ll need to tweak a few additional settings.
First, choose a bid strategy. The ones you have available at this point include “Manual CPC,” “Target ROAS,” and “Maximize clicks.”
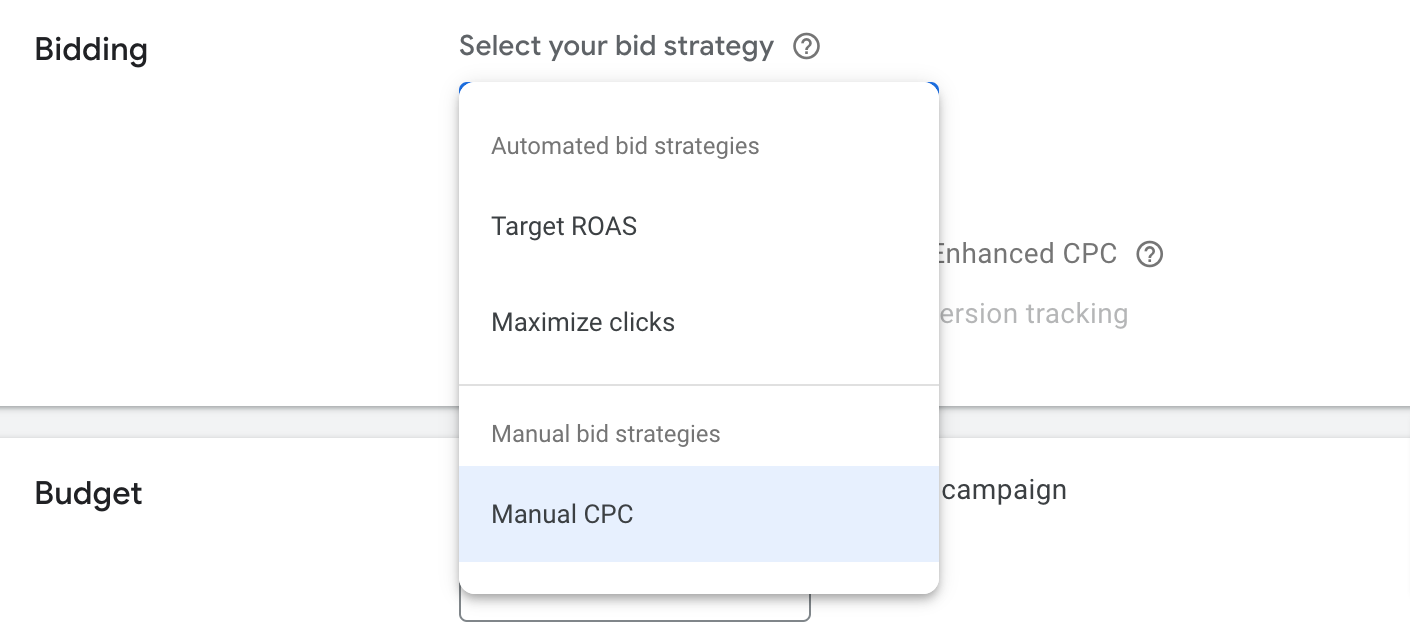
Next, set a daily budget for your campaign.

Google Ads also gives you the option to prioritize specific campaigns by selecting a campaign priority. This can be useful if you have multiple campaigns running that include the same product.

You can also select:
- Where you want the ads to appear
- Which devices they should appear on
- The locations you want to target
- The start and end date for your campaign
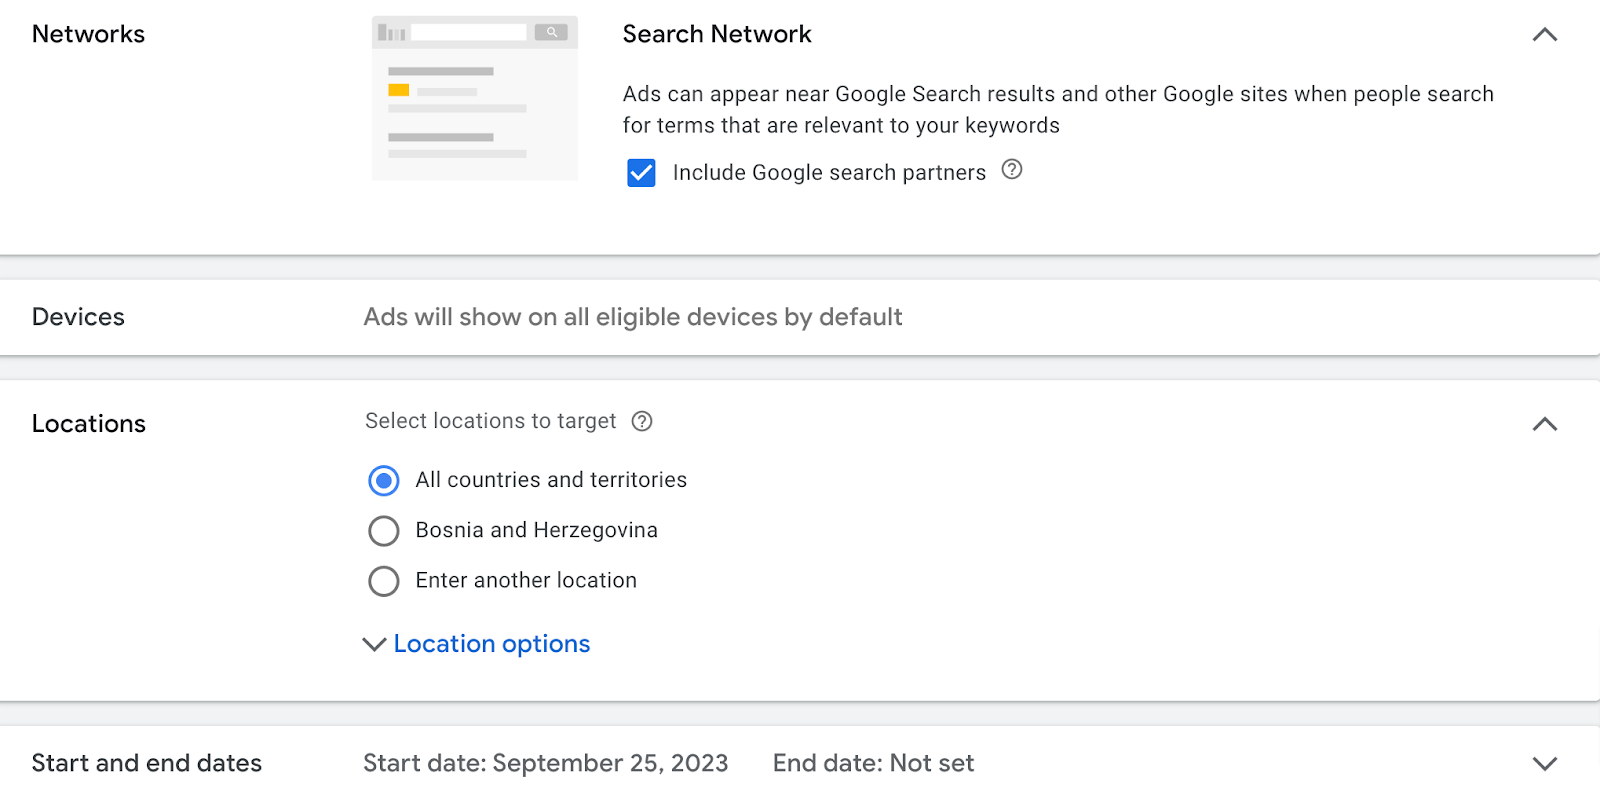
Enter a name for your ad group. If you’ve selected the “Manual CPC” bidding strategy, you’ll also need to set your CPC bid.

Finally, click the “Create Campaign” button.
Google Shopping Ads Bidding Strategies
The two main types of bidding strategies available to you in Google Shopping ads are manual and automated bidding.
Manual Bidding
With manual bidding, you specify the maximum amount you’re willing to pay for each click on your ad. This is the most basic type of bidding strategy available on the platform.
While manual bidding is great for controlling costs, it often results in inferior results for inexperienced advertisers due to a lack of expertise with PPC (pay-per-click) campaigns and no data on which to base manual bids.
If you’re just starting out with Google Shopping ads, you’re better off going with an automated bidding strategy.
Automated Bidding
Automated bidding is just what it sounds like—Google sets your bids automatically to help you reach a specific goal.
There are a few different automated bidding strategies currently available on the platform:
- Maximize clicks: Helps you get the most clicks possible out of your budget
- Enhanced cost-per-click: Adjusts your manual bid automatically based on the likelihood of a click resulting in a conversion
- Target return on ad spend: Designed to get you the most conversions possible while staying within your target return on ad spend (ROAS)
6 Google Shopping Ads Strategies to Maximize Your Revenue
Now that you understand the basics of Google Shopping ads, let’s look at a few strategies you can use to get better results from your campaigns.
1. Analyze Your Competition
A good first step to making sure you get the most out of your Google Shopping ads is to analyze your competition’s ads.
You’ll want to analyze competitors’ listings to find out:
- Which keywords they use
- What kind of product titles and descriptions they use
- How they’re pricing their products
Semrush’s PLA Research tool can be of great help here. You can use it to research competitor ads, see the number of search queries that trigger their ads, and more.
Here’s how to use it:
On the PLA Research tool page, enter your competitor’s domain and hit the green “Search” button.

You’ll then be presented with a detailed report outlining your competitor’s advertising activity.
The “Positions” tab shows you the total number of keywords your competitor’s ads show up for, as well as the total number of ads they’re running.

Review the specific keywords that trigger their ads and the associated product listings.

Check out the “Competitors” tab to discover more competitors you should potentially analyze.

Finally, you can use the “PLA Copies” tab to see your competitors’ best-performing ads.

Carefully review all the provided information and then take advantage of it to improve your own ads.
2. Optimize Your Product Titles
The product titles you use for your Google Shopping ads have a big impact on your click-through rate. With a poorly optimized product title, your ad might get very little or no clicks at all.
Follow these guidelines to ensure your product titles attract clicks:
- Use a descriptive title. The product title needs to clearly describe your product (e.g., “Organic Cotton Men’s T-Shirt - Red - L”). There shouldn’t be any confusion about what the product is.
- Include relevant keywords. Google uses keywords to understand whether your ad is relevant for a particular search. Make sure to add a relevant keyword to your product title.
- Frontload the most important information. Google gives you the option to include up to 150 characters in your product title, but anything over 70-100 characters will get cut off and not displayed in the ad. This makes it crucial that you include the most important information (and keywords) at the beginning of the product title.
- Avoid using all caps. The official product title guidelines for Google Shopping ads state that you shouldn’t use all caps in your product titles. Since using all caps is often associated with spam and untrustworthy ads, it might make searchers less likely to click on your ad.
- Don’t add promotional information. It’s against Google’s guidelines to add promotional information, such as price, shipping costs, or delivery dates, to your product titles.

3. Choose the Best Images
The product image is often the first thing people will notice about your ad. Because of this, you need to make sure your product images are compelling and high quality.
Also, Google will block your campaign from running if your images are low quality.

Google also offers guidelines you should follow to make sure your product images are on point:
- Use the right image size. At least 100x100px for non-apparel images and 250x250px for apparel images. Images shouldn’t be larger than 64 megapixels or 16 MB.
- Show the entire product. The image should display the entire product and include minimal to no staging.
- Use a white or transparent background. Opt for a white or transparent background to ensure your image works well with existing Google Shopping ads design elements.
- Don’t use images of anything other than the product. Avoid using placeholders, generic images, or illustrations.
- Don’t include promotional elements. You’re not allowed to include shipping information, discount offers, and warranty details in the image.
- Submit a unique image for each product variant. If your product has multiple variants (e.g., for different colors), make sure to submit a unique image for each variant.
- Show the correct variant in your product image. Each product image should also show the correct variant.
4. Use Negative Keywords
When you use Google Shopping ads, sometimes, your ads will show up for irrelevant searches. To prevent this, you need to add negative keywords to your campaign.
Negative keywords are search terms you don’t want your ads to show up for. For example, if you’re selling high-end furniture, you might not want your ads to appear for queries like “cheap couches” or “used leather sofas.”
Using negative keywords effectively can improve your ads’ click-through rates. And help you reduce advertising costs.
The best way to apply negative keywords to your Google Shopping ads campaigns is to create a negative keyword list.
But how do you know which keywords to add to your negative keywords list? This is where the search terms report comes in.
The search terms report shows you which search terms have triggered your ads.
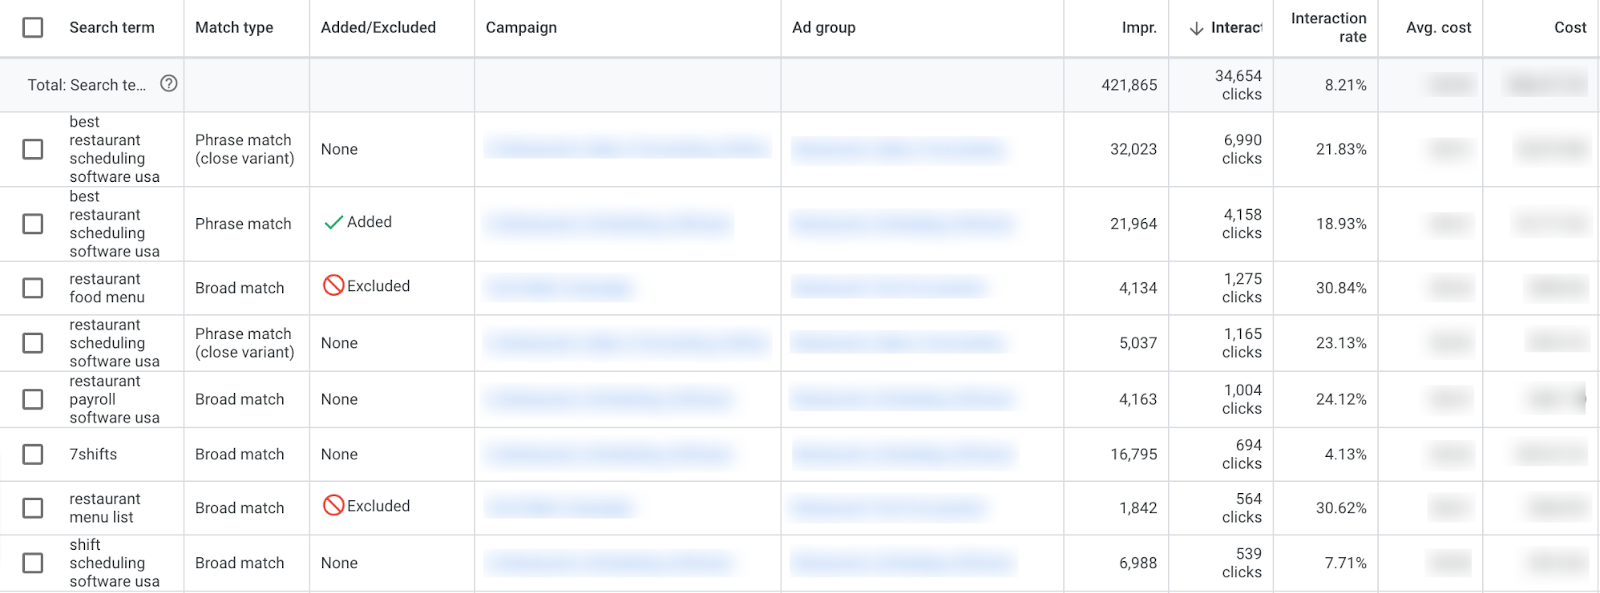
To access the search terms report, log in to your Google Ads account and then go to “Campaigns” > “Insights and reports” > “Search terms.”
Here, you’ll want to look for any terms that are irrelevant to your offering (e.g., search terms for products you don’t sell) and add them as negative keywords.
Keep an eye on relevant search terms that are getting a lot of clicks but aren’t generating any conversions. You should add these as negative keywords to reduce wasted ad spend.
To add a search term as a negative keyword, check the box next to it and then click on “Add as negative keyword.” You can also select multiple keywords and add them to a list in bulk.
5. Add Product Ratings to Your Ads
Reviews and ratings are some of the most important factors that impact purchasing decisions for consumers. Also, 77% of consumers stated in a survey that they considered a product’s average star rating when reading reviews.
Having a large number of positive reviews and high product ratings can help improve both the click-through rate and the conversion rate on your ads.

Note that your ads won’t display product ratings by default. You need to request ratings to be added to your ads—and it’s up to Google to approve or reject your request.
There’s also a minimum requirement of having 50 reviews before becoming eligible for getting product ratings on your ads.
To make a request for ratings to be included in your ads, fill out this interest form.
6. Make Sure Your Landing Pages Are on Point
While the quality of your ad impacts how many clicks you get, it’s your landing page that’s going to have the biggest impact on how many sales you’re able to generate from those clicks.
Keep Your CTA High on the Page
According to a Norman Nielsen Group study, website visitors spent 57% of their time viewing the upper half of the website (also known as “above the fold”). Because of this, you should keep the most important elements of your landing page as high on the page as possible.
This includes your call-to-action (CTA) button (e.g., “Add to Cart” or “Buy Now”).
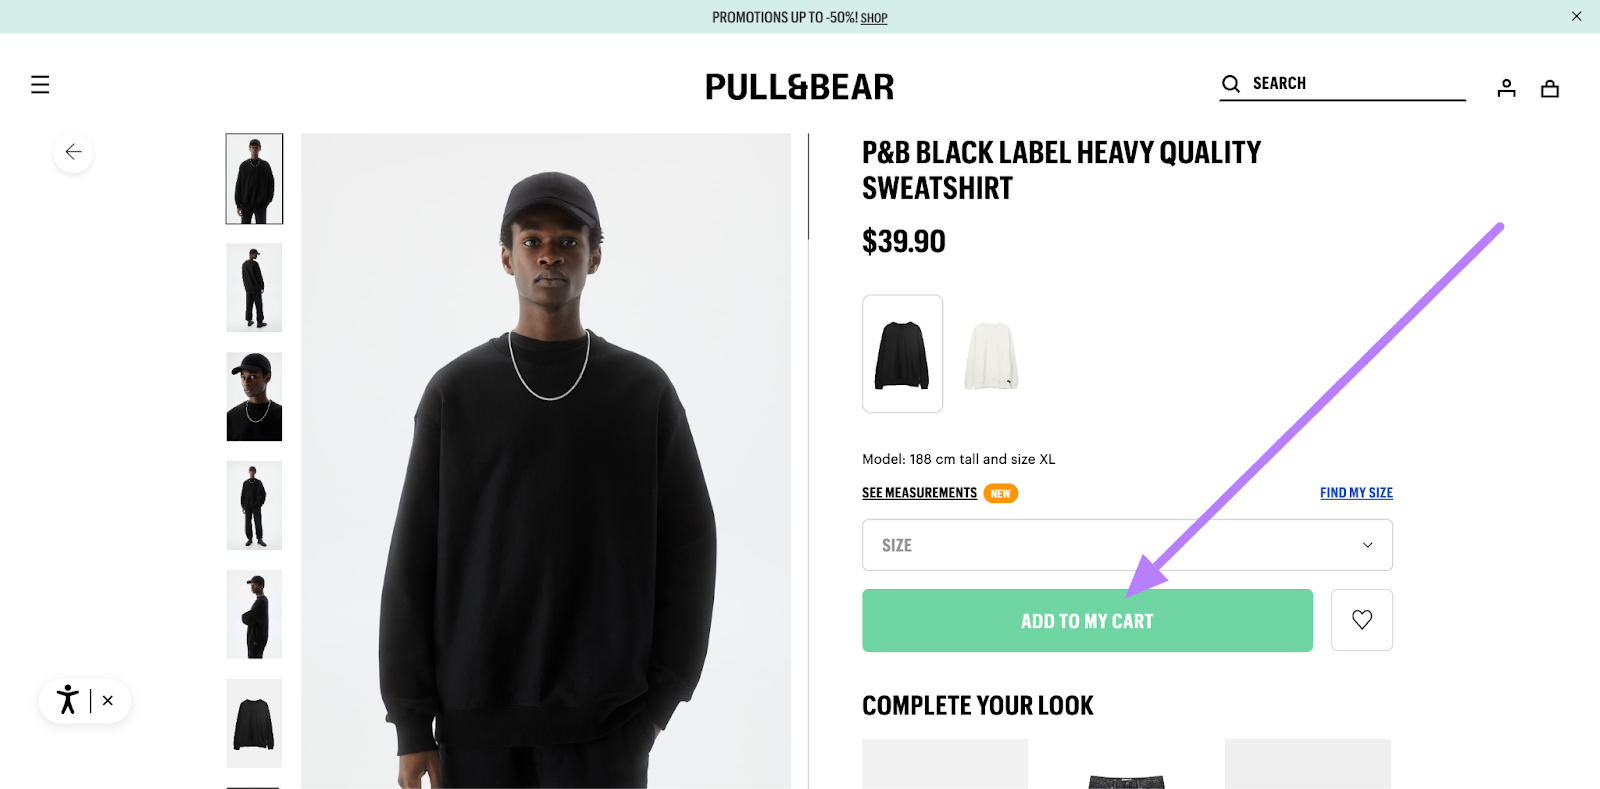
Think about it—if visitors end up on your ecommerce website and can’t find the “Buy” button, they’re likely to leave without making a purchase.
Add Social Proof
When it comes to online shopping, there’s always a degree of uncertainty involved. A shopper might be thinking:
- Are the products this website sells of high quality?
- Are the product description and images an accurate representation of the actual product I’m going to get?
- Can I trust this website with my credit card information?
You can ease shoppers’ uncertainty by including social proof on your landing page.
Social proof is a phenomenon where people copy the actions of others when determining how to behave in a specific situation. For a landing page, the most effective form of social proof are positive reviews and testimonials.

If shoppers see there are plenty of customers who are happy with your product, they’ll be much more likely to purchase it themselves.
This makes it crucial that you work on getting as many positive reviews for your products as you can. Here are a few tips that can help:
- Automate review requests. Customers will forget to leave a review, even if they end up loving the product. Remind them to leave a review by sending an automated review request email.
- Request reviews at the right time. When sending review request emails, be mindful of timing. Ensure customers have received the product before sending a review request—asking them for a review while they’re still waiting for the product to arrive can only cause confusion or frustration.
- Provide an incentive. Most people won’t bother leaving a review, even if you ask for it. A good way to encourage customers to leave a review is to offer an incentive, such as a discount or free shipping on their next order.
Improve Page Load Speed
Blazing-fast websites are the norm. If your page doesn’t load in a few seconds, many users won’t stick around—they’ll just close the tab and move on.
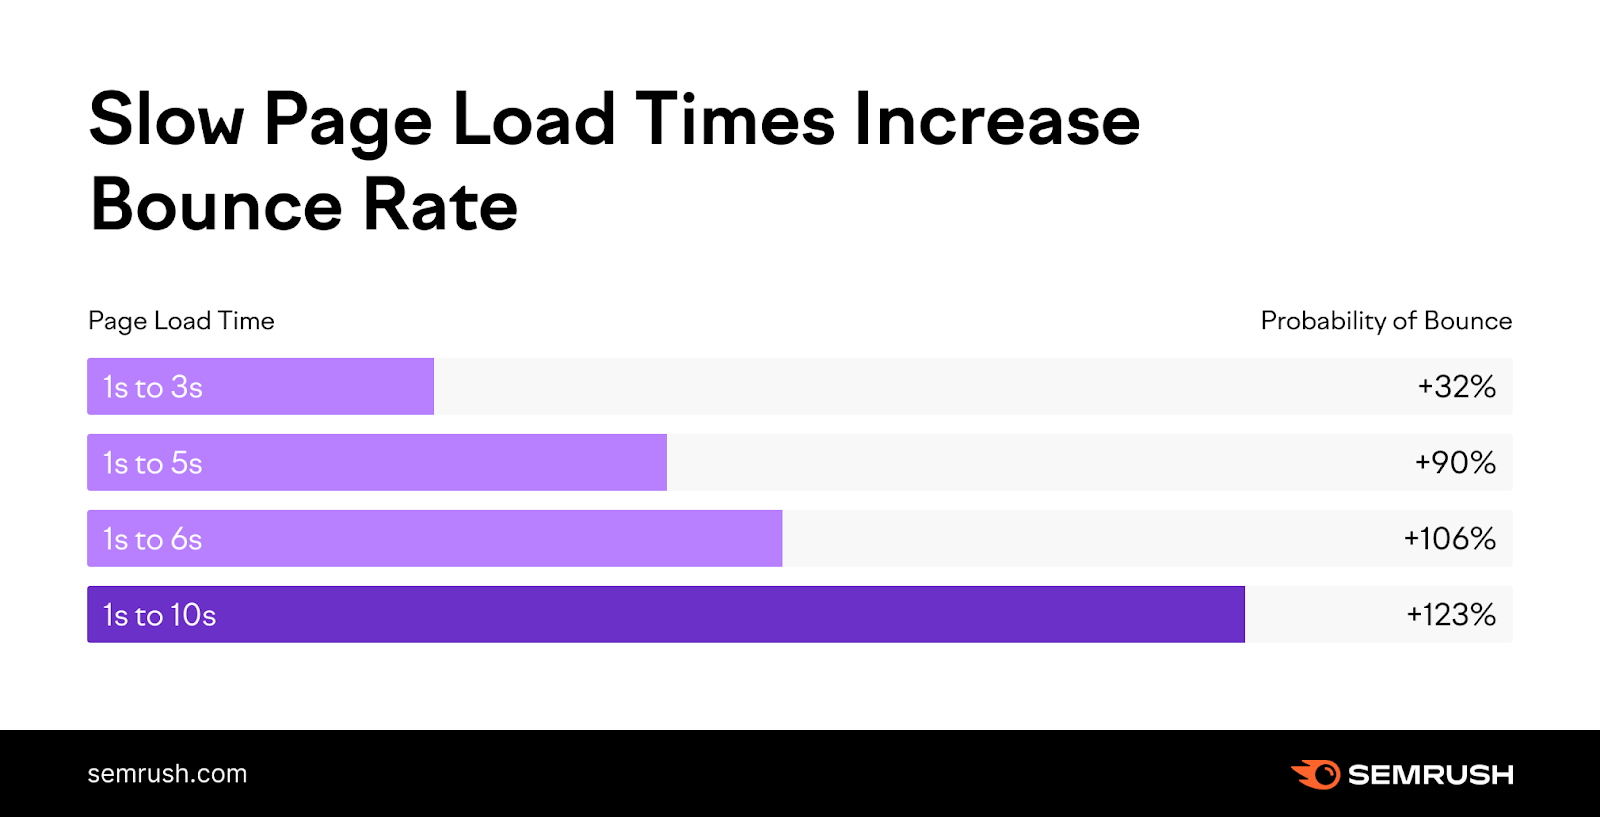
So, it’s not surprising that a website that loads in 1 second has a 300% higher conversion rate compared to a website that loads in 5 seconds.
Here’s what you can do to improve the load speed for your landing page:
- Use image compression. Images, especially high-definition ones, can take a while to load. To speed things up, compress images using tools like Kraken or opt for more web-friendly image formats such as WebP.
- Remove unnecessary scripts. Another website element that’s notorious for decreasing load speed are scripts. Review the scripts you have running on your website and remove any you don’t absolutely need.
- Use a CDN. Use a content delivery network (CDN) like Cloudflare to deliver website content to visitors from servers that are physically closest to them.
Drive Revenue Through Google Shopping Ads
Google Shopping ads are a great way to drive more sales and revenue for your ecommerce business.
But this is only true if you know how to create profitable Google Shopping ads campaigns.
Follow the tips we outlined above to inform your Google Shopping ads strategy and make sure you get a positive return on your ad spend.
And remember to use Semrush’s Product Feed Health Checker and PLA Research tools to make your job easier.
