
Learn how to post on Instagram, step by step:
- Sign Into the Instagram App or Website
- Tap the “+” Icon
- Select Images
- Edit Images
- Add a Caption
- Tag People and Locations
- Add Alt Text
- Review Settings
- Publish or Schedule Your Post
This is how you add photos (and other kinds of images) to your Instagram feed and profile grid. It’s one of the most popular ways to engage followers and expand your reach.

Alternatively, learn how to post on Instagram with Semrush. This can be a huge time-saver for social media managers.
1. Sign Into the Instagram App or Website
If you don’t have the Instagram app, download it from your device’s app store:
- App Store (iPhone)
- Google Play (Android / Chrome OS)
- Microsoft Store (Windows)
- Amazon Appstore (Fire OS)
How do you post on Instagram without an app?
Open instagram.com in a web browser. Instagram recommends using the latest version of Google Chrome, Mozilla Firefox, Safari, or Microsoft Edge.
Or use a third-party tool like Semrush’s Social Poster.
The following steps explain how to post to Instagram via the mobile app (as of January 2024). But similar instructions apply when posting via other official apps or the Instagram website.
Tip: If you use Instagram for marketing purposes, switch to a Business account via “Settings” > “Account” > “Switch to a Professional account.” It provides access to additional features, like scheduling.
2. Tap the “+” Icon
Tap the “+” icon to start creating your Instagram post. (The “Post” option is selected by default.)

Posting on Instagram allows you to share one image. Or create a photo carousel containing multiple images.

Side note: Check out these resources to learn about other types of Instagram content:
- Story: Post photos and videos that disappear within 24 hours
- Reel: Share a video up to 90 seconds long
- Live: Livestream through Instagram
3. Select Images
Next, select the image(s) you want to post on Instagram.
You have three options:
Remember:
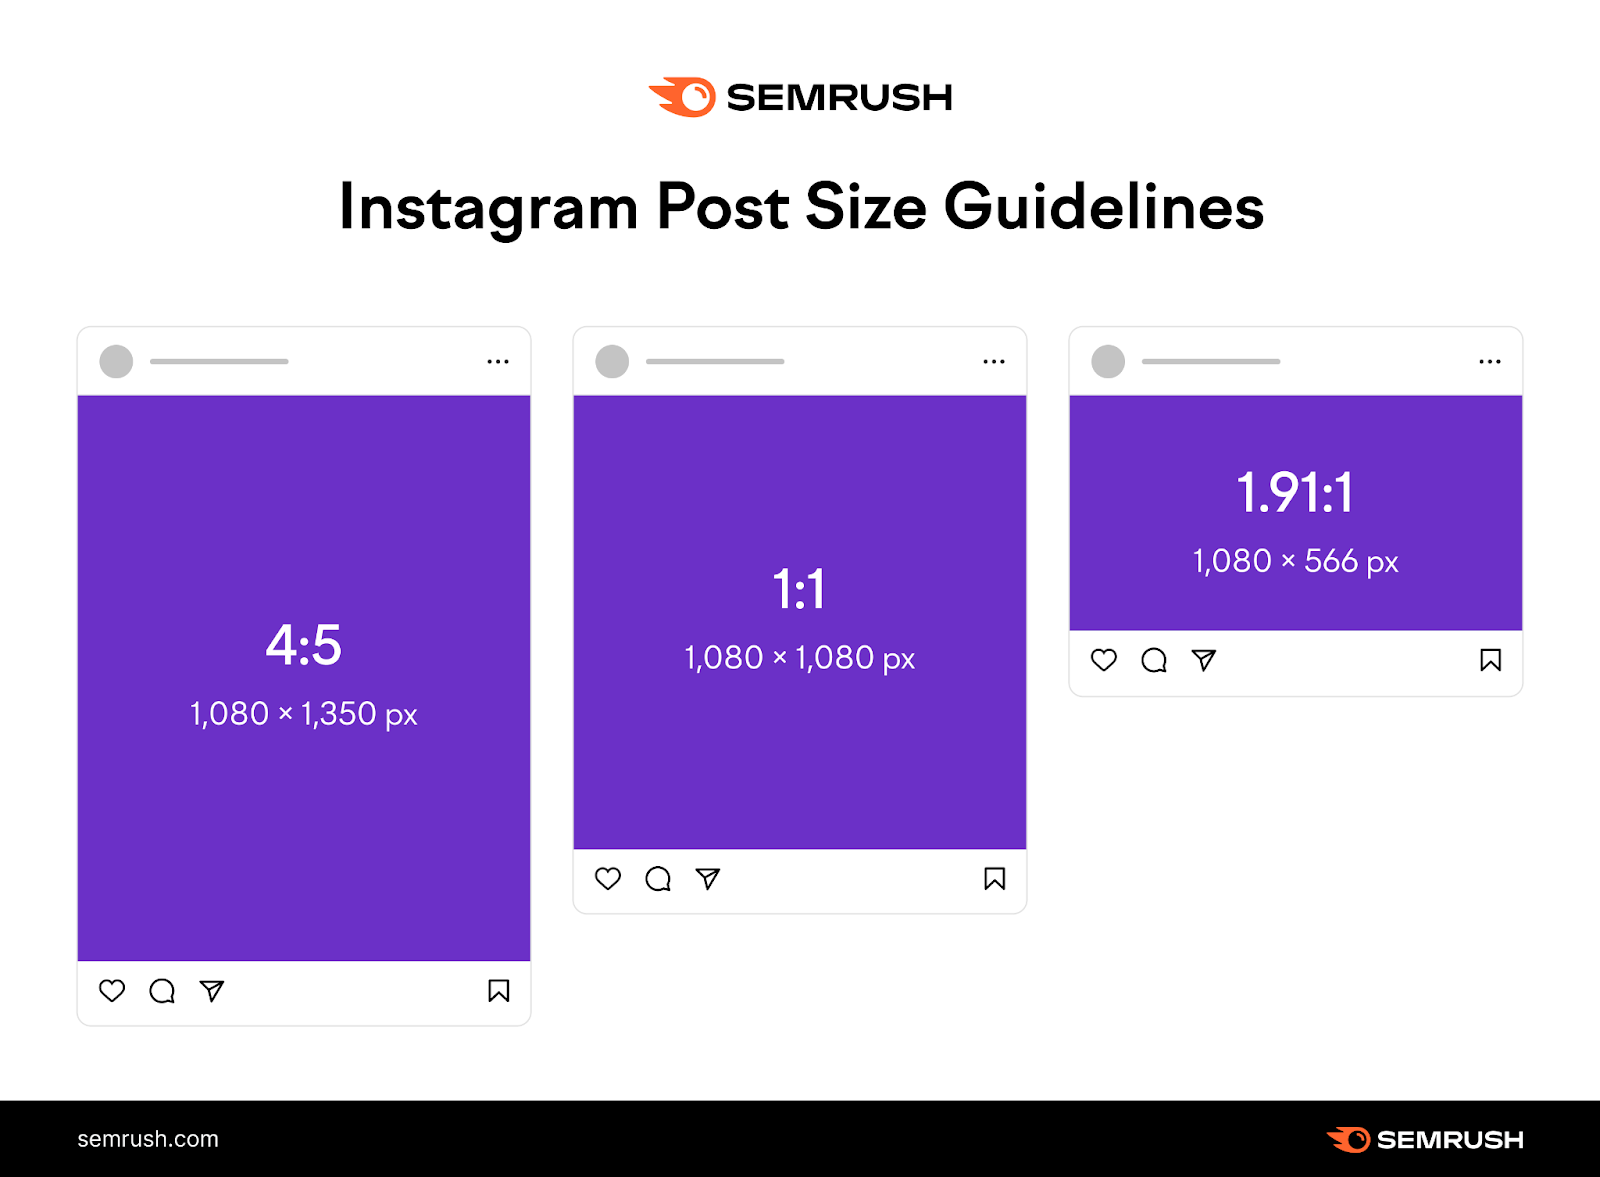
You can post square, horizontal, and vertical photos on Instagram. But they may be resized or cropped to fit the supported resolutions and ratios:
- Instagram post size resolution: From 320 to 1,080 pixels wide
- Instagram post size ratio: Between 1.91:1 and 4:5
Option 1: Upload One Image
Tap the photo you want to post to Instagram. Or use the drop-down to browse other albums.

Instagram crops horizontal and vertical photos to squares by default. Tap the expand icon to view your photo in full.

To adjust the crop, pinch and move your image within the frame.
Tap “Next” or “→” when you’re done.

Option 2: Create a Photo Carousel
Use the Instagram upload feature to create a photo carousel that users can swipe through.
Tap the “Select Multiple” text or icon. Then select up to 10 pictures in the order you want them to appear.
Switch between albums using the drop-down menu.

Tap “Next” or “→” when you’re done.
Option 3: Take a New Photo
Tap the camera icon to take a new photo. And turn it into an Insta post.
The rotate icon switches between front and rear cameras. The lightning symbol changes flash settings.

You can also double tap anywhere on your screen to switch cameras.
Capture the shot when you’re ready. You can always go back if you’re not happy with it.
Now that you know how to add photos to Instagram, let’s learn how to edit them:
4. Edit Images
You can edit your Instagram photo(s) via the magic wand icon, “Filter” tab, and “Edit” tab. To make your images more eye-catching and engaging.
If you’re posting a photo carousel, you can apply a filter to all pics first. Tap any image to access its individual settings. Then tap “Done” or “✓” when you’re finished editing.
Magic Wand Icon (Lux)
The magic wand icon at the top of the page opens “Lux” settings. This affects the contrast and saturation of your Instagram photo.
Use the slider to experiment. Then click “Cancel” or “Done” when you’re finished.

Filter Tab
In the “Filter” tab, you can apply a filter to your image. Instagram filters combine a number of effects (such as brightness and color) to give photos a particular look.
Tap any option to see what the filtered image looks like.
Then tap the same filter again to adjust its intensity. Select “Cancel” or “Done” once you’re finished.

To undo your changes, go back to “Normal” at any time. (Many users tag these photos #nofilter.)

Edit Tab
In the “Edit” tab, you can apply various effects to your Instagram photo:
| Effect | Description |
| Adjust | Change the photo’s horizontal or vertical perspective |
| Brightness | Make your photo brighter or darker |
| Contrast | Change the variation between light and dark colors |
| Structure | Amplify the details in your picture (similar to Sharpen) |
| Warmth | Shift colors toward warm orange tones or cool blue tones |
| Saturation | Adjust the intensity of your photo’s colors |
| Color | Give shadows or highlights a colorful tint |
| Fade | Give your image a washed-out look |
| Highlights | Make the lightest areas of your image lighter or darker |
| Shadows | Make the darkest areas of your image lighter or darker |
| Vignette | Darken the outer edges of your picture |
| Tilt Shift | Apply a radial or linear tilt shift to change your image’s focus |
| Sharpen | Amplify the details in your picture (similar to Structure) |
Tap any effect to start making changes. When you’re finished, tap “Cancel” or “Done.”

Once you’re happy with your photos, click “Next” or “→” in the upper-right. This will take you to the “New post” page.

5. Add a Caption
Write a caption for your Instagram post in the corresponding field. This allows you to add context to your photo.
The character limit is 2,200 characters. But short and snappy descriptions are usually best for engaging users.
Plus, Instagram truncates captions, depending on context:

Some creators add extra context via comments:

Include relevant keywords and hashtags in your caption—not the comments. This helps users discover your post through search.

Tip: See which hashtags drive the most engagement by analyzing your Instagram posts in Semrush’s Social Tracker tool. You can also see which hashtags your competitors use.

You can also include emojis and tag users. But it’s not possible to add clickable links to captions or comments. Many creators get around this by directing users to the link in their bio.

Tip: When you create Instagram posts in Semrush’s Social Poster tool, you can easily update the link in your bio. There’s no need to edit your bio each time.
6. Tag People and Locations
If your photo features another Instagram user (either a person or a brand), tap “Tag people.”
Then tap the relevant part of the image, search for their handle, and select the correct result from the list.

After publishing, the tagged user will receive a notification. They might be more likely to engage (i.e., like, comment, or share) as a result.
If they approve your tag, your post will appear in their “Tagged” section.
All of these elements can improve your post’s reach.

If the location in your image could interest users, tap “Add location.” Then choose or search for a place to tag. This can be a city, attraction, area, etc.
Instagram users can search for photos by place. So location tags are great for connecting with local residents and tourists.

7. Add Alt Text
Add custom alt text to your image(s) via “Advanced settings” > “Write alt text.”
Alt text acts as an image substitute for users with visual impairments or learning differences who use screen-reading software. It makes Instagram posts more accessible.

Instagram uses AI to generate alt text automatically. But custom alt text can be more accurate and effective.
Plus, including keywords in your alt text could help your posts show up in search results and suggestions.
8. Review Settings
The “New post” page offers other options depending on your device, post type, and account settings.
For example, you might be able to cross-post your Instagram photo to your Facebook page. Add music. Or turn off commenting by clicking “Advanced settings.”

Review these settings before posting on Instagram.
Tip: When you create Instagram posts with Semrush’s Social Poster tool, you can cross-post to Facebook, Pinterest, LinkedIn, Twitter, and Google Business Profile.
9. Publish or Schedule Your Post
To publish your Instagram post immediately, tap “Share” or “✓” in the upper-right.

To schedule your Instagram post for later, tap “Advanced settings” > “Schedule this post.” Select a date and time up to 75 days in advance, then tap “Set time.”

Go back to the “New post” page then tap “Schedule” to confirm your post.

Note: You must use the mobile app and have a Professional account to schedule Instagram posts like this. Alternatively, use a social media scheduling tool like Semrush’s Social Poster:
How to Post on Instagram with Semrush
Semrush’s Social Poster tool can make it quicker and easier to add a post on Instagram. And schedule posts for later.
✓ Create and preview your post on one page
✓ Edit your photos with filters, effects, overlays, stickers, and more
✓ Publish your post alongside a comment and new bio link
✓ Cross-post to Facebook, Pinterest, LinkedIn, Twitter, and Google Business Profile
✓ See how Insta posts fit into your wider social media calendar
Especially if you’re posting on Instagram for multiple clients.
✓ Get client approval before posting
✓ Manage multiple accounts in one place
✓ Use Social Analytics to share reports via the Client Portal
After signing up, follow the prompts to connect your Instagram for Business account.
(Don’t have a Business account? Go to “Settings” > “Account” > “Switch to Professional account” in Instagram to get started.)
Then, go to the “Social Poster” and click “New post.”

Check the Instagram icon at the top. And any other connected profiles you’d like to cross-post to.

Now you’re ready to draft your Instagram post.
Enter a caption at the top. Click the smiley face icon to add emojis.
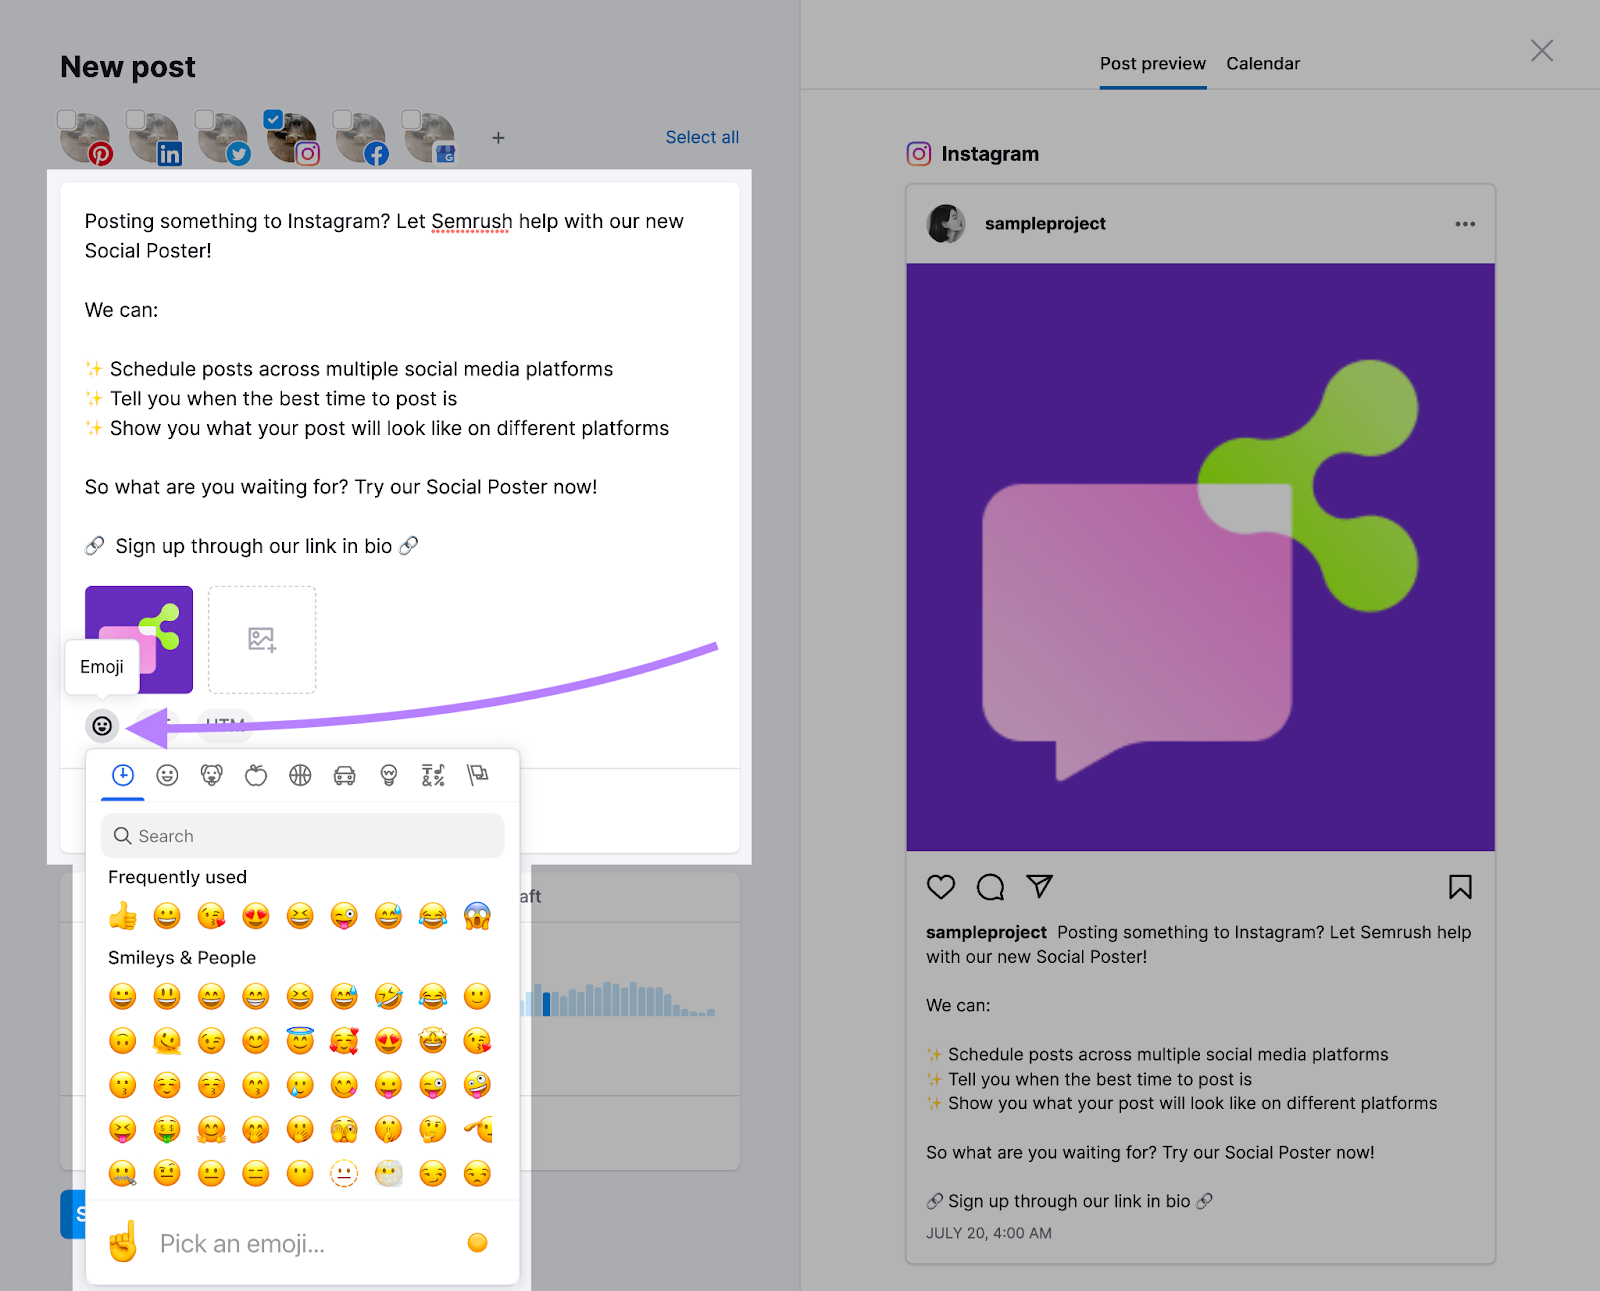
Then drag and drop your photo(s) into the box. Or click to open your file explorer.

To edit an image, hover on the thumbnail and click the pen icon.

There are many ways to enhance your photos:
| Tool | Description |
| Library | Replace your image by uploading another image, opening your webcam to take a photo, or choosing a picture from our library |
| Transform | Crop, rotate, and realign your image |
| Filters | Apply a filter from our library and adjust its intensity |
| Adjust | Change brightness, contrast, saturation, and much more |
| Focus | Apply a blurred effect to certain parts of your photo |
| Frames | Add a border to your image |
| Overlays | Apply an image overlay and adjust its opacity |
| Text | Add highly customized text to your image |
| Stickers | Apply emoticons and shapes to your picture |
| Brush | Draw on your picture using the adjustable tool |
Make sure to click “Save” when you’re done.

If you want to update the link in your bio when the post goes out, click “Link in bio” and enter the URL.
(The first time you do this, you need to set up the process. Click “Learn more” and copy the magic link. Then go to Instagram > “Edit Profile” > “Add Link” > “Add external link” and save it there.)

If you want to publish a comment alongside your post, click “First comment” and enter your text.

Next, decide when your Instagram post should be published:
- Post now: Publish your post as soon as you confirm
- Schedule: Schedule your post for a set time in the future—use the toggle and copy the secret link if your “Post needs approval” first
- Publish regularly: Republish your post at a regular interval
- Save as draft: Save your draft in Semrush and work on it later
Check the “Calendar” on the right to see where the post fits into your social schedule.

Once you’re happy with your settings (and the “Post preview” on the right), click the blue button to confirm.
Or click the gray button to confirm and start your next post. This is handy if you want to schedule Instagram posts in bulk.

And that’s how to post on Instagram via Semrush! You can follow a similar process to publish and schedule video reels.
Check out the rest of our Social Media Toolkit for more ways to elevate your social strategy. Or pick up some extra tips and tricks from our social media management guide.