Editor’s note: On March 21, 2024, Google announced “conversions” would be renamed as “key events.” GA4 will continue to use the term “conversions” in only one specific context: reports that measure your Google Ads campaign performance. The rollout is gradual, so you may still see the term “conversion” in your reports. We’ll update this article with the latest information once the transition is complete.
Google Analytics 4 (GA4) tracks web interactions that are important for your business. They’re known as conversions (or “key events”) and relate to how you achieve business goals.
For example, a completed sale for an online store is a conversion. The same goes for a form submission on a B2B site or an online restaurant reservation.
In this guide, you’ll learn how to set up GA4 conversion tracking for your website. And how conversions (key events) can help you understand your business’s performance, so you can make your marketing efforts more effective.
Why Conversion Tracking Is Important
Conversion tracking turns Google Analytics 4 into a more powerful tool that helps you understand if your website is doing its job. And lets you uncover insights about your site and web visitors that can help you drive more business.
Let’s say you’re a marketing manager for a dental practice with locations in several cities. And you want to get new appointments from patients.
For you, conversions equate to appointment requests submitted through your website. In GA4, you set this as a key event called “generate_lead.”
Here are three important things you’ll be able to learn about your business in GA4:
1. Which Traffic Sources Perform Best
Conversion tracking reveals which traffic sources are best helping you reach your goals. So you can focus your marketing efforts and budget accordingly.
As you can see below, your site produced 112 “generate_lead” conversions in the last 30 days. And you can add a Google Analytics dimension (an attribute that helps you gain an in-depth understanding of your data) to your conversion data to see its traffic sources.
In this case, you can see the originating traffic source using the “Session source / medium” dimension.
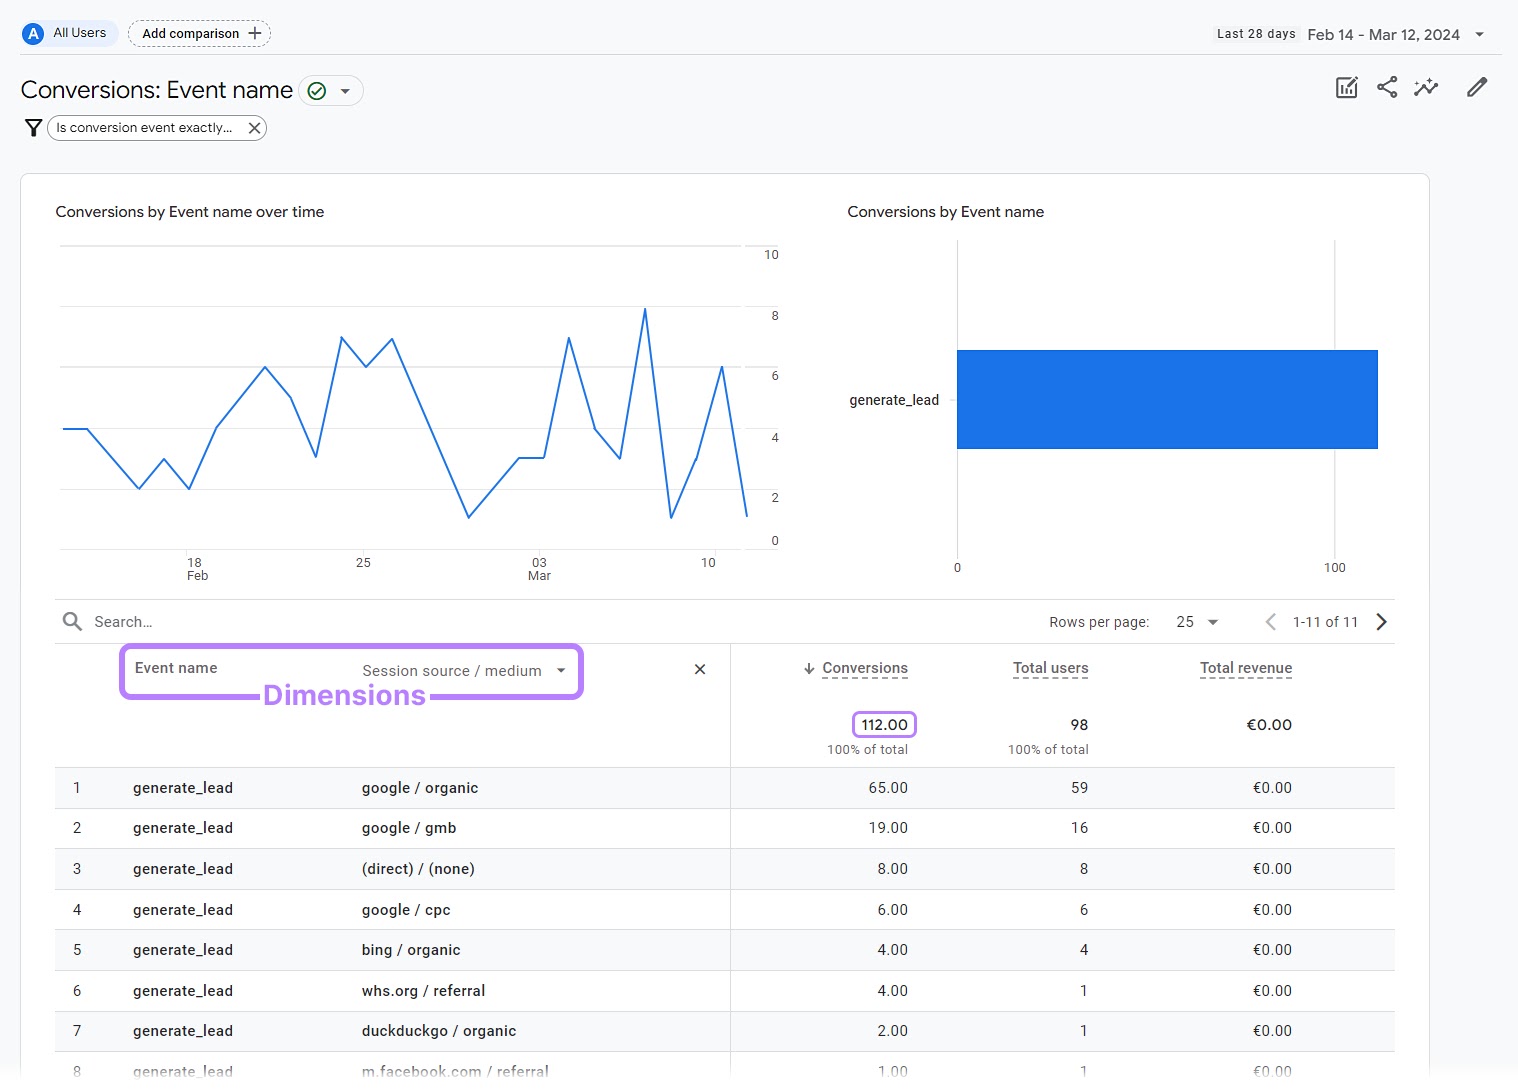
Based on the above data, you may decide to continue focusing on your organic (meaning unpaid) search efforts. After all, organic traffic from Google drives the majority of your conversions (key events).
You also conclude that your social media efforts aren’t working well. And decide to test a new approach on Facebook to see if it’s more effective.
2. How Profitable Your Google Ads Are
Google Ads data integrates with Google Analytics to show campaign performance. Which helps you manage your budget because you can see how much you’re paying for a new patient inquiry.
Let’s say you’re willing to spend up to $300 to acquire a new patient. You can see that your average “Cost per conversion” is $154.30—which is well within your budget.
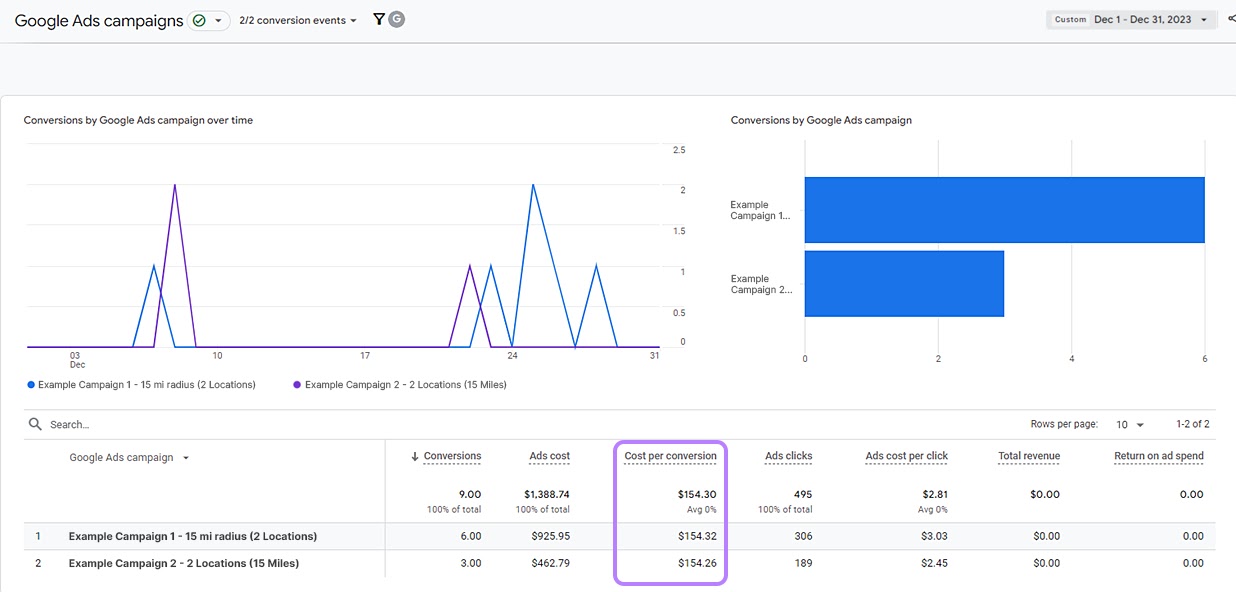
The above ad campaigns both generate a similar cost per conversion. Should that change in the future, you’ll have the information you need to reallocate the budget between campaigns.
You can keep an eye on this important metric each month. Ensuring that your campaigns continue to be profitable for your business.
3. What Characteristics You Should Know About Your Audience
You can use key event data in custom Google Analytics reports to learn more about the people who use your site. So you can better meet their preferences.
If you’re a dental practice marketing manager responsible for several markets, you’ll want to know where your digital marketing efforts perform best.
To obtain that information, create a report in GA4 that shows the city and traffic source for each of your converting visitors. Like this one:

Now, you can compare your campaigns for each market. To tease out what did and didn’t work.
Or maybe you want to redesign your website to make it faster and easier to use for your patients. It’s helpful to know that over 63% of your converted visitors used a mobile device.

With that knowledge, you can focus more on the mobile experience during the web redesign process.
How GA4 Conversion Tracking Works
Google Analytics 4 collects all web interactions as events—visitor interactions like views, file downloads, scrolls, clicks, and purchases. They’re the foundation of all tracking in GA4 and essential to conversion (key event) tracking.
Google Analytics will record some events by default without any work from you. You can read our GA4 event tracking guide to learn about those.
But some events like form submissions require you to set them up.
How to Set Up and See Conversions in GA4
To start using key event information, you need to identify a valuable interaction and follow a few steps to track it.
Let’s go back to our dental practice example.
As with many other businesses, the website generates new customer inquiries through a contact form. So, your first step is to track that important interaction as an event.
Set Up a GA4 Event
To create an event in GA4, log in to Google Analytics. Click “Admin” in the bottom-left corner of any screen.
From the “Admin” area, click “Events” under “Property settings” > “Data display” from the left-hand navigation bar or in the main view.
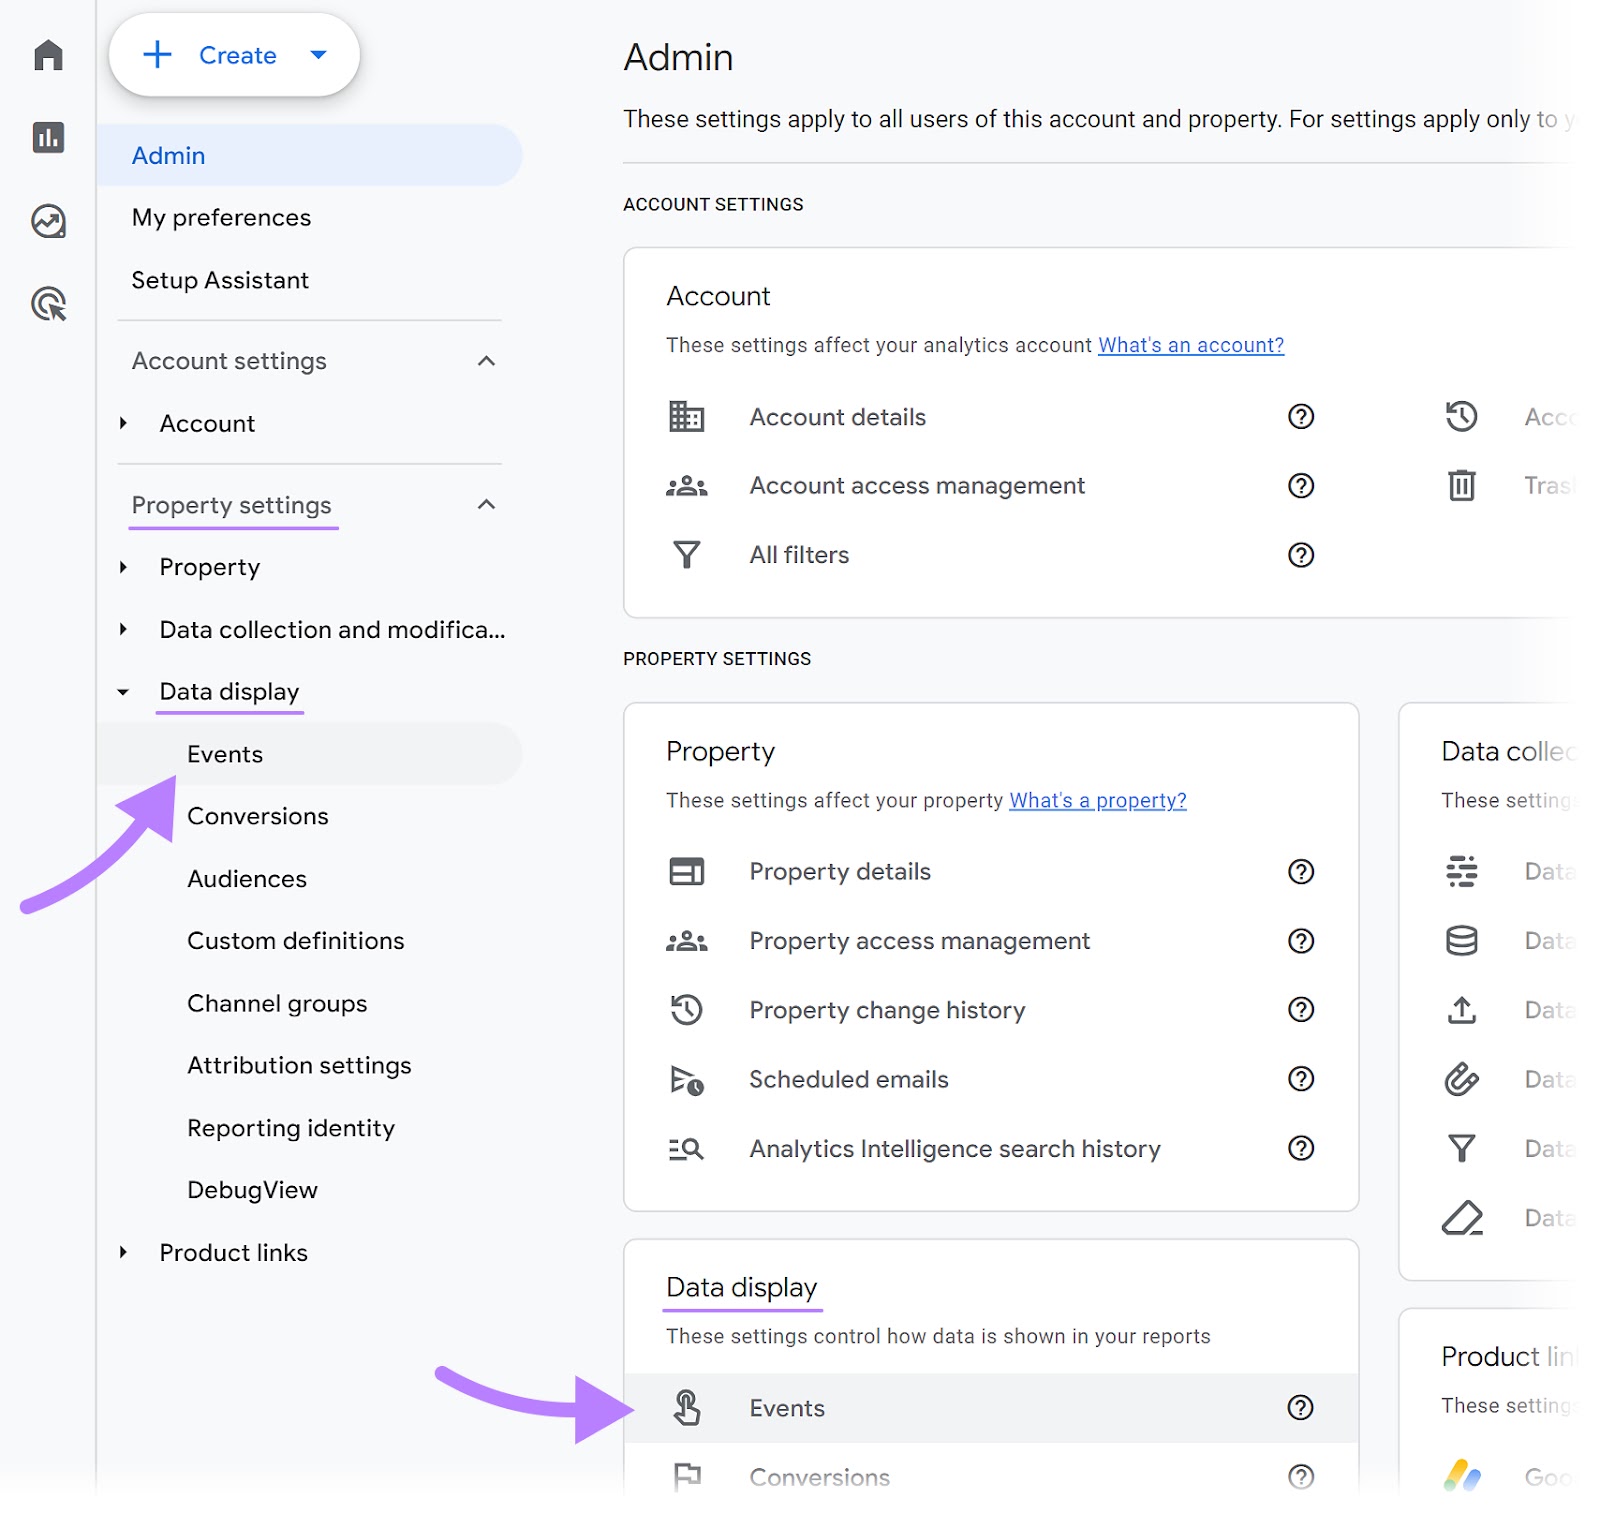
Then, click “Create event” to set up a new custom event.

And click “Create” once more.

You’ll see an event configuration window where you can start by naming your event in the “Custom event name” field. This is the name you’ll see in your reports whenever the event takes place.
Choose something like “form_submission,” “thank_you_page,” or “generate_lead.” The latter matches Google’s recommendation.
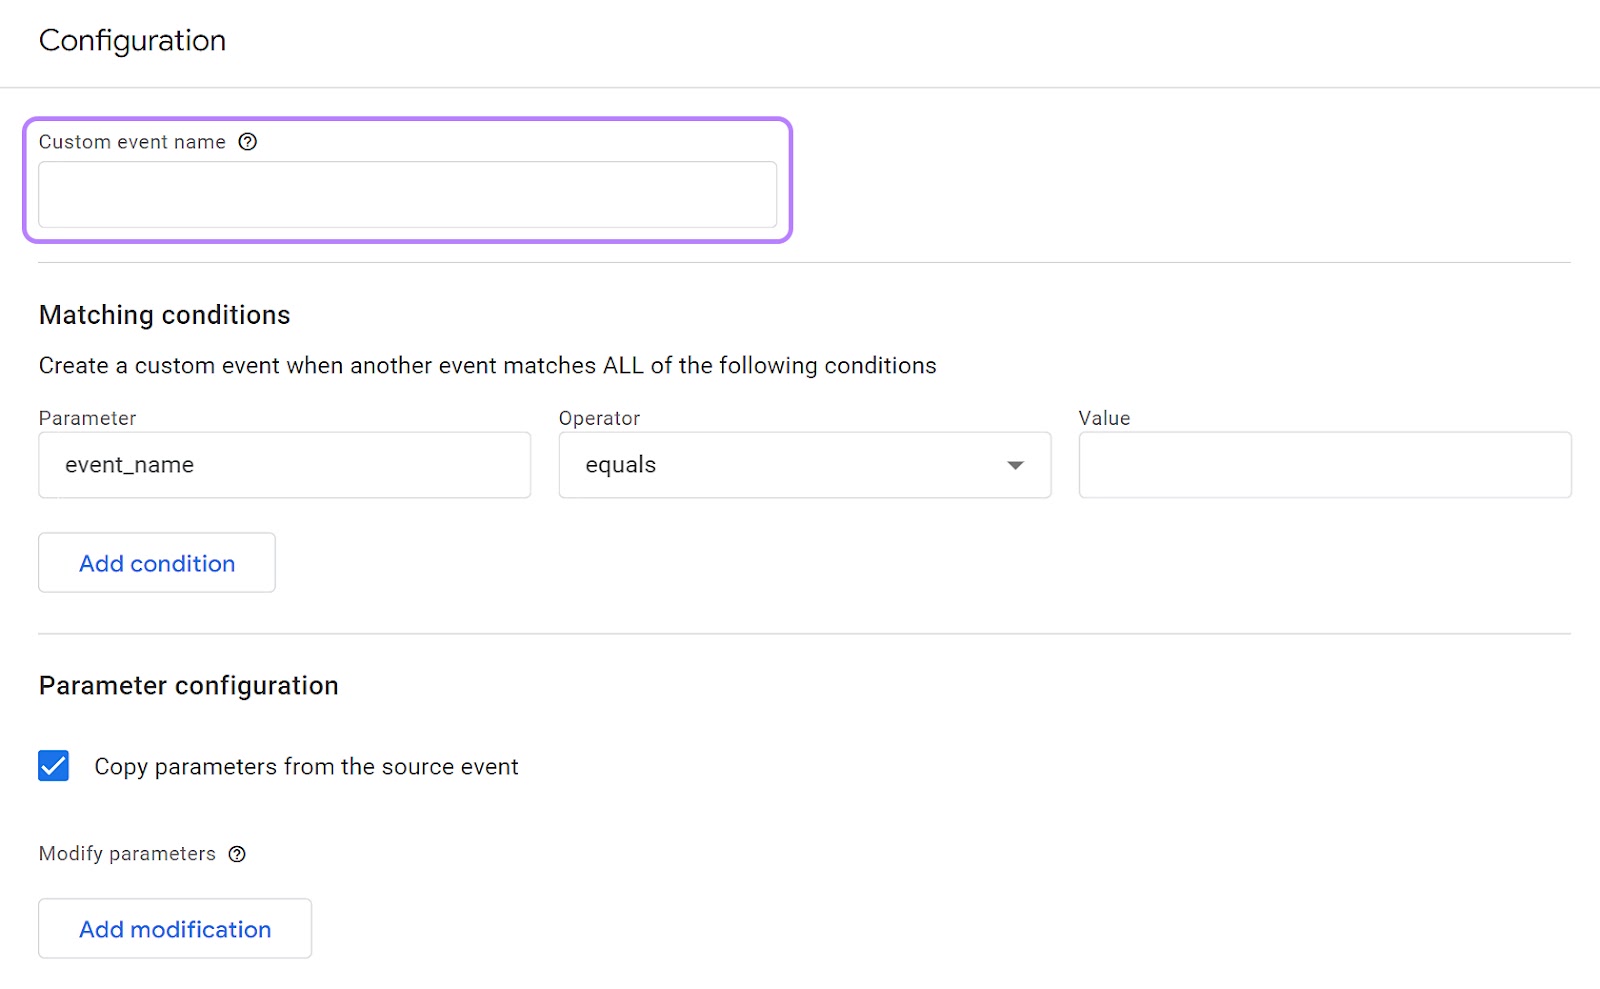
Now, it’s time to set the matching conditions that will determine when your “generate_lead” event fires.
Your contact form redirects to a thank you page when it’s submitted. So, you can look for views of that page to record your custom event.
You’ll need two conditions to achieve that.
First, set the following parameter so the event name equals “page_view.” This limits your custom event only to interactions where a new page is loading.
Click the “Add condition” button.
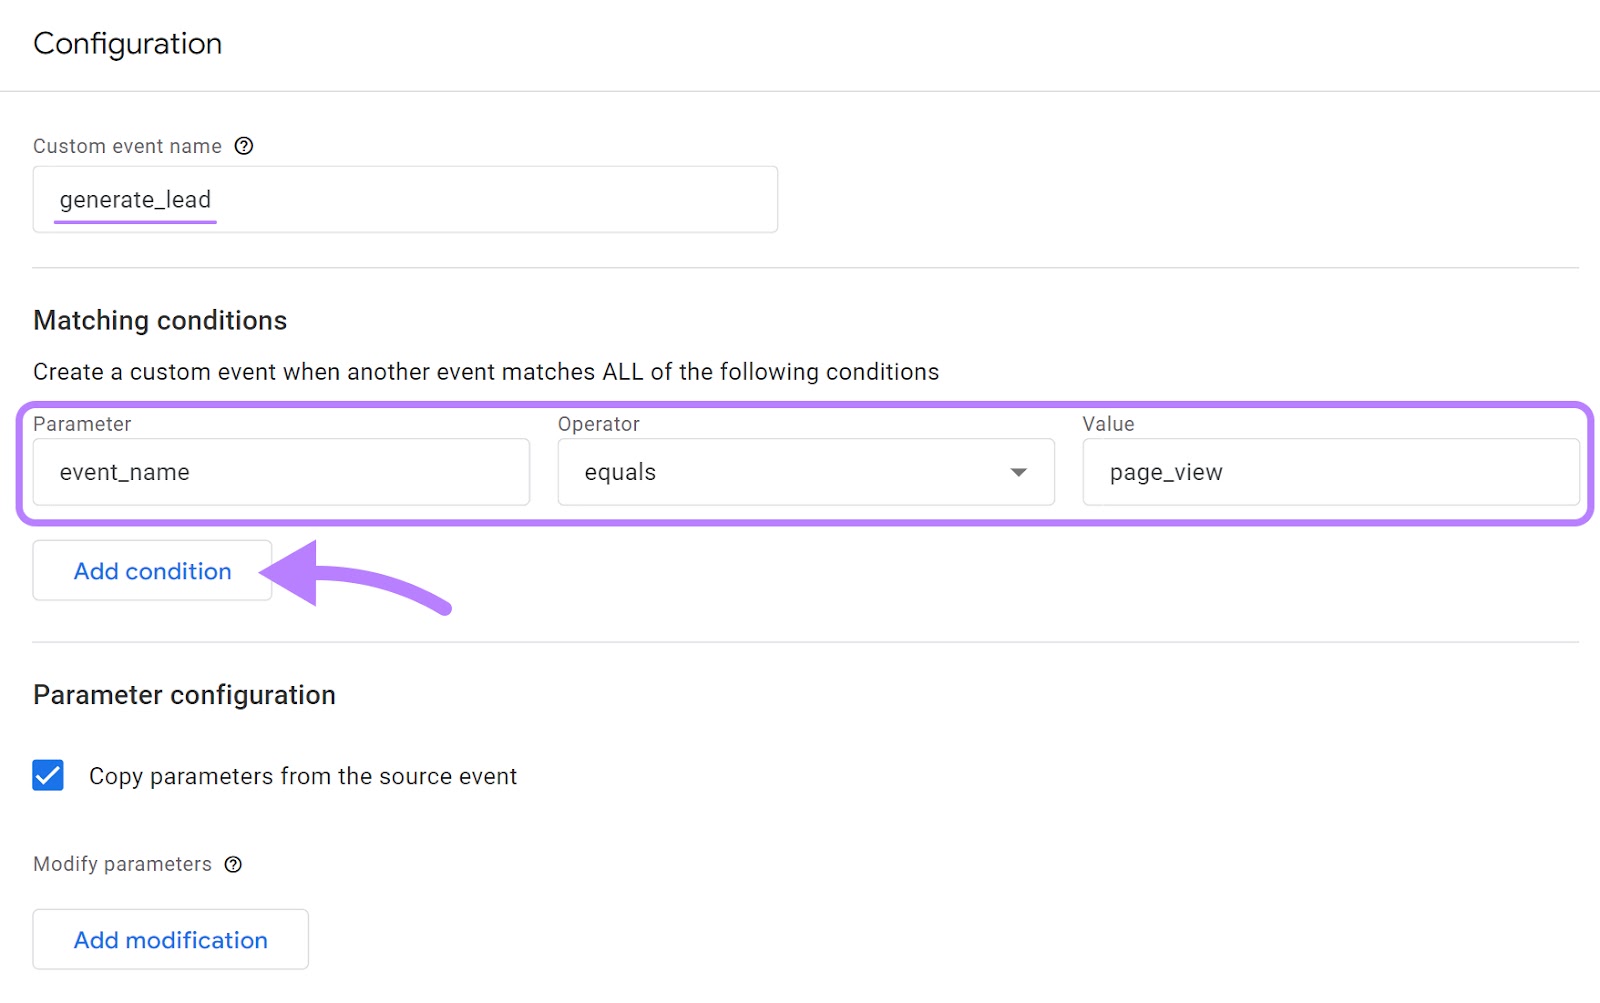
Then, set your next condition to limit your custom event to your thank you page.
Set the “Parameter” by typing “page_location” or choosing it from the drop-down list. Set the “Operator” to “contains.”
Type the page path of your thank you page URL in the “Value” field. Your page path is the part of the URL that comes after the domain name.
Adjust the value depending on the specific URL of the thank you page on your site.
Finally, click “Create.”
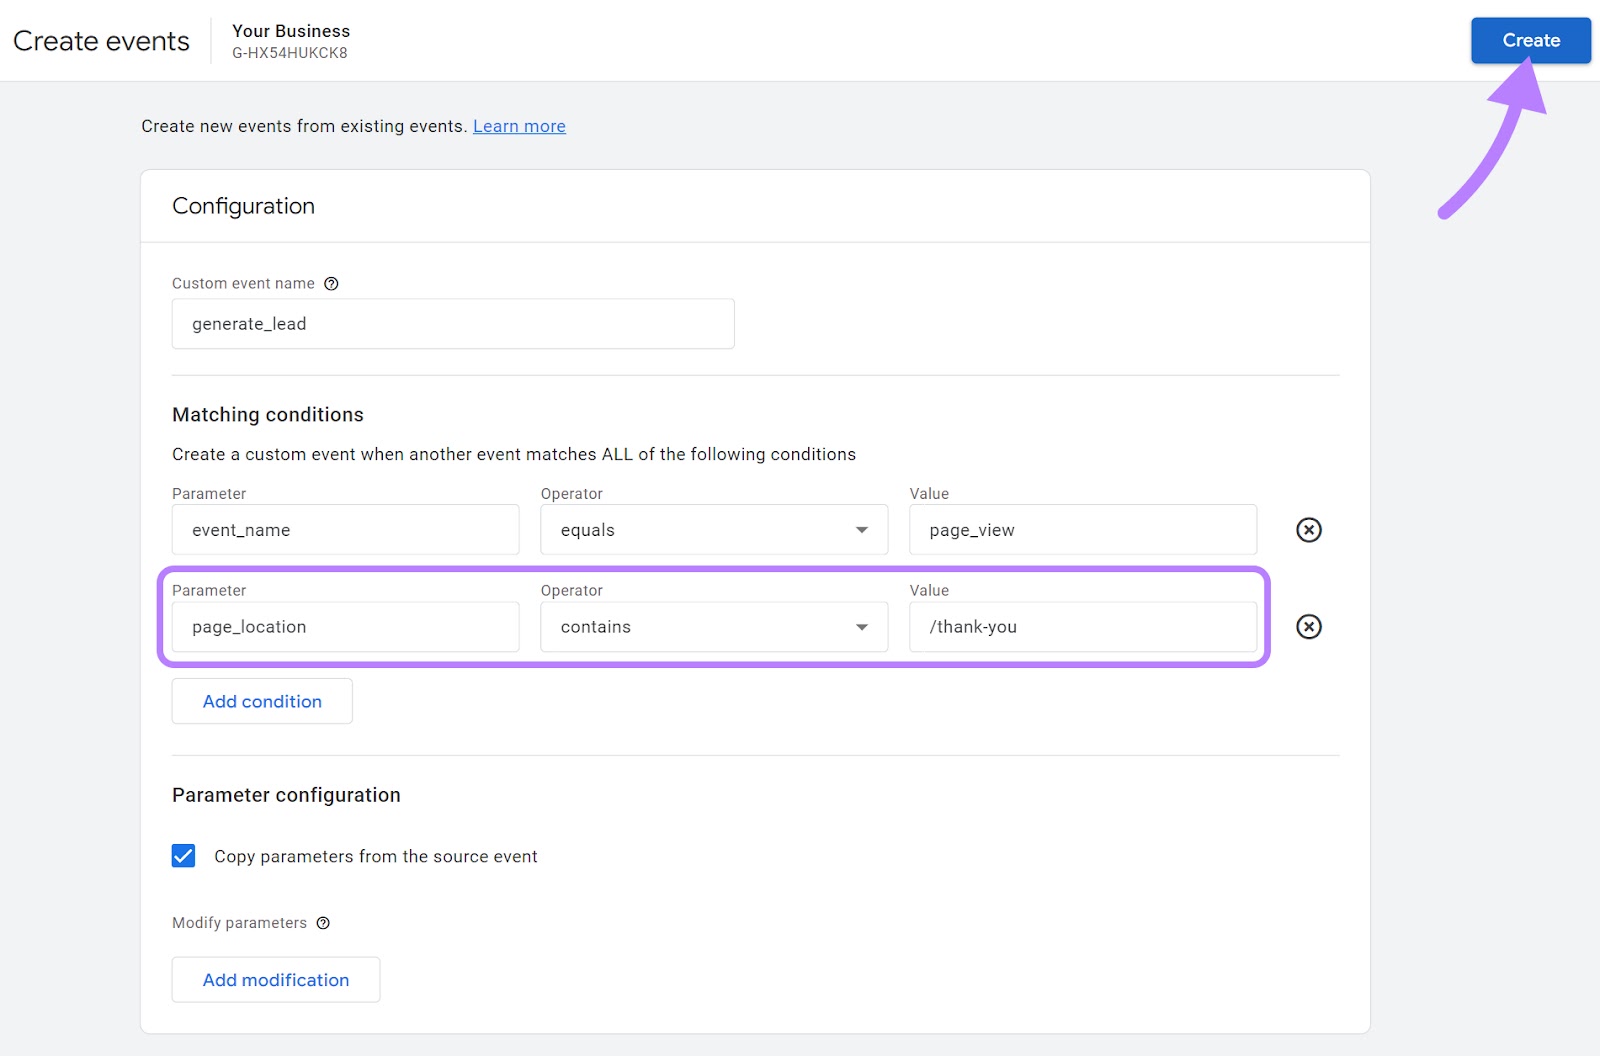
Once you do, you’ll see your new custom event in a summary list.

You’re now recording event data that you can find in your GA4 reports. But it won’t count as a conversion (key event) until you take an extra step.
Mark an Event as a Key Event
Now that you’ve created your custom event, click “Conversions” under “Admin” > “Property settings” > “Data display” to set up GA4 conversion events. Then, click “New conversion event.”

Type the name of your new event in the “New event name *” field and click “Save.”

Your new conversion event will appear in a list.

Next, let’s review where to find your conversion data.
View Your Conversion Reports in GA4
Google Analytics has a built-in report where you can see all your conversions (key events).
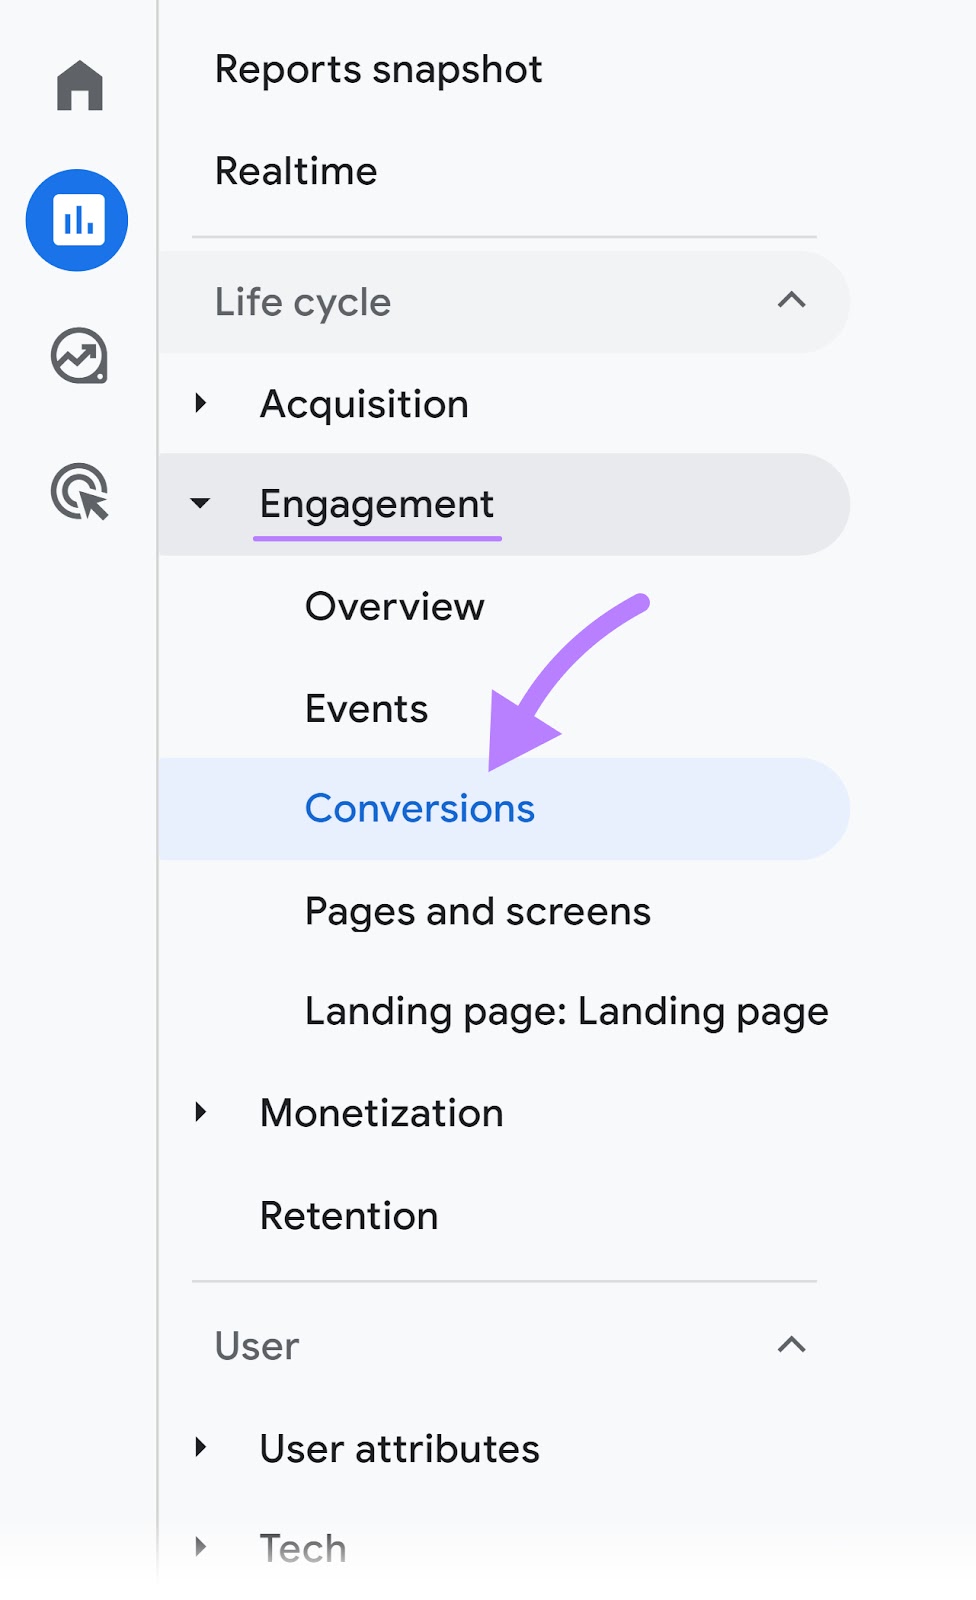
To get there, click “Reports” from the left-hand navigation bar. Select “Engagement” followed by “Conversions.”
You’ll see a report listing any conversion events you’ve created so far. And a chart showing how often they occur over time.
To get more information, add a secondary dimension by clicking the “+” sign next to the event name.
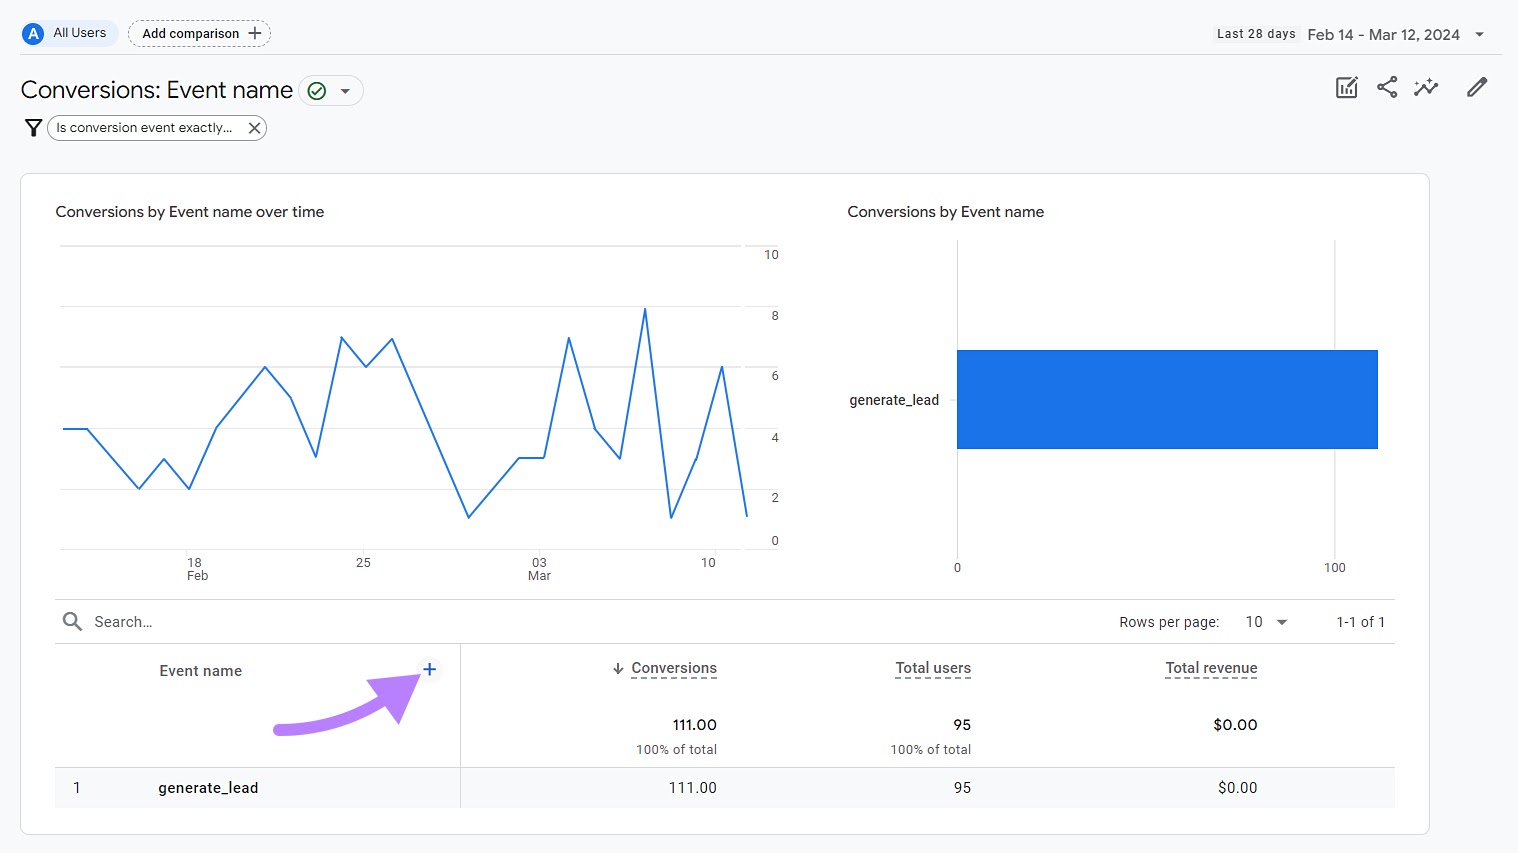
A dialog box will appear showing various dimensions for more granular analysis.
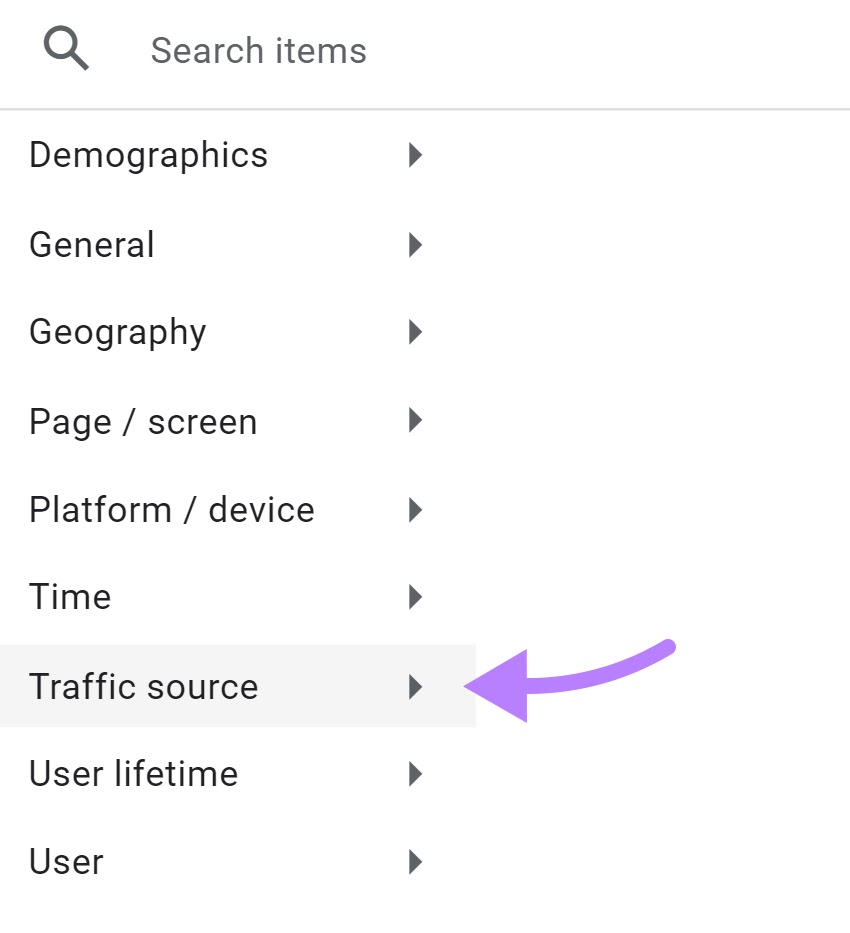
Click “Traffic source” to analyze where your conversions came from.
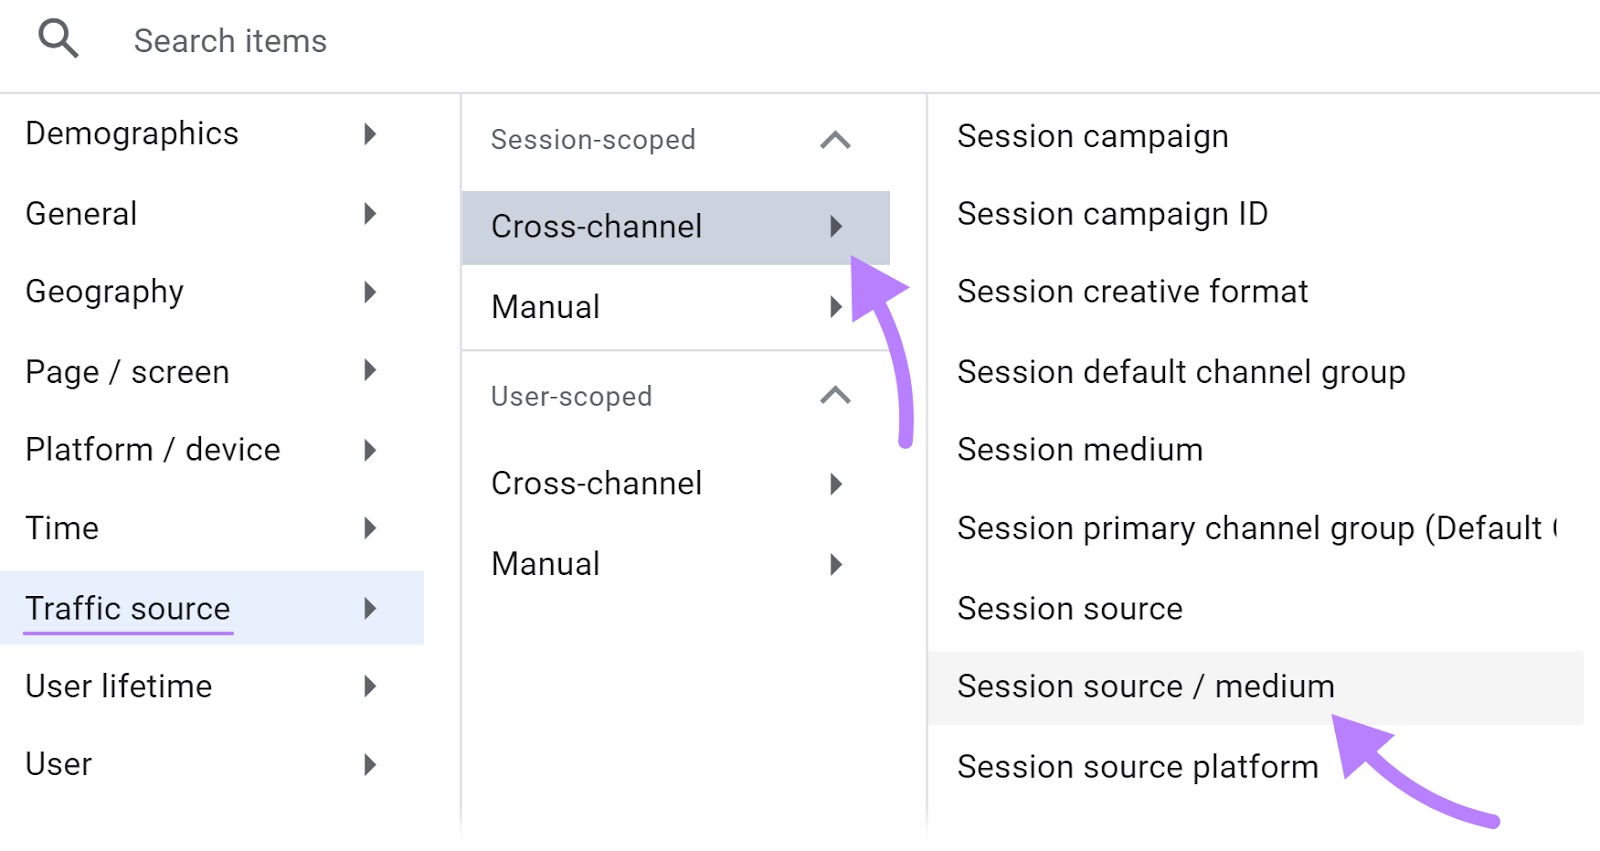
Then, select “Cross-channel” followed by “Session source / medium.”
This is a way to identify your most important Google Analytics traffic sources—what’s working well. It also helps you uncover traffic sources where you might have opportunities to try new tactics.
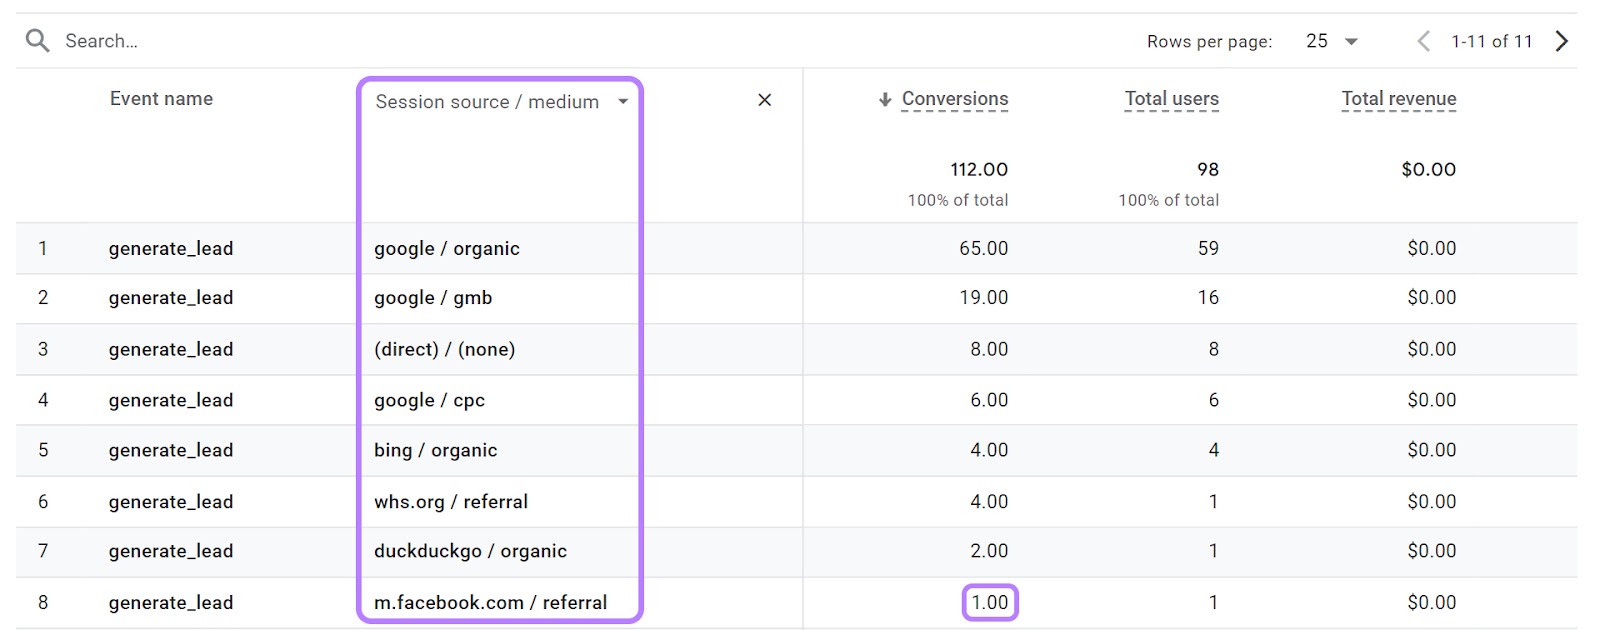
For example, the traffic data shows only a single conversion from Facebook. This might signal that it’s time to look deeper at your social media content strategy.
Evaluating Additional Conversion-Related Information
Here are a few ways to get even more insights about your conversions:
Conversion Rates
Your conversion rate tells you how efficiently users are converting. To help you understand whether there’s room for improvement.
There are two conversion rates in GA4:
- Session conversion (key event) rate: The number of sessions (visits) resulting in a conversion divided by the total number of sessions. And multiplied by 100 to get a percentage.
- User conversion (key event) rate: The number of users (unique visitors) with a conversion divided by the total number of users. Also multiplied by 100.
Going back to our dental practice scenario, let’s say your website receives 10,000 visits in one month and generates 105 conversions. Your session conversion rate is 1.05%.
But many of your visitors come to the site more than once over that period. The total number of users is 5,000. And so your user key event rate is 2.10%.
You might choose to analyze one or the other depending on what question you’re trying to answer. And the insights you’re looking to glean. For instance:
- How likely is a single visit to result in a conversion? Look into session conversion rate.
- What are the chances that a visitor will ultimately convert? User conversion rate can help here.
Let’s say you want to forecast conversions based on a traffic goal.
For example, your leadership team wants to increase website traffic by 20,000 visits in the year ahead. You can anticipate that this will have a business impact of 210 new appointment requests (20,000 x .0105 = 210).
Here’s how you can get conversion rate data in your GA4 reports.
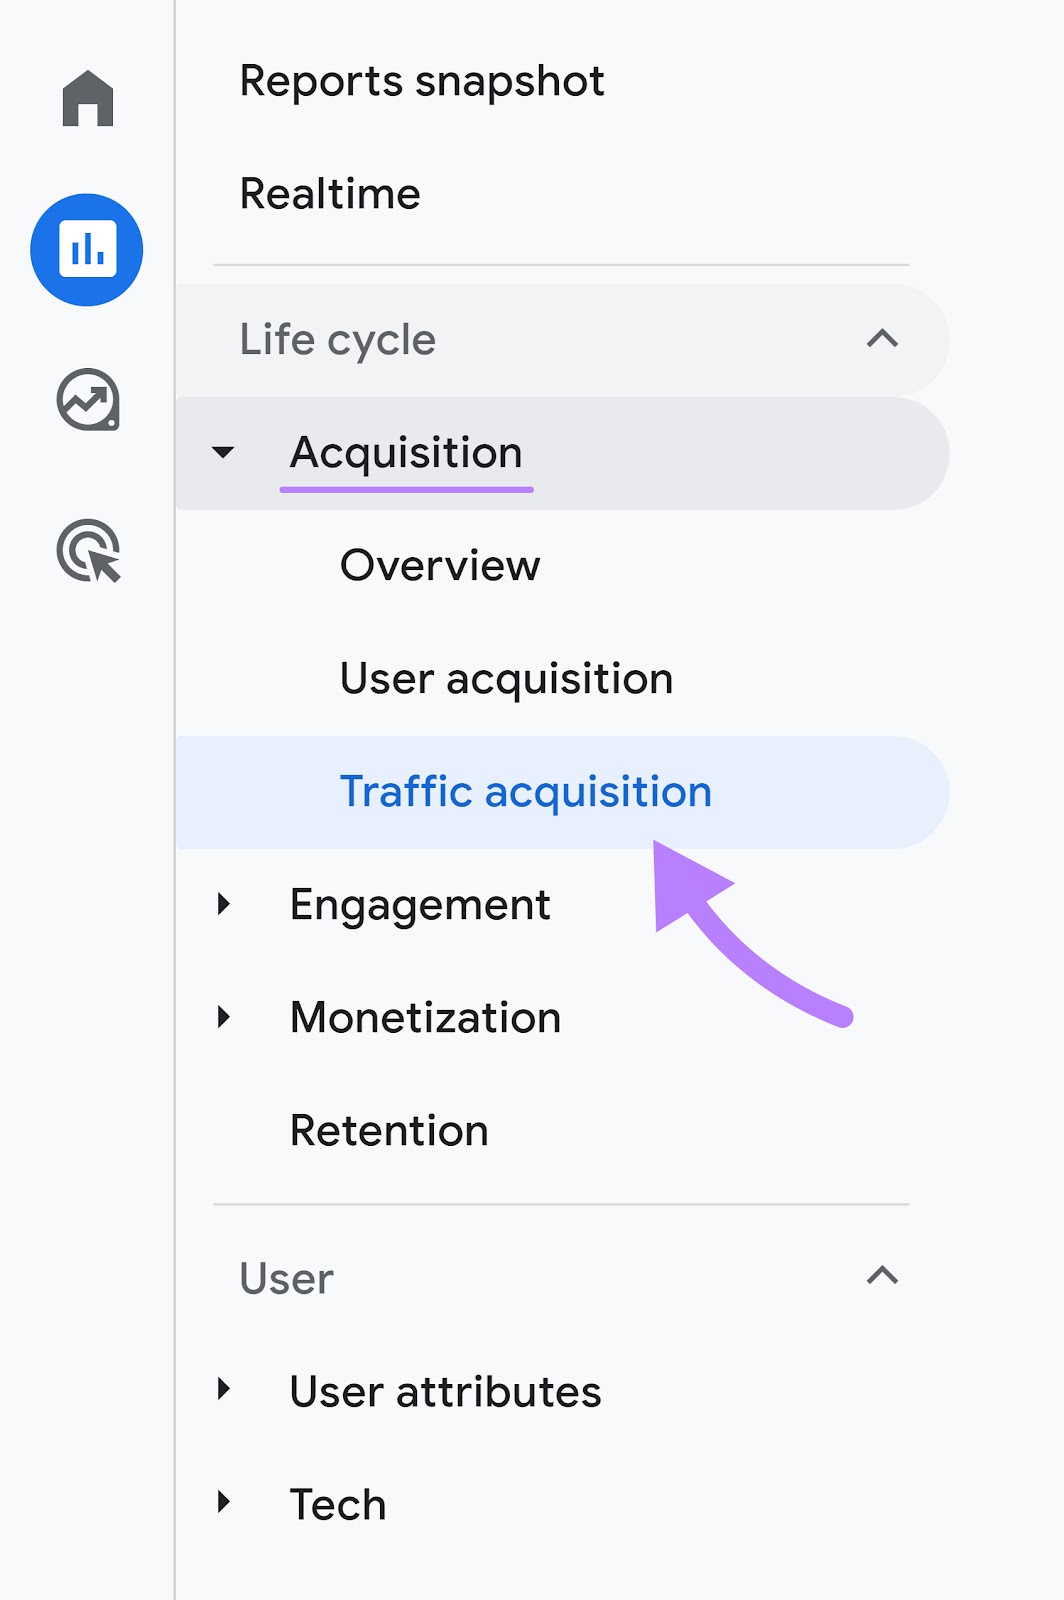
First, click “Traffic acquisition” from the “Acquisition” drop-down of your GA4 reports section.
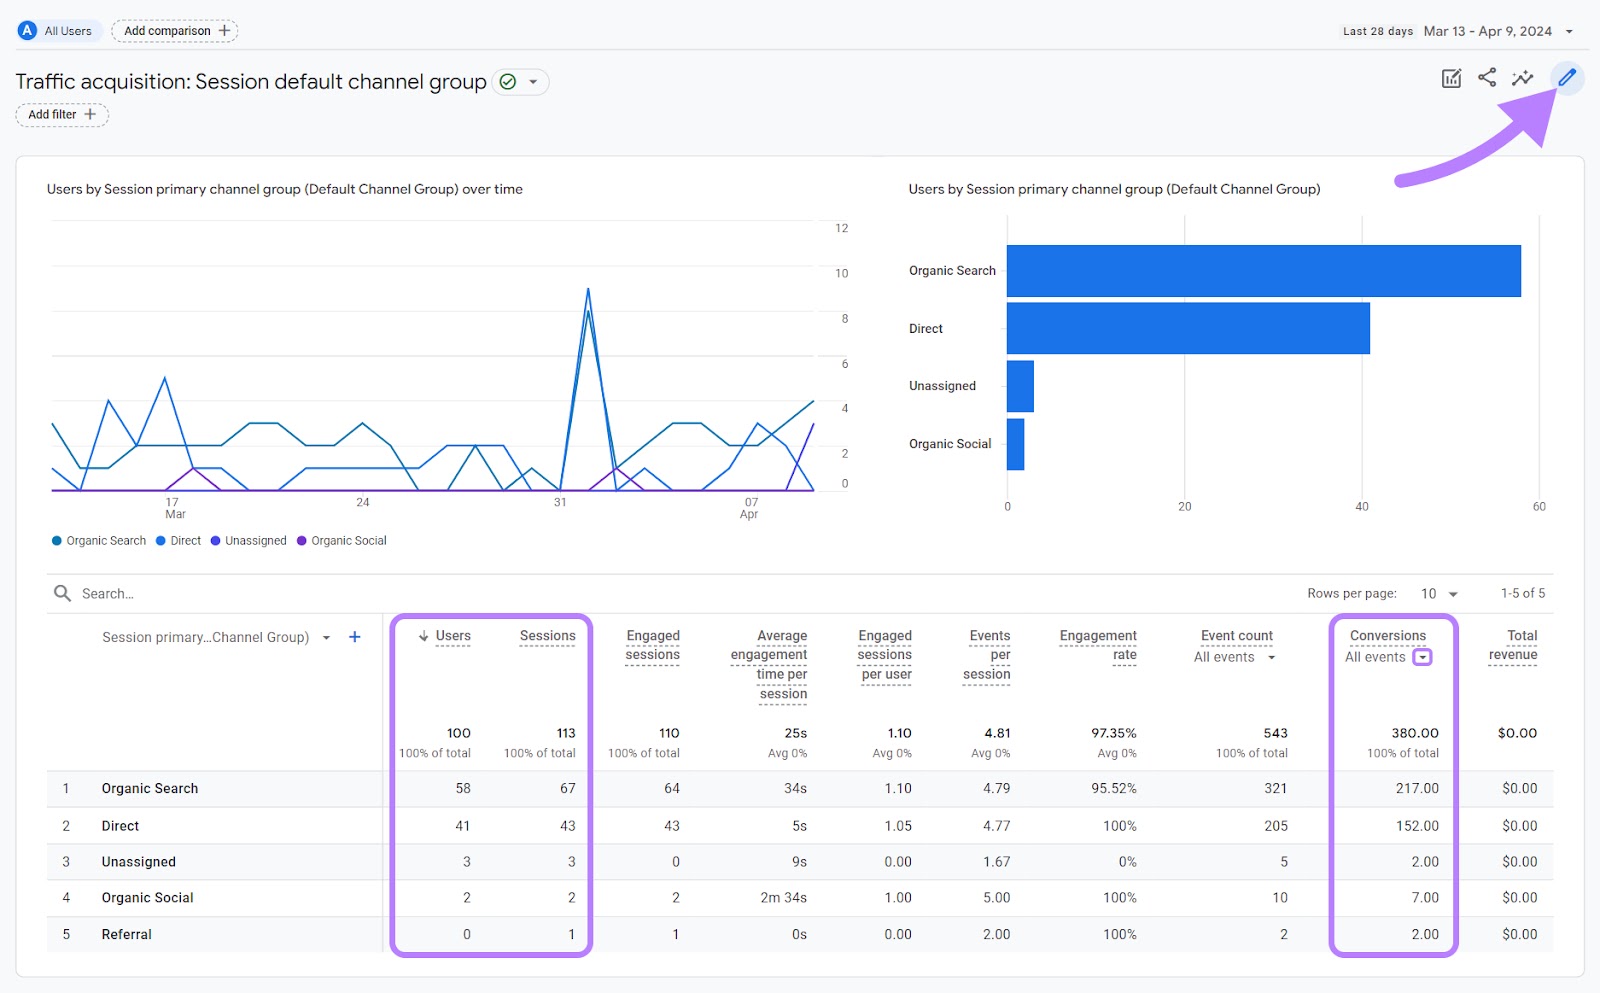
You’ll see two graphs at the top and a detailed data table below. Your conversion (key event) counts are visible in the second column from the right, alongside other important metrics like “Users” and “Sessions.”
Click the pencil icon in the top right to customize your report.
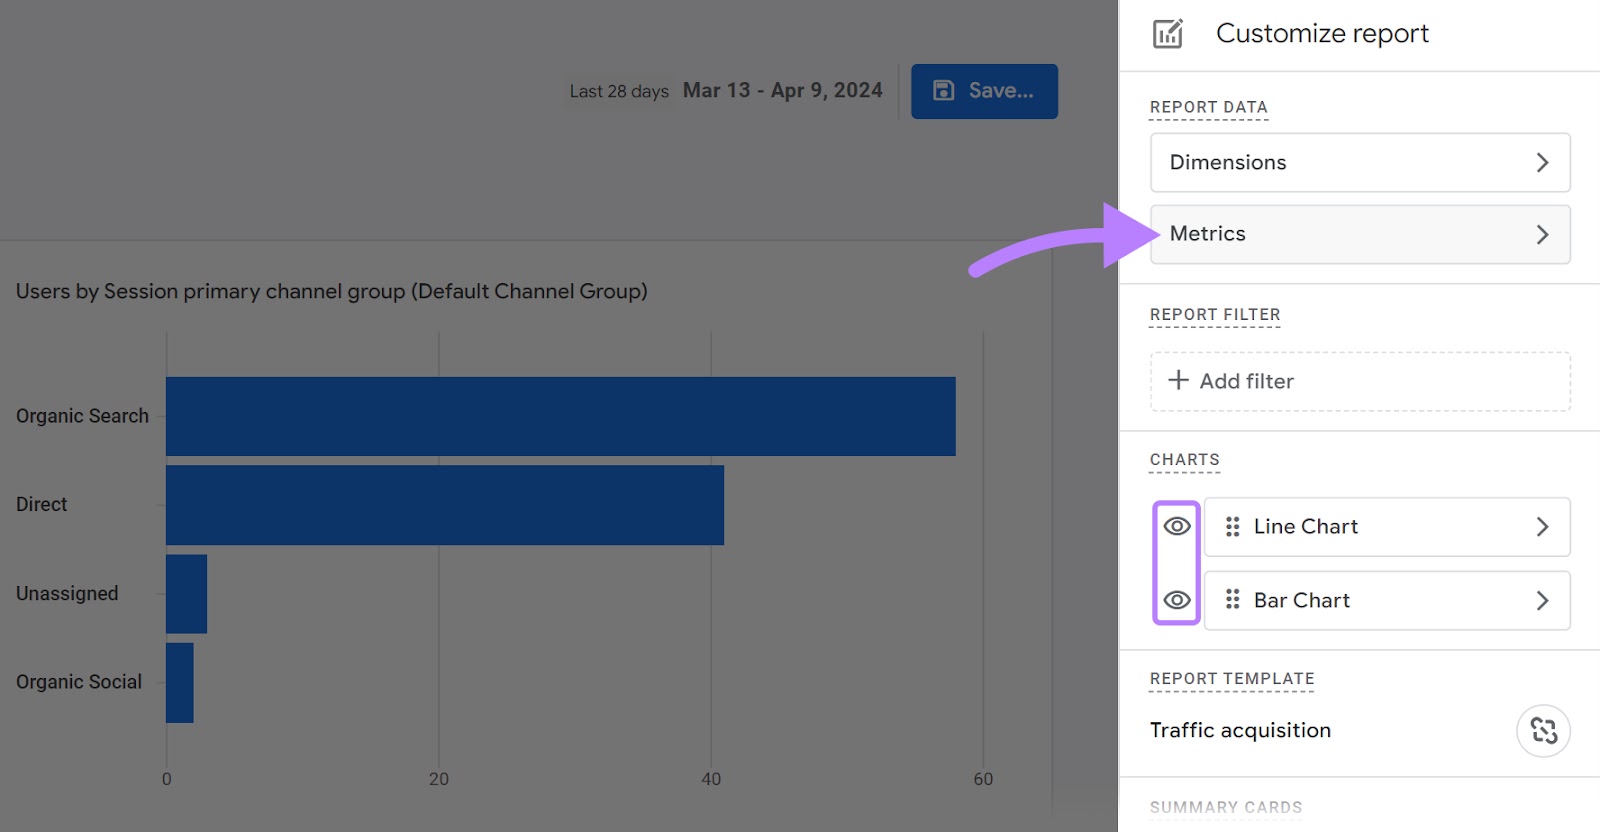
You’ll see a “Customize report” window to the right. Click “Metrics.”
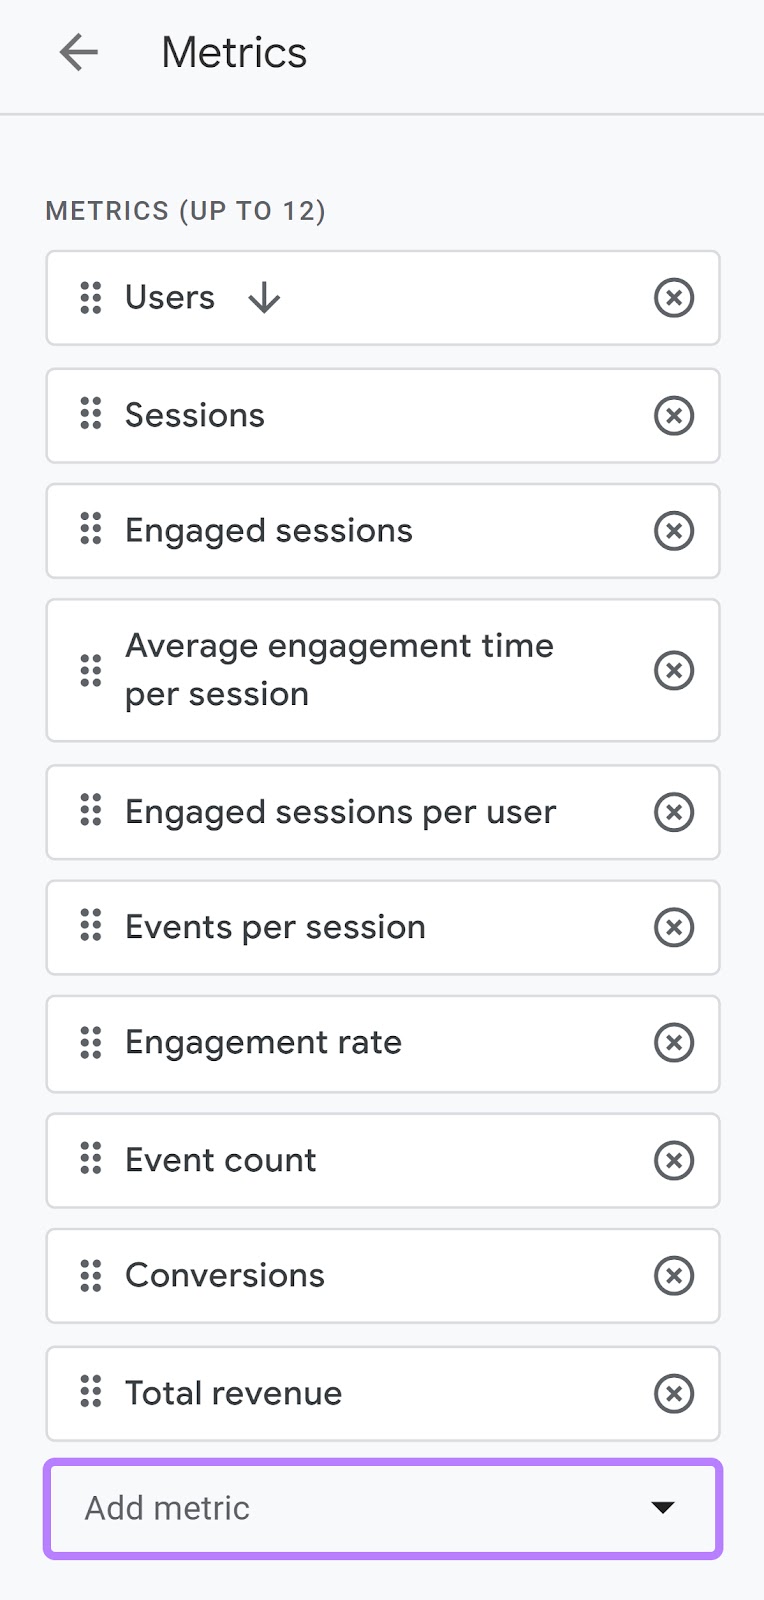
Now, click the “Add metric” field at the bottom of your metrics list. You can also delete any irrelevant metrics from your table by clicking “x.”
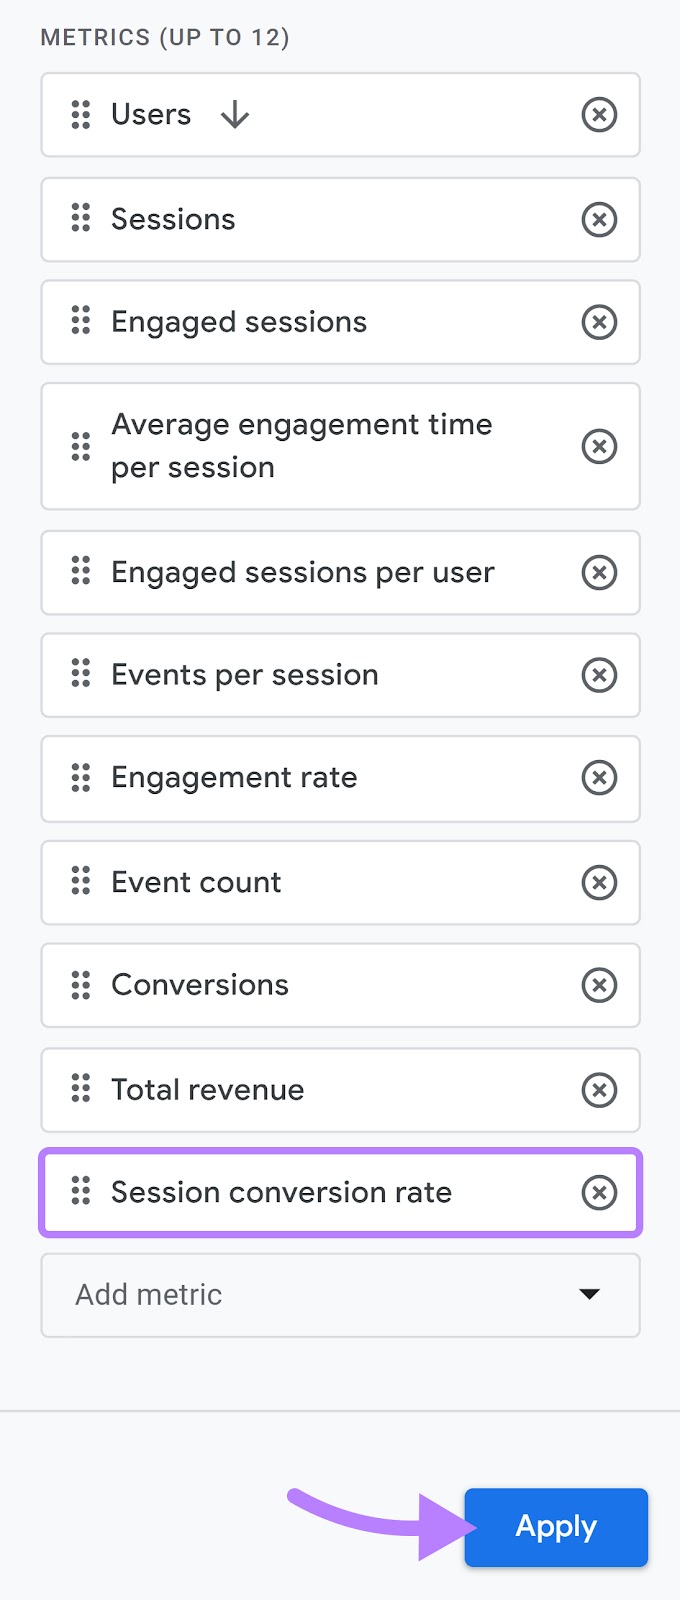
Begin typing “conversion” and select “Session conversion rate” when it appears. Your list of metrics will change to include your new addition. Click “Apply” to update your reporting view.
You’ll now see a new column at the far right of your table: “Session conversion rate.” By default, this will show the conversion rate for all your conversion events.
Click the down arrow to the right of “All events” to choose which specific conversion event you want to analyze.
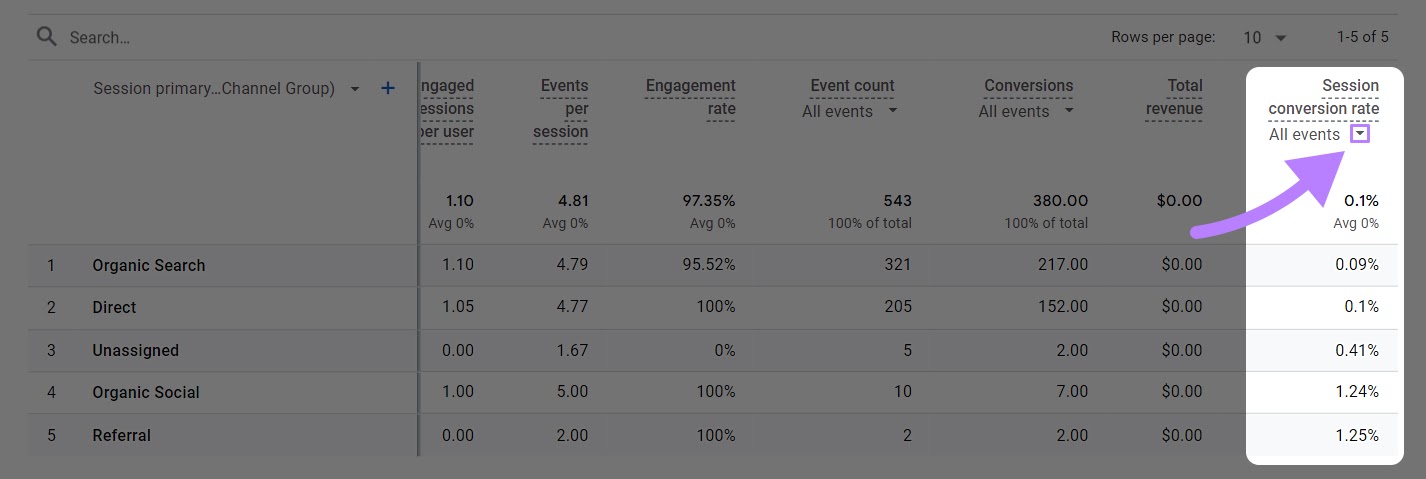
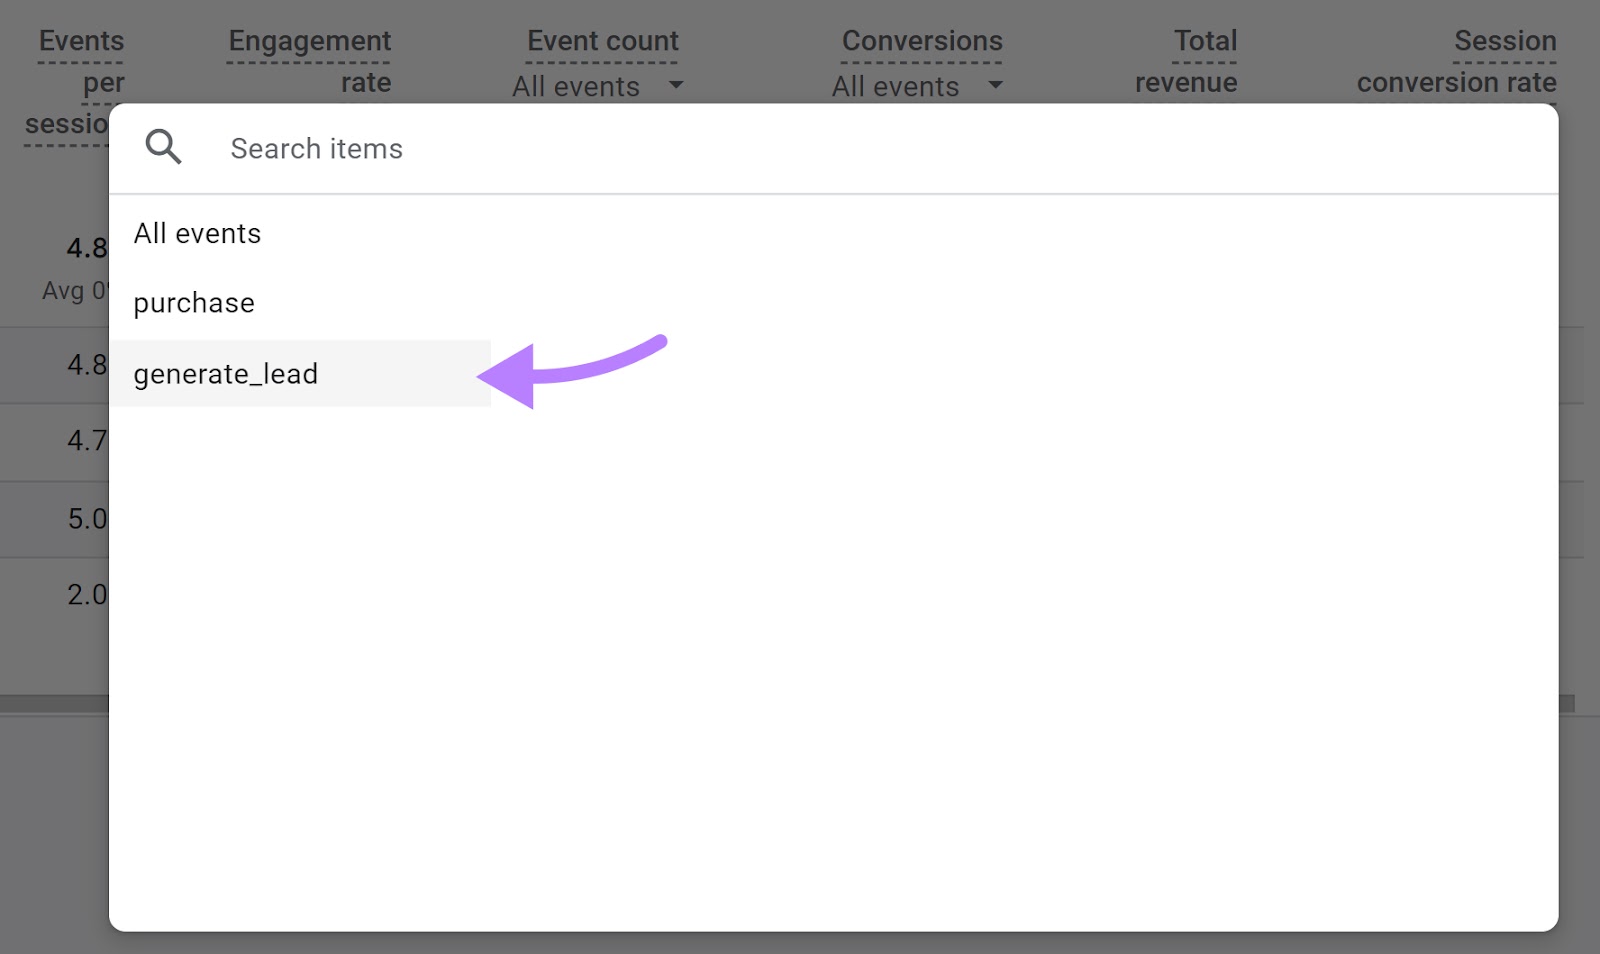
Choose your desired conversion from the dialog box and your report data will refresh.
In this case, we only have the single “generate_lead” conversion (remember that “purchase” is a GA4 conversion by default). Click on it.
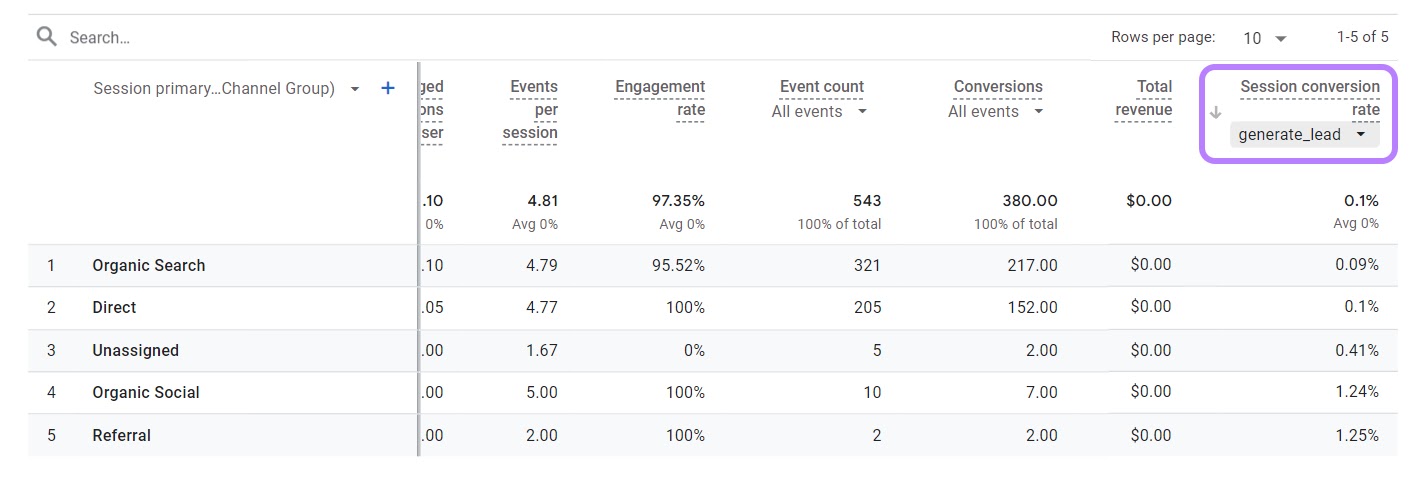
The column header will update automatically so you can see what you’re analyzing.
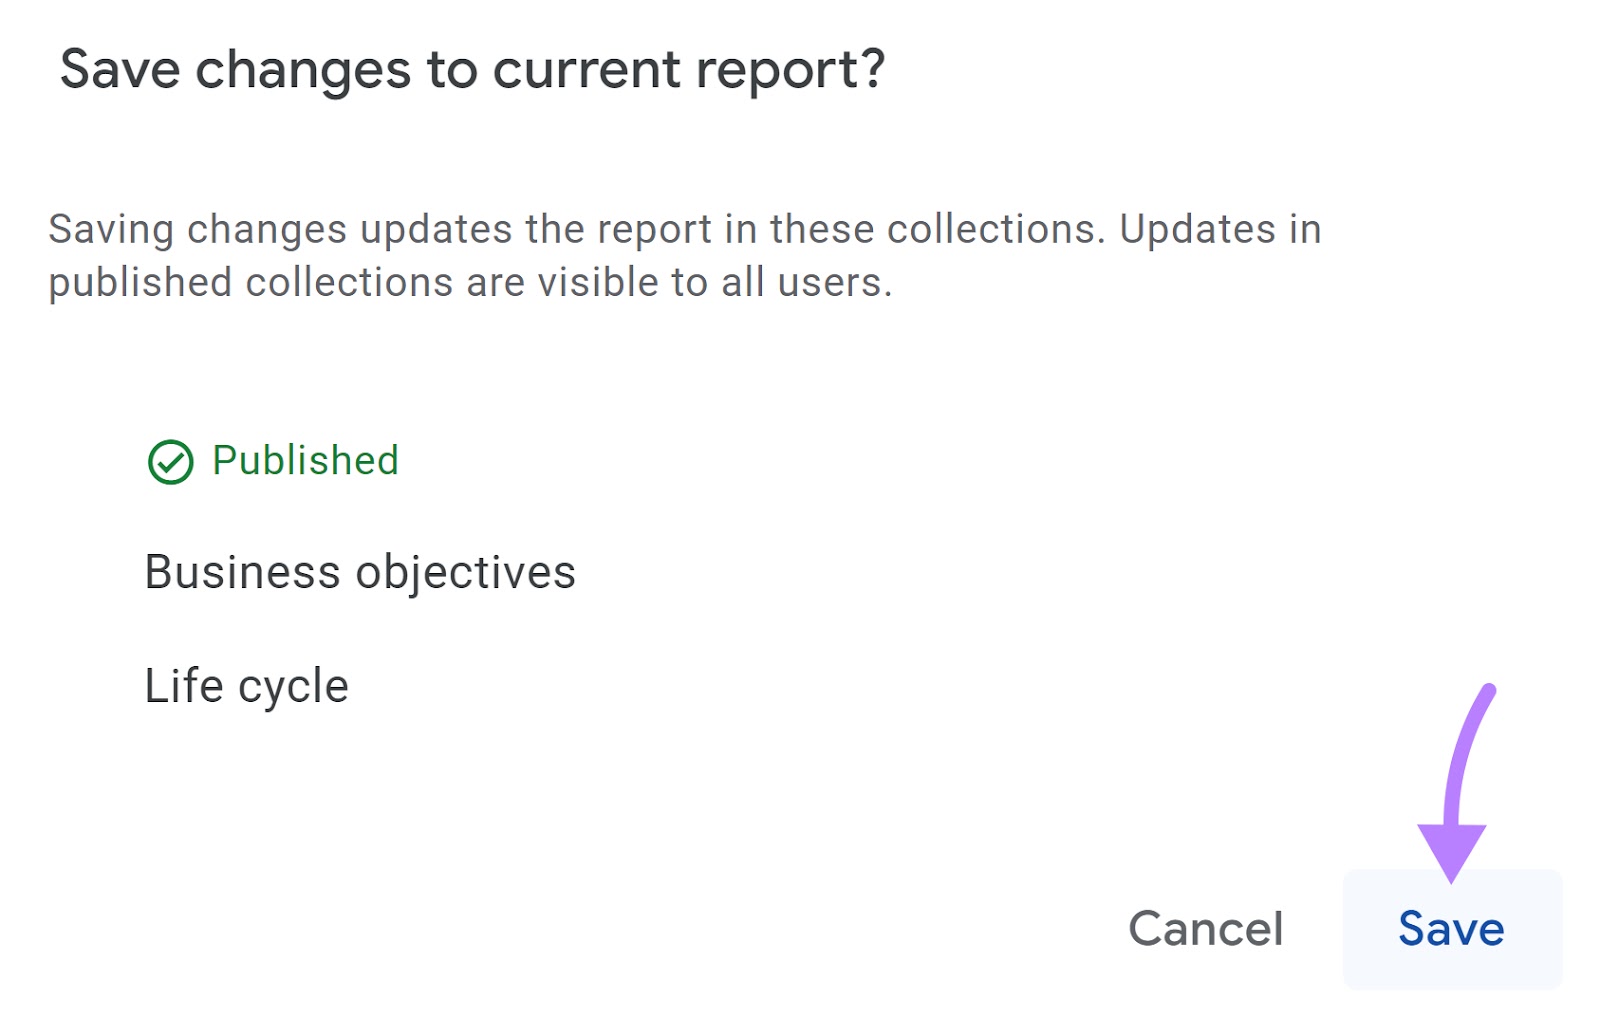
To make your changes to the report permanent, click “Save” as shown below. Then, select “Save changes to current report.”
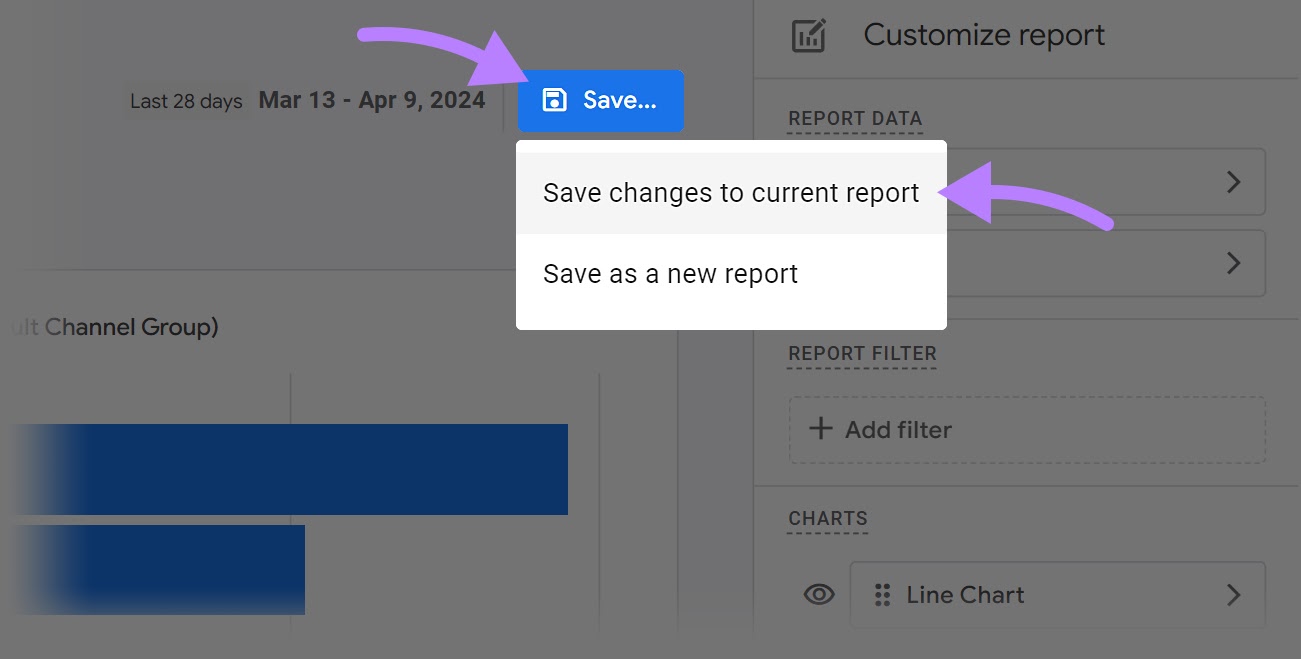
Click “Save” one last time.
As you continue to create new GA4 events and mark them as event conversions, you’ll be able to use your conversion rate data to analyze individual conversions.
Attribution
Attribution is the process of assigning “credit” for conversions (key events) to various Google Analytics traffic sources.
Let’s say you had a visitor who purchased from your ecommerce site after three visits.
- The first visit came through organic search
- The second visit came from email marketing
- The third visit was via organic social media
Google Analytics can give all the credit to social media for driving the last visit—called last-click attribution. Or use data-driven attribution, which gives GA4 the flexibility to acknowledge multiple channels.
The data-driven attribution model is the default and what Google recommends. Google says this model is advertiser-specific and uses data unique to each website and advertiser to credit conversions properly.
You can compare the attribution models using GA4’s model comparison report.
Start by clicking “Advertising” from the left-hand navigation menu. Then, click “Model comparison” to see the two attribution models side by side.
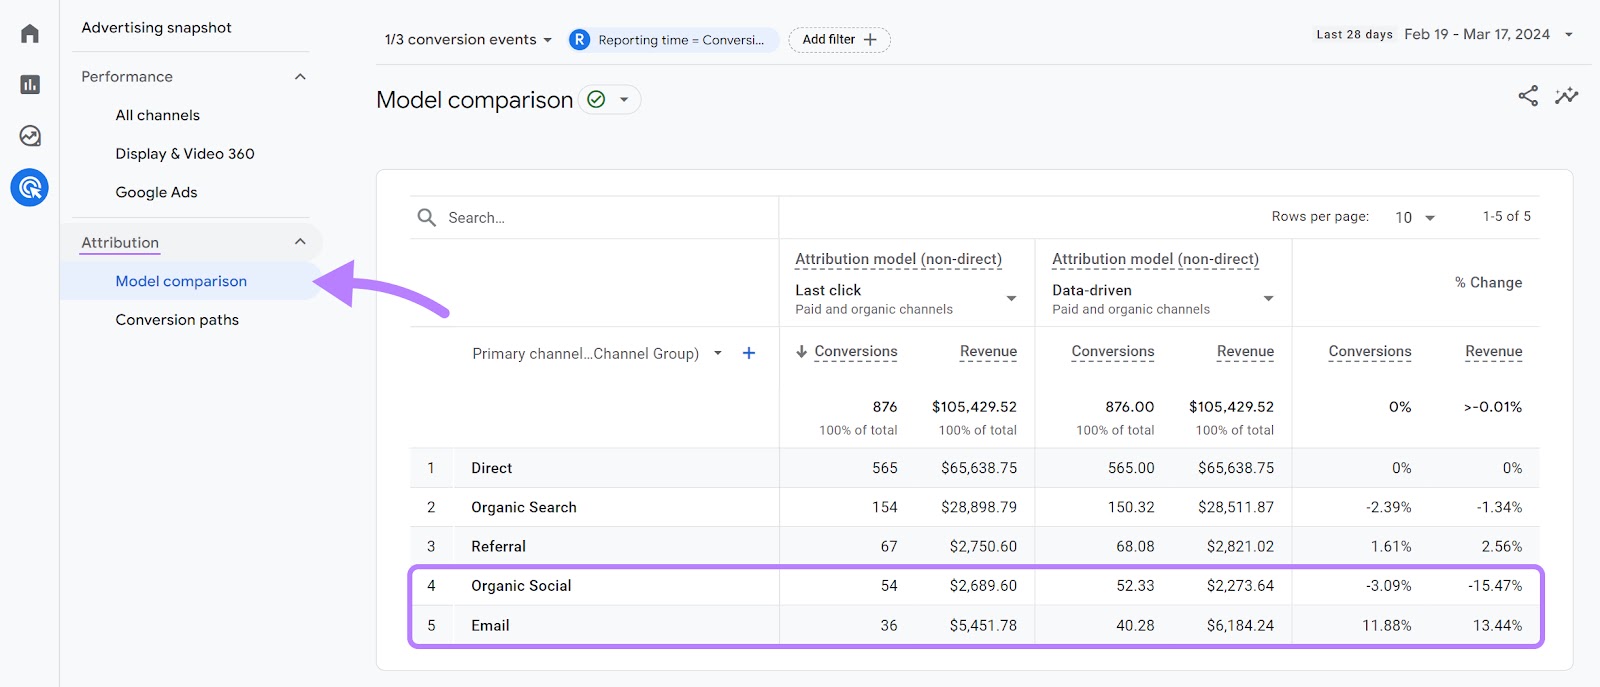
For this particular ecommerce business, you can see that the data-driven model assigns more credit to email and less to organic social than the last-click model.
Conversion Paths
Conversion paths help you understand all the traffic sources factored into your conversions.
Let’s go back to our dental practice example and click the “Conversion paths” report. By default, this report will show data for all conversion events combined.
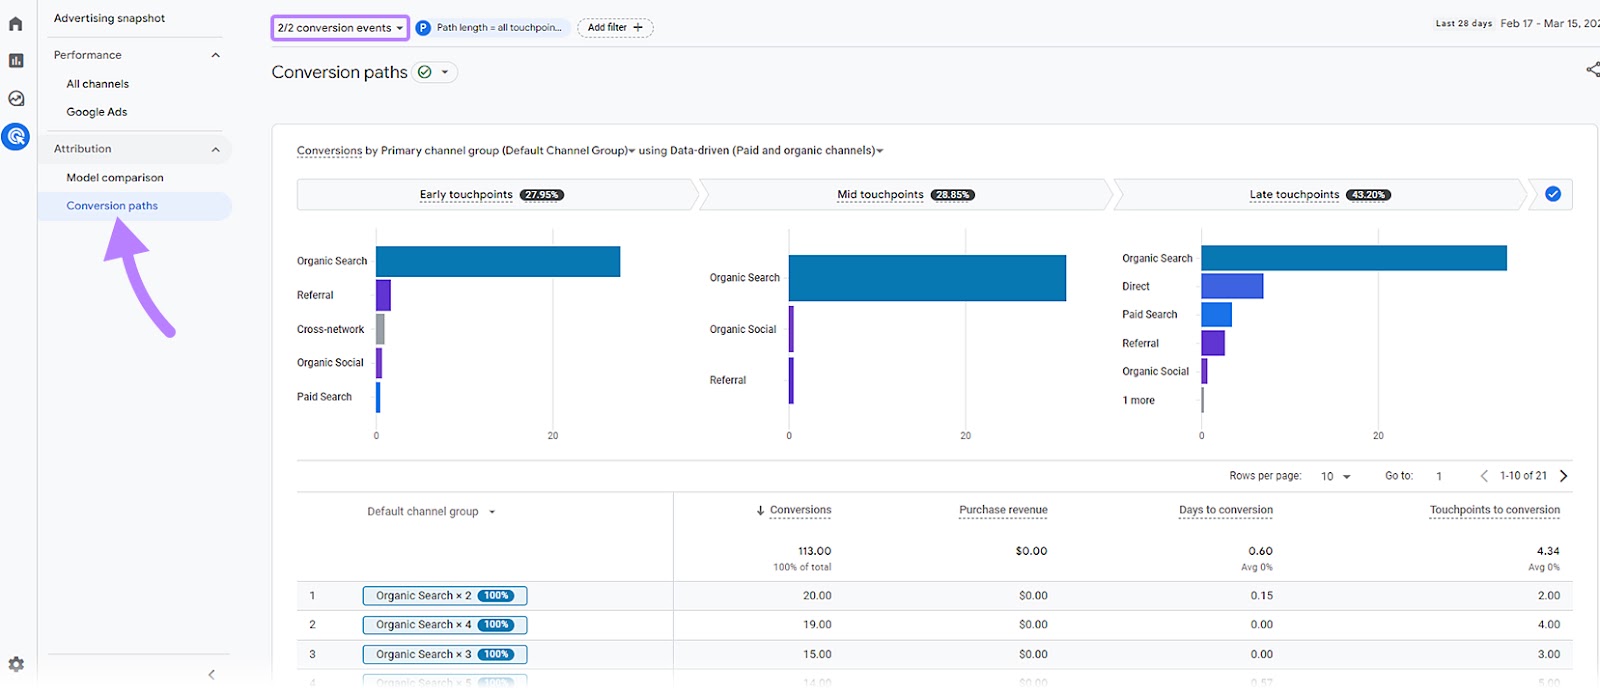
If you want to limit your conversion path analysis to a single conversion (key event), click the “conversion events” drop-down at the top of the page. Use the toggles to choose a conversion and click “Apply.”
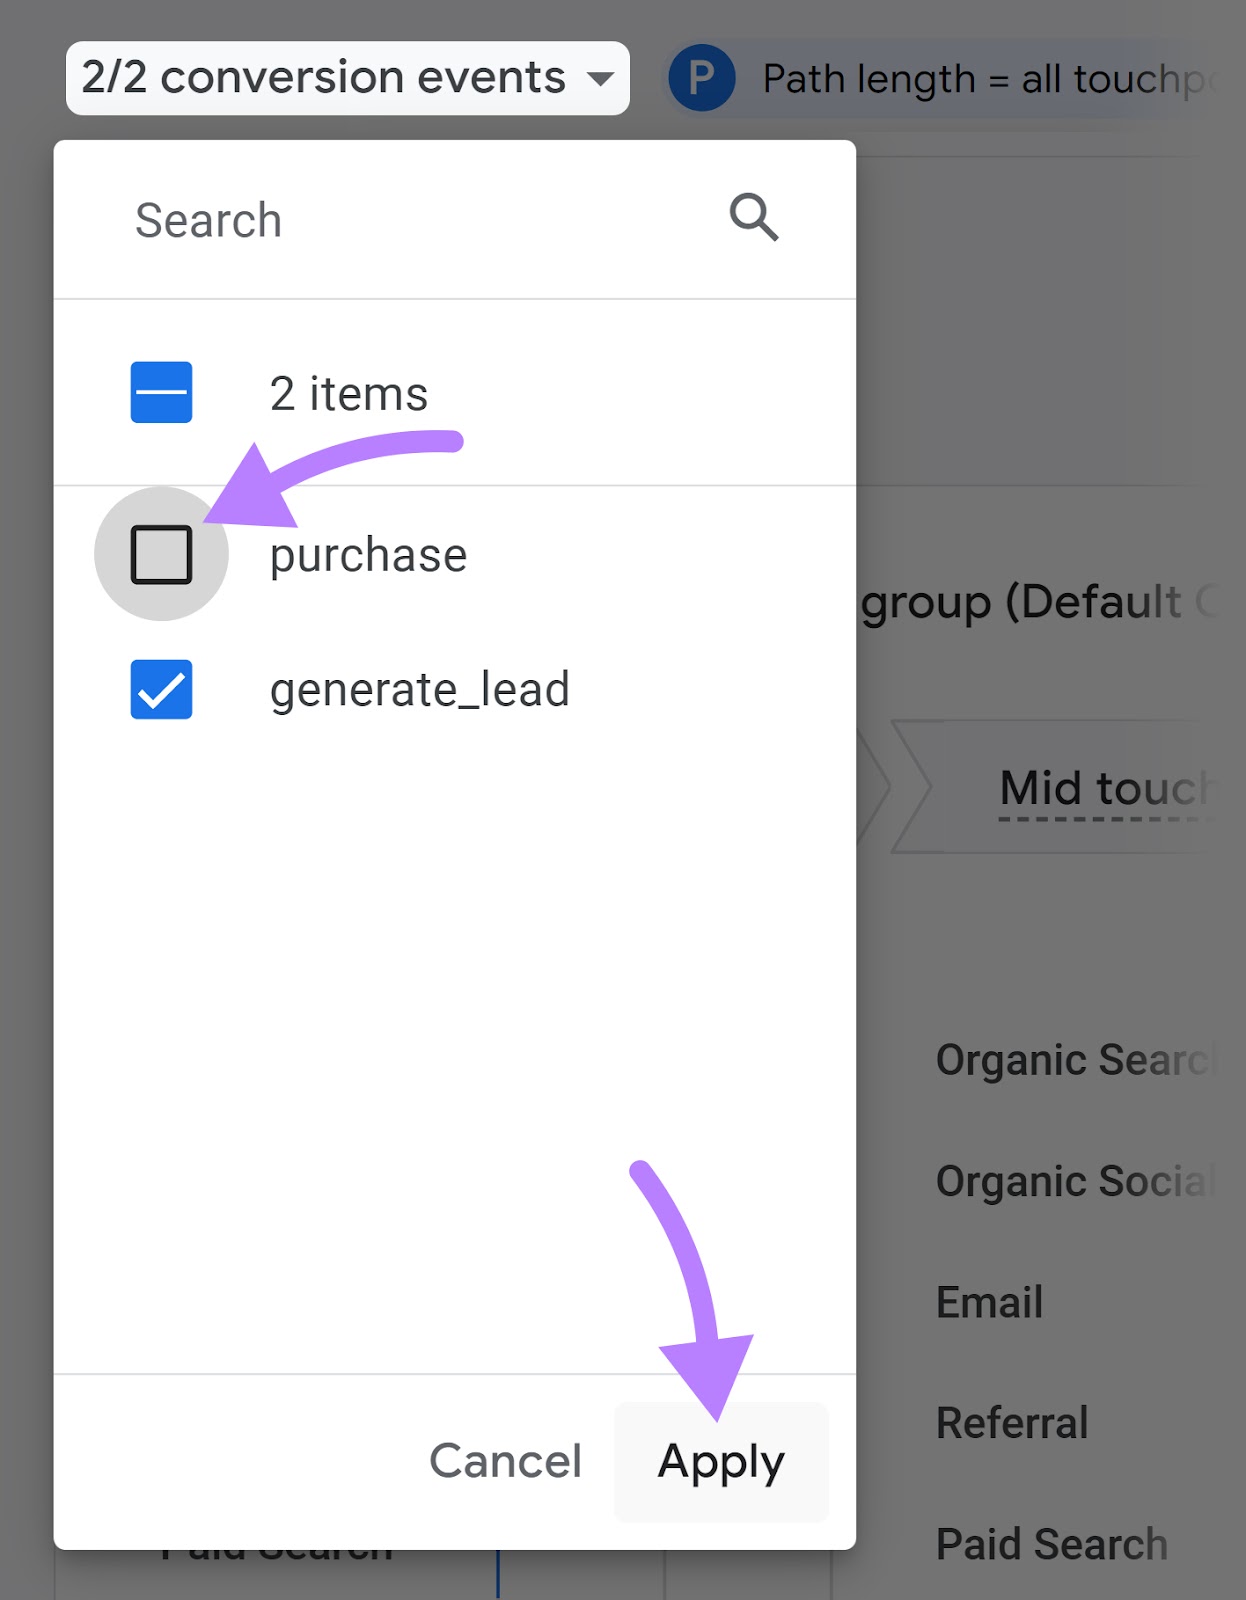
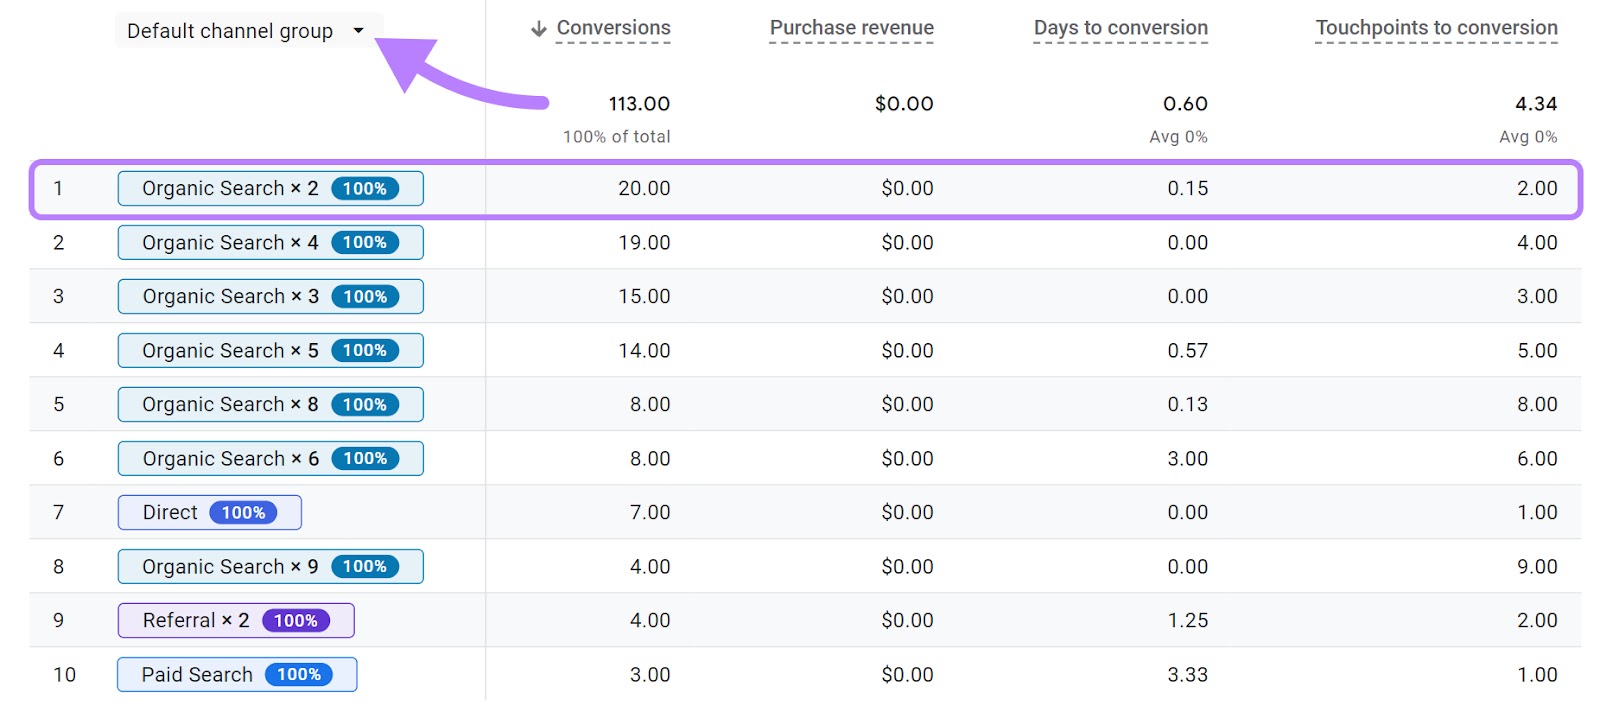
You’ll see which paths are most common for that specific conversion. In this case, the most common conversion path is two separate visits via organic search.
To change how you group traffic sources, click the “Default channel group” drop-down arrow.
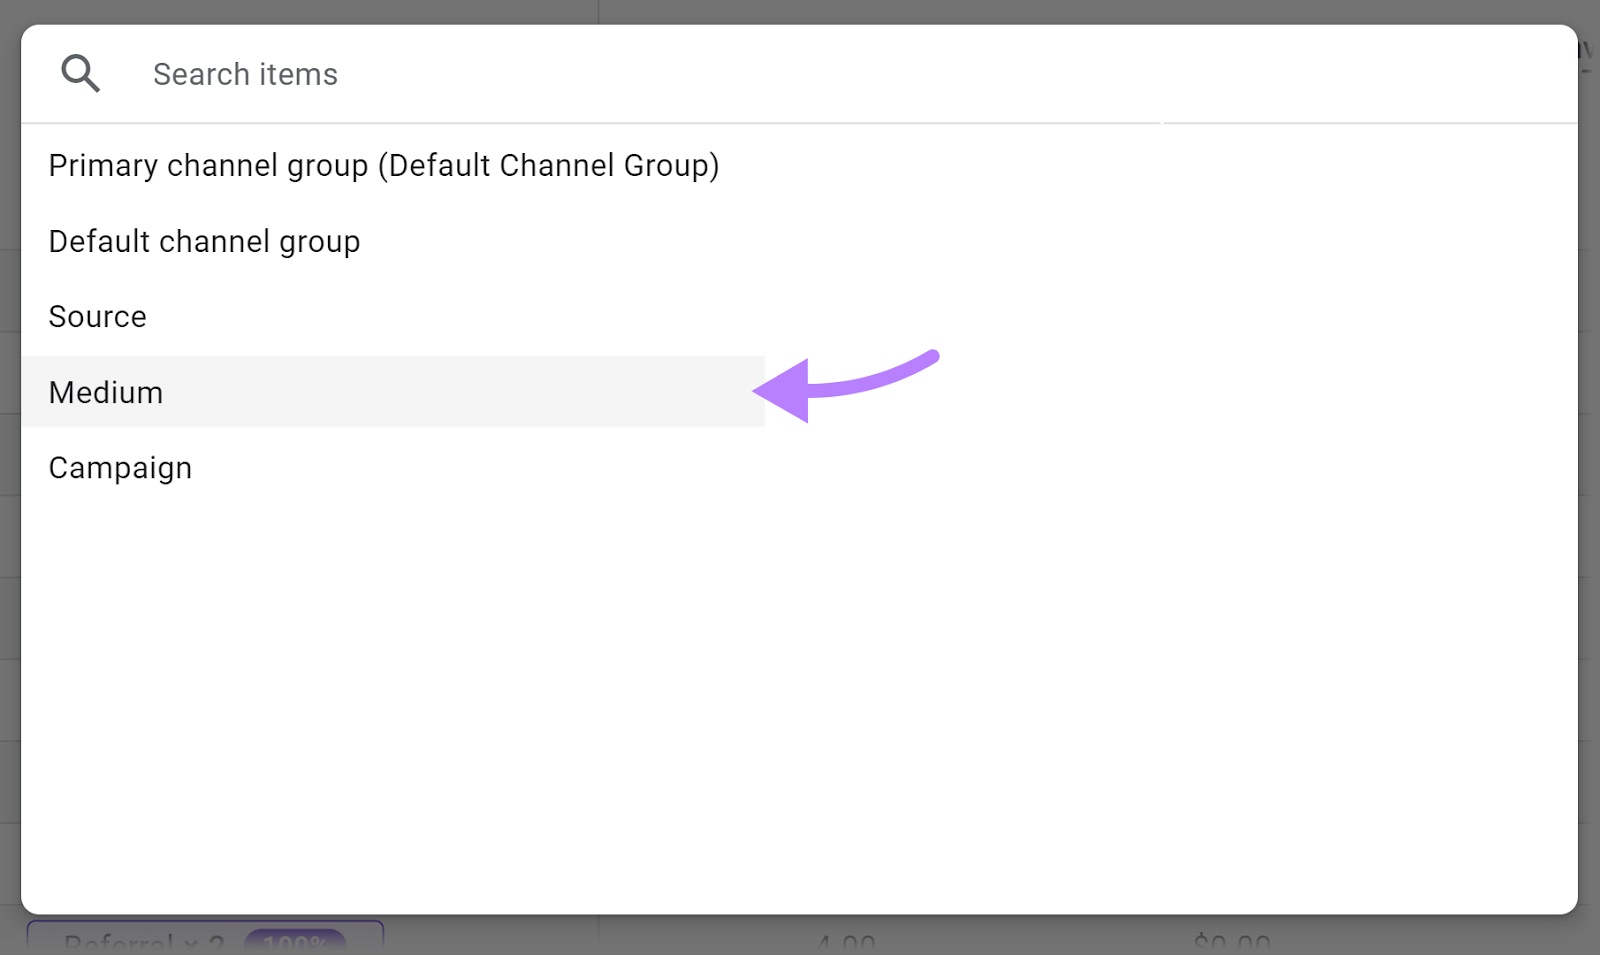
You’ll see a dialog box with different traffic source options. Here’s what they mean:
- Source: The specific source sending the traffic (like Google, Bing, or DuckDuckGo)
- Medium: The type of traffic (like organic or cost per click)
- Campaign: Traffic coming from a specific marketing campaign
- Session channel group: Rule-based definitions of traffic groups (for example, the organic search channel)
Select “Medium” to group your conversion traffic based on the type of traffic that drove the visit.
Further reading: Google Analytics Traffic Sources: An In-Depth Guide
Limitations of GA4 Conversion Tracking
There are several limitations to GA4 conversions, which we outline below.
Few Conversion Types
There isn’t a simple way to track session duration conversions or pages/screens per session conversions.
Since everything is an event in GA4, these types of conversions aren’t available as they are in some Google Analytics alternatives.
Some Tracking Requires Google Tag Manager
You can’t track everything with only GA4. For some things, you need to use Google Tag Manager to assist with the setup process.
Examples include button click tracking, submitted forms that don’t redirect to a thank you page, and ecommerce tracking.
Limited Attribution Options
You can only use last-click or data-driven attribution with GA4.
Other web analytics tools include additional options like these:
- First-click attribution gives 100% of the credit to the channel that brought the first visit, regardless of when the visitor converted
- Linear attribution splits the credit equally across any and all traffic sources involved in the visitor’s journey before conversion
- Time-decay attribution assigns most of the credit to the traffic source that brought the final visit, with decreasing credit assigned to preceding visits
In GA4, you don’t have the flexibility to view any other of these attribution models.
No Assisted Conversions Report
There isn’t a dedicated assisted conversions report in GA4 that summarizes how many times each traffic channel participated in a conversion path.
Use the conversion paths report we outlined earlier to visualize the various traffic channels that contributed to your conversions.
The Next Step After GA4 Conversion Analysis
When you have the conversion data to understand your website, you can see how to drive performance into the future.
Let’s say your dental practice aspires to get 50% more new patients in the next 12 months. And you recognize that driving more organic traffic is one of the most feasible ways to do that.
Keyword Magic Tool is a great way to start working on your traffic growth goals.
For example, you might search for “pain free dentistry” because patients have recently started asking about this.
Enter the keyword and click “Search” to see if they’ve been searching about it as well.

With a relatively high search volume (“Volume”) and low keyword difficulty (“KD %”), both “pain free dentistry” and “pain free dentistry near me” have great potential.
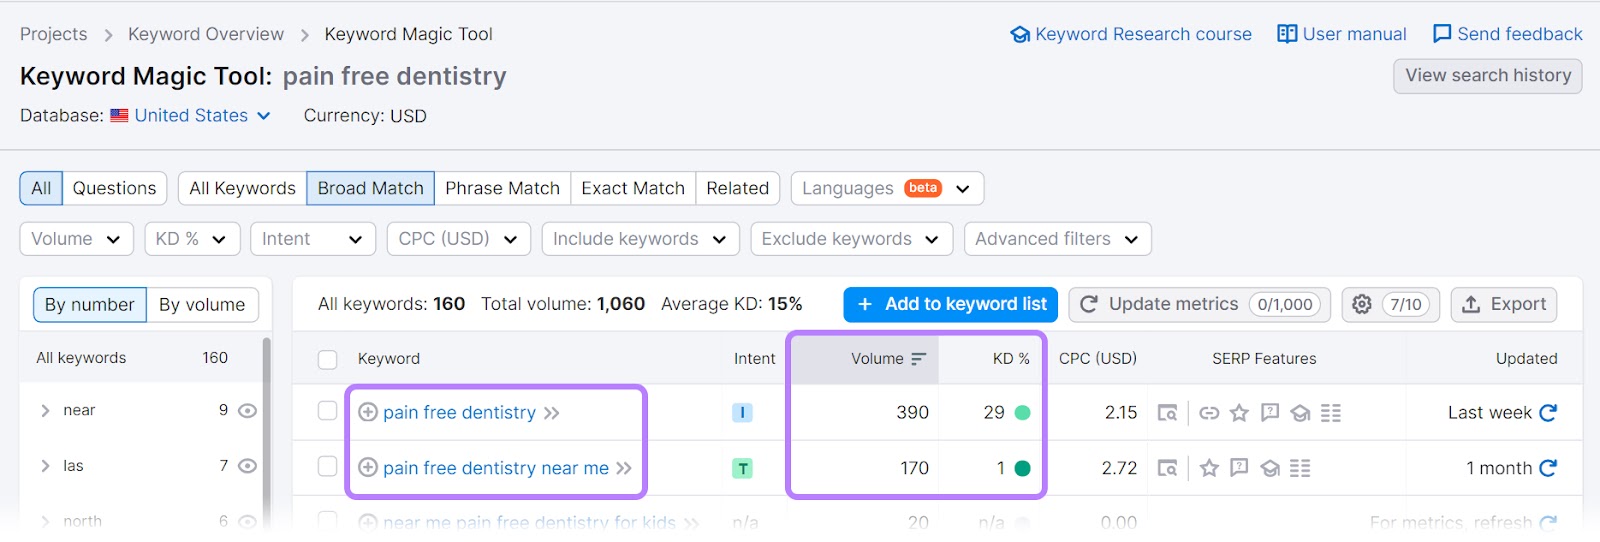
You’ve already spotted a great opportunity that you could target with a new service page or detailed blog post.
And you could include a link to your appointment request form within that content to help drive readers toward converting.
