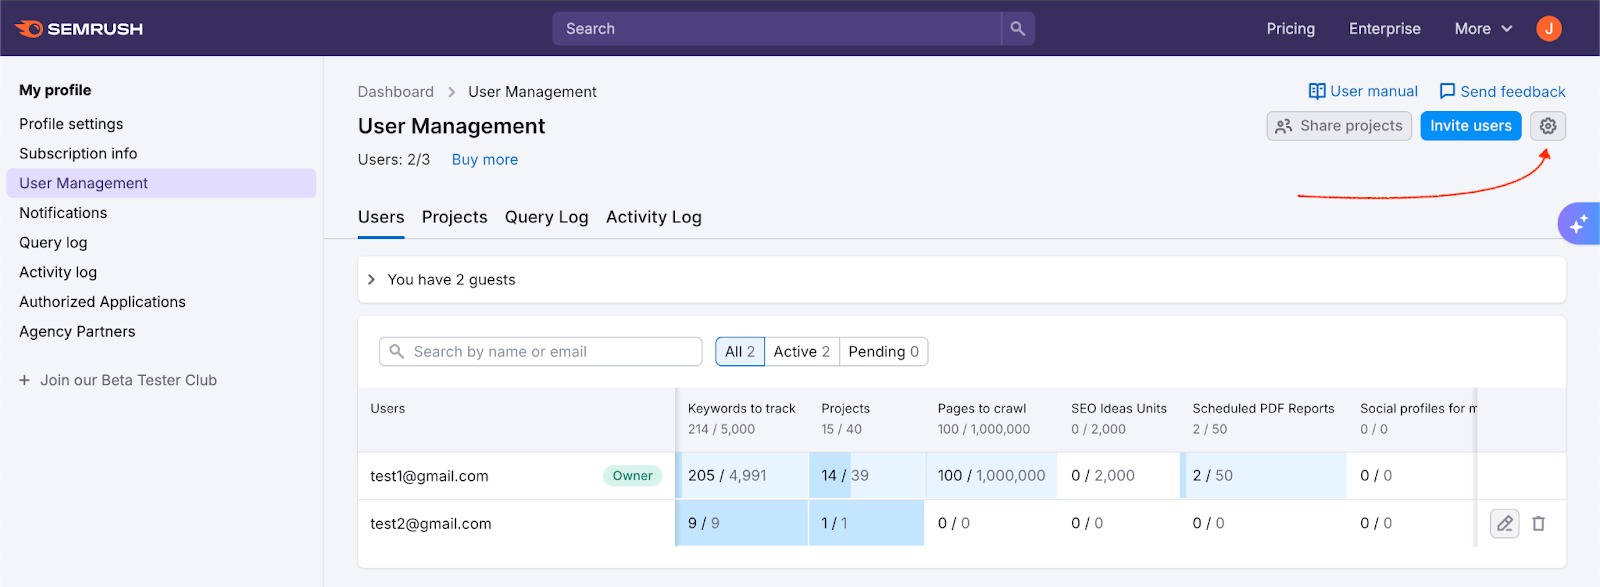
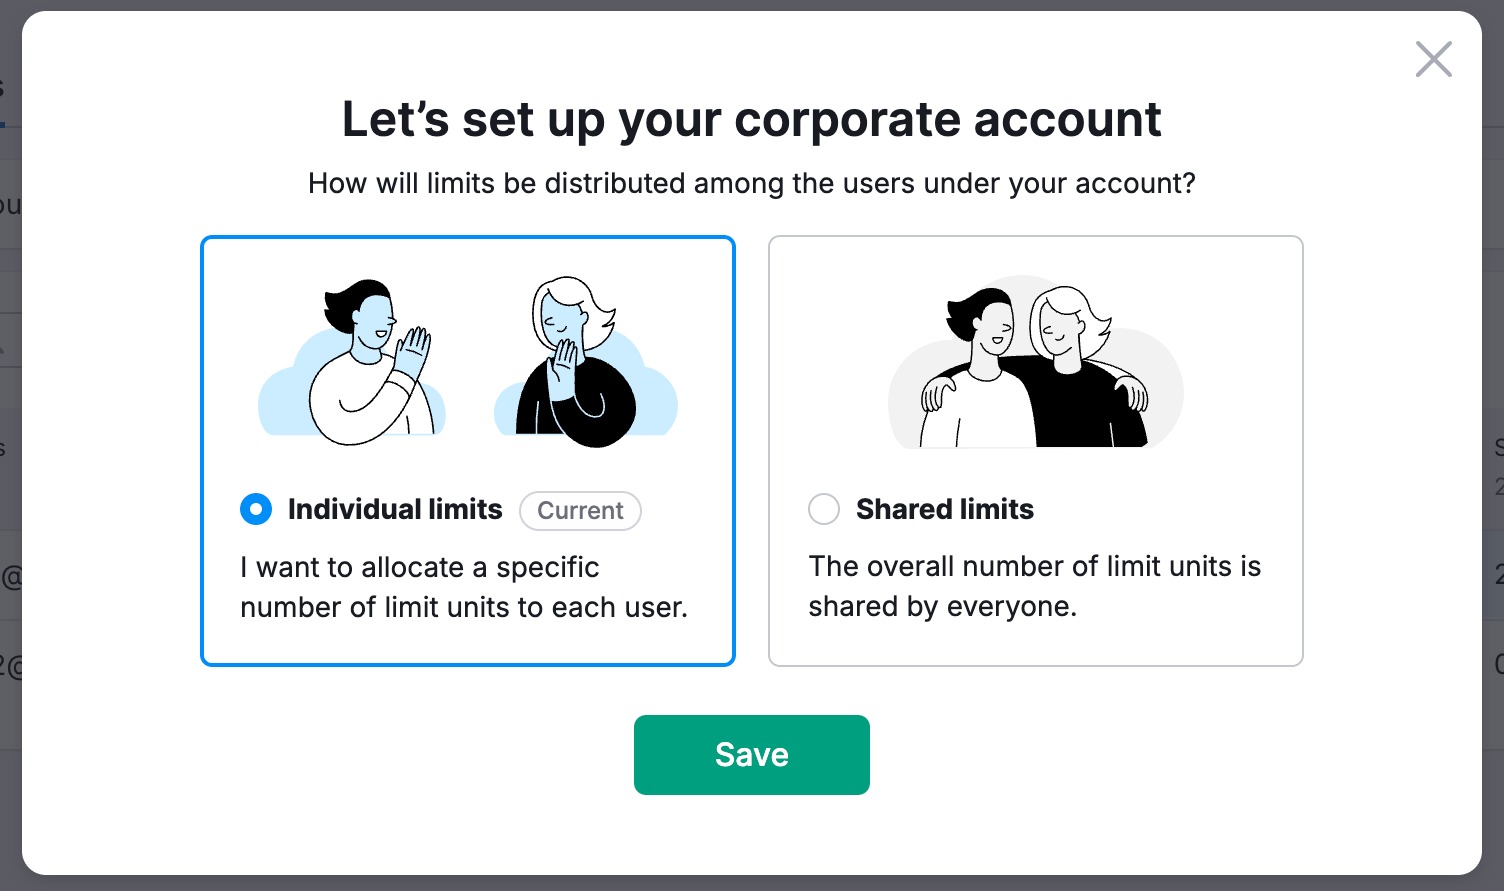
Semrush offers two ways of distributing subscription units to a team: individual limits and shared limits. An account owner or admin can manage it by clicking the gear button in the upper-right corner on the User Management page.
Distribution Methods
Shared Limits (Default)
The Shared limits setting allows all users on the account to draw from a single pool of subscription units.
- Behavior: Users consume units as needed without individual caps.
- Benefit: Reduces administrative work for the Owner/Admin; provides flexibility for users.
- Note: This setting applies to the account as a whole and all its users.
Individual Limits
The Individual limits setting allows the Owner/Admin to allocate a specific number of units to specific users.
- Behavior: Users are capped at the amount allocated to them.
- Benefit: Ensures equal distribution and prevents one user from draining the account's total resources.
- Allocation Logic:
- Allocated units are subtracted from the Owner's total available balance.
- If a user needs more units, an Owner/Admin must manually edit their allocation.
- If purchases are enabled for additional users, they can purchase additional limits for themselves. When an additional user purchases a limit (while on Individual Limits), that limit is assigned directly to that user. It does not go to the corporate account owner's pool, meaning the owner does not need to manually redistribute these specific units.
Exceptions
The following toolkits cannot be shared via the "Shared limits" pool. They must be assigned individually to specific users:
- Traffic & Market Toolkit
- AI Visibility Toolkit
- App Center apps
Understanding Unit Usage in Shared Folders
When users collaborate on a shared folder, it is critical to understand whose limits are being consumed.
Units are drawn from the folder owner's account, regardless of who is performing the action.
- Example: User A owns a folder. User B has "Edit" access. If User B adds keywords to a Position Tracking campaign within that folder, the keyword limits are deducted from User A's balance.
- If using Individual Limits, ensure the user who creates/owns the folder has a sufficient allocation of units (e.g., Tracked Keywords, Crawled Pages).
- If using Shared Limits, each user draws from the shared pool of units.
To illustrate, let’s imagine a four-person team. You are the owner, and you add your three teammates (Sally, Randy, and Joe) as users to your Semrush subscription. You decide to use the individual limits setting to control the number of units available to each member. You trust Sally the most, so you appoint her as an admin and keep Randy and Joe as users.
Since Sally is an admin, she distributes 1 folder, 100 crawled pages, and 100 keywords to both Joe's and Randy’s accounts. This takes 2 folders, 200 crawled pages, and 200 keywords out of the total subscription’s pool of units.
Randy creates a folder and shares it with Joe with “edit” permissions so they can both make changes in the same folder. Then, Randy sets up Position Tracking and adds 100 keywords to the campaign.
When Joe tries to add 15 new keywords to the Position Tracking campaign, he gets blocked. However, since Randy created the folder, all the activities in the folder must originate from his account. Therefore, Joe currently doesn’t have access to those units.
Joe tells Sally that he can’t add keywords to Position Tracking and explains the situation. Luckily, Sally remembers what she read on the Semrush Knowledge Base about how units work.
To resolve the issue, Sally accesses the User Management interface, transfers the 100 keyword units from Joe's account to Randy's account, and then places them into Randy’s account. Now, Joe can return to Randy’s Position Tracking campaign and add the keywords they want to track.
How to Switch Distribution Modes
You can toggle between Shared and Individual limits at any time.
- Go to User Management.
- Click the gear icon (Settings) in the top right corner.
- Select Individual limits or Shared limits.
- Click Save.
Note: Switching from Individual to Shared limits will reset all custom user allocations to zero. If you switch back to Individual limits later, you will need to manually reallocate units.
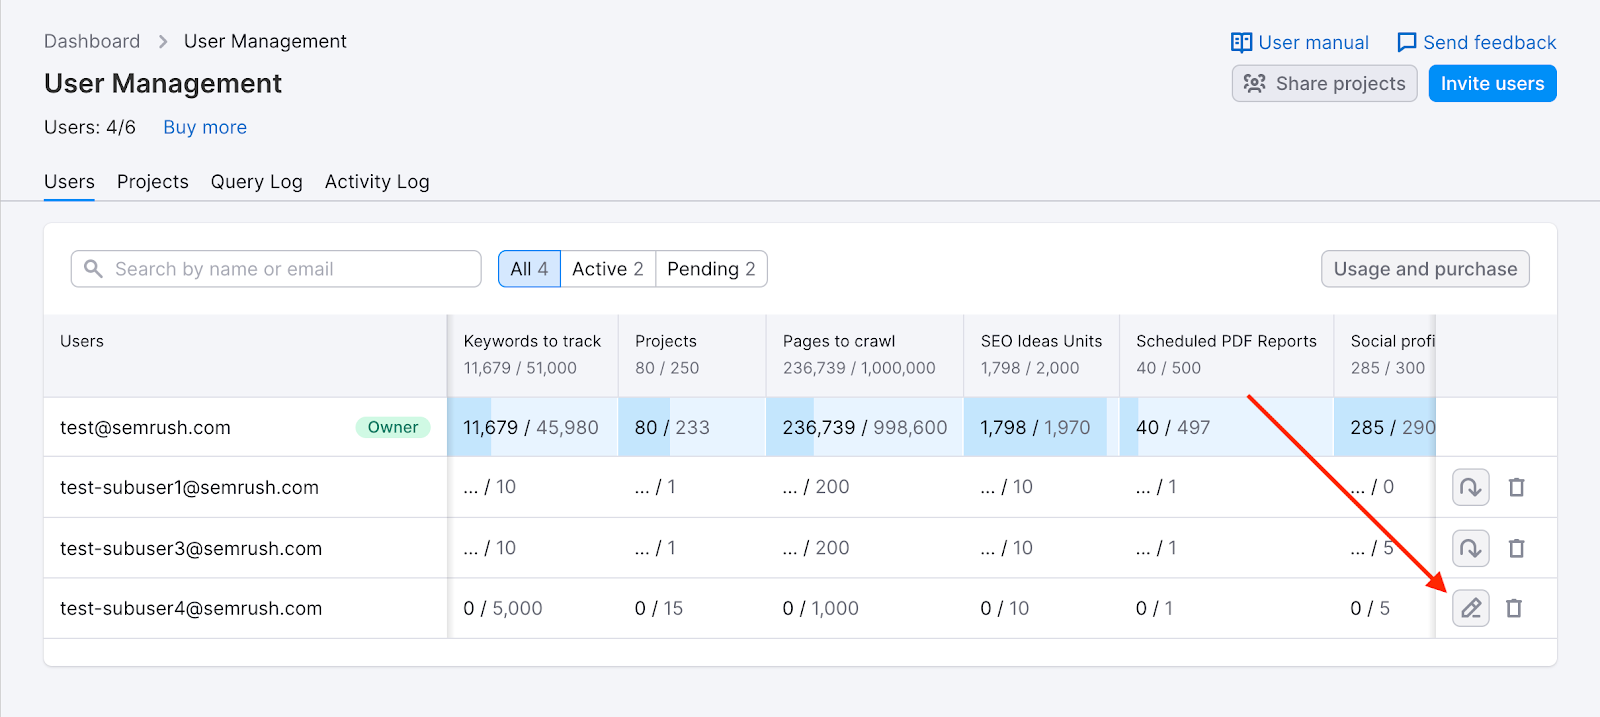
How to Edit User Limits and Roles
When using Individual Limits, owners and admins can edit specific balances for team members.
- Go to User Management.
- Locate the user in the list.
- Click the pencil icon (Edit) in that user's row.
- To Allocate Units: Enter the desired amount in the specific tool field (e.g., "Keywords to track"). A hint will display the Owner's available balance.
- To Change Role: Toggle the user role between User and Admin at the top of the window.
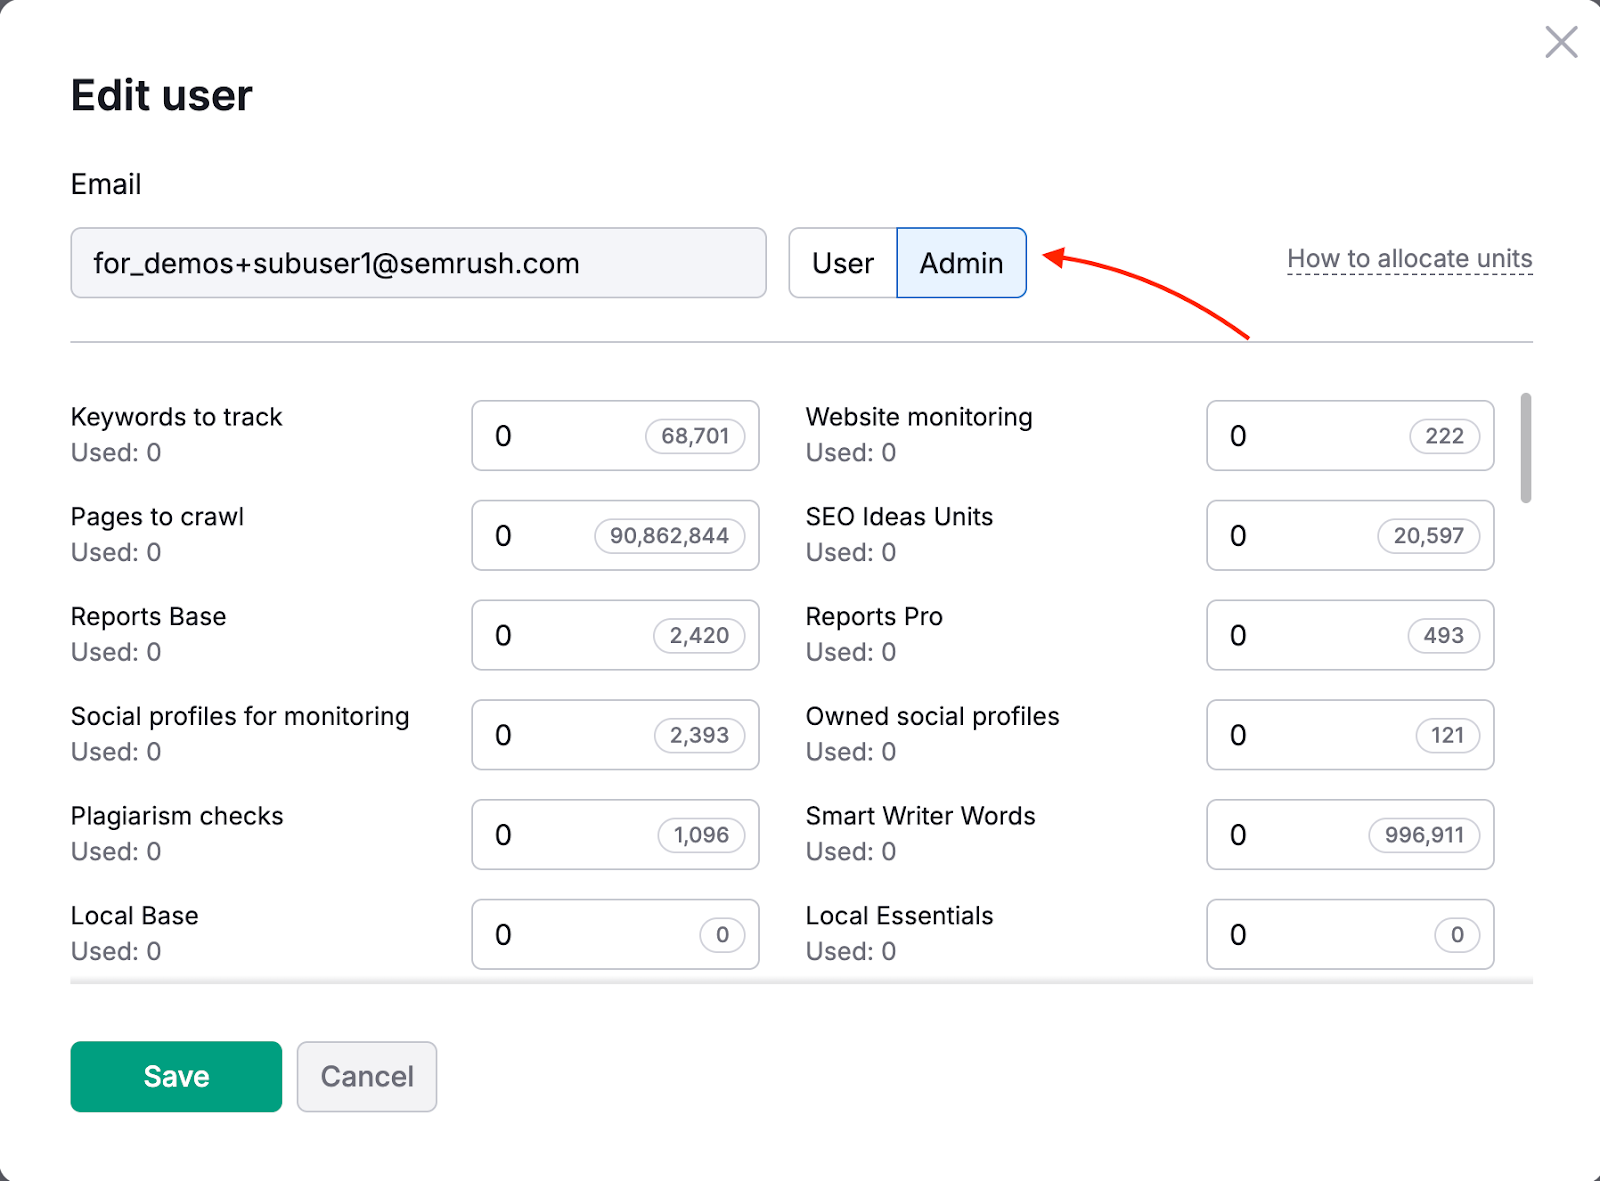
- Click Save.