404 pages show when users try to access resources that don’t exist.
Like a misspelled URL.
Or a page that was deleted.
And you can create a custom 404 page in WordPress (even if you can’t code).
Why You Need a Custom 404 Page in WordPress
Custom 404 pages can improve the user experience by helping users find what they need.
And you can tailor your 404 page to reflect your brand. Through elements like personalized copy and imagery.
Take this default 404 page:
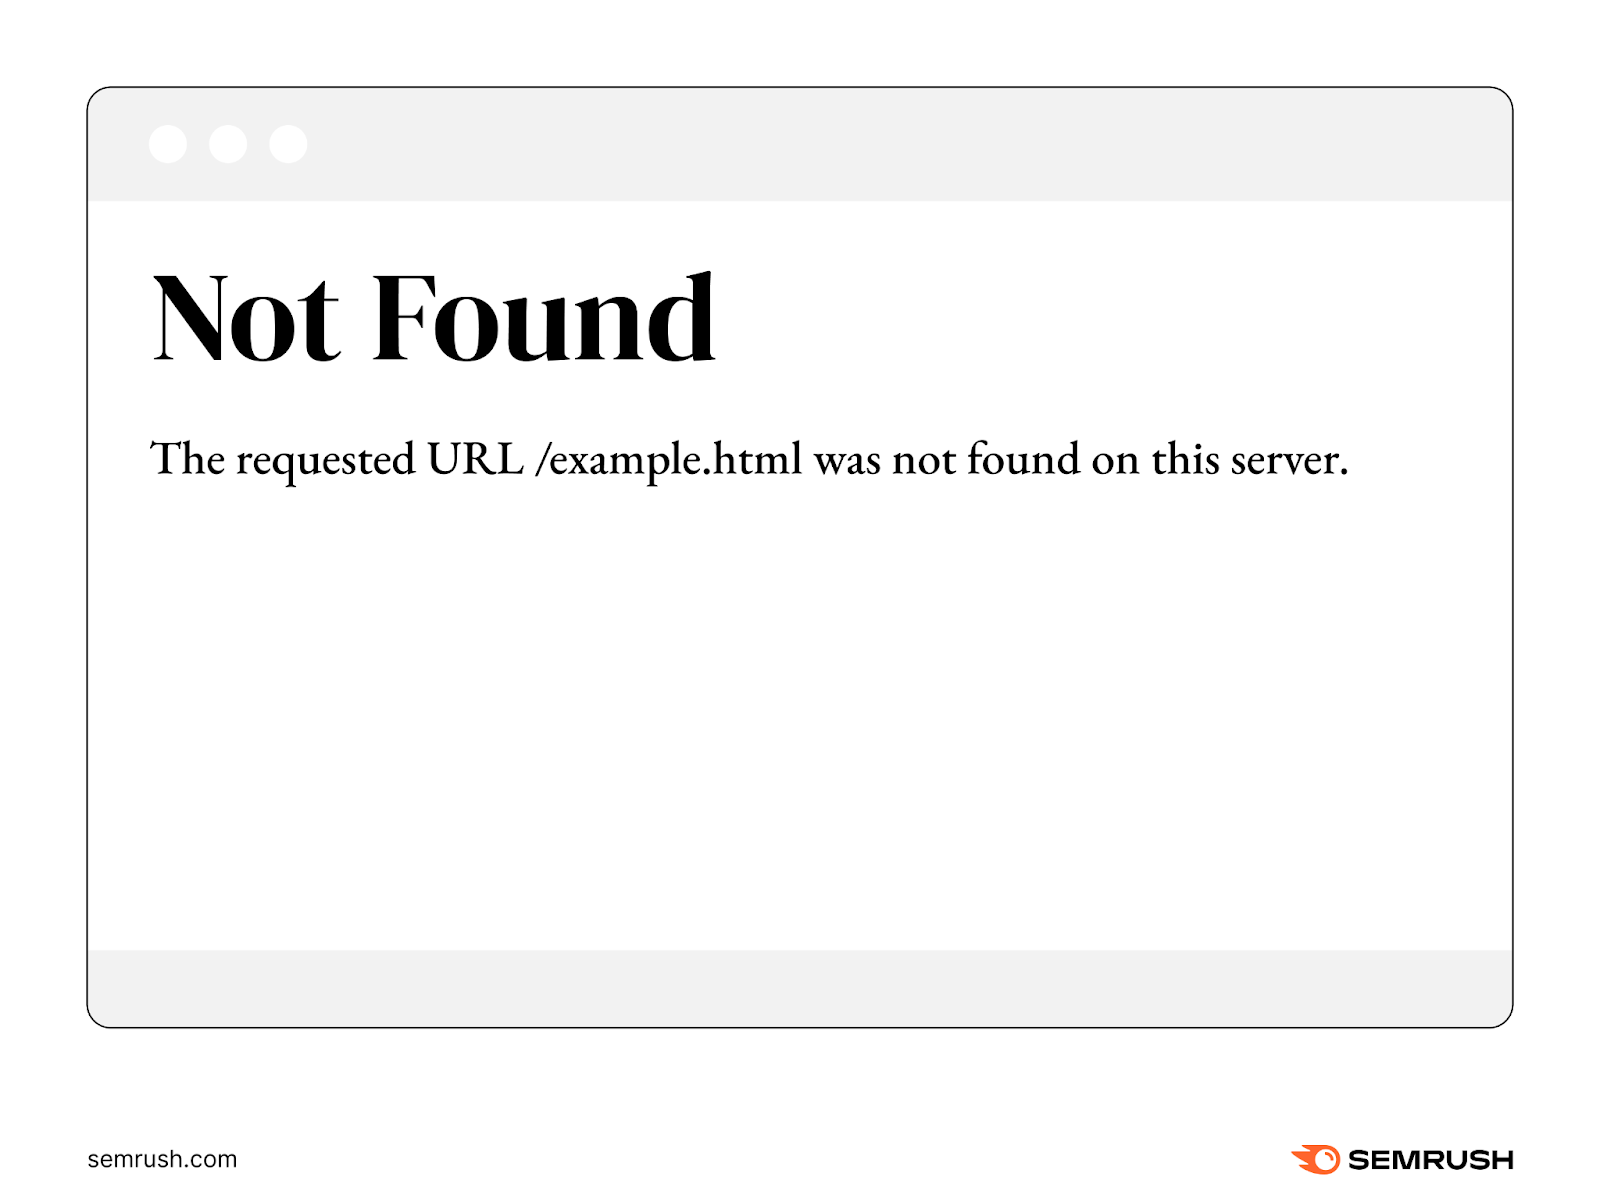
This page is unhelpful. And doesn’t point users in the right direction through elements like useful links. Or a site search box.
This might cause people to leave your site and go elsewhere. Which can drive up bounce rates.
The solution?
Create a custom 404 page that reflects your brand. And helps users move through your site with ease.
How to Create a Custom 404 Page in WordPress
Here are three methods to make your own 404 page in WordPress:
Option 1: Theme File Editor
Many WordPress themes come with a premade 404 page.
However, if you’re not comfortable working in PHP—a scripting language—consider another option to build your 404 page. Like a page builder.
But if you do want to go this route, you can edit your premade 404 page using your theme file editor. WordPress’s theme file editor is a text editor that lets you edit files for your site’s theme.
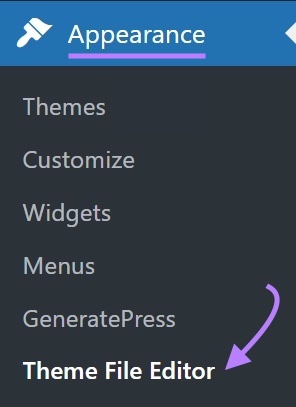
To do this, log into your site. Click “Appearance” and “Theme File Editor.”
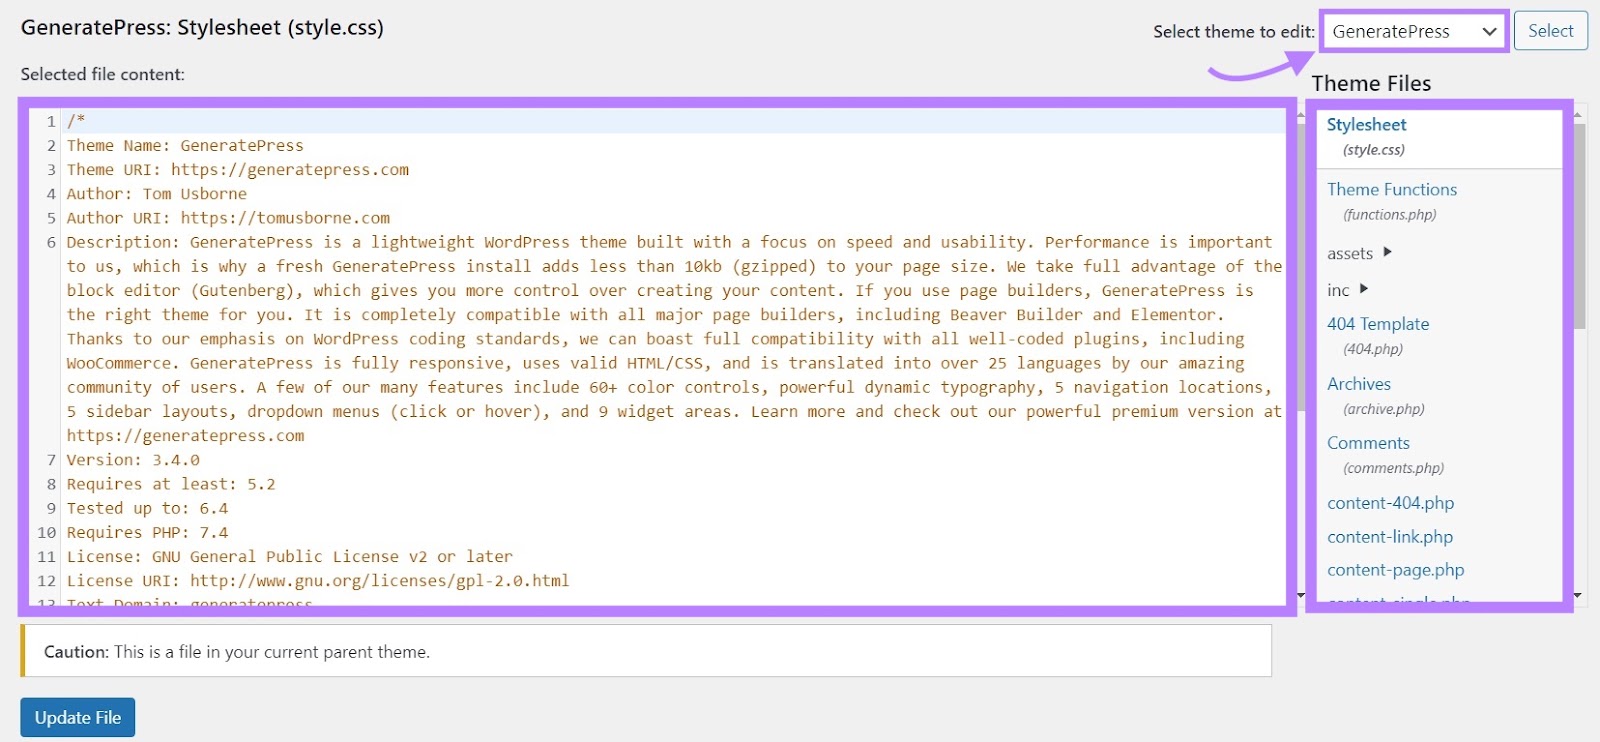
Your theme file editor contains a drop-down where you can select which theme you’d like to edit.
It also contains your theme’s files and a text box with each file’s code.
Changes you make through your child theme remain even when you update your parent theme. So, create a child theme to keep any changes to your 404 page.
You can use plugins like the Child Theme Configurator to create a child theme in a few clicks. Or follow WordPress’s instructions to create a child theme without a plugin.
Once you have a child theme, use an FTP client or your web host’s file manager to add files to your child theme.
The following tutorial will show you how to add files with your site’s file manager.
To start, log in to your host and locate your file manager.
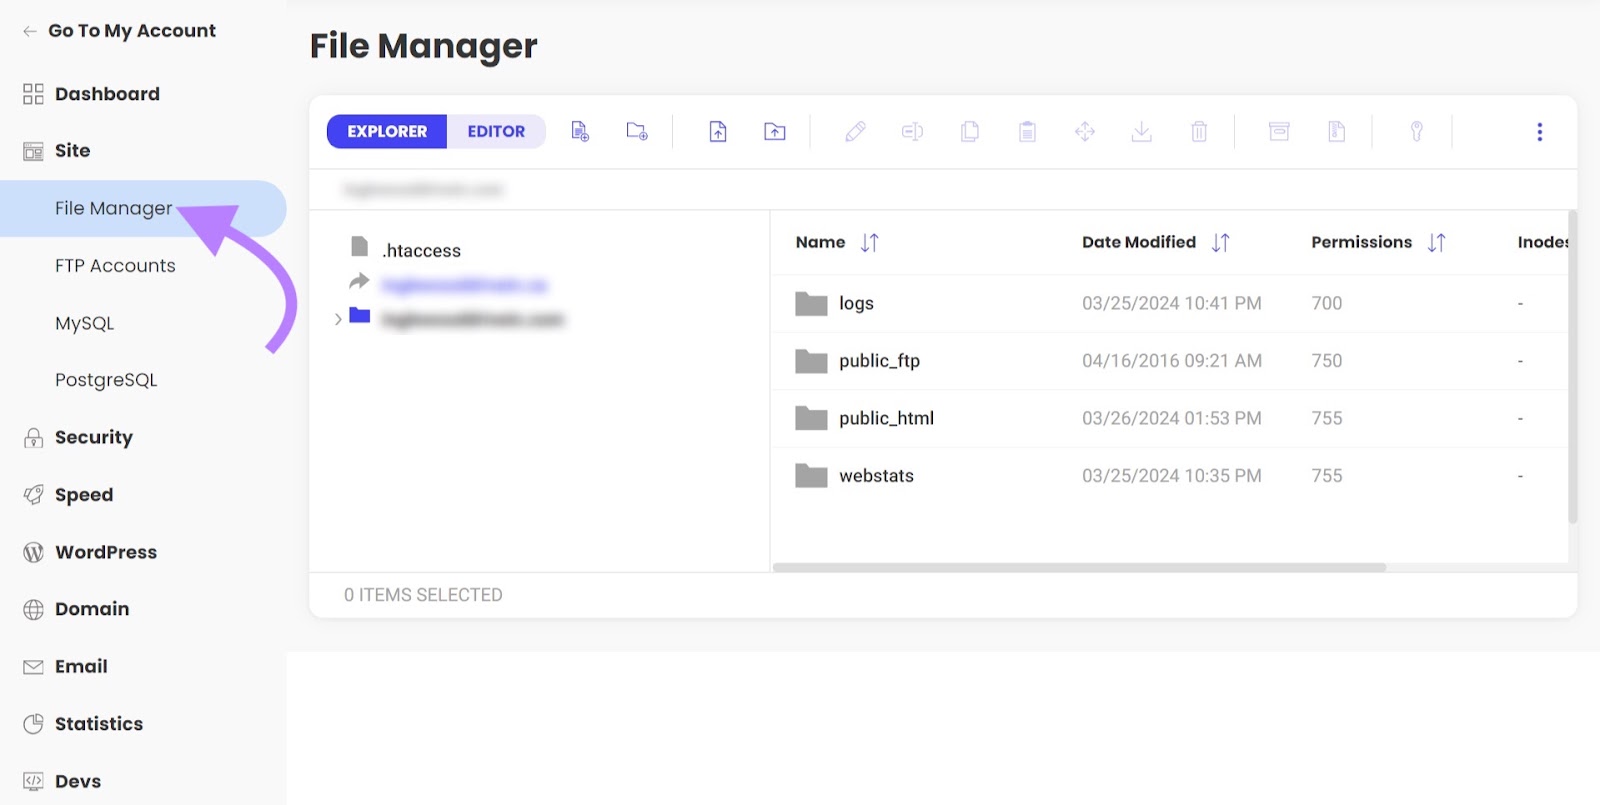
Find your 404 page file. It will likely be under your root folder (often named “/” or “public_html”). Then go to “wp-content” > “themes” > “your theme.”
Our example has two 404 page files:
- A file named 404.php for the overall format of the 404 page
- A file named content-404.php that includes the content of the 404 page (like text and images)
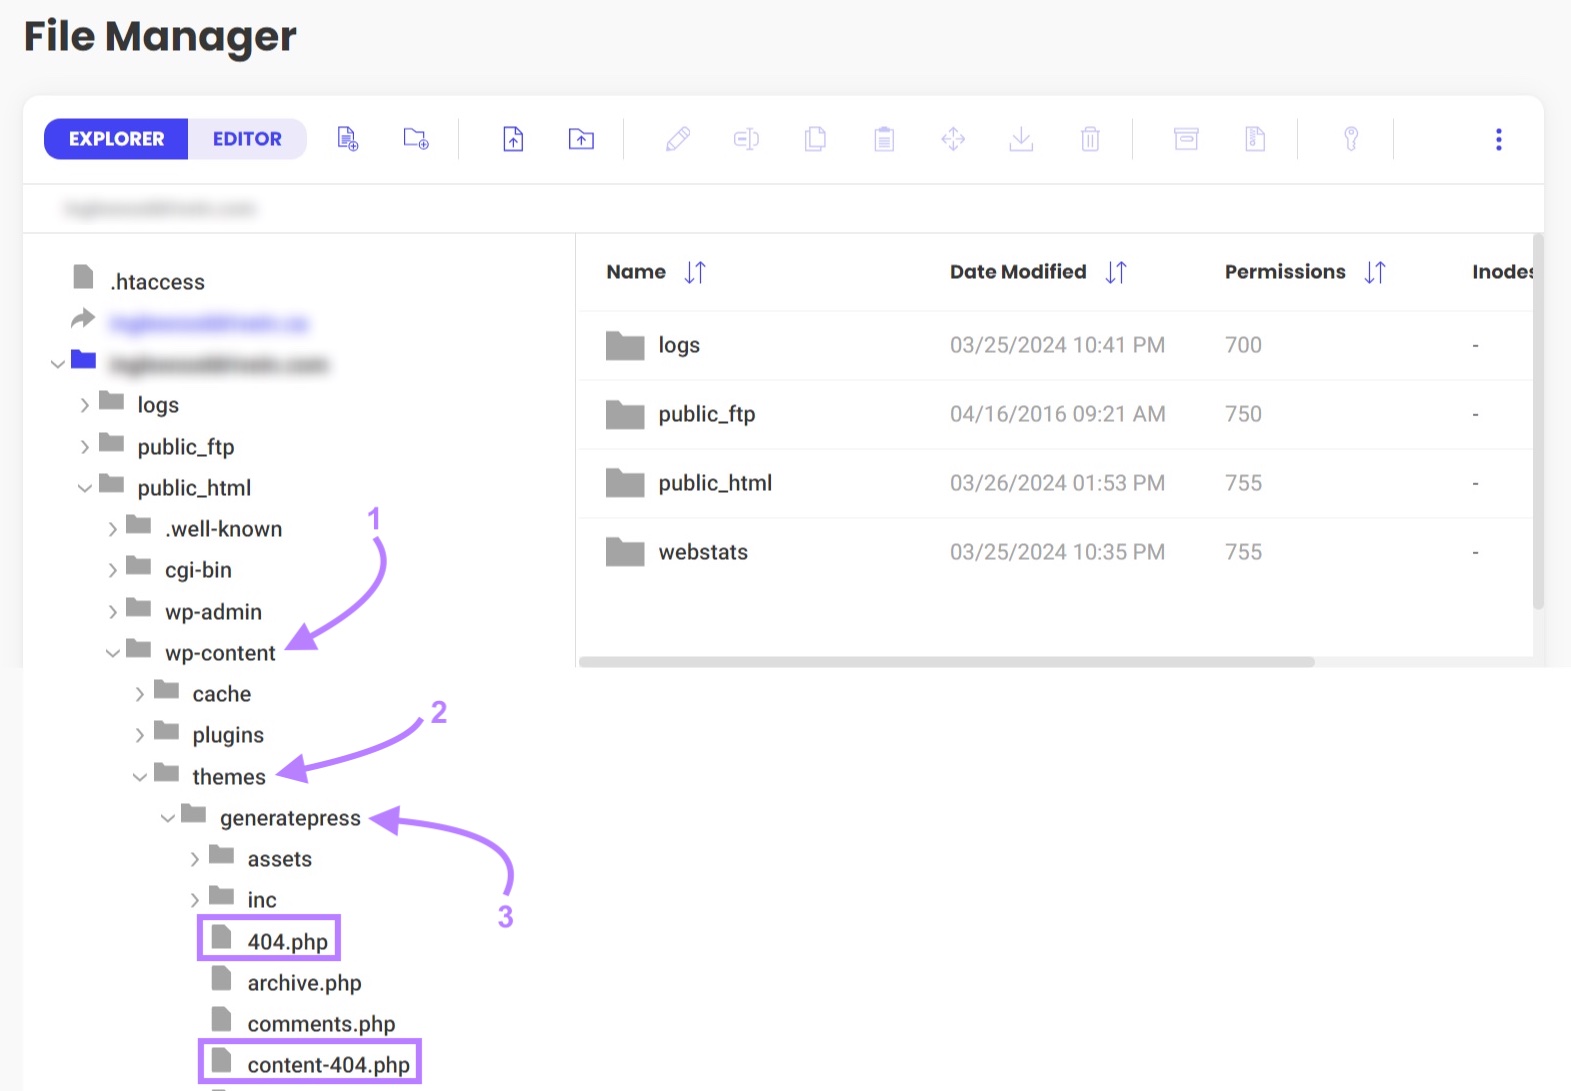
For our example, we’ll make a copy of the content-404.php file. To edit the text and imagery for this page.
Double click this to open your 404 page file.
Then copy the contents into a plain text editor. Like a notepad app on your computer.
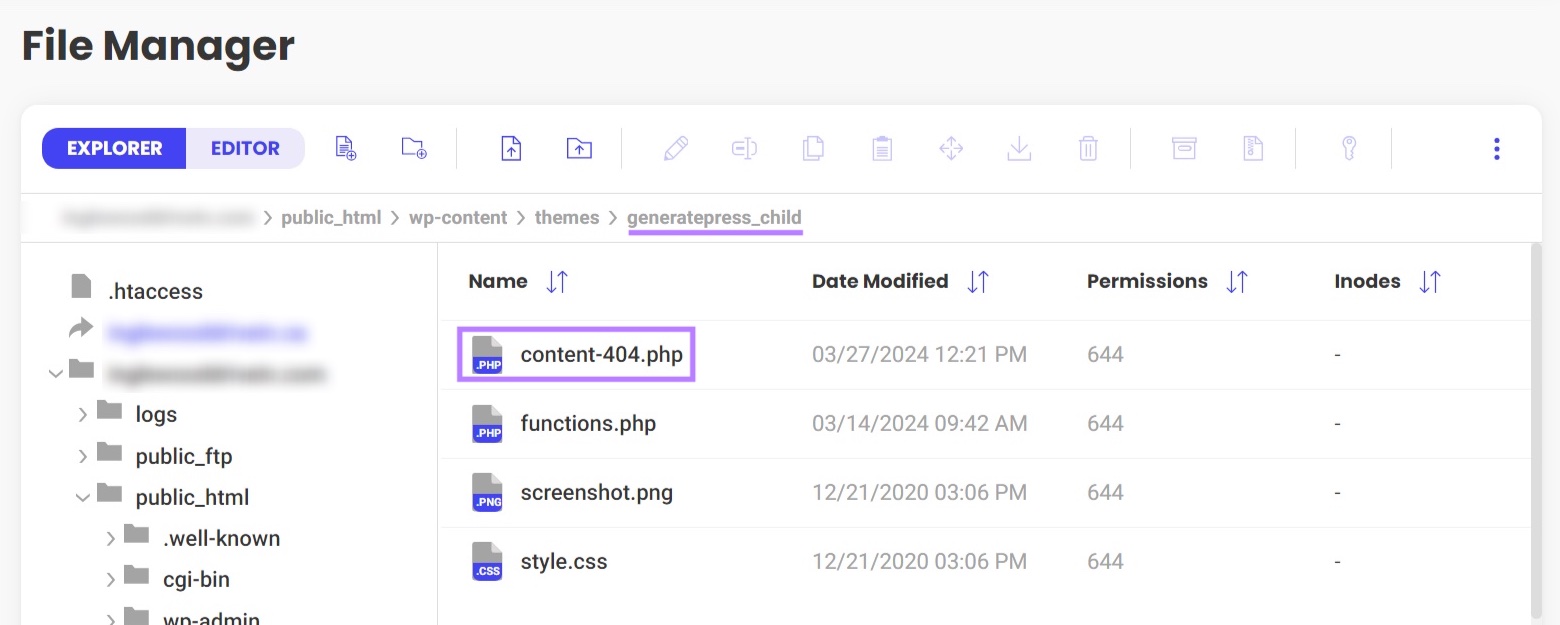
Next, click your child theme’s folder and create a new file within it. Name this file the same name as your 404 page (in our case, “content-404.php”).
Then, paste the code from your plain text editor into your new file, and click save.
Next, edit the contents of your 404 page.
For example, we could change the highlighted text (below) to something that’s more aligned with our brand voice.
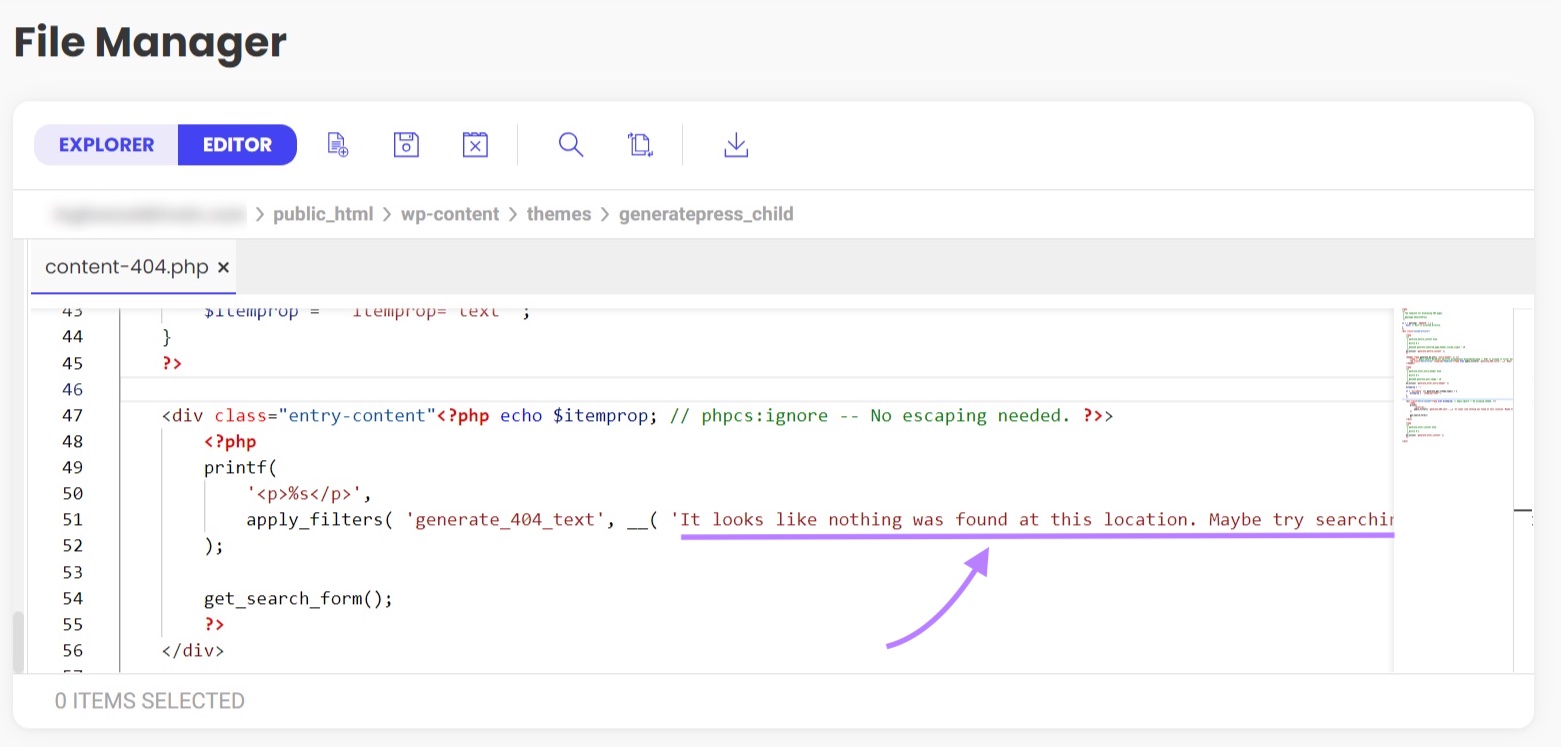
After saving your changes, your custom 404 page should now display when someone tries to access a page that doesn’t exist.
Option 2: Page Builder
Page builders like Elementor, Beaver Builder, and Divi Builder are no-code solutions for building a custom 404 page.
While page builders often have free options, you may need to upgrade to the paid version to build a custom 404 page.
Here’s how to make a custom 404 page with Elementor.
First, install and activate Elementor Pro.
Click “Templates” and “Theme Builder.”
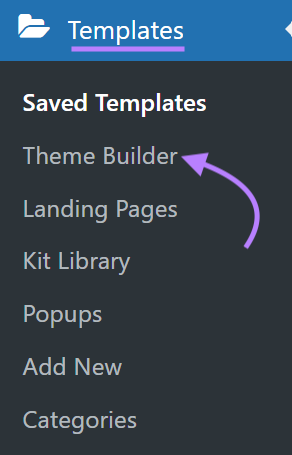
Then click the “Add new” button.
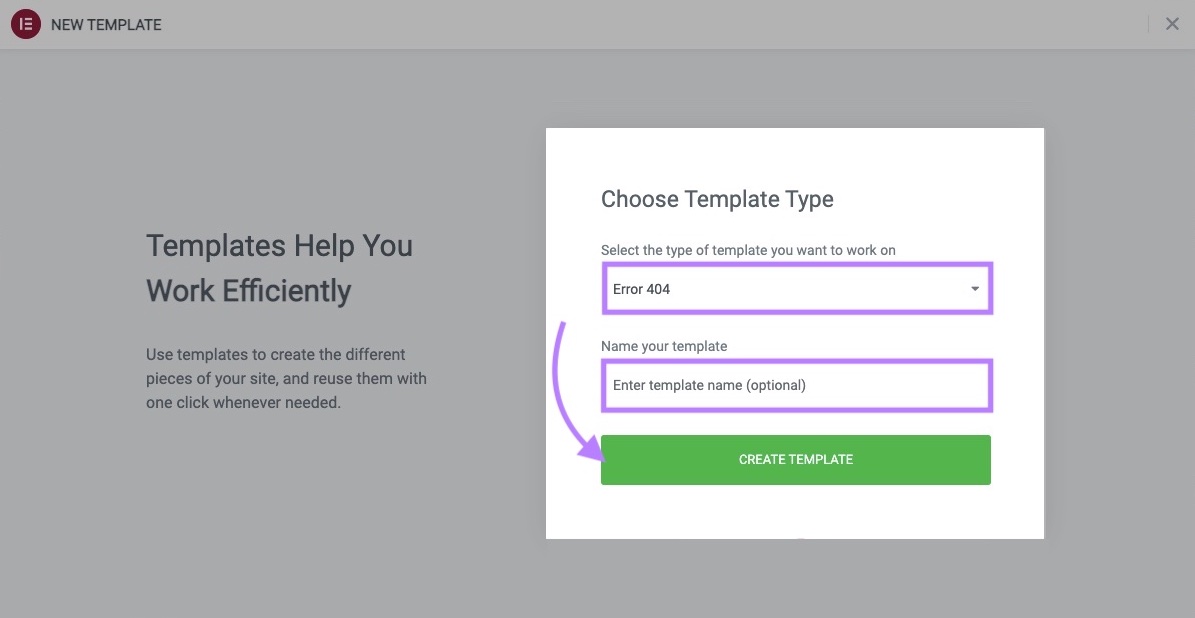
A window will pop up. Select “Error 404” from the drop-down, and give your template a name. Click “Create Template.”
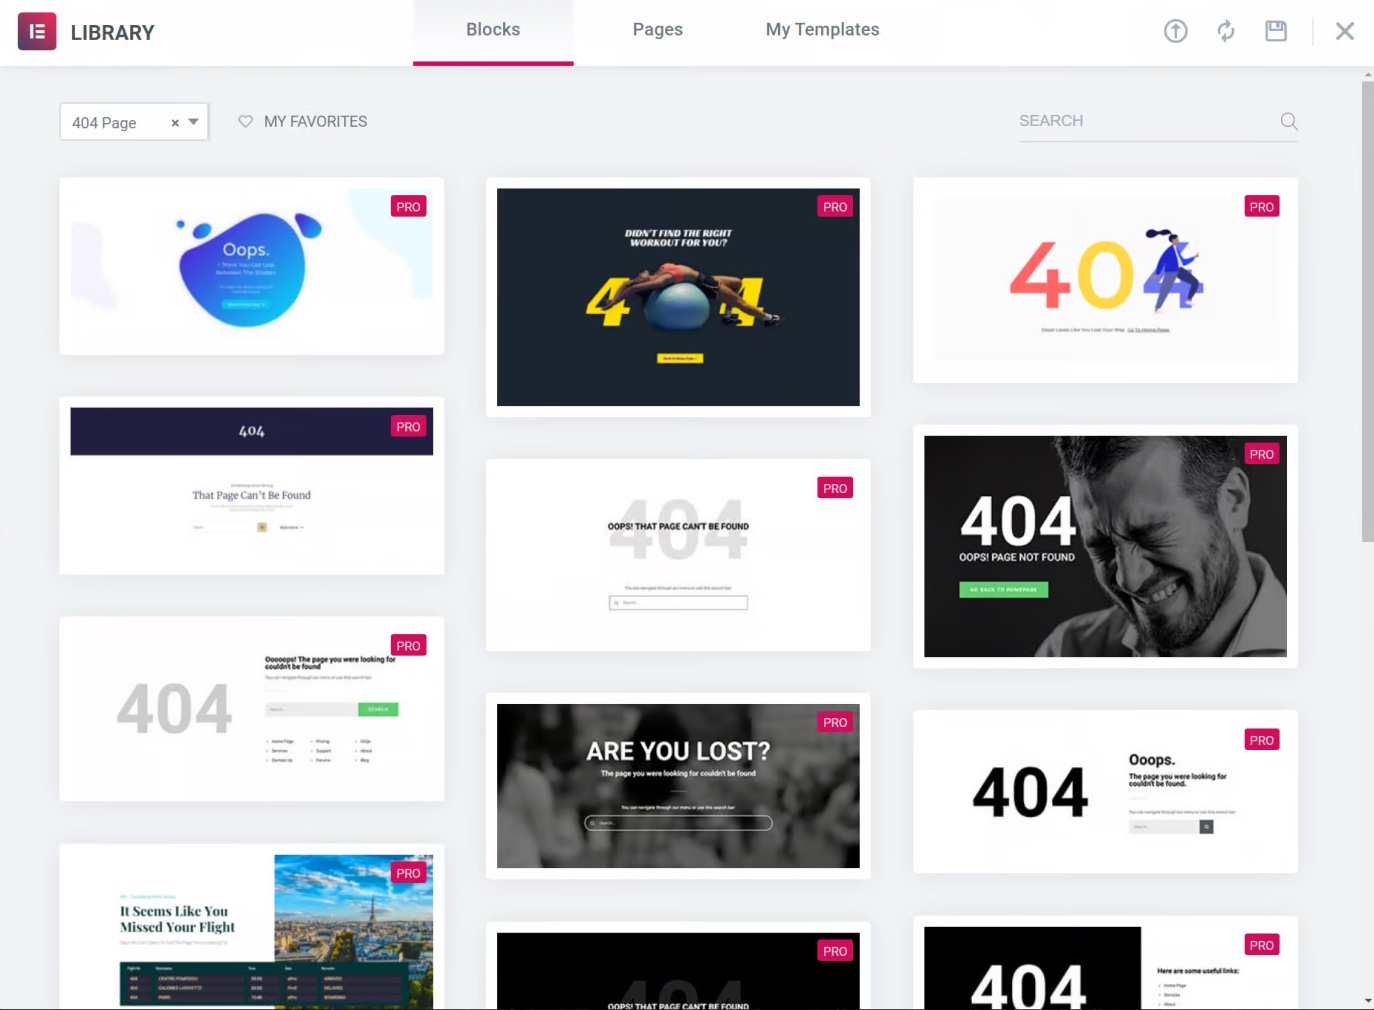
You can select from premade templates. Or design one from scratch.
Add elements like text, imagery, and a site search box to your 404 page. So your users can easily navigate elsewhere.
Publish your page when you’re ready. Make sure the “Include” drop-down says “404 Page.” Then click “Save & Close.”
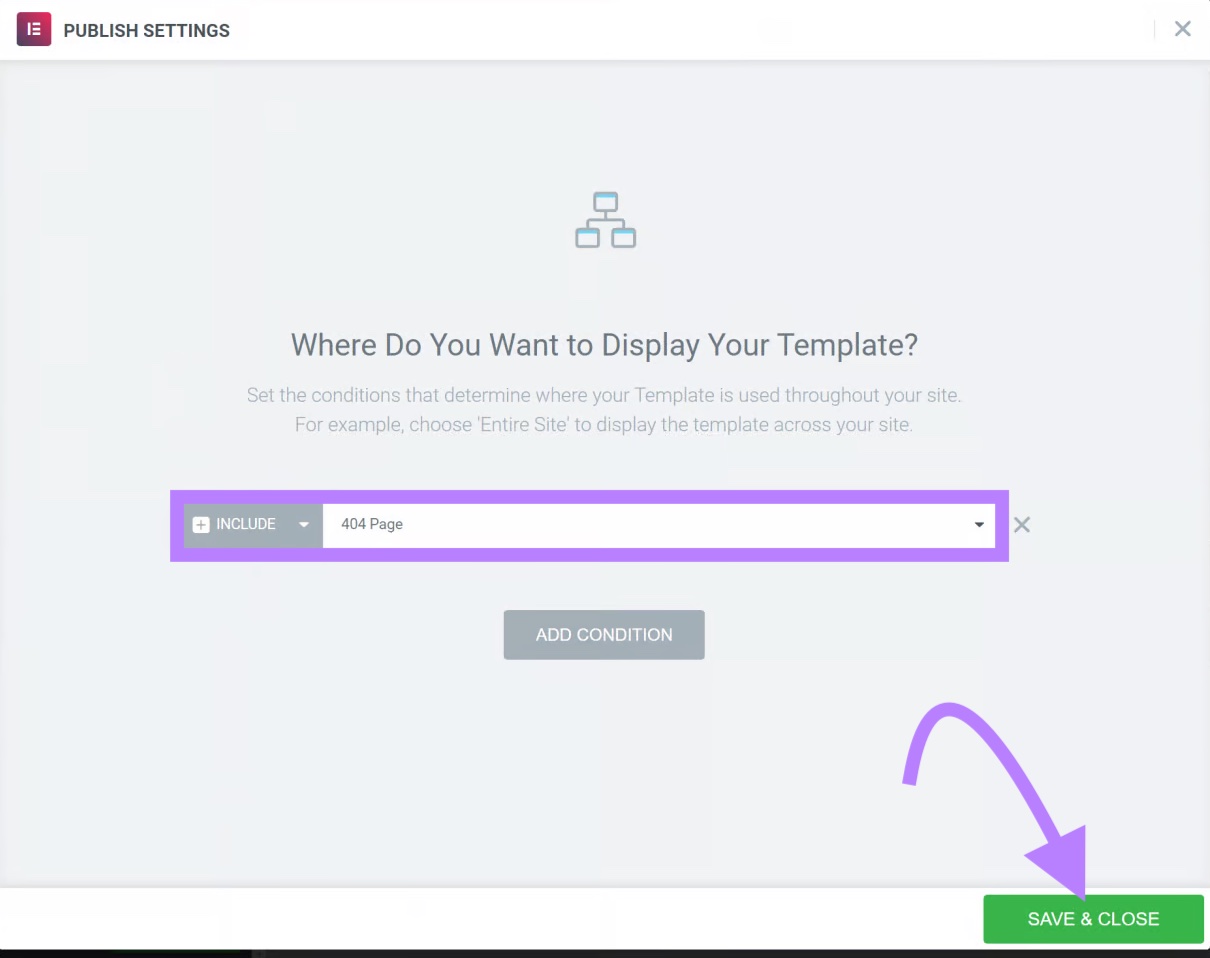
Your custom 404 page will now display when someone lands on a URL that doesn’t exist.
Option 3: 404 Page Plugin
Plugins are another option to create a custom WordPress 404 page without code.
Some plugins to consider are 404page (also listed as “Smart Custom 404”) and Colorlib 404 Customizer.
We’ll use the 404page plugin for our example.
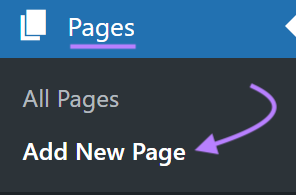
Install and activate the plugin. Then create your 404 error page by clicking “Pages” > “Add New Page.”
Make your page using your page builder. We’ve made the error page below with Gutenberg, WordPress’s native page builder.
Update the URL slug—the last part of the URL—to something like “404.”
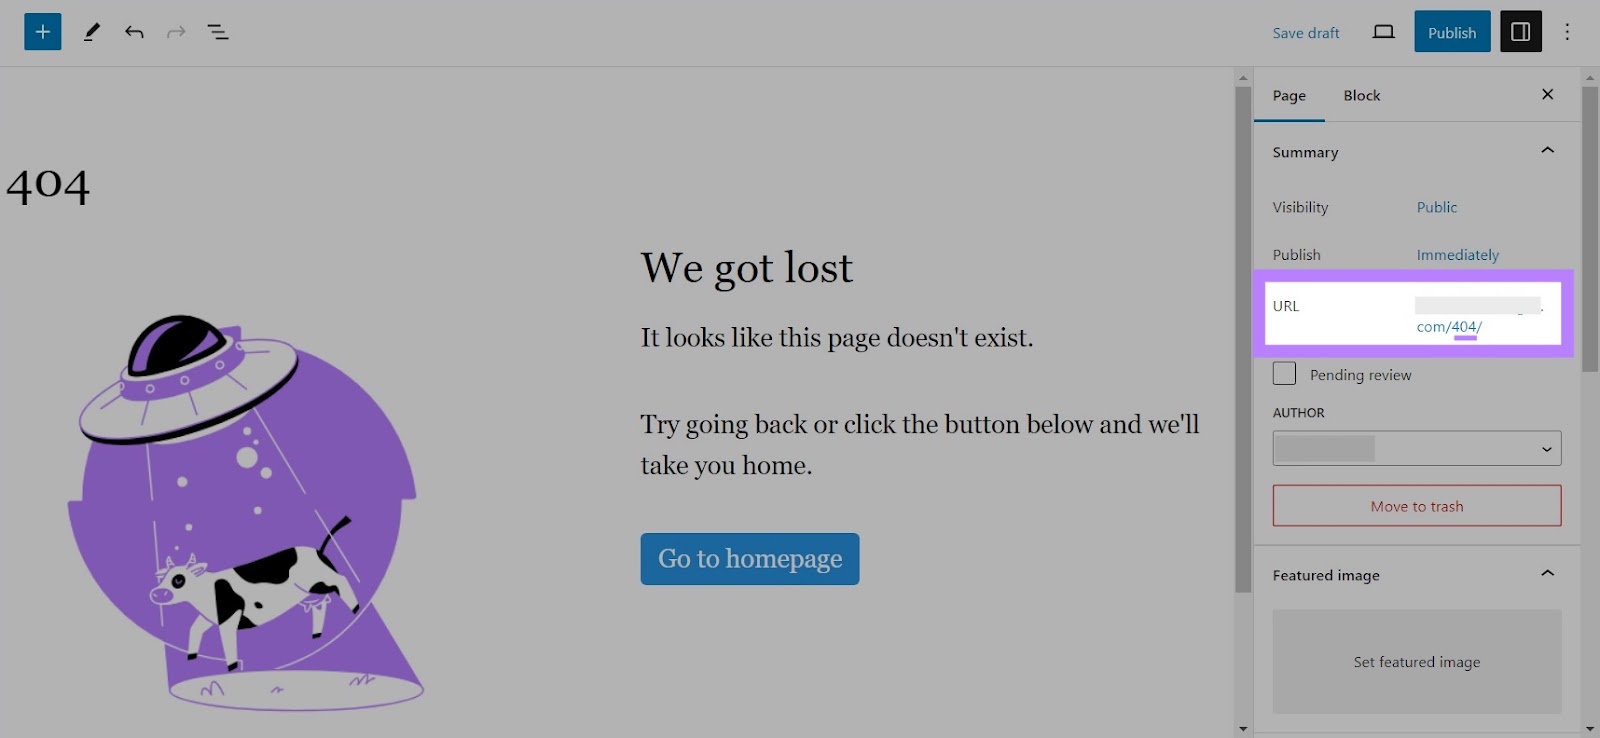
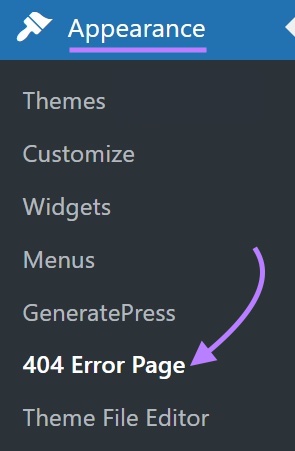
Publish your page. Then click “Appearance” and “404 Error Page.”
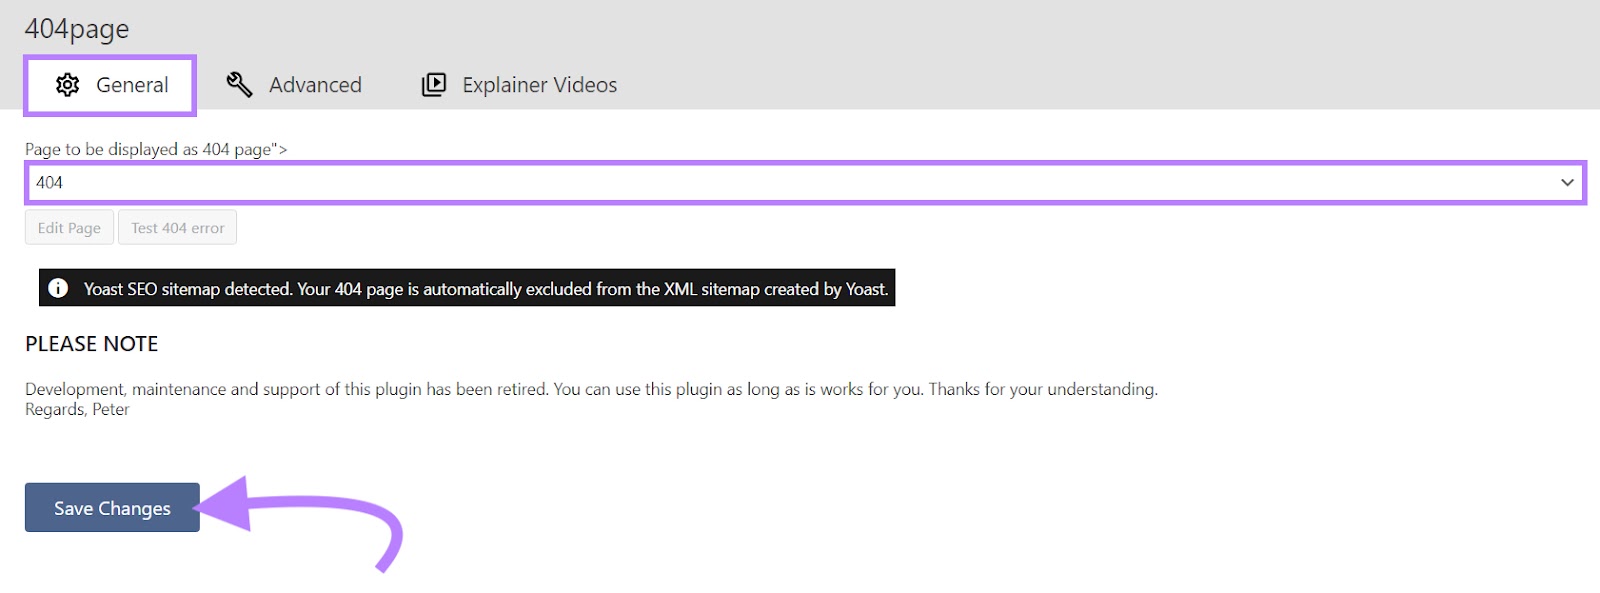
Head into the “General” tab and select your 404 page from the drop-down. Click “Save Changes.”
Your website will now load your custom 404 page when someone navigates to a page that doesn’t exist.
Custom 404 Page Examples
Here are four custom 404 error page examples to inspire your own:
Netflix
Netflix tailors their 404 page to popular shows with an image in the background. Which helps them promote their product while directing users to their homepage.

Wendy’s
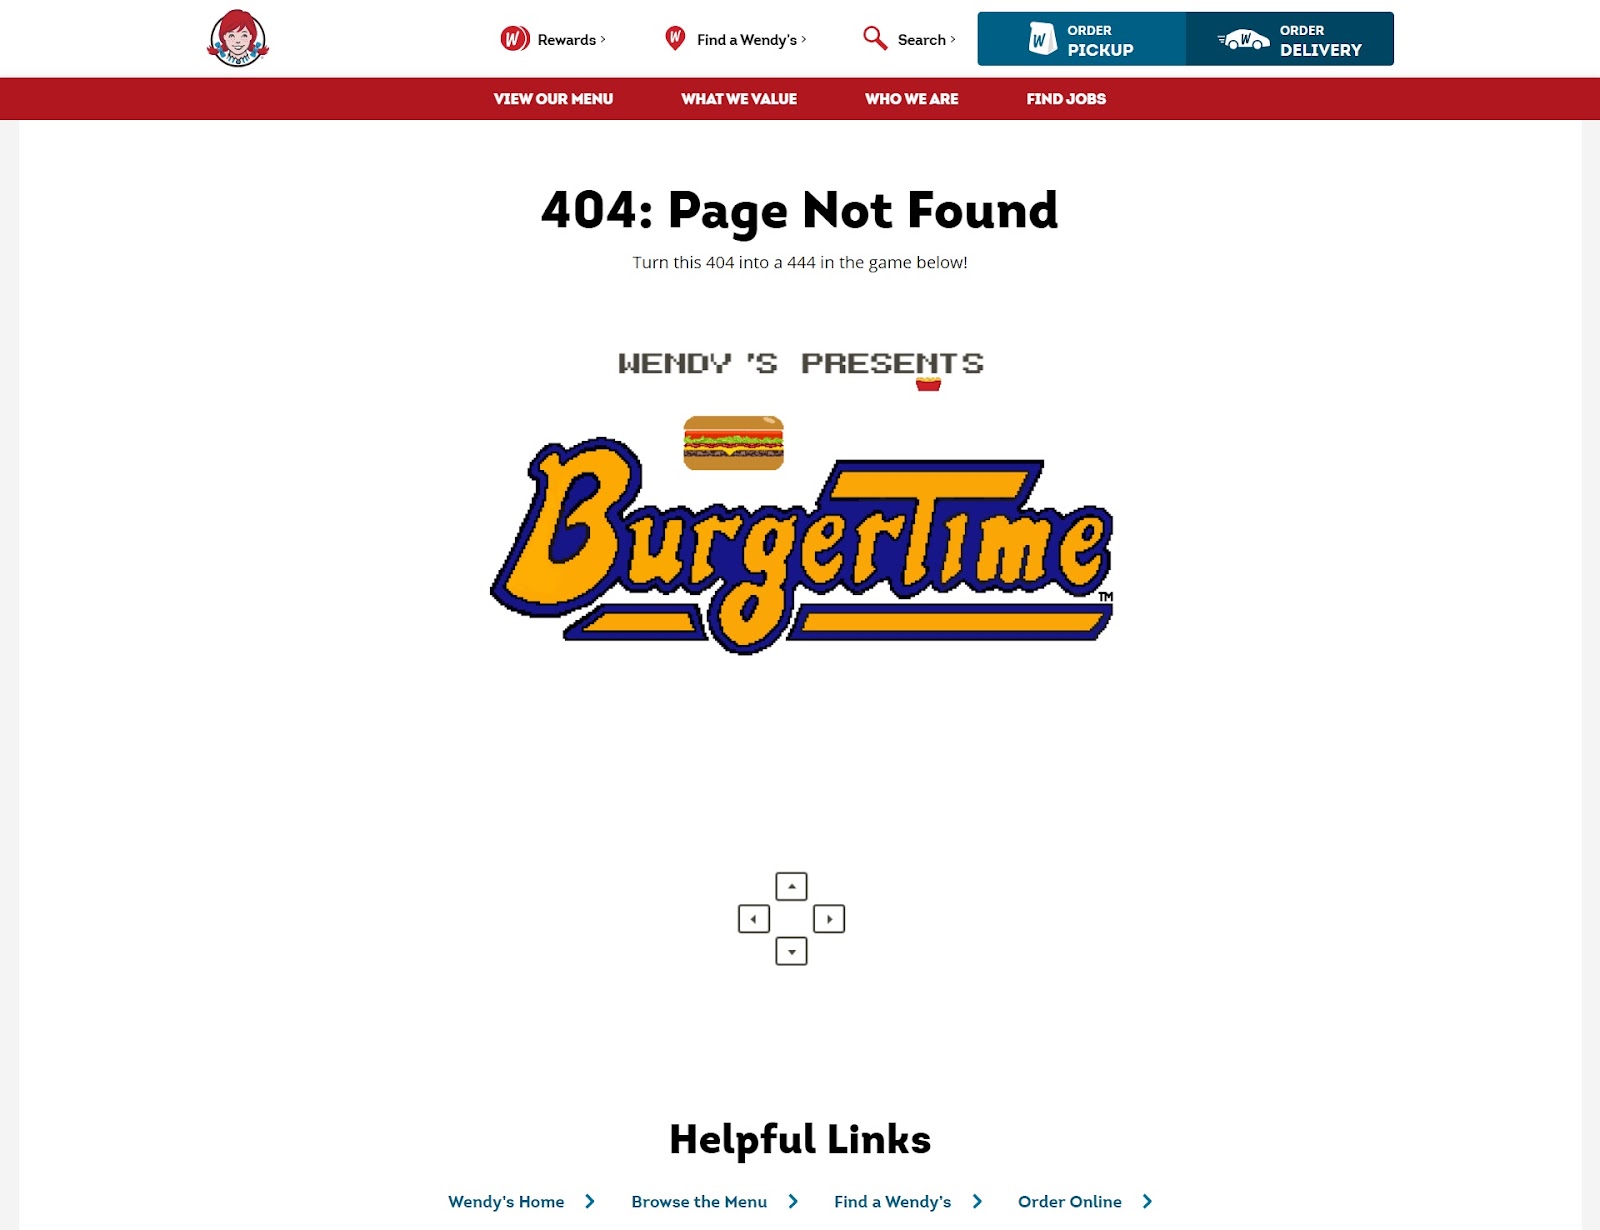
Wendy’s includes a simple game on their 404 page. Which adds a bit of fun to a page that is otherwise frustrating to land on.
Plus, this 404 page has links directly below the game. To help users find what they need.
Ryanair
Ryanair leans on their travel-based brand for their 404 page with a relevant image background. They also include links to help users continue along their journey.

Cadbury
Cadbury includes links to their homepage on their 404 page, along with a playful, relevant “Oh, Crumbs!” message. And encourages users to reach out to let them know if they continue to encounter issues.

Best Practices for 404 Pages
These tips will help you craft up a great 404 page for your site. Improving the user experience and potentially reducing bounce rates.
Explain What Happened
A quick explanation helps users understand why they got an error. So they can troubleshoot on their own.
For example, Microsoft's 404 page explains that the URL may be misspelled or the page no longer exists:

Stay on Brand
Your 404 page shouldn’t feel disjointed from your website. So, inject your brand and personality into your 404 page.
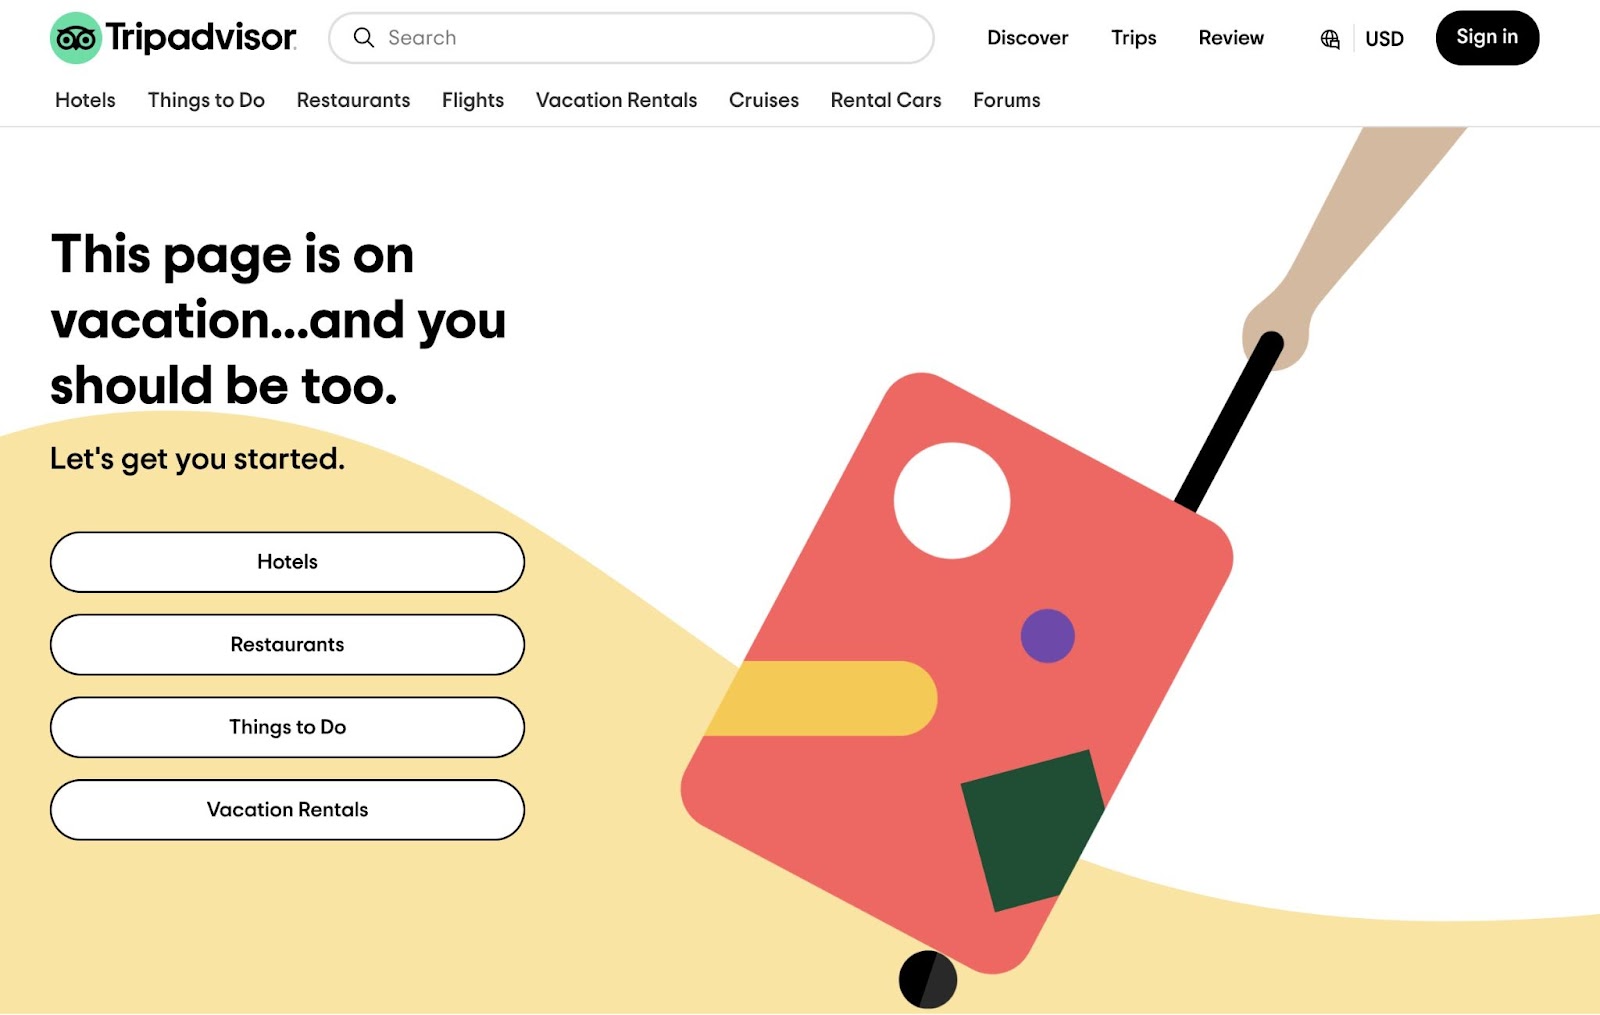
Tripadvisor uses clever language that reflects their brand on their 404 page:
Help Users Find What They Need
Keep users flowing through your site by adding elements like a search bar to your custom 404 page. Or links to popular pages. Or links to your top products.
This way, users can carry on with their journey.
Amazon includes a search bar and a link to their homepage within their 404 page (along with an image of one of many possible dogs):

How to Check Your Website for 404 Errors
Use Semrush’s Site Audit to check—and monitor—your site for unwanted 404 errors.
Open Site Audit, enter your domain, and click “Start Audit.”

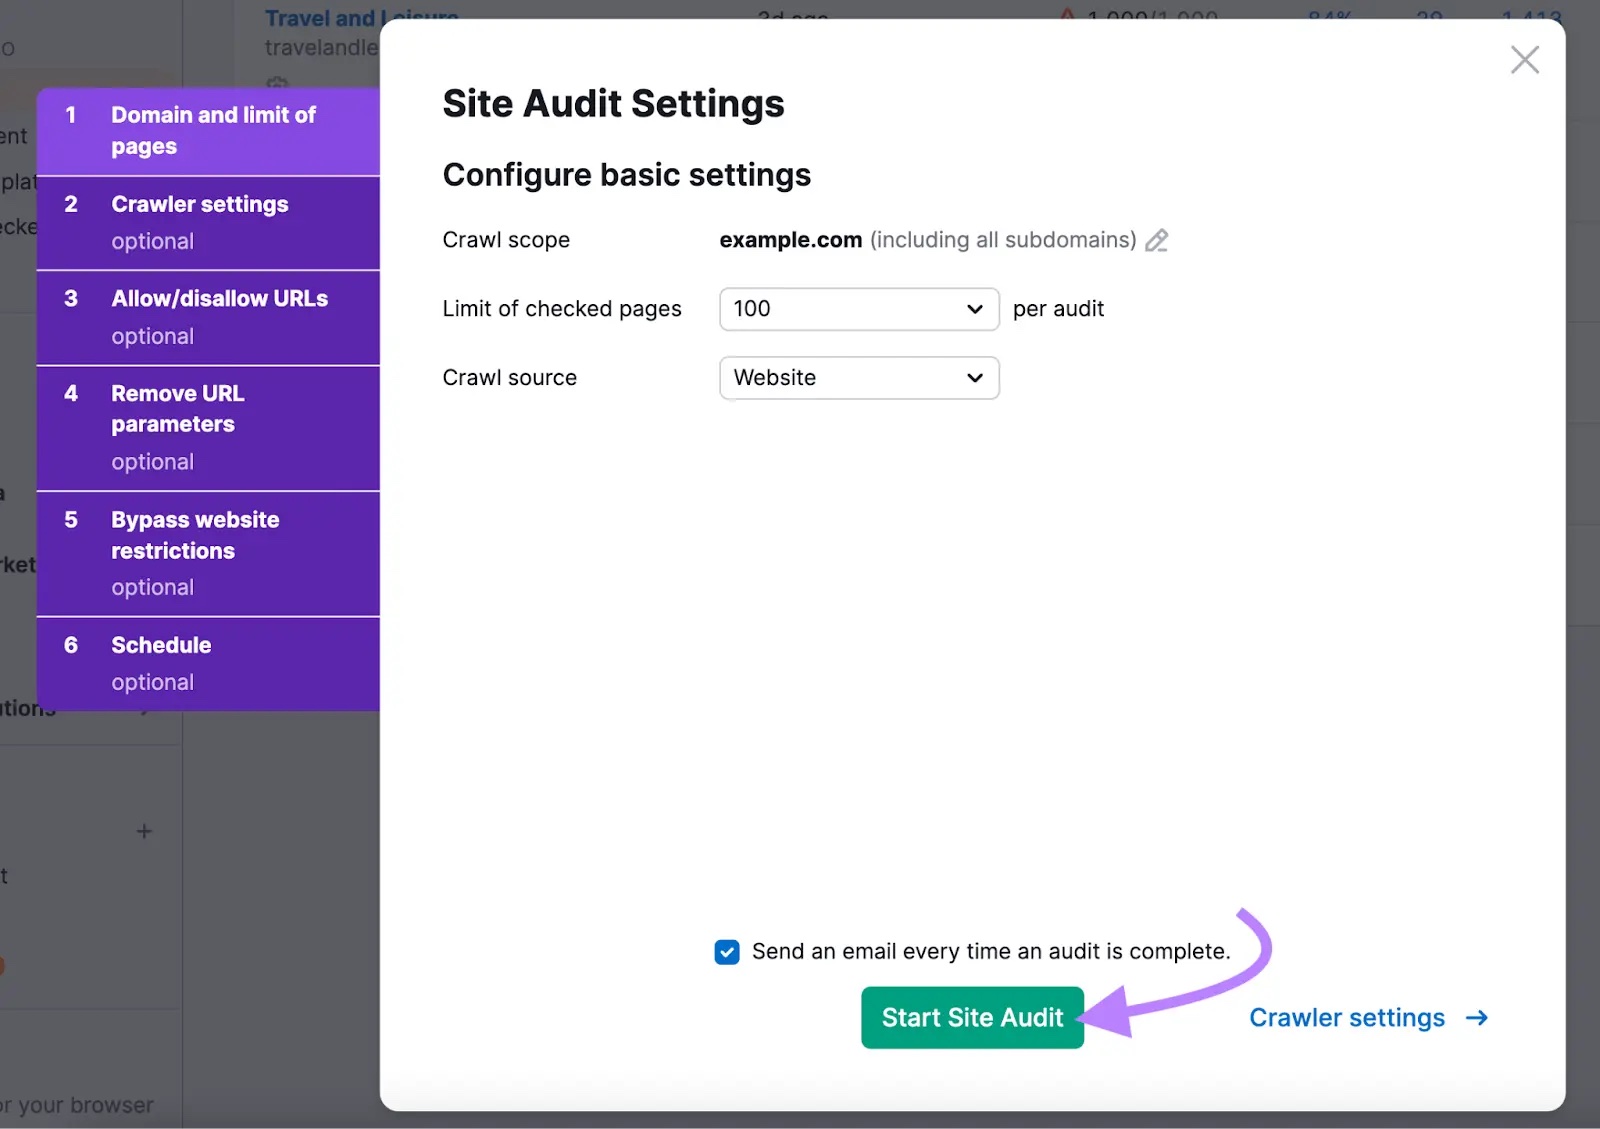
Configure the site audit. (Our configuration guide can help if you get stuck.) Click “Start Site Audit” when you’re ready.
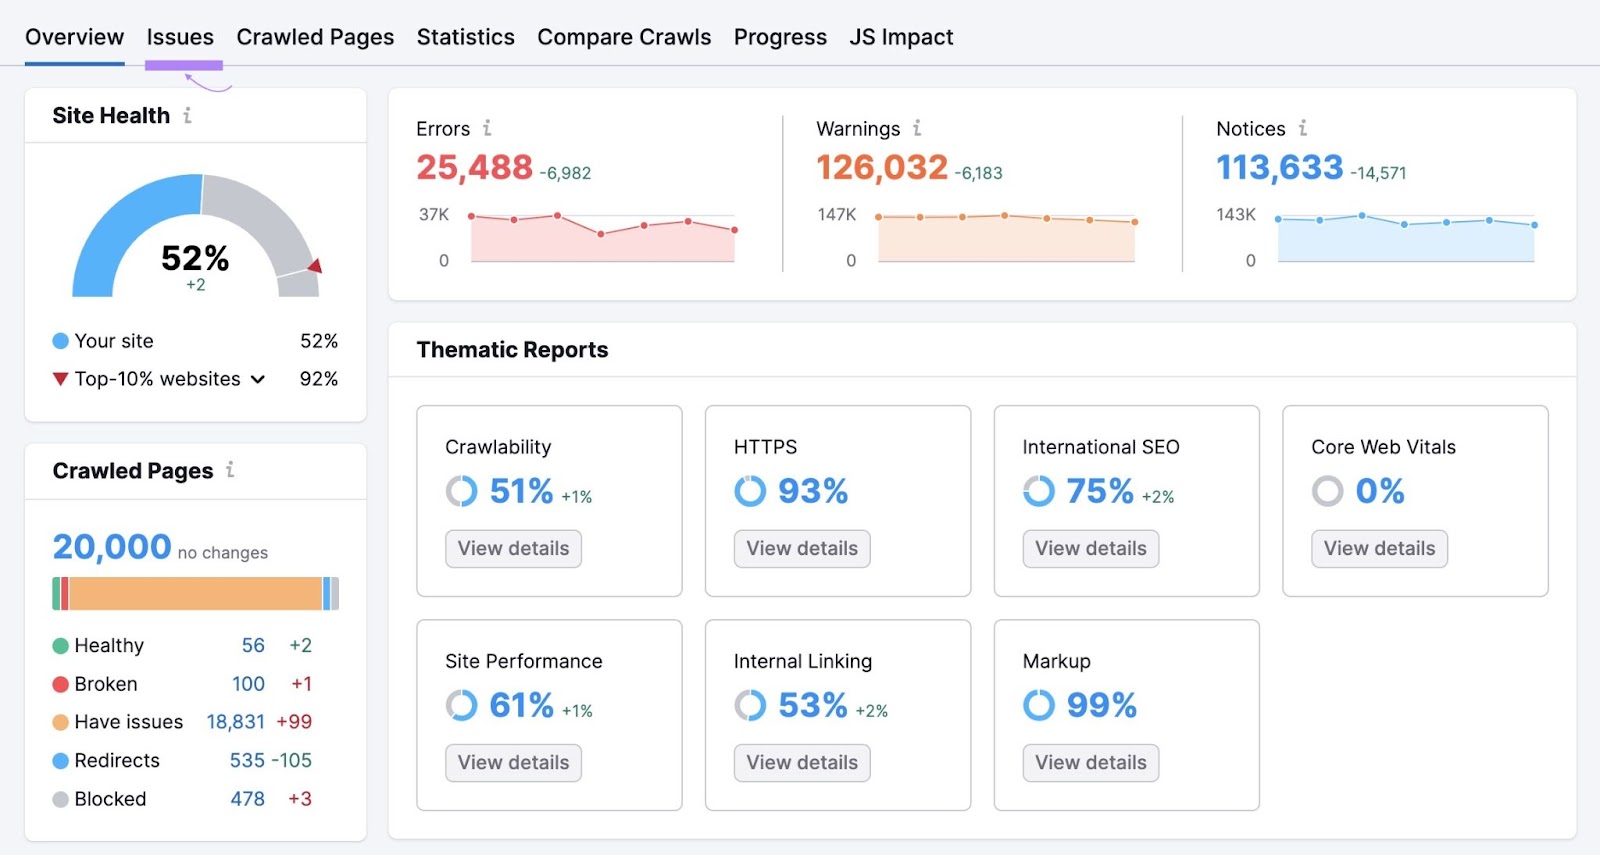
You’ll then get a report outlining your site’s health along with an overview of issues, warnings, and notices.
Inside the report click “Issues.”
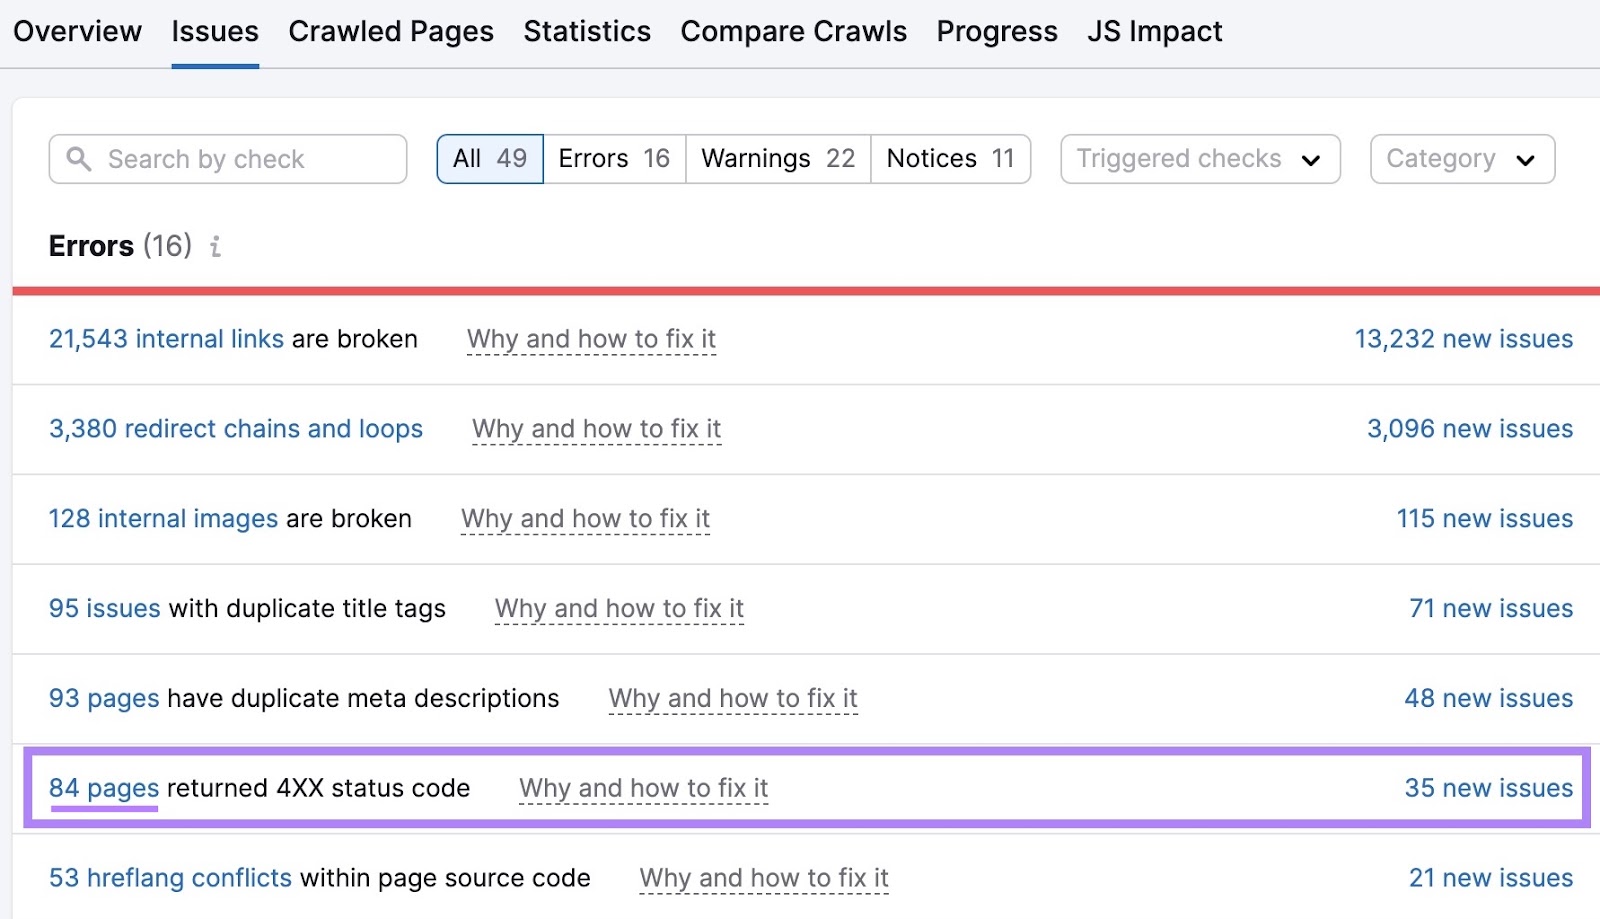
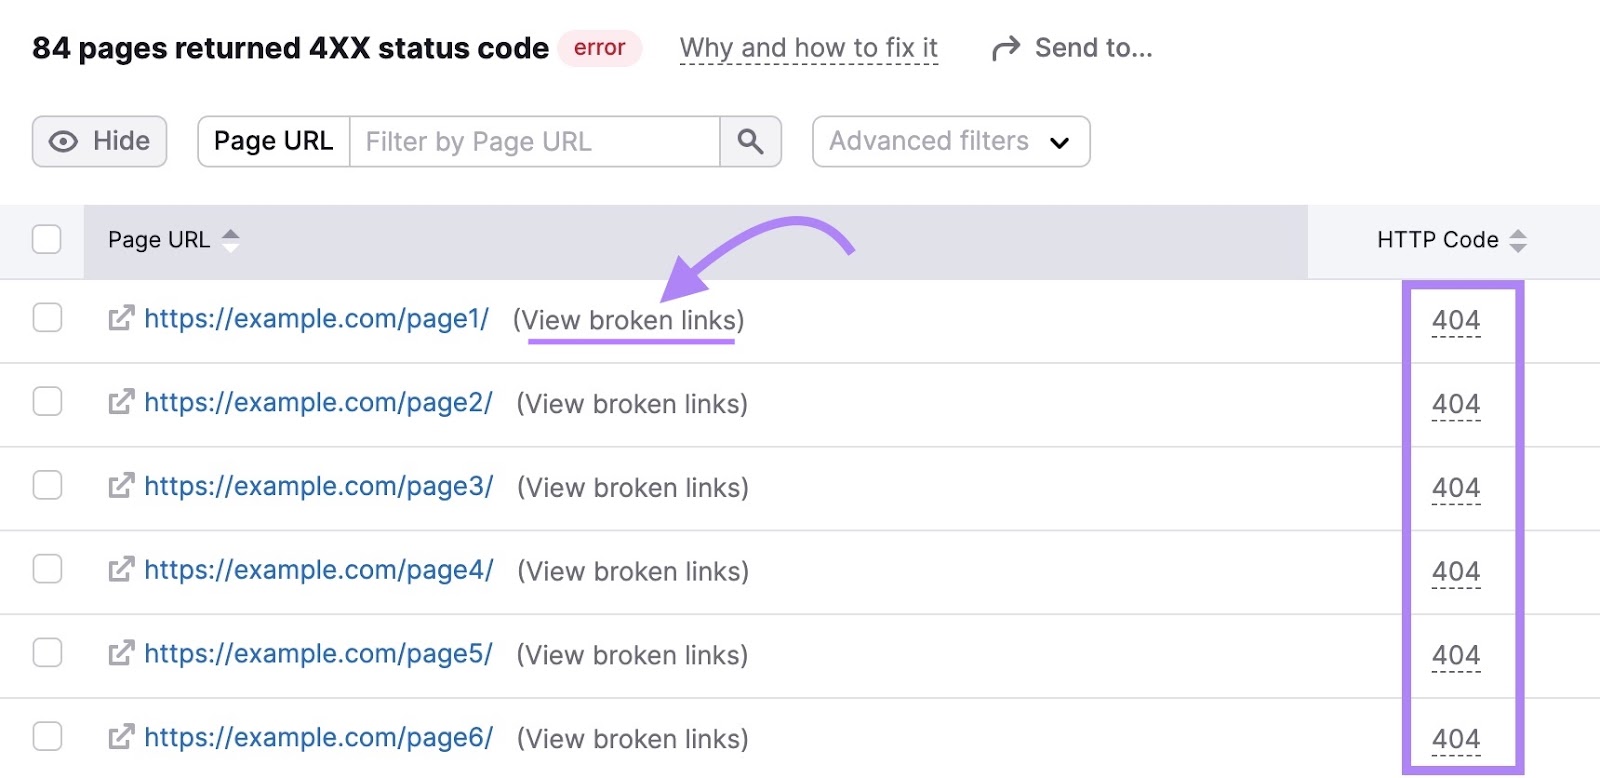
Under “Errors” look for “# pages returned 4XX status code.” Click the “# pages” part to view which pages on your site show a 4XX error.
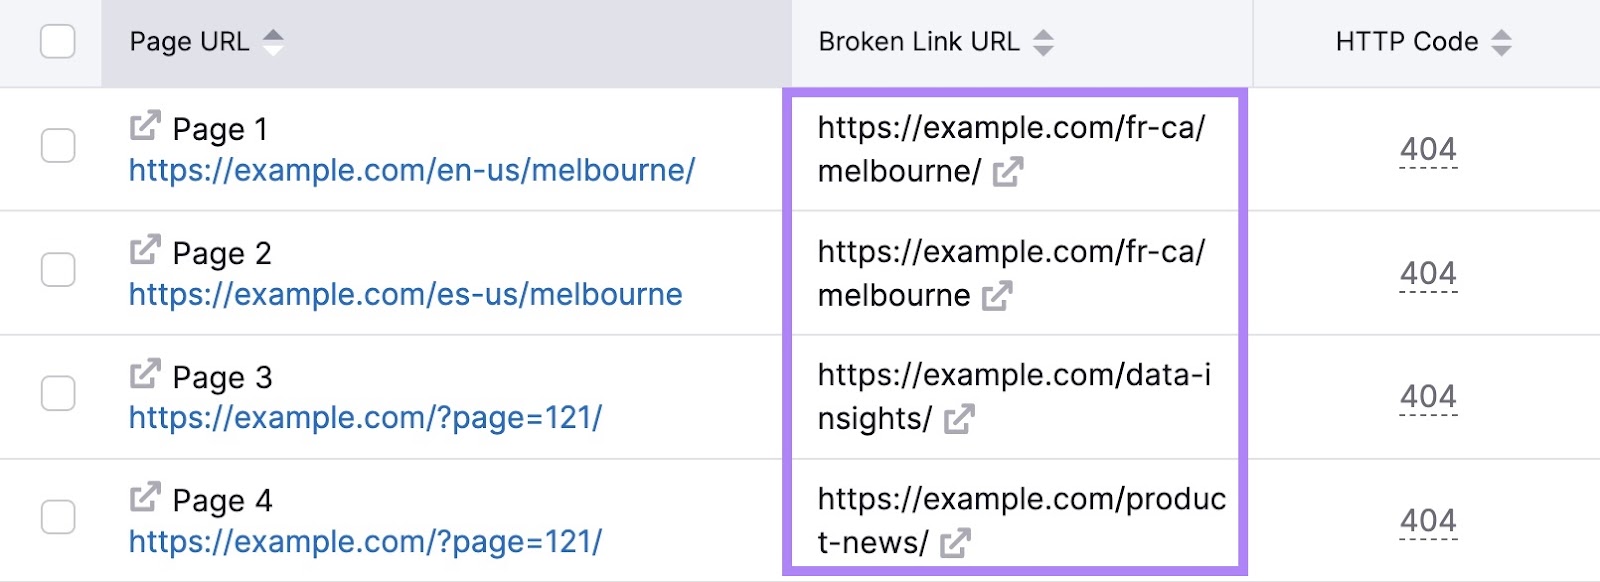
Look for pages with a 404 error. Click “View broken links” to see which pages link to the page with the 404 error.
Remove or change these broken links to another relevant (and working) link. So that people don’t end up on a 404 page when they click them. And so search engines don’t encounter potential crawl errors.
Then, decide how you’d like to approach the page with the 404 error. You have two options:
Leave the Error
404 errors can be useful. As they indicate that certain pages no longer exist. And you might want to communicate this to users.
For example, say you deleted a product page because you no longer sell that product. You’d want to leave the 404 error so users know the product’s page no longer exists.
Redirect Traffic to a New Page
Redirects—like a 301 permanent redirect—can automatically send users from one page to another when they access a link. You might do this if you replaced a page with a new one. And you want to direct users from the old page to the new page.
Imagine you changed your about page from example.com/about to example.com/about-us. You’d likely want to redirect traffic from /about to /about-us. Because the page still exists, but it has moved. And so you wouldn't want to keep the 404 page.
Improve Your Website Experience with a Custom 404 Page
Create a custom 404 page to help users find what they need without any roadblocks.
Then, use Semrush’s Site Audit tool to monitor your 404 errors. And ensure that users don’t get stuck while browsing your site.
Try Site Audit for free today.
