Technical SEO is primarily about making it easier for search engines to find, index, and rank your website. It can also enhance your site’s user experience (UX) by making it faster and more accessible.
We’ve put together a comprehensive technical SEO checklist to help you address and prevent potential technical issues. And provide the best experience for your users.
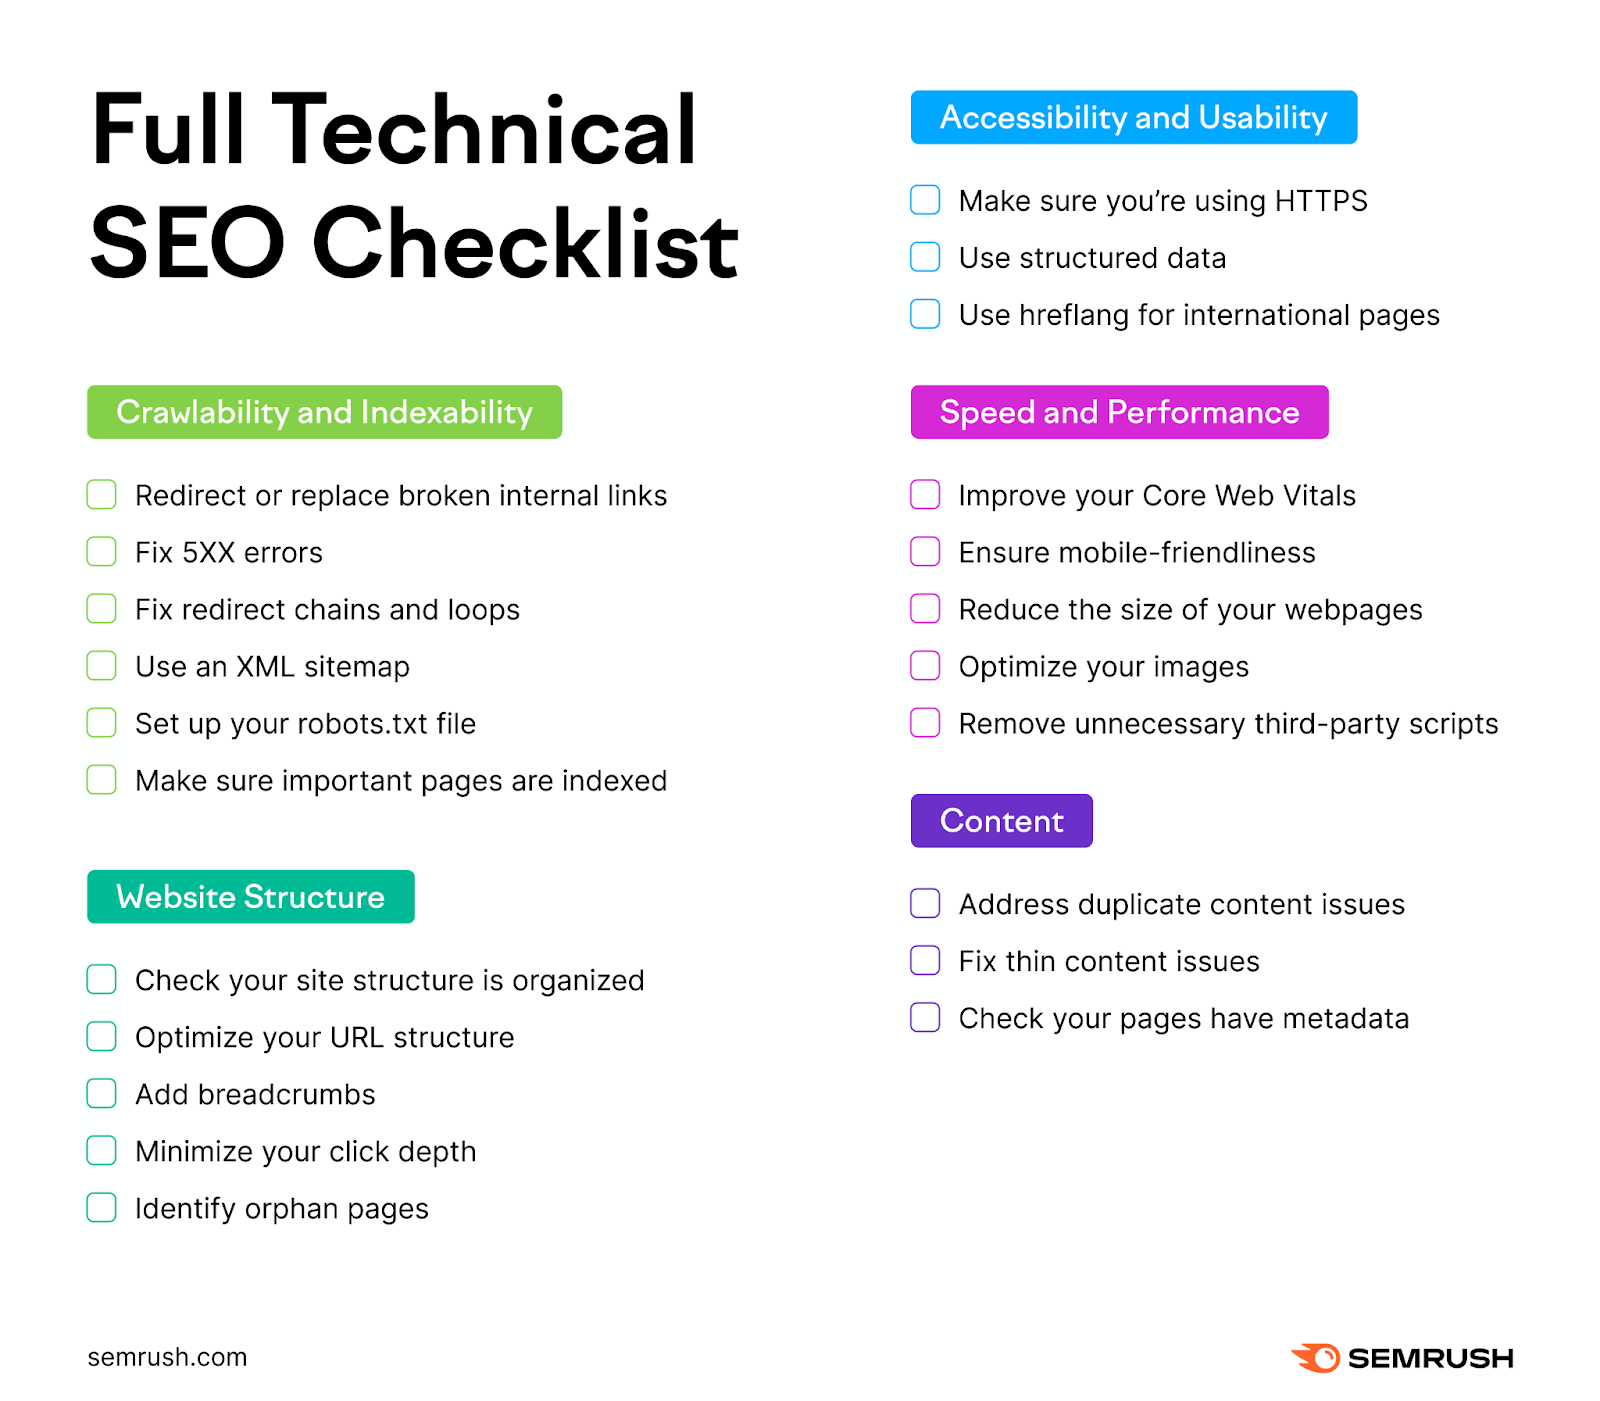
Crawlability and Indexability
Search engines like Google use crawlers to discover (crawl) content. And add it to their database of webpages (known as the index).
If your site has indexing or crawling errors, your pages might not appear in search results. Leading to reduced visibility and traffic.
Here are the most important crawlability and indexability issues to check for:
1. Redirect or Replace Broken Internal Links
Broken internal links point to non-existent pages within your site. This can happen if you’ve mistyped the URL, deleted the page, or moved it without setting up a proper redirect.
Clicking on a broken link normally takes you to a 404 error page:
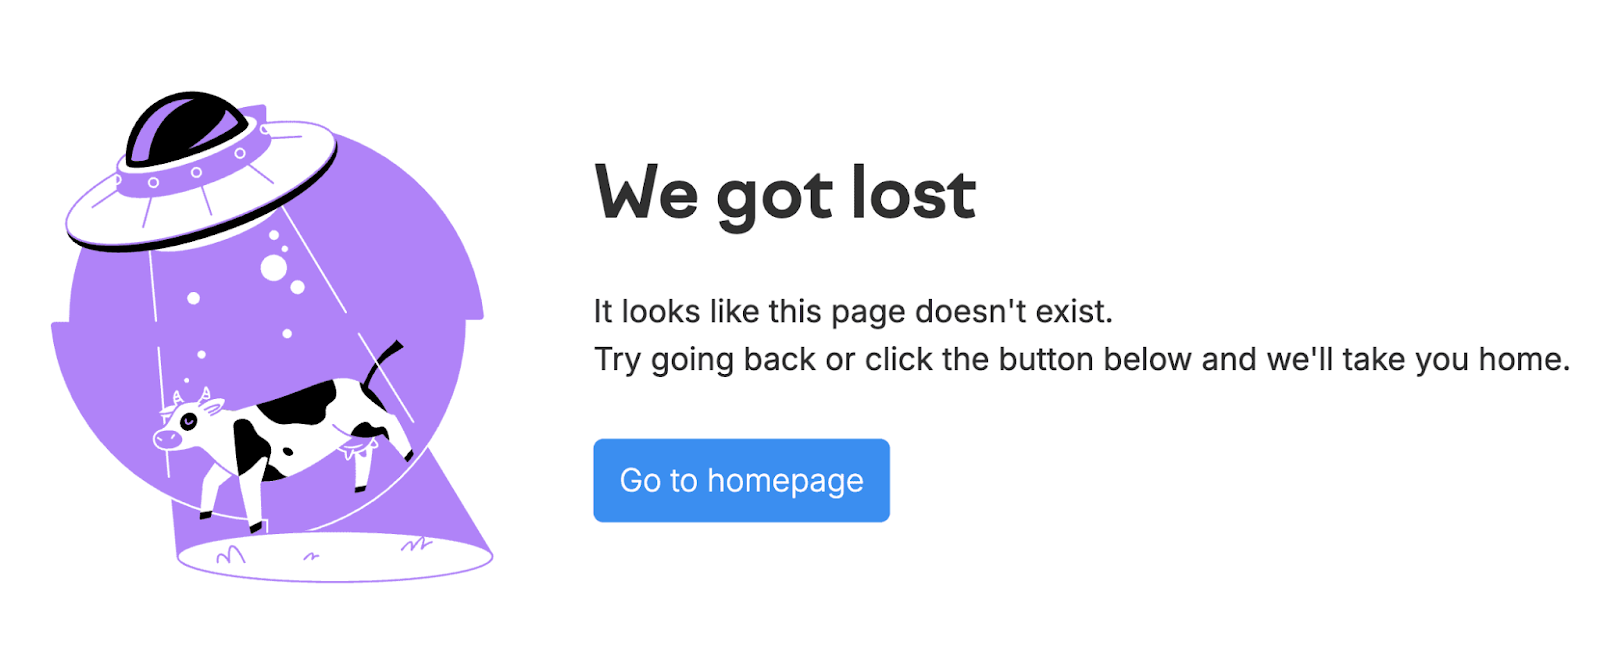
Broken links disrupt the user's experience on your site. And make it harder for people to find what they need.
Use Semrush’s Site Audit tool to identify broken links.
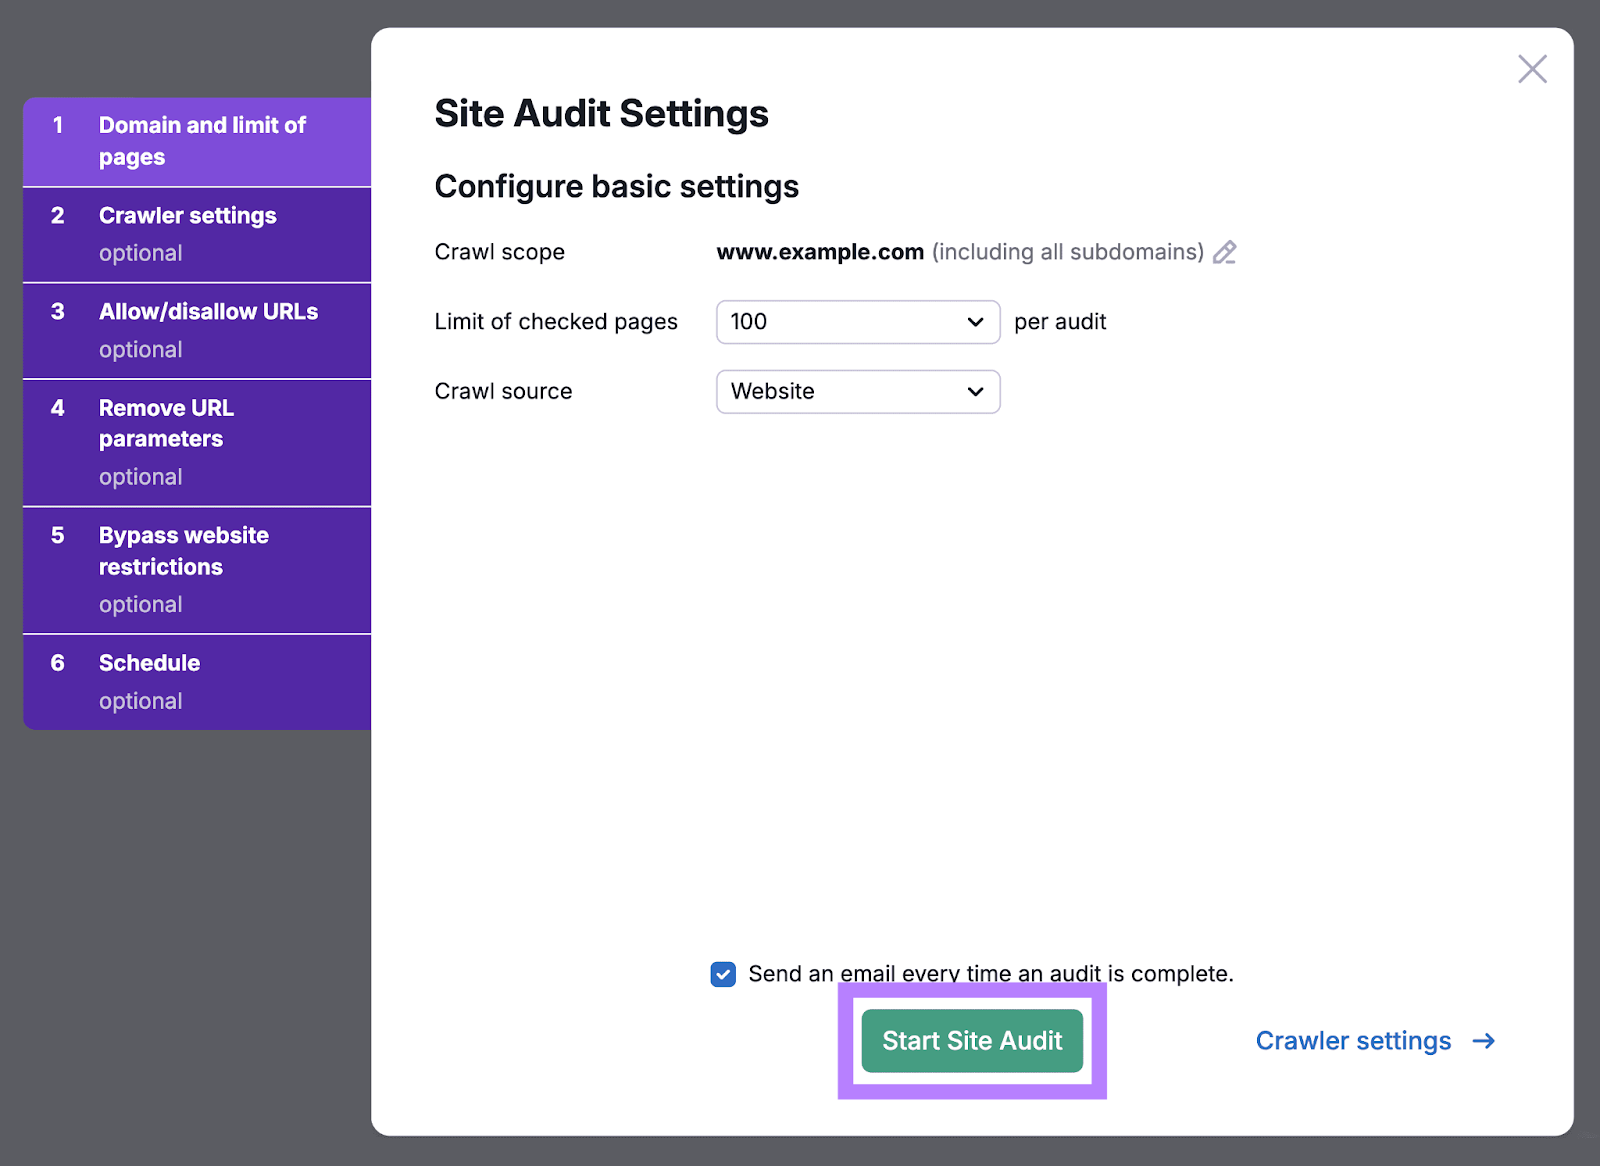
Open the tool and follow the configuration guide to set it up. (Or stick with the default settings.) Then, click “Start Site Audit.”
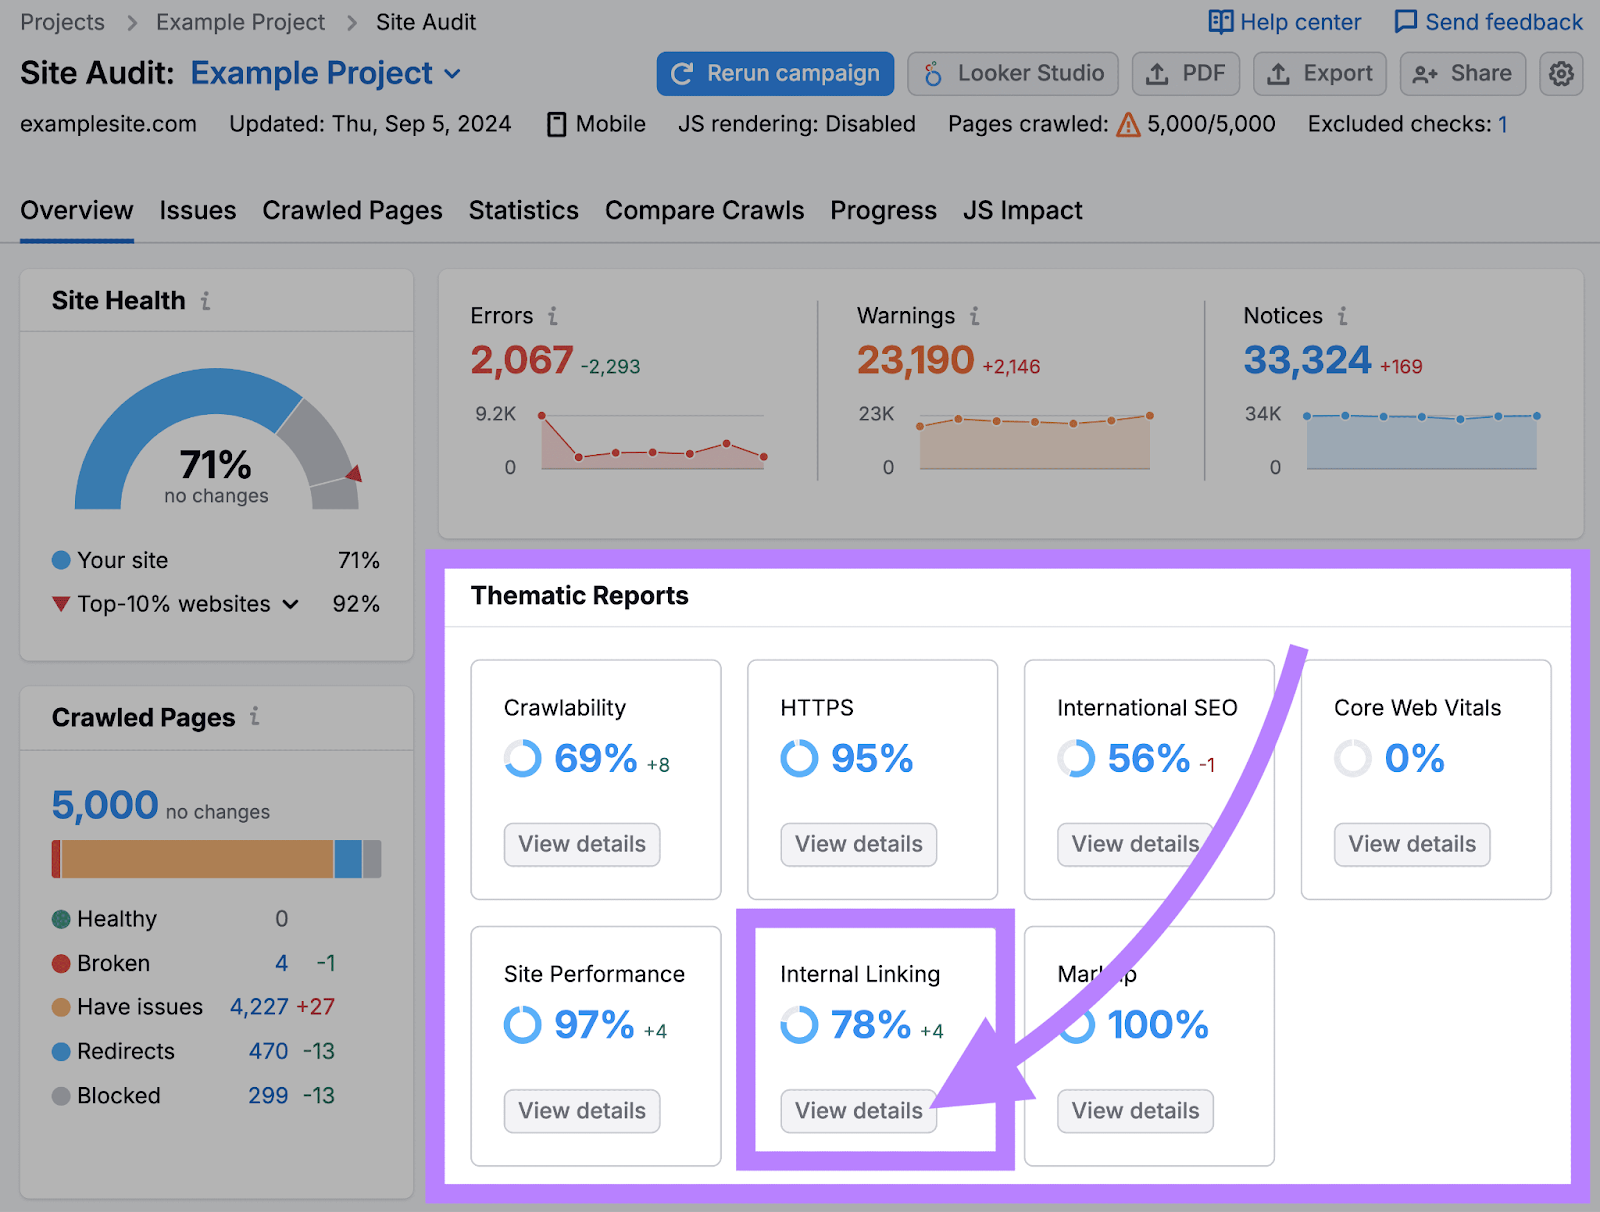
Once your report is ready, you’ll see an overview page.
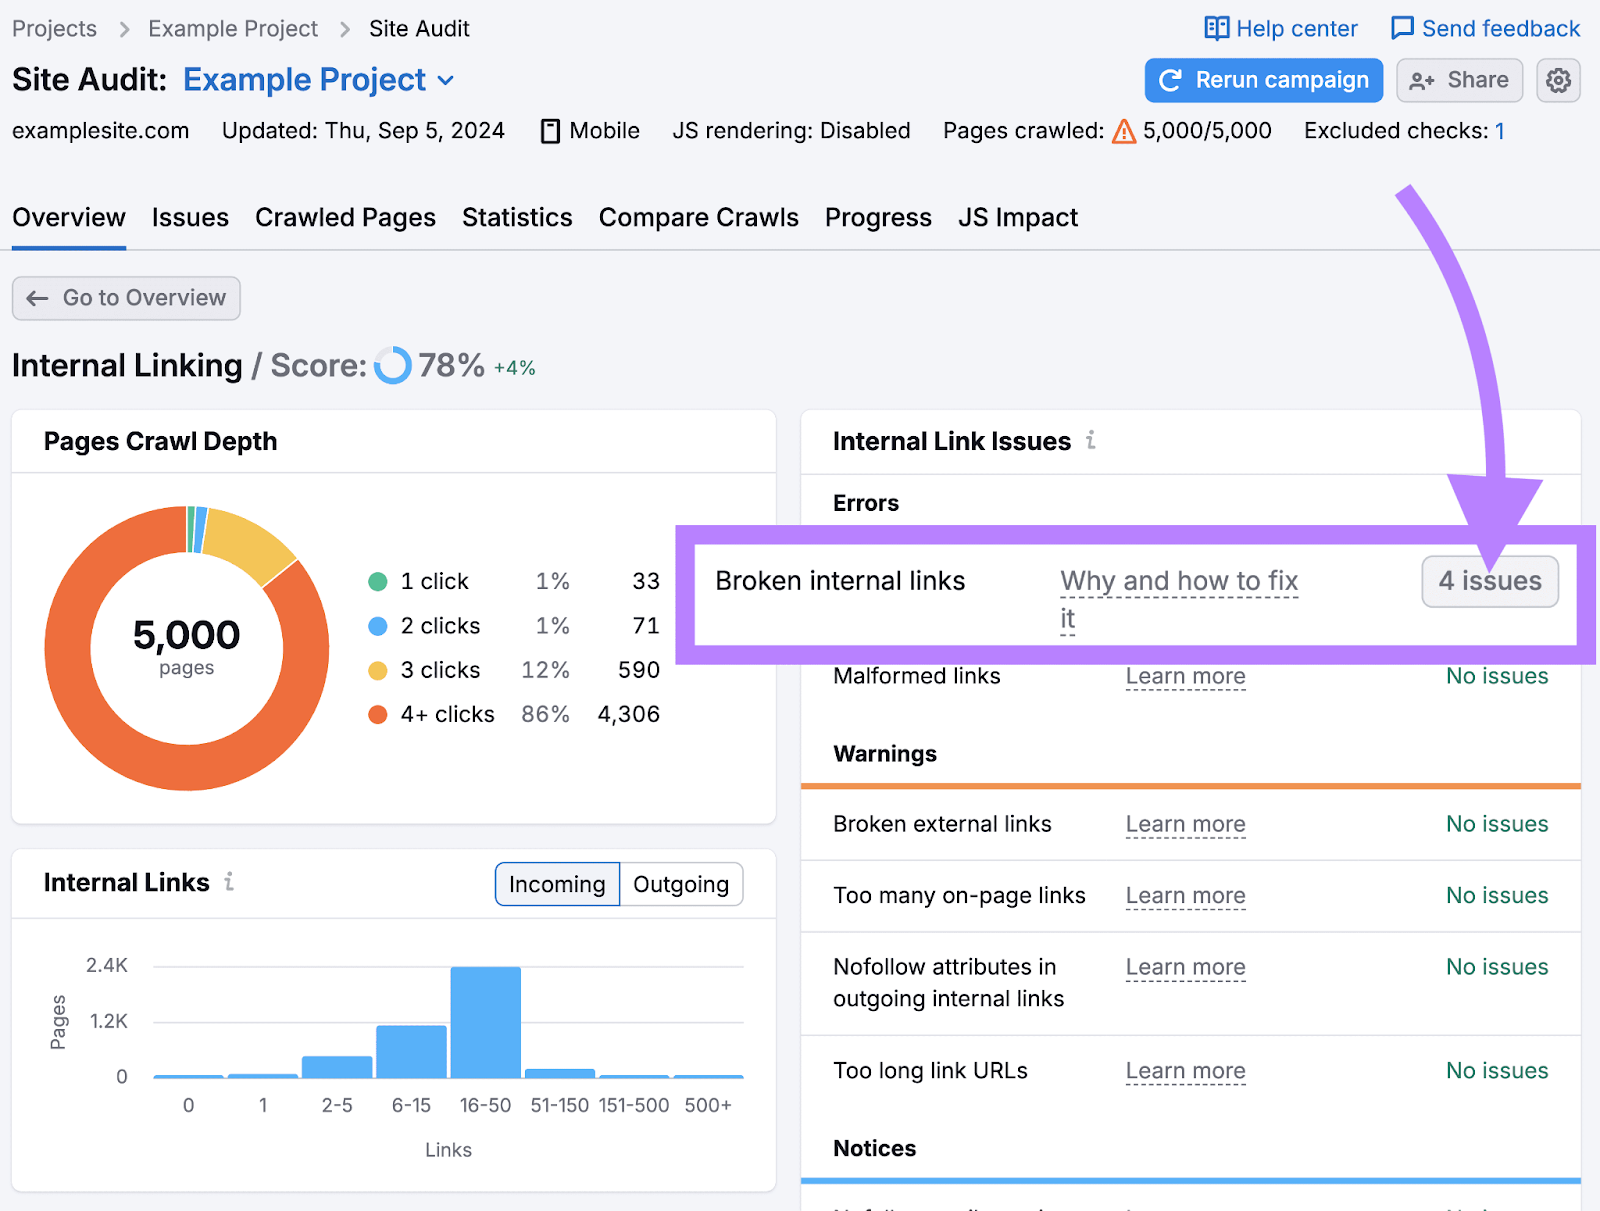
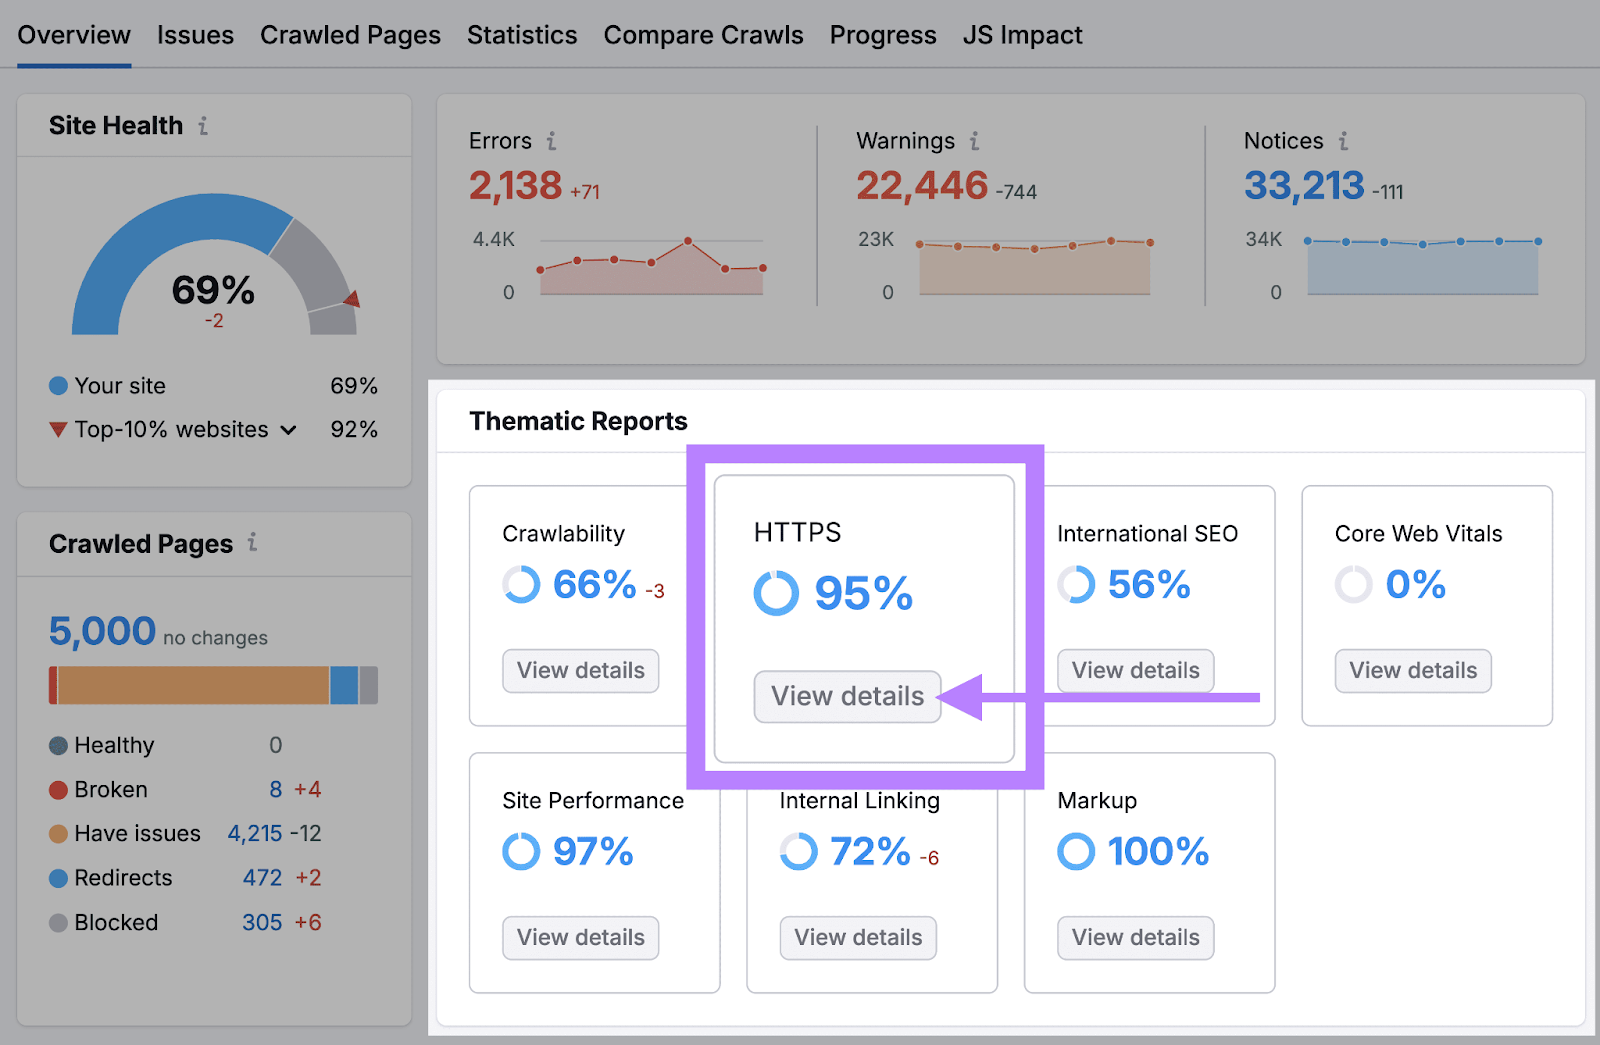
Click on “View details” in the “Internal Linking” widget under “Thematic Reports.” This will take you to a dedicated report on your site’s internal linking structure.
You can find any broken link issues under the “Errors” section. Click on the “# Issues” button on the “Broken internal links” line for a complete list of all your broken links.
To fix the issues, first go through the links on the list one by one and check that they’re spelled correctly.
If they’re correct but still broken, replace them with links that point to relevant live pages. Or remove them entirely.
2. Fix 5XX Errors
5XX errors (like 500 HTTP status codes) happen when your web server encounters an issue that prevents it from fulfilling a user or crawler request. Making the page inaccessible.
Like not being able to load a webpage because the server is overloaded with too many requests.
Server-side errors prevent users and crawlers from accessing your webpages. This negatively impacts both user experience and crawlability. Which can lead to a drop in organic (free) traffic to your website.
Jump back into the Site Audit tool to check for any 5XX errors.
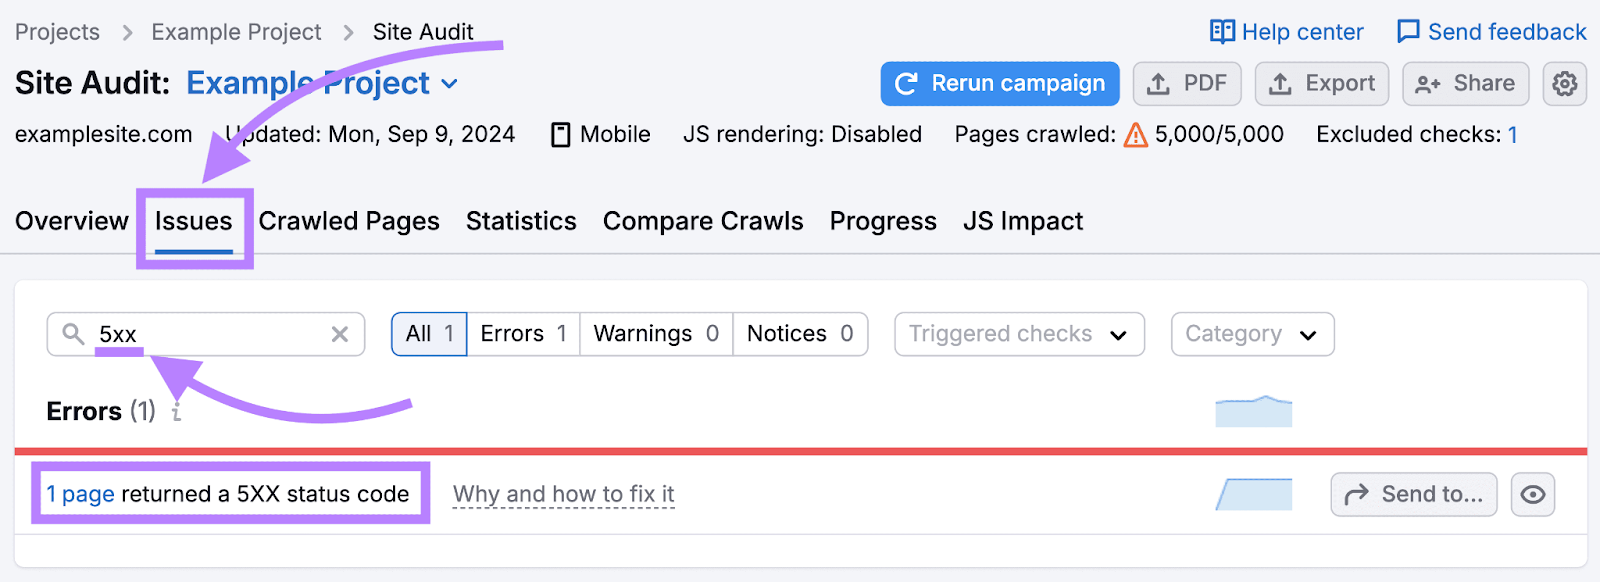
Navigate to the “Issues” tab. Then, search for “5XX” in the search bar.
If Site Audit identifies any issues, you’ll see a “# pages returned a 5XX status code” error. Click on the link for a complete list of affected pages. Either fix these issues yourself or send the list to your developer to investigate and resolve the issues.
3. Fix Redirect Chains and Loops
A redirect sends users and crawlers to a different page than the one they originally tried to access. It’s a great way to ensure visitors don’t land on a broken page.
But if a link redirects to another redirect, it can create a chain. Like this:
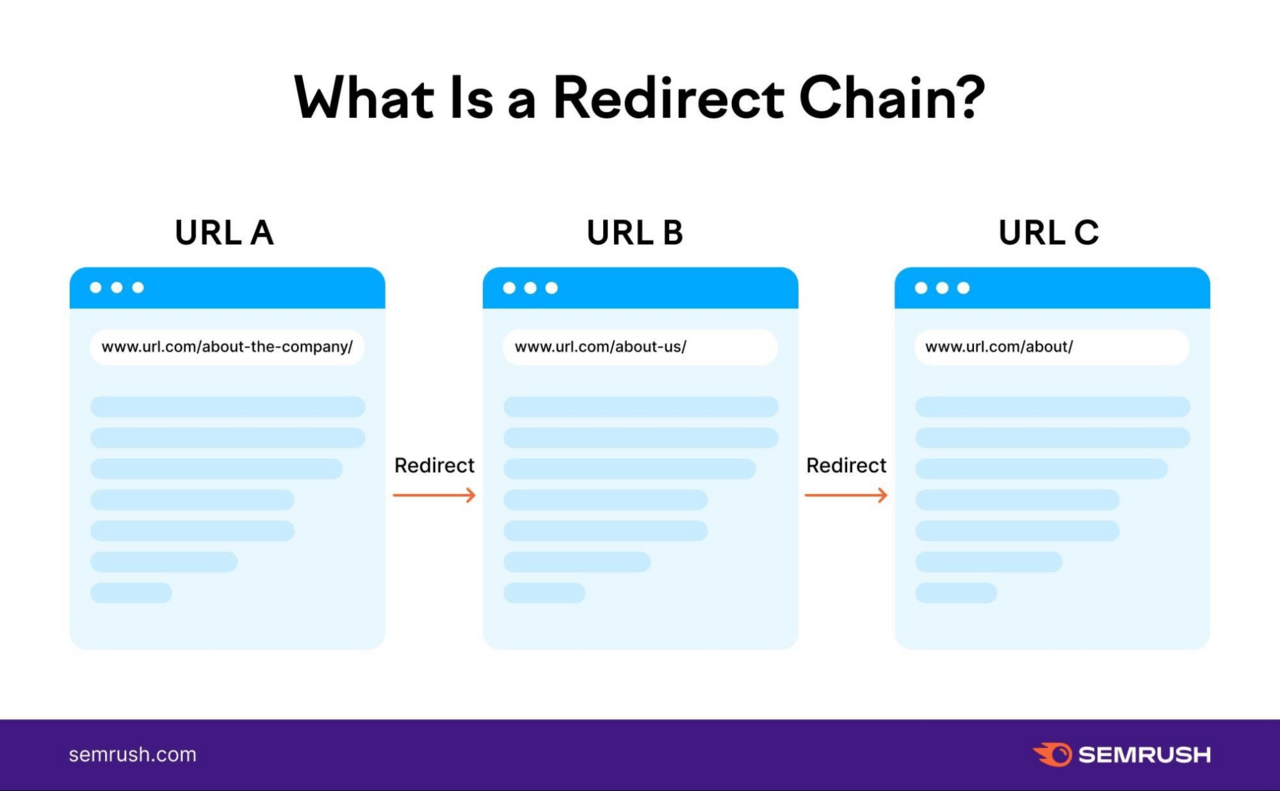
Long redirect chains can slow down your site and waste crawl budget.
Redirect loops, on the other hand, happen when a chain loops in on itself. For example, if page X redirects to page Y, and page Y redirects back to page X.
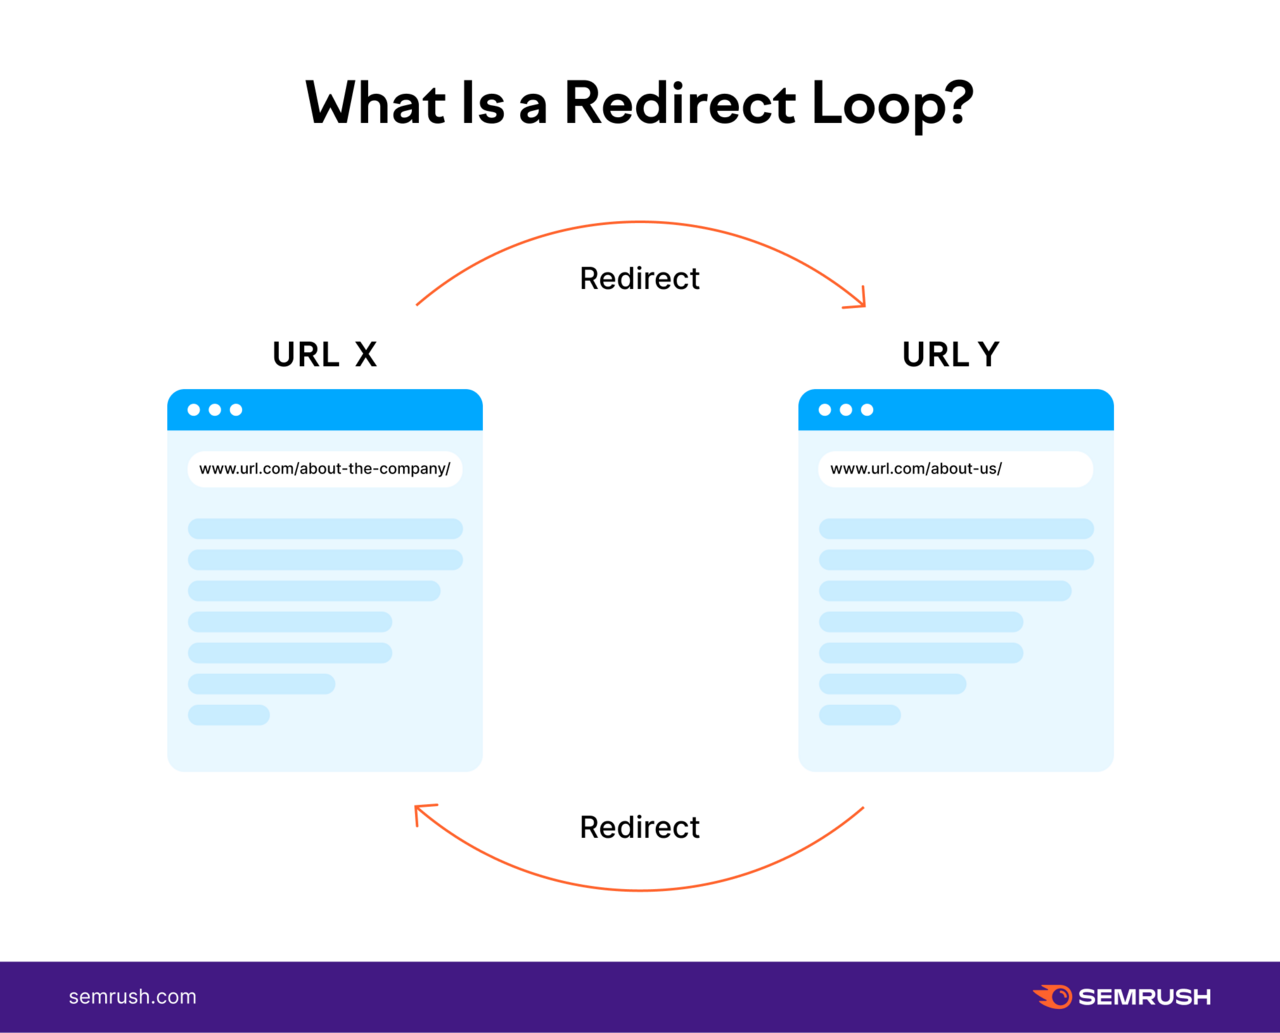
Redirect loops make it difficult for search engines to crawl your site and can trap both crawlers and users in an endless cycle. Preventing them from accessing your content.
Use Site Audit to identify redirect chains and loops.
Just open the “Issues” tab. And search for “redirect chain” in the search bar.
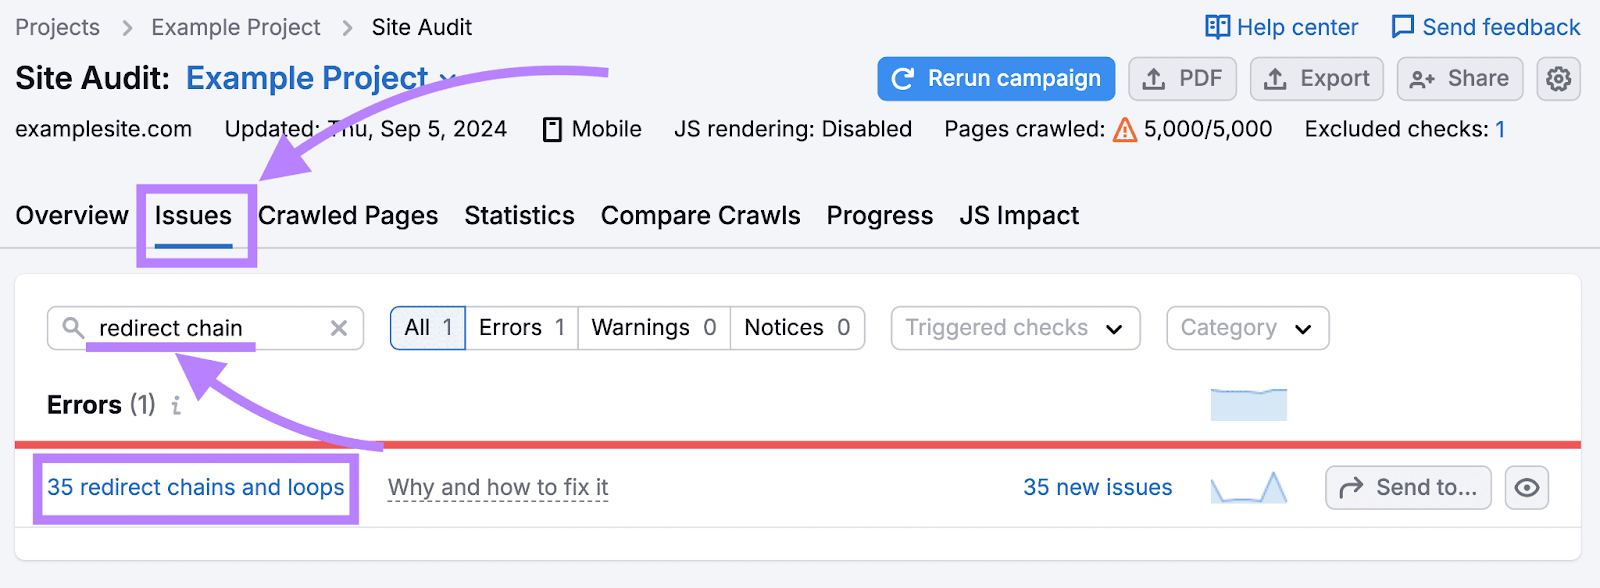
Address redirect chains by linking directly to the destination page.
For redirect loops, find and fix the faulty redirects so each one points to the correct final page.
4. Use an XML Sitemap
An XML sitemap lists all the important pages on your website. Helping search engines like Google discover and index your content more easily.
Your sitemap might look something like this:
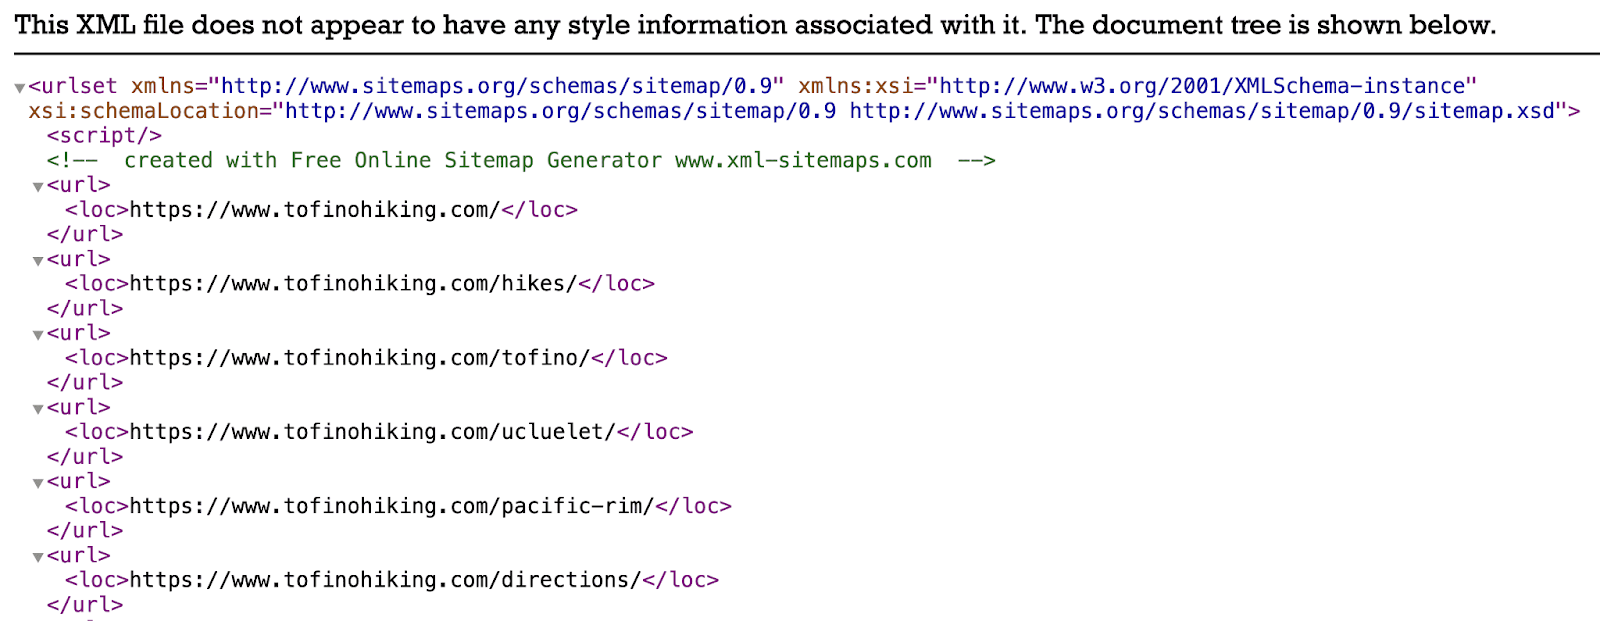
Without an XML sitemap, search engine bots need to rely on links to navigate your site and discover your important pages. Which can lead to some pages being missed.
Especially if your site is large or complex to navigate.
If you use a content management system (CMS) like WordPress, Wix, Squarespace, or Shopify, it may generate a sitemap file for you automatically.
You can typically access it by typing yourdomain.com/sitemap.xml in your browser. (Sometimes, it’ll be yourdomain.com/sitemap_index.xml instead.)
Like this:
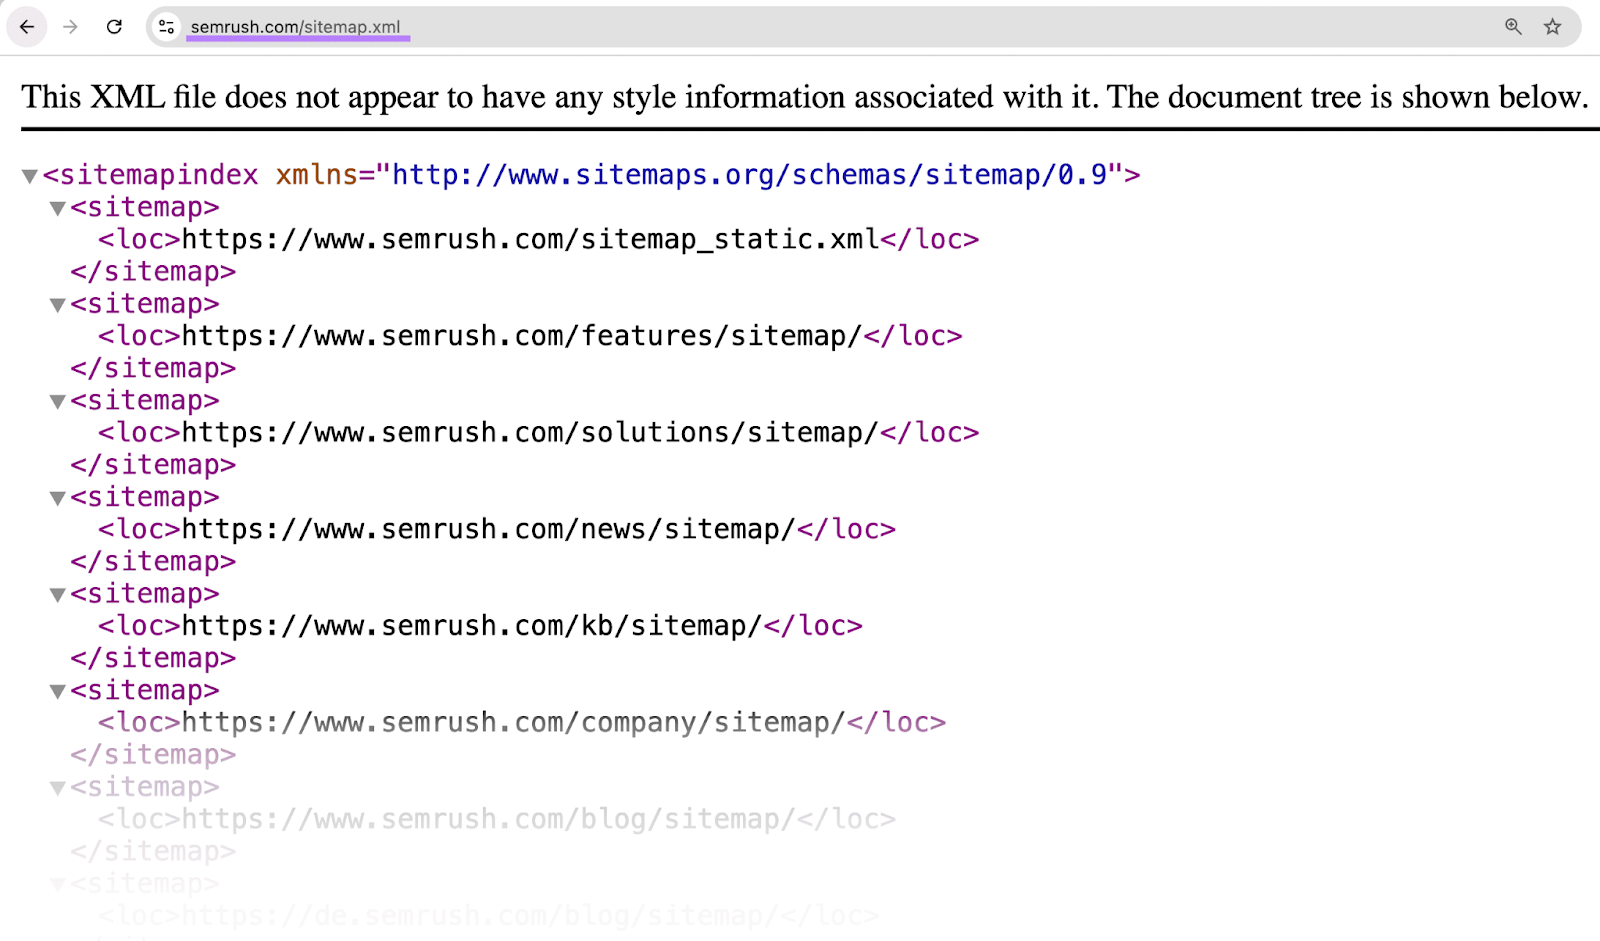
If your CMS or website builder doesn’t generate an XML sitemap for you, you can use a sitemap generator tool.
For example, if you have a smaller site, you can use XML-Sitemaps.com. Just enter your site URL and click “Start.”

Once you have your sitemap, save the file as “sitemap.xml” and upload it to your site’s root directory or public_html folder.
Finally, submit your sitemap to Google through your Google Search Console account.
To do that, open your account and click “Sitemaps” in the left-hand menu.
Enter your sitemap URL. And click “Submit.”
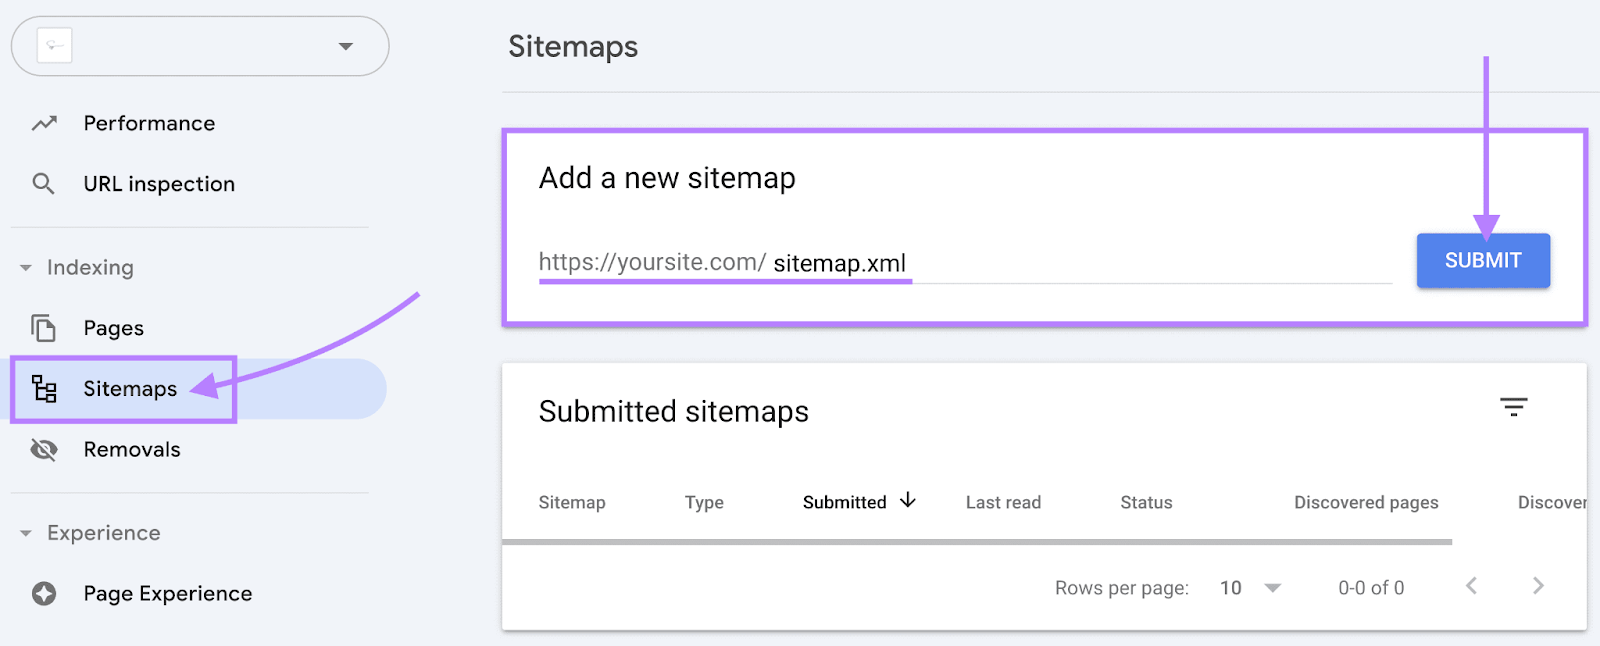
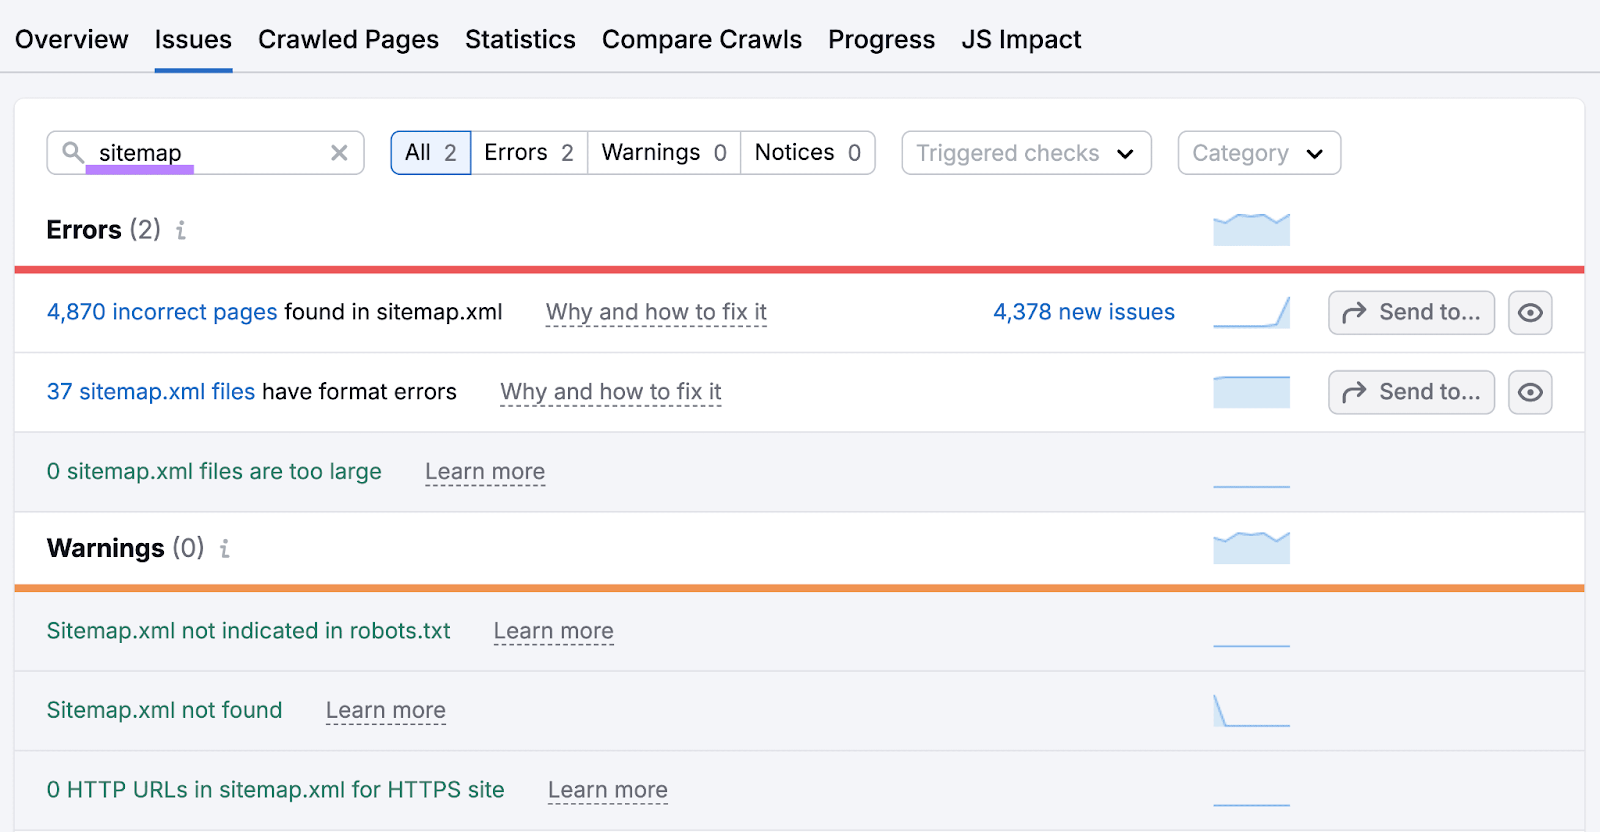
Use Site Audit to make sure your sitemap is set up correctly. Just search for “Sitemap” on the “Issues” tab.
5. Set Up Your Robots.txt File
A robots.txt file is a set of instructions that tells search engines like Google which pages they should and shouldn’t crawl.
This helps focus crawlers on your most valuable content, keeping them from wasting resources on unimportant pages. Or pages you don’t want to appear in search results, like login pages.
If you don’t set up your robots.txt file correctly, you could risk blocking important pages from appearing in search results. Harming your organic visibility.
If your site doesn’t have a robots.txt file yet, use a robots.txt generator tool to create one. If you’re using a CMS like WordPress, there are plugins that can do this for you.
Add your sitemap URL to your robots.txt file to help search engines understand which pages are most important on your site.
It might look something like this:
Sitemap: https://www.yourdomain.com/sitemap.xml
User-agent: *
Disallow: /admin/
Disallow: /private/
In this example, we’re disallowing all web crawlers from crawling our /admin/ and /private/ pages.
Use Google Search Console to check the status of your robots.txt files.
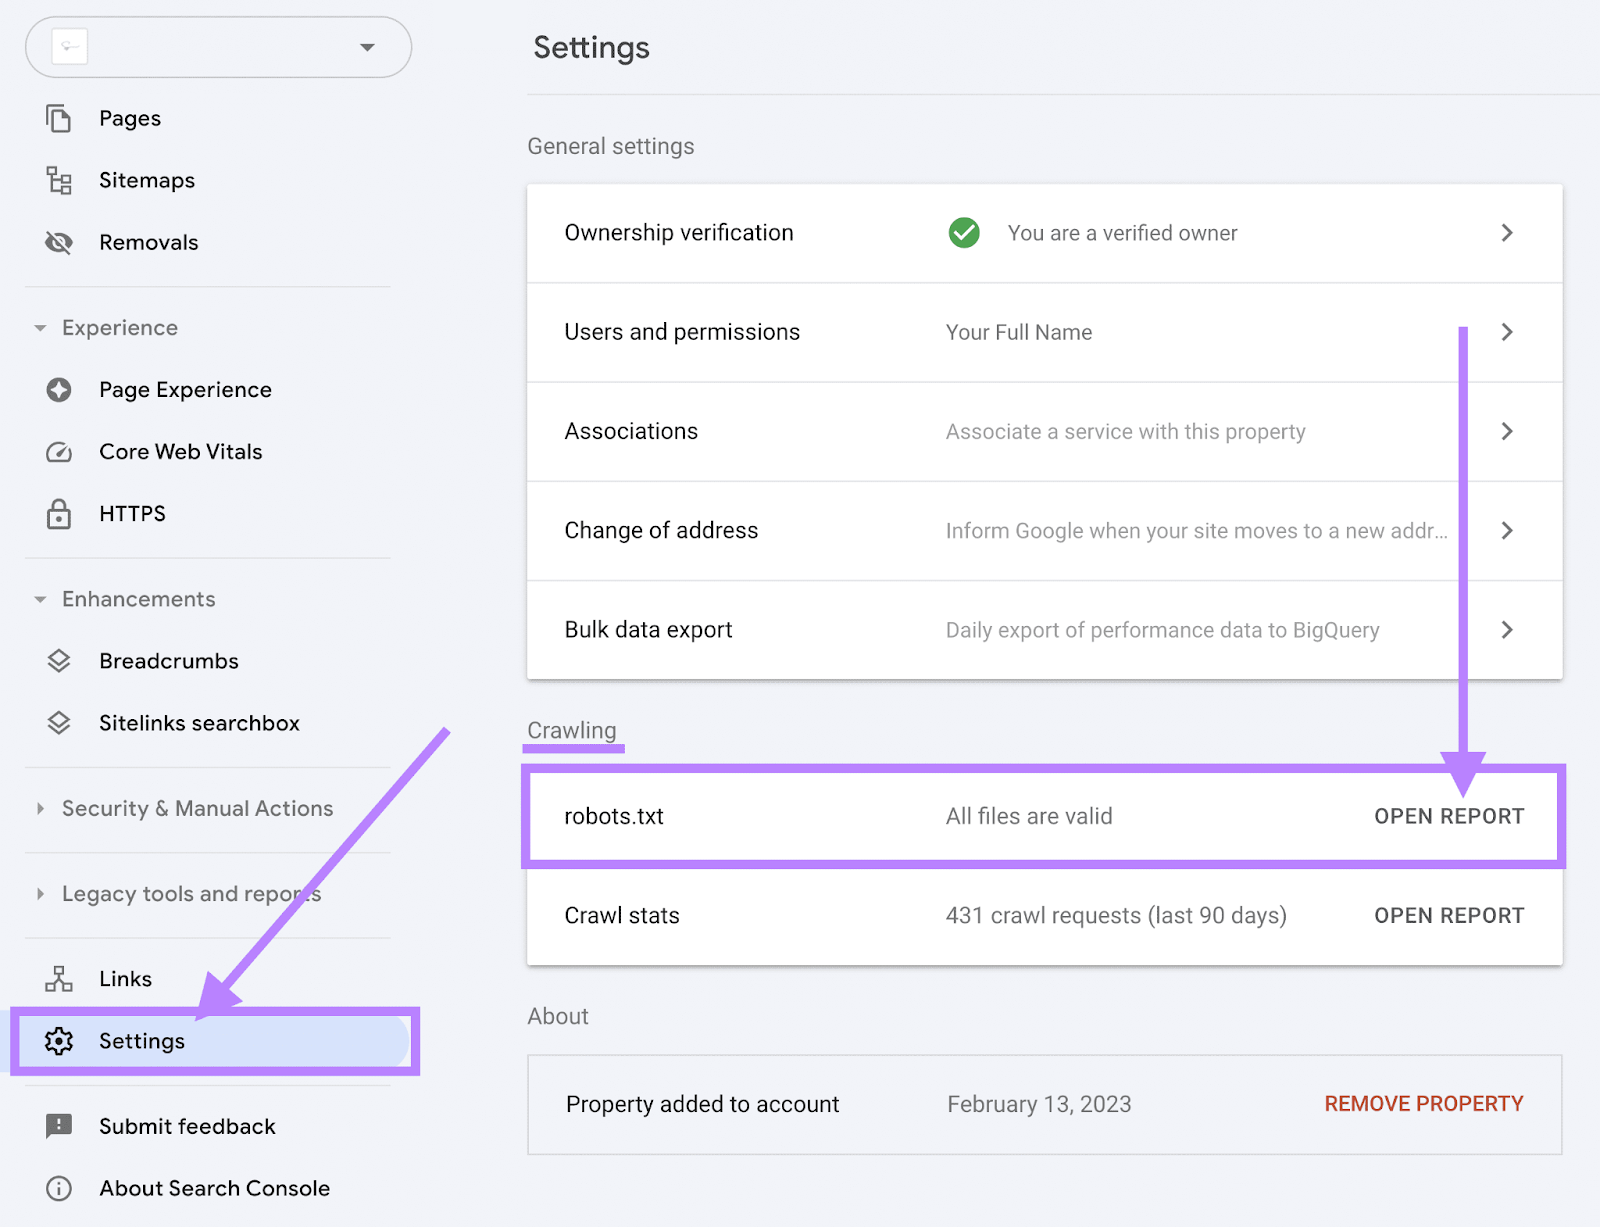
Open your account, and head over to “Settings.”
Then, find "robots.txt" under "Crawling." And click "OPEN REPORT" to view the details.
Your report includes robots.txt files from your domain and subdomains. If there are any issues, you’ll see the number of problems in the “Issues” column.
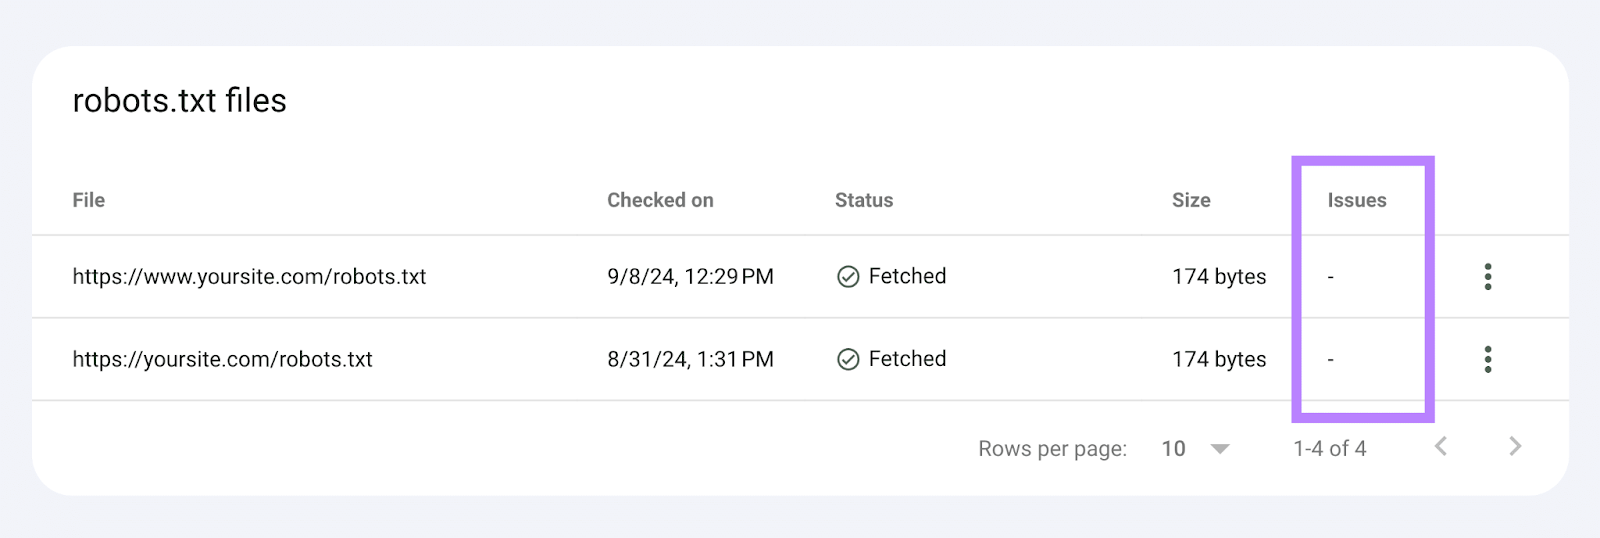
Click on any row to access the file and see where any issues might be. From here, you or your developer can use a robots.txt validator to fix the problems.
Further reading: What Robots.txt Is & Why It Matters for SEO
6. Make Sure Important Pages Are Indexed
If your pages don’t appear in Google’s index, Google can’t rank them for relevant search queries and show them to users.
And no rankings means no search traffic.
Use Google Search Console to find out which pages aren’t indexed and why.
Click “Pages” from the left-hand menu, under “Indexing.”
Then scroll down to the “Why pages aren’t indexed” section. To see a list of reasons that Google hasn’t indexed your pages. Along with the number of affected pages.
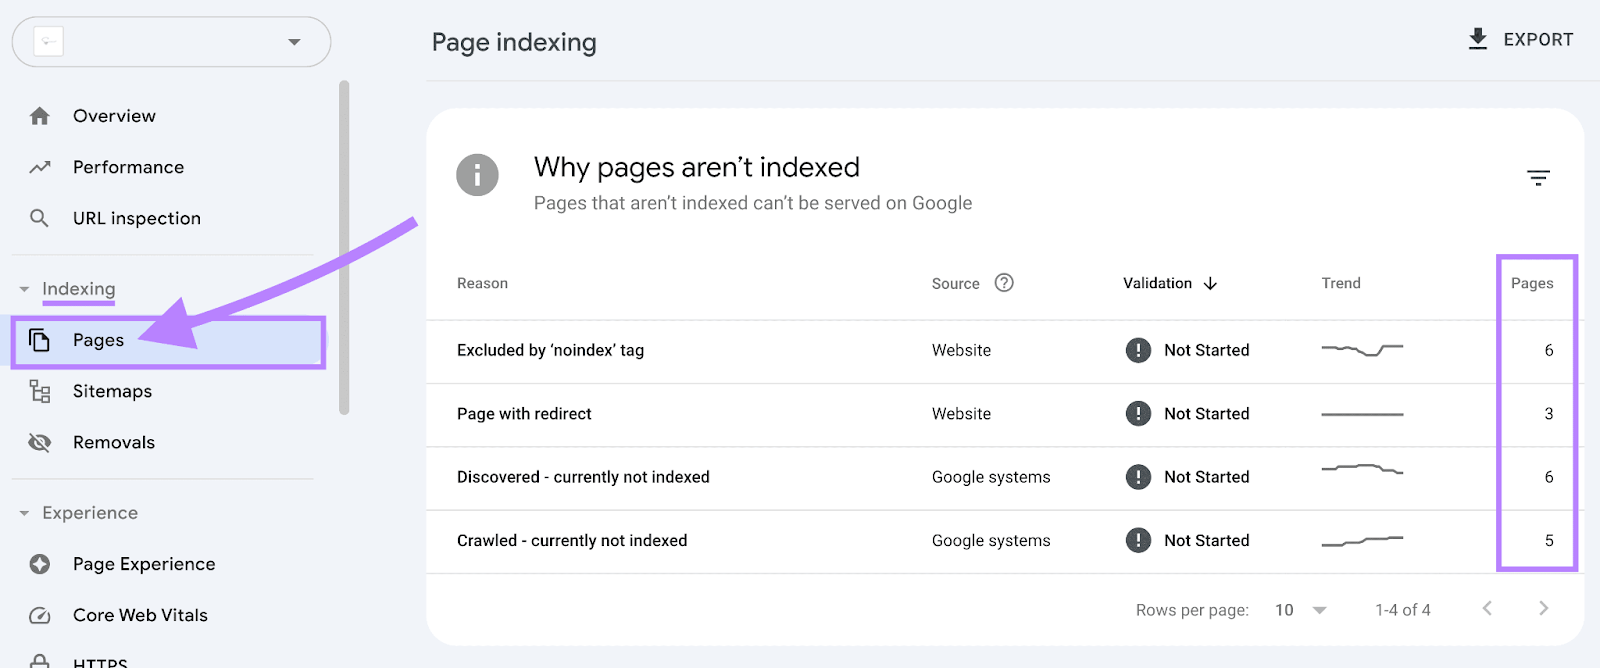
Click one of the reasons to see a full list of pages with that issue.
Once you fix the issue, you can request indexing to prompt Google to recrawl your page (although this doesn’t guarantee the page will be indexed).
Just click the URL. Then select “INSPECT URL” on the right-hand side.
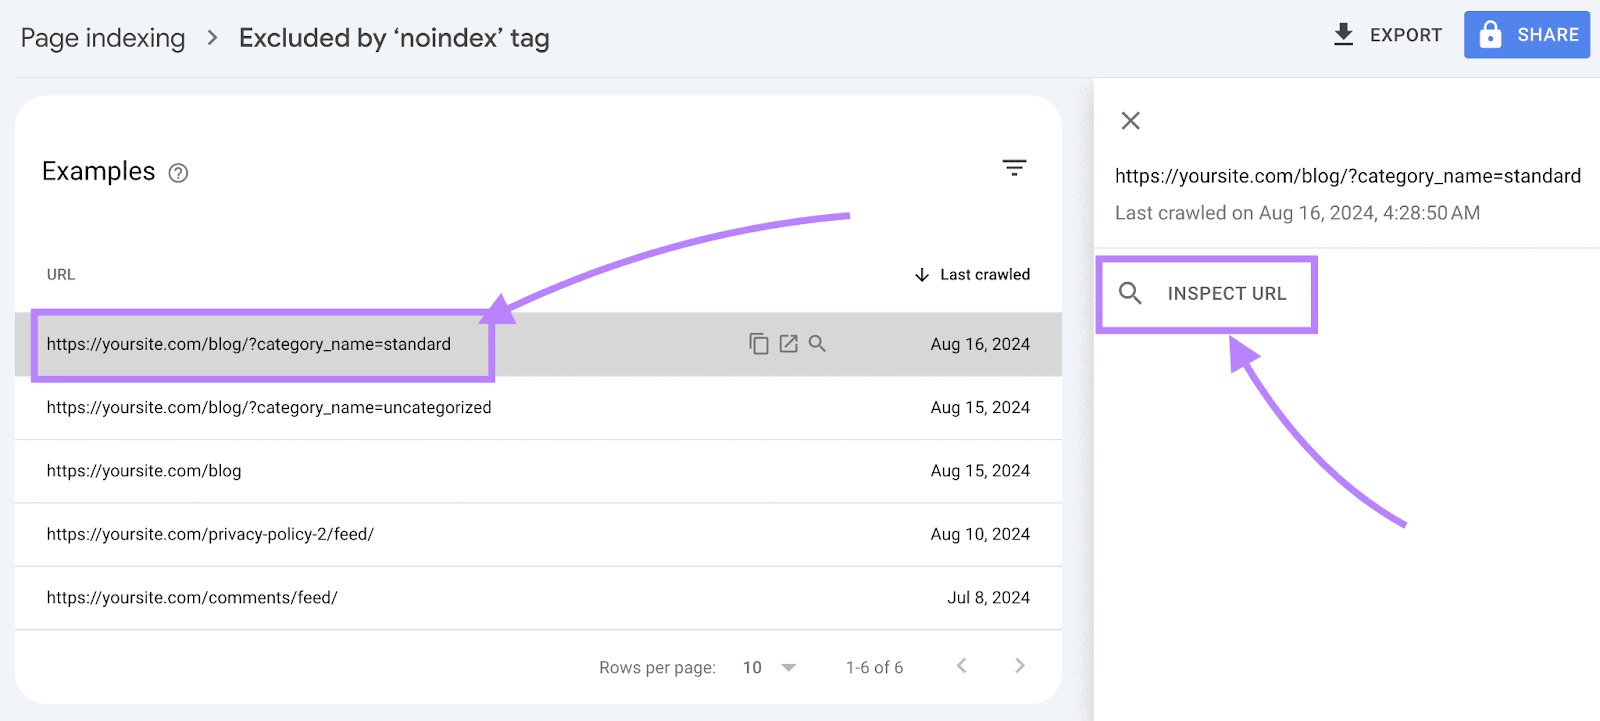
Then, click the “REQUEST INDEXING” button from the page’s URL inspection report.

Website Structure
Site structure, or website architecture, is the way your website’s pages are organized and linked together.
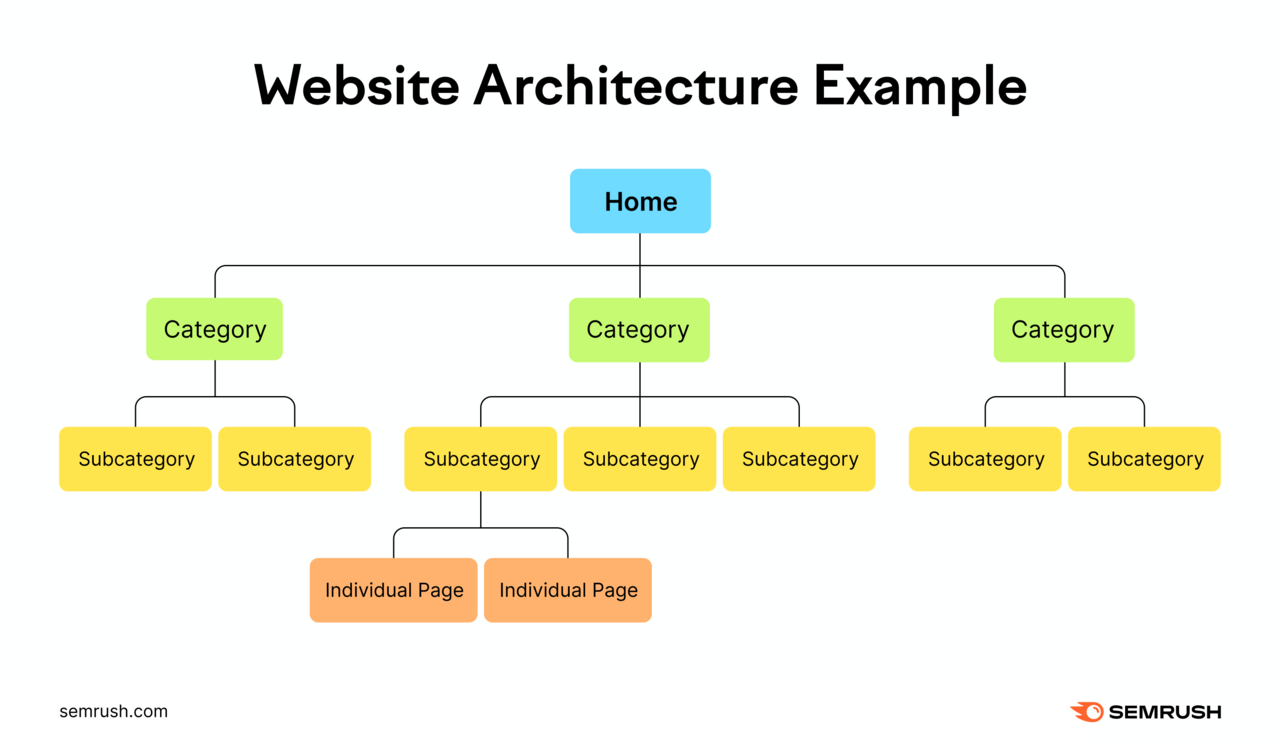
A well-structured site provides a logical and efficient navigation system for users and search engines. This can:
- Help search engines find and index all your site’s pages
- Spread authority throughout your webpages via internal links
- Make it easy for users to find the content they’re looking for
Here’s how to ensure you have a logical and SEO-friendly site structure:
7. Check Your Site Structure Is Organized
An organized site structure has a clear, hierarchical layout. With main categories and subcategories that logically group related pages together.
For example, an online bookstore might have main categories like "Fiction," "Non-Fiction," and "Children's Books.” With subcategories like "Mystery," "Biographies," and "Picture Books" under each main category.
This way, users can quickly find what they’re looking for.
Here’s how Barnes & Noble’s site structure looks like in action, from users’ point of view:
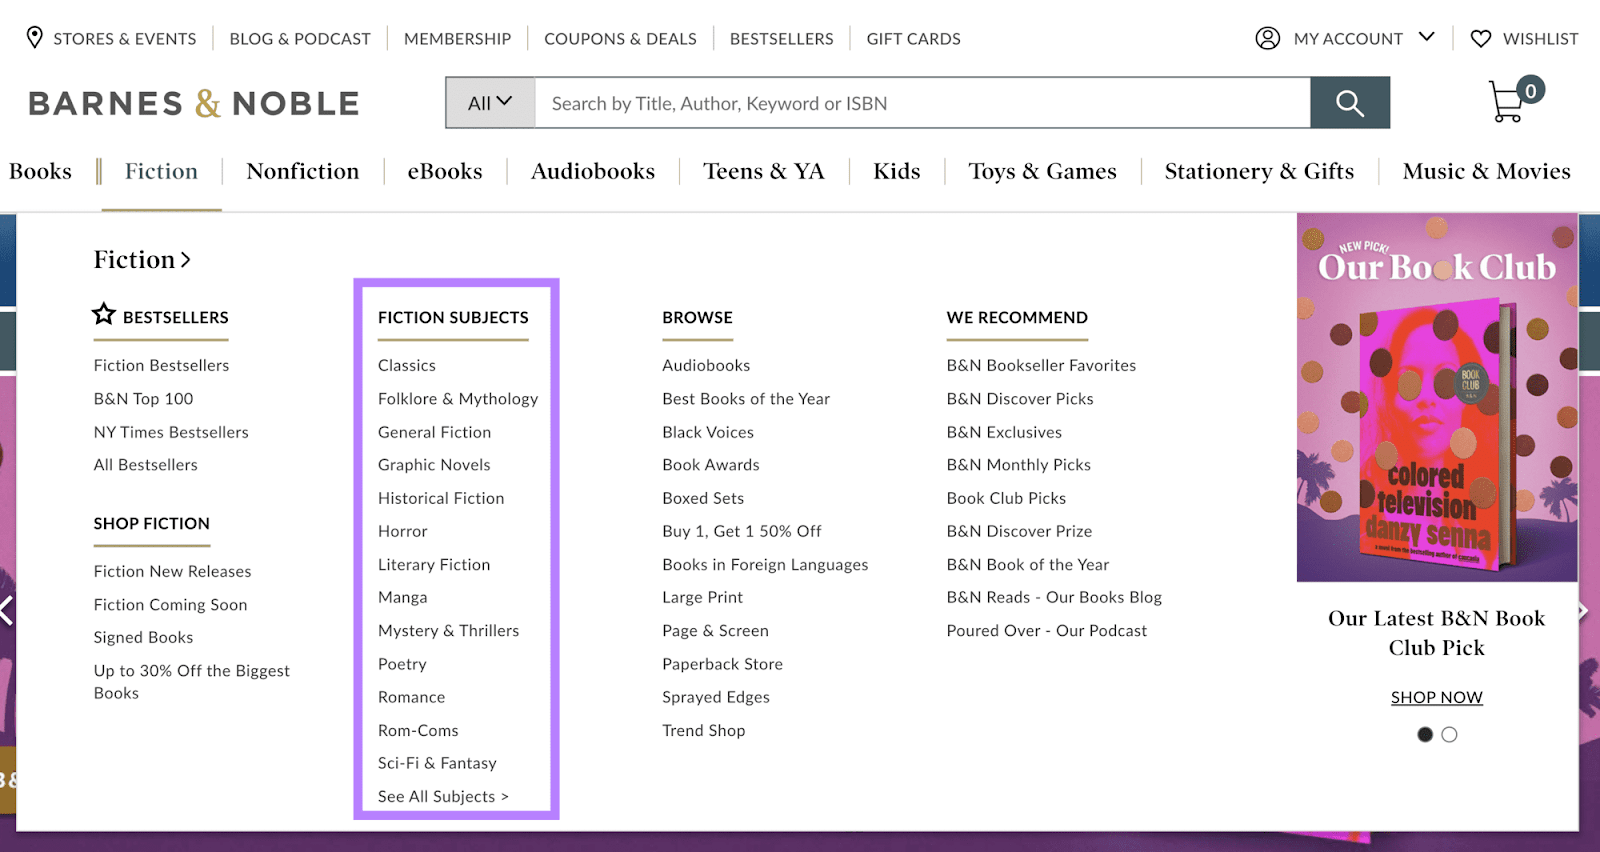
In this example, Barnes & Noble’s fiction books are organized by subjects. Which makes it easier for visitors to navigate the retailer’s collection more easily. And to find what they need.
If you run a small site, optimizing your site structure may just be a case of organizing your pages and posts into categories. And having a clean, simple navigation menu.
If you have a large or complex website, you can get a quick overview of your site architecture by navigating to the “Crawled Pages” tab of your Site Audit report. And clicking “Site Structure.”
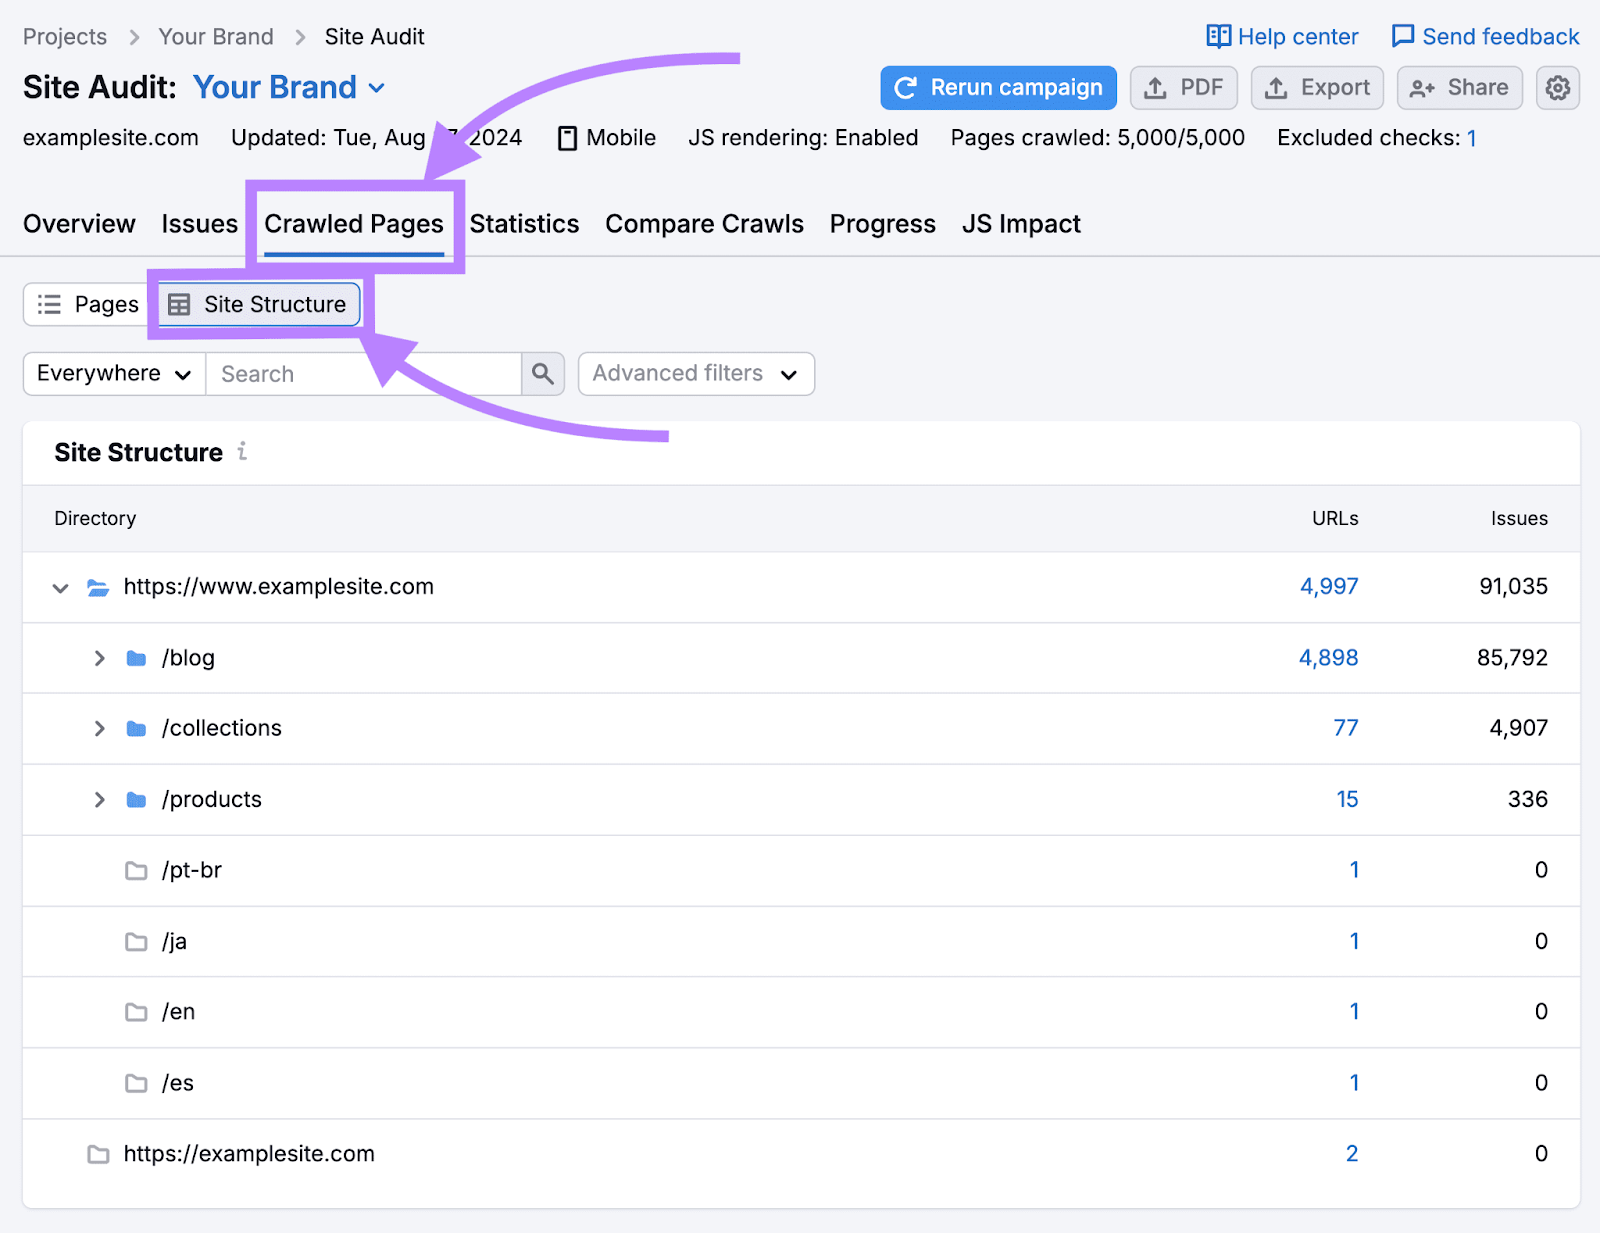
Review your site’s subfolders to make sure the hierarchy is well-organized.
8. Optimize Your URL Structure
A well-optimized URL structure makes it easier for Google to crawl and index your site. It can also make navigating your site more user-friendly.
Here’s how to enhance your URL structure:
- Be descriptive. This helps search engines (and users) understand your page content. So use keywords that describe the page’s content. Like “example.com/seo-tips” instead of “example.com/page-671.”
- Keep it short. Short, clean URL structures are easier for users to read and share. Aim for concise URLs. Like “example.com/about” instead of “example.com/how-our-company-started-our-journey-page-update.”
- Reflect your site hierarchy. This helps maintain a predictable and logical site structure. Which makes it easier for users to know where they are on your site. For example, if you have a blog section on your website, you could nest individual blog posts under the blog category. Like this:

Further reading: What Is a URL? A Complete Guide to Website URLs
9. Add Breadcrumbs
Breadcrumbs are a type of navigational aid used to help users understand their location within your site's hierarchy. And to make it easy to navigate back to previous pages.
They also help search engines find their way around your site. And can improve crawlability.
Breadcrumbs typically appear near the top of a webpage. And provide a trail of links from the current page back to the homepage or main categories.
For example, each of these is a breadcrumb:

Adding breadcrumbs is generally more beneficial for larger sites with a deep (complex) site architecture. But you can set them up early, even for smaller sites, to enhance your navigation and SEO from the start.
To do this, you need to use breadcrumb schema in your page’s code. Check out this breadcrumb structured data guide from Google to learn how.
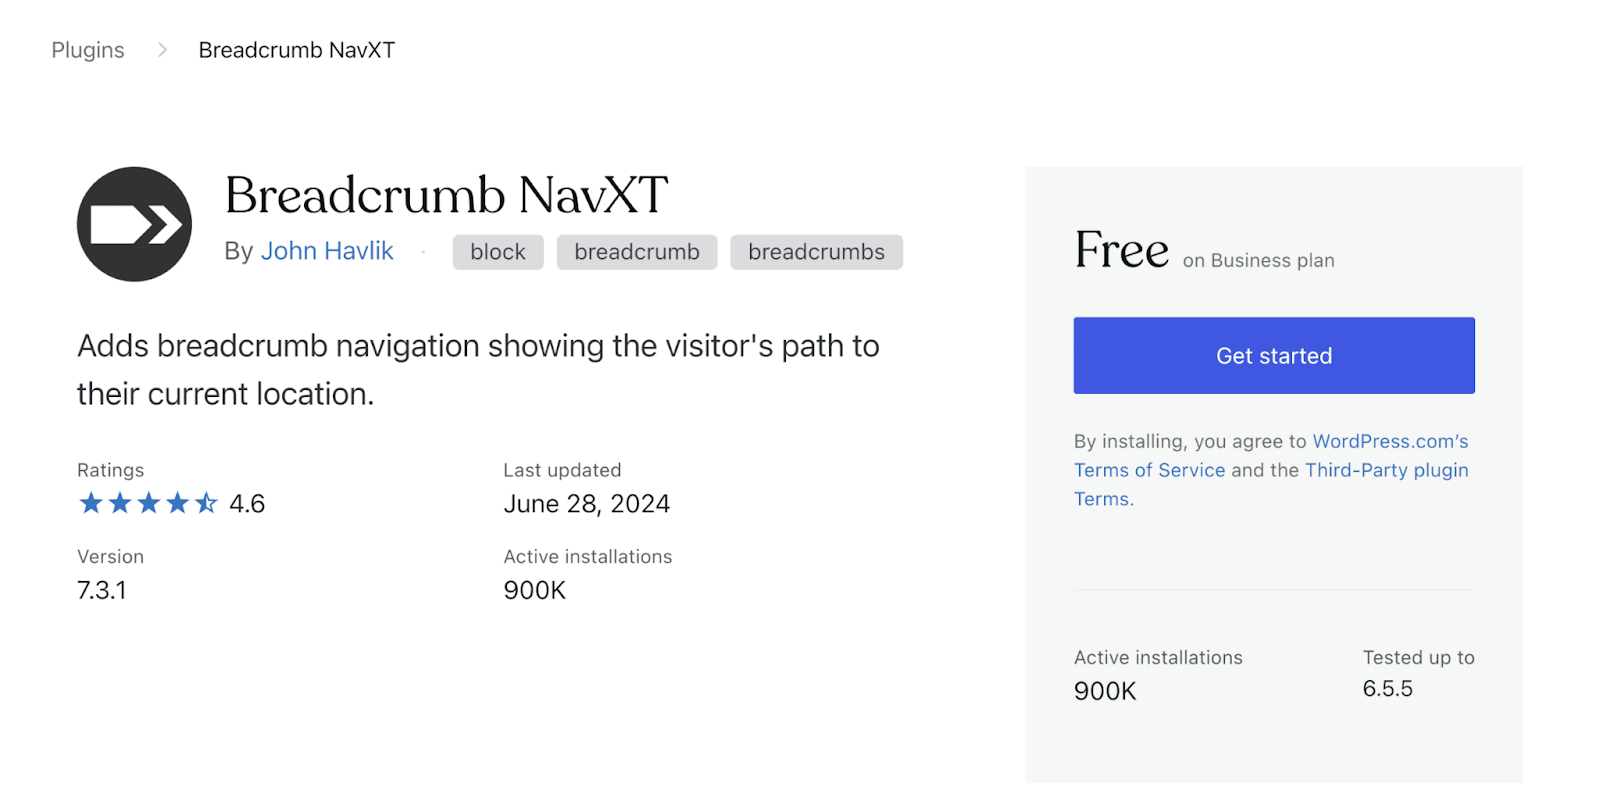
Alternatively, if you use a CMS like WordPress, you can use dedicated plugins. Like Breadcrumb NavXT, which can easily add breadcrumbs to your site without needing to edit code.
Further reading: Breadcrumb Navigation for Websites: What It Is & How to Use It
10. Minimize Your Click Depth
Ideally, it should take fewer than four clicks to get from your homepage to any other page on your site. You should be able to reach your most important pages in one or two clicks.
When users have to click through multiple pages to find what they’re looking for, it creates a bad experience. Because it makes your site feel complicated and frustrating to navigate.
Search engines like Google might also assume that deeply buried pages are less important. And might crawl them less frequently.
The “Internal Linking” report in Site Audit can quickly show you any pages that require four or more clicks to reach:
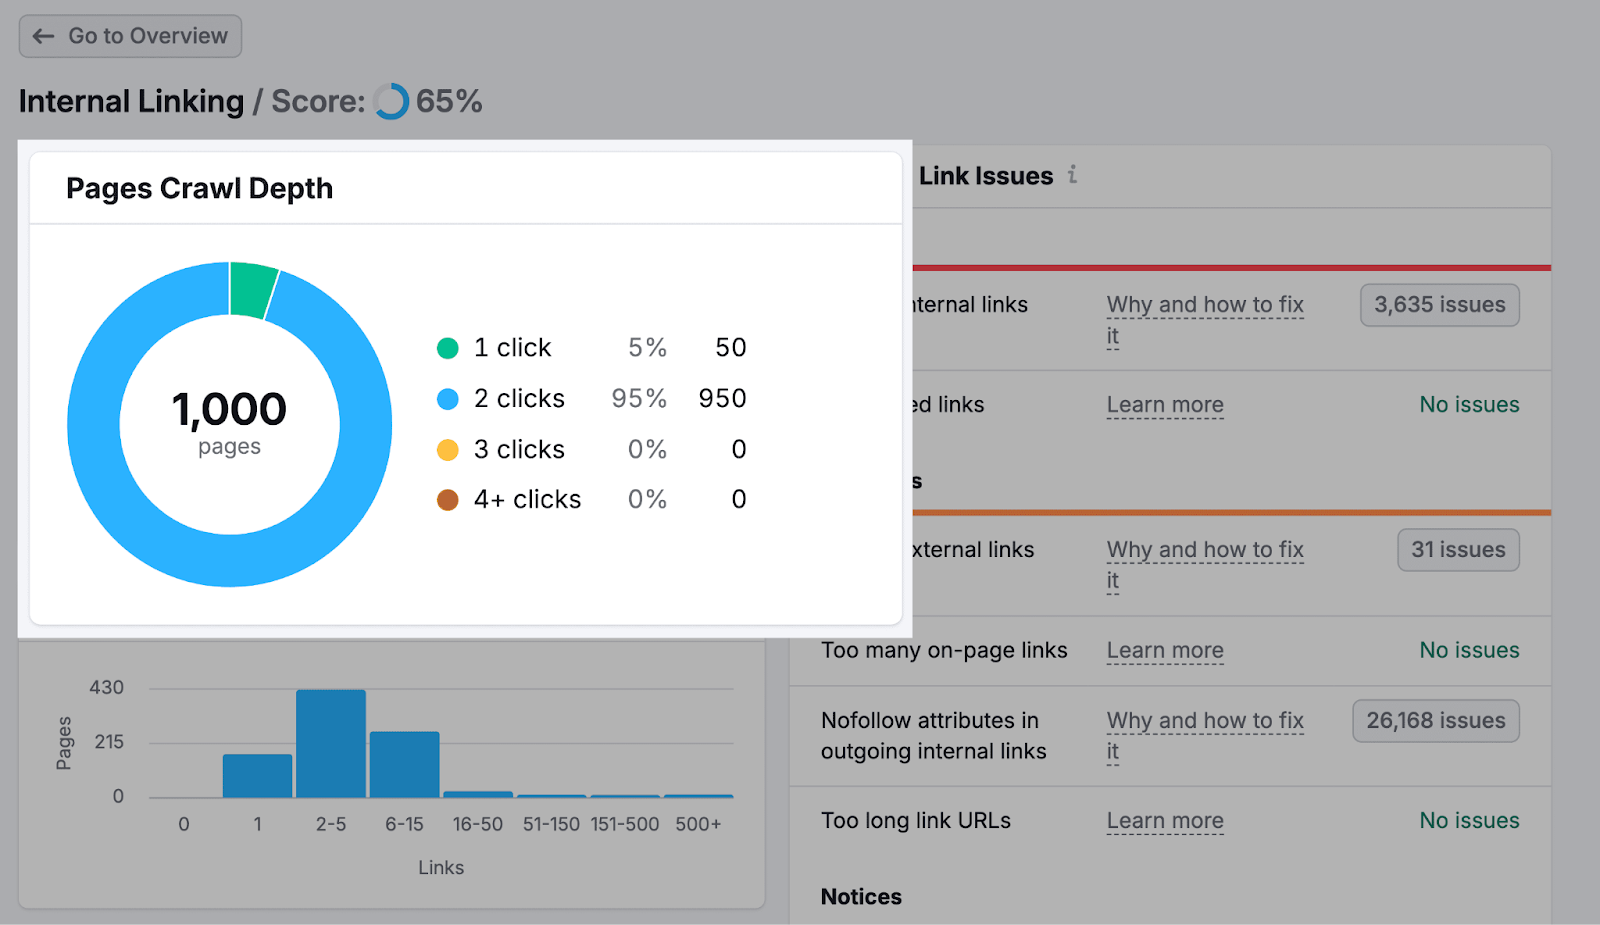
One of the easiest ways to reduce crawl depth is to make sure important pages are linked directly from your homepage or main category pages.
For example, if you run an ecommerce site, link popular product categories or best-selling products directly from the homepage.
Also ensure your pages are interlinked well. For example, if you have a blog post on “how to create a skincare routine,” you could link to it in another relevant post like “skincare routine essentials.”
See our guide to effective internal linking to learn more.
11. Identify Orphan Pages
Orphan pages are pages with zero incoming internal links.
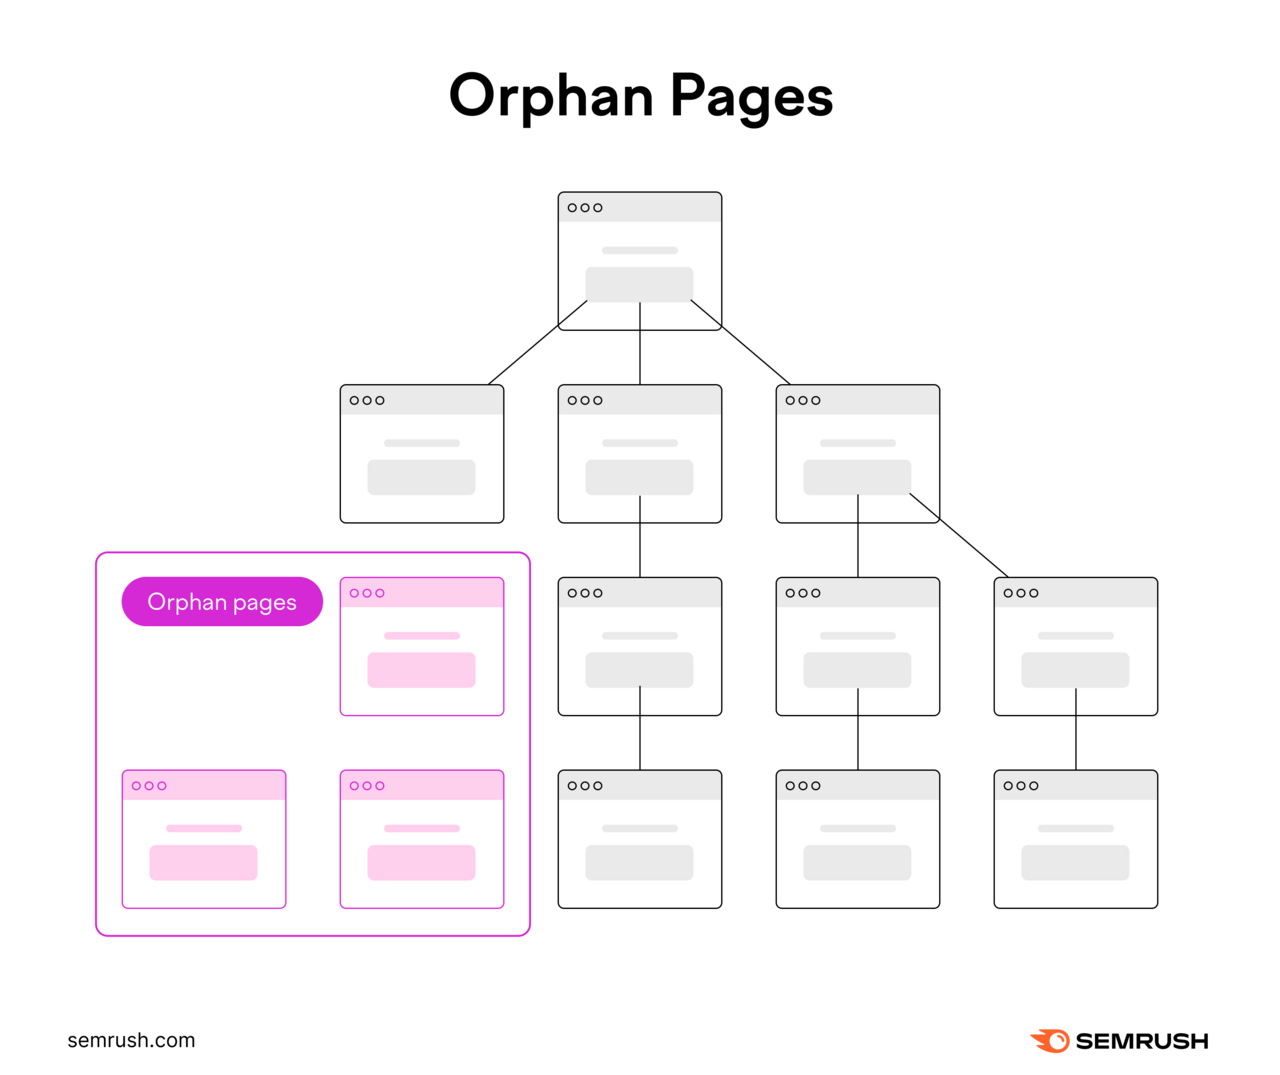
Search engine crawlers use links to discover pages and navigate the web. So orphan pages may go unnoticed when search engine bots crawl your site.
Orphan pages are also harder for users to discover.
Find orphan pages by heading over to the “Issues” tab within Site Audit. And search for “orphaned pages.”

Fix the issue by adding a link to the orphaned page from another relevant page.
Accessibility and Usability
Usability measures how easily and efficiently users can interact with and navigate your website to achieve their goals. Like making a purchase or signing up for a newsletter.
Accessibility focuses on making all of a site’s functions available for all types of users. Regardless of their abilities, internet connection, browser, and device.
Sites with better usability and accessibility tend to offer a better page experience. Which Google’s ranking systems aim to reward.
This can contribute to better performance in search results, higher levels of engagement, lower bounce rates, and increased conversions.
Here’s how to improve your site’s accessibility and usability:
12. Make Sure You’re Using HTTPS
Hypertext Transfer Protocol Secure (HTTPS) is a secure protocol used for sending data between a user's browser and the server of the website they're visiting.
It encrypts this data, making it far more secure than HTTP.
You can tell your site runs on a secure server by clicking the icon beside the URL. And looking for the “Connection is secure” option. Like this:
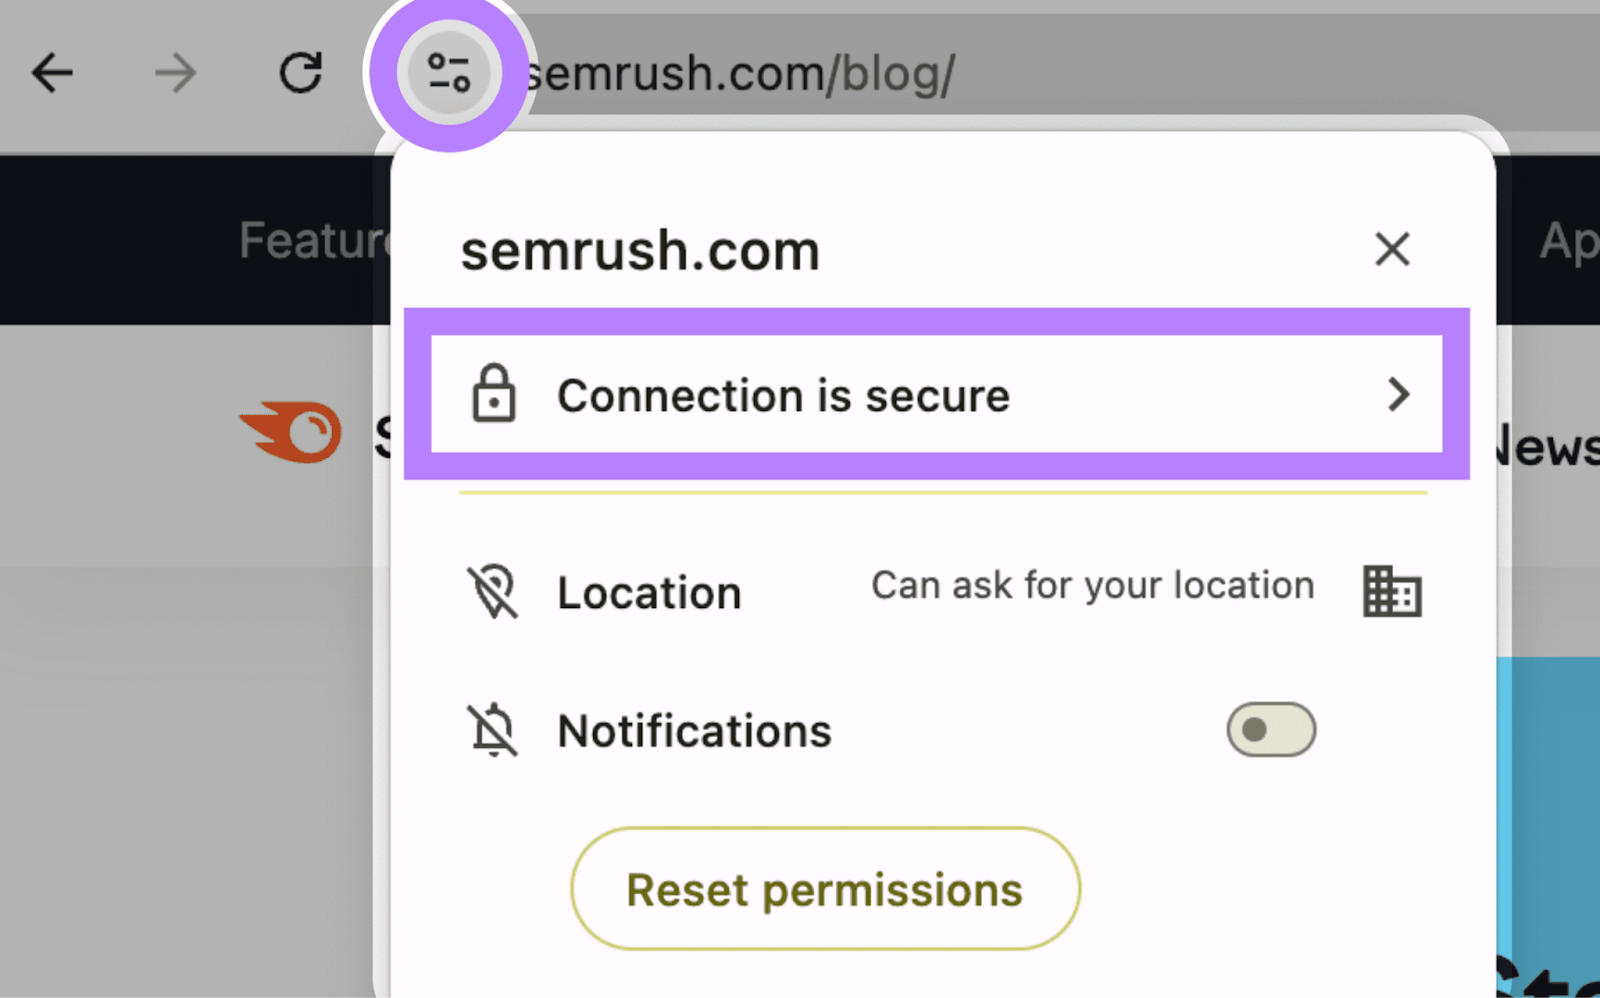
As a ranking signal, HTTPS is an essential item on any tech SEO checklist. You can implement it on your site by acquiring an SSL certificate. Many web hosting services offer this when you sign up, often for free.
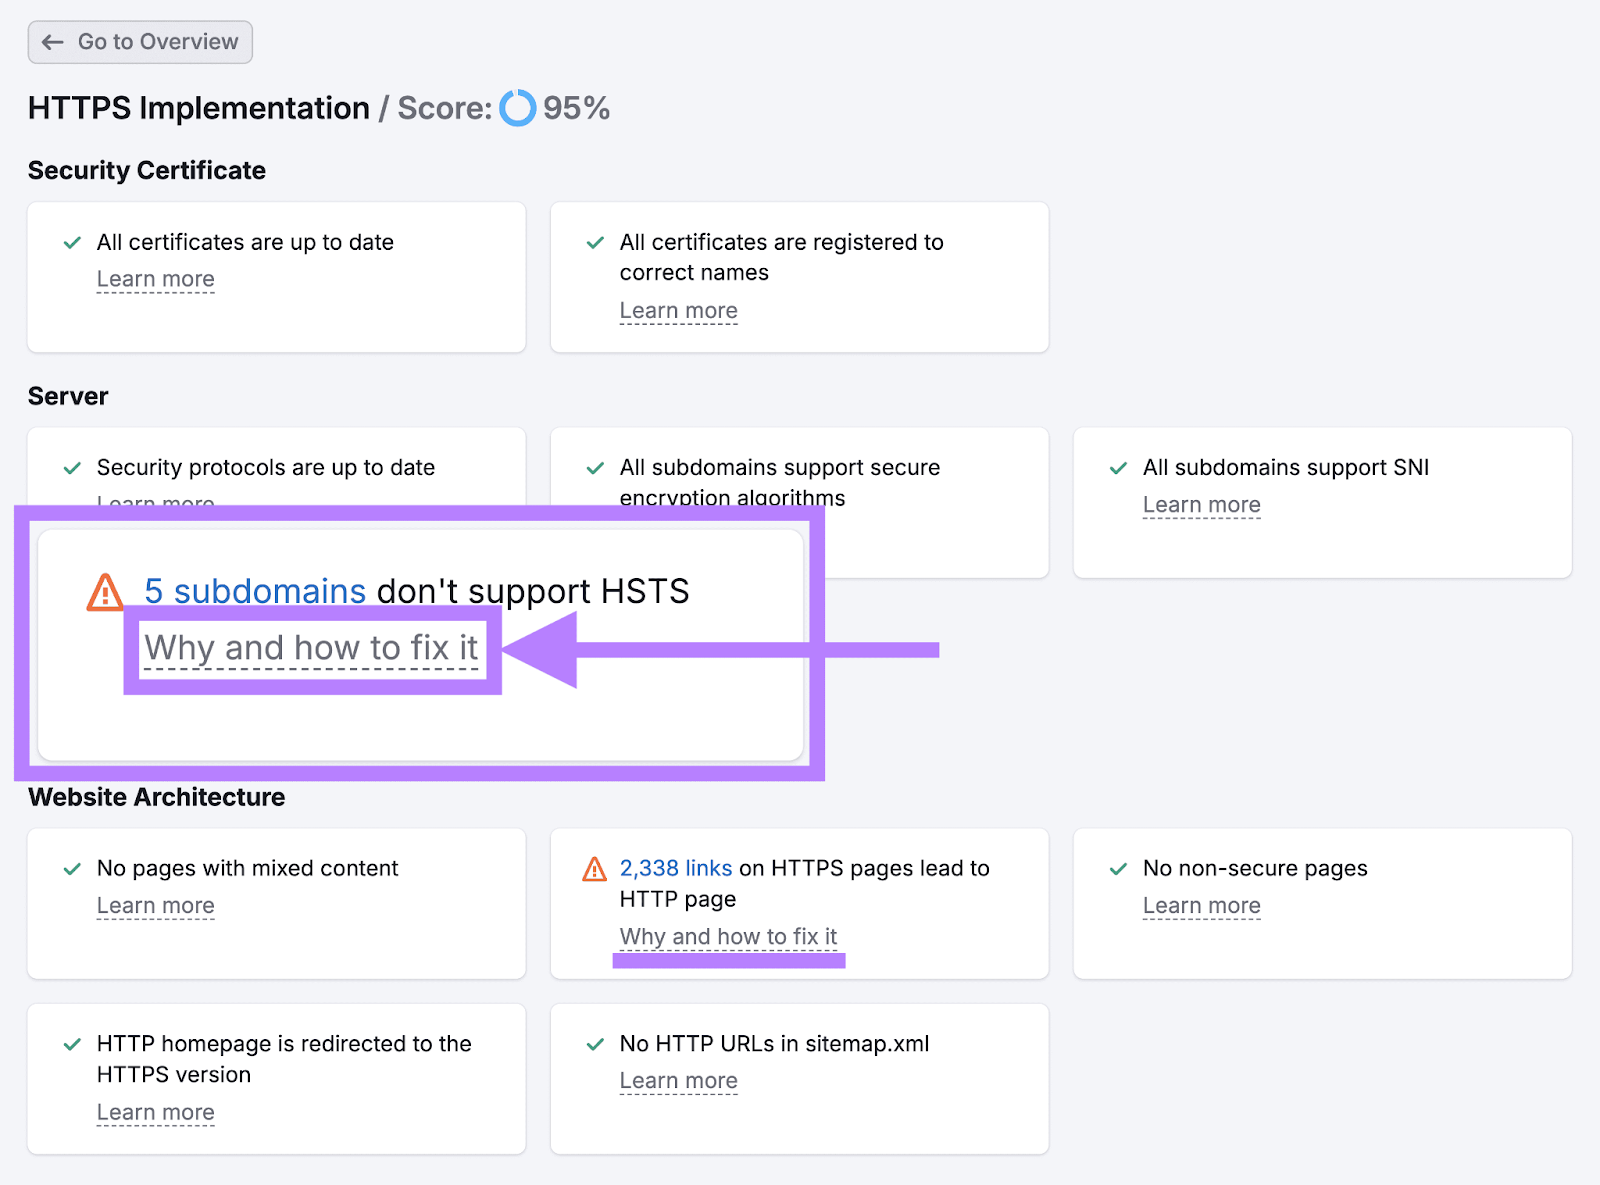
Once you implement it, use Site Audit to check for any issues. Like having non-secure pages.
Just click on “View details” under “HTTPS” from your Site Audit overview dashboard.
If your site has an HTTPS issue, you can click the issue to see a list of affected URLs and get advice on how to address the problem.
13. Use Structured Data
Structured data is information you add to your site to give search engines more context about your page and its contents.
Like the average customer rating for your products. Or your business’s opening hours.
One of the most popular ways to mark up (or label) this data is by using schema markup.
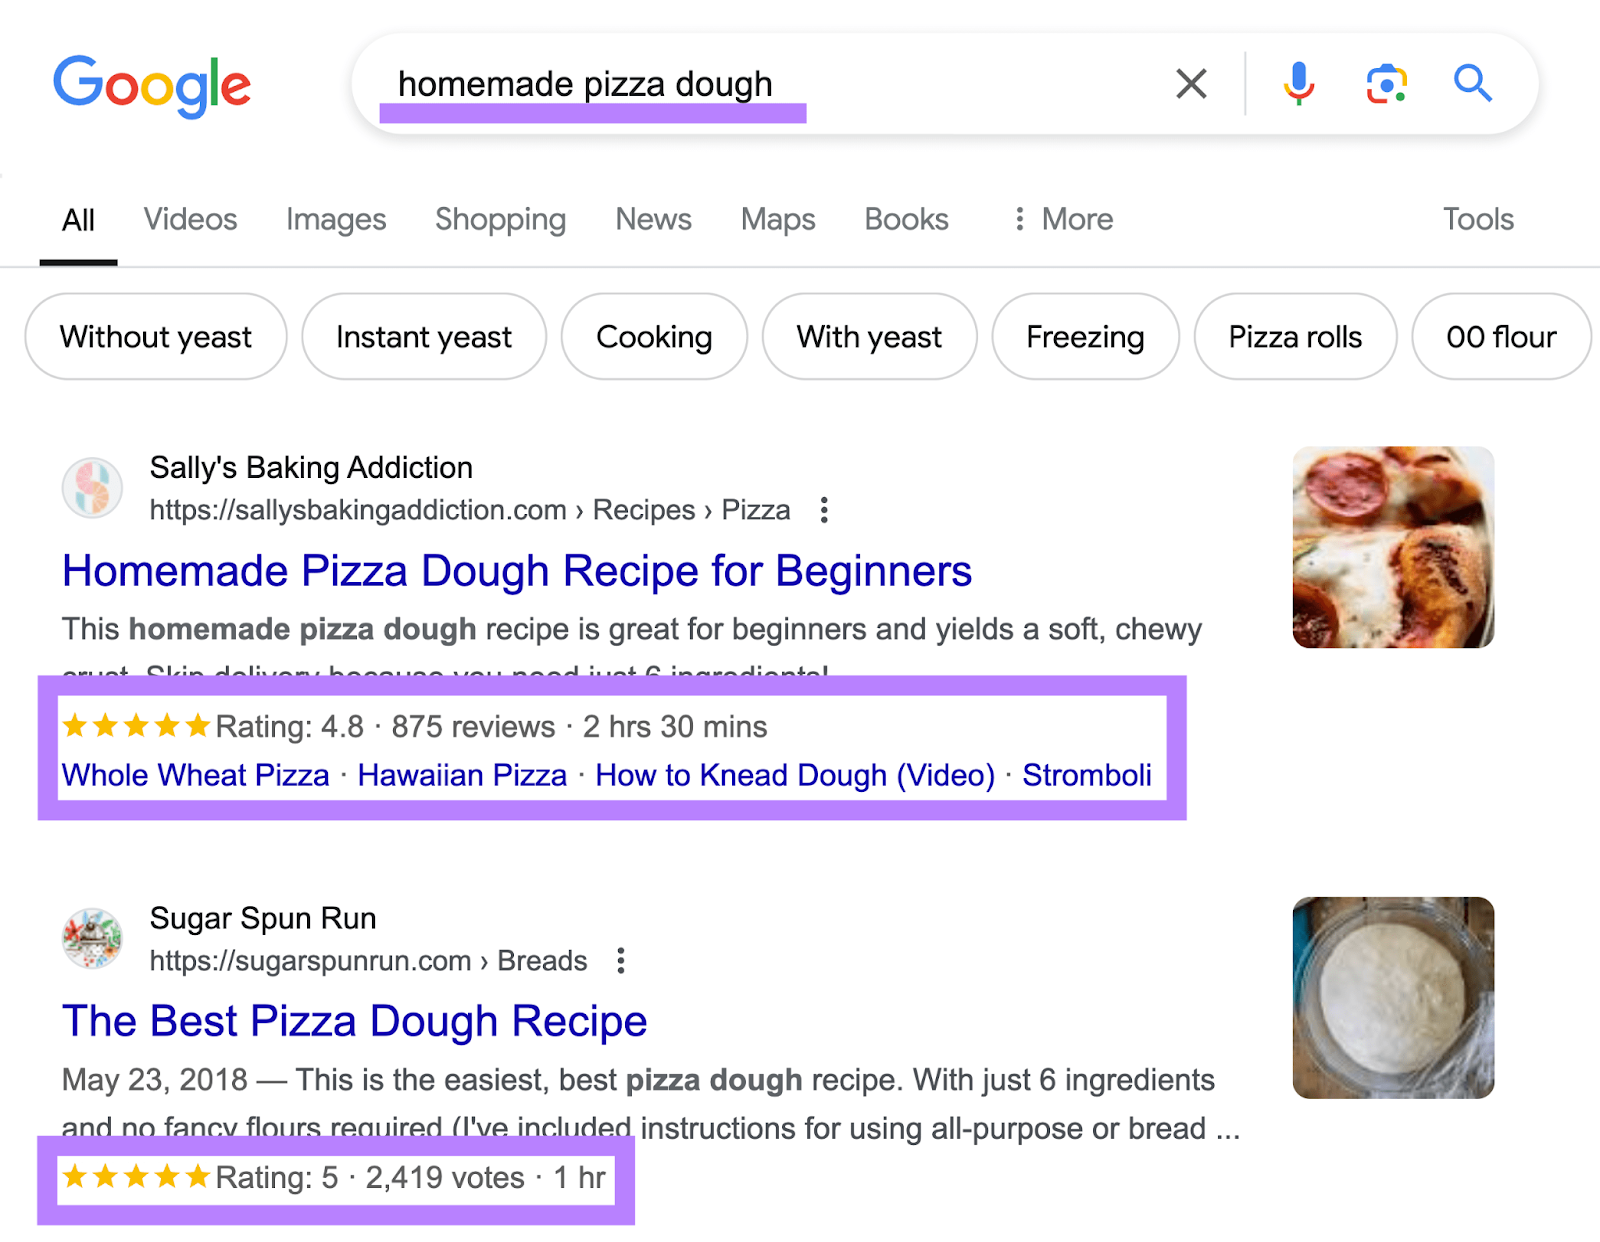
Using schema helps Google interpret your content. And it may lead to Google showing rich snippets for your site in search results. Making your content stand out and potentially attract more traffic.
For example, recipe schema shows up on the SERP as ratings, number of reviews, sitelinks, cook time, and more. Like this:
You can use schema on various types of webpages and content, including:
- Product pages
- Local business listings
- Event pages
- Recipe pages
- Job postings
- How-to-guides
- Video content
- Movie/book reviews
- Blog posts
Use Google’s Rich Results Test tool to check if your page is eligible for rich results. Just insert the URL of the page you want to test and click “TEST URL.”
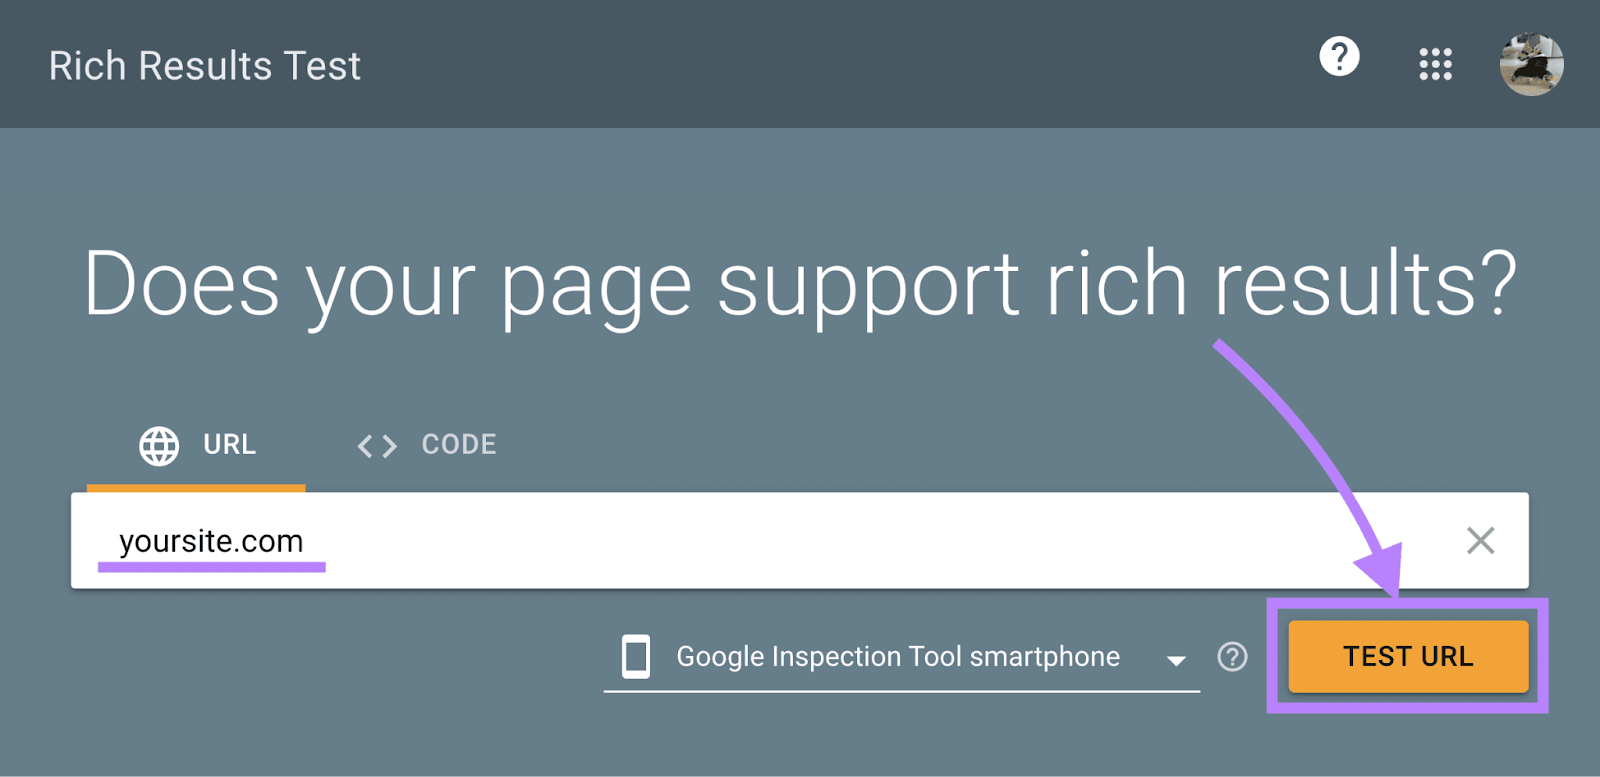
For example, the recipe site from the example above is eligible for “Recipes” structured data.
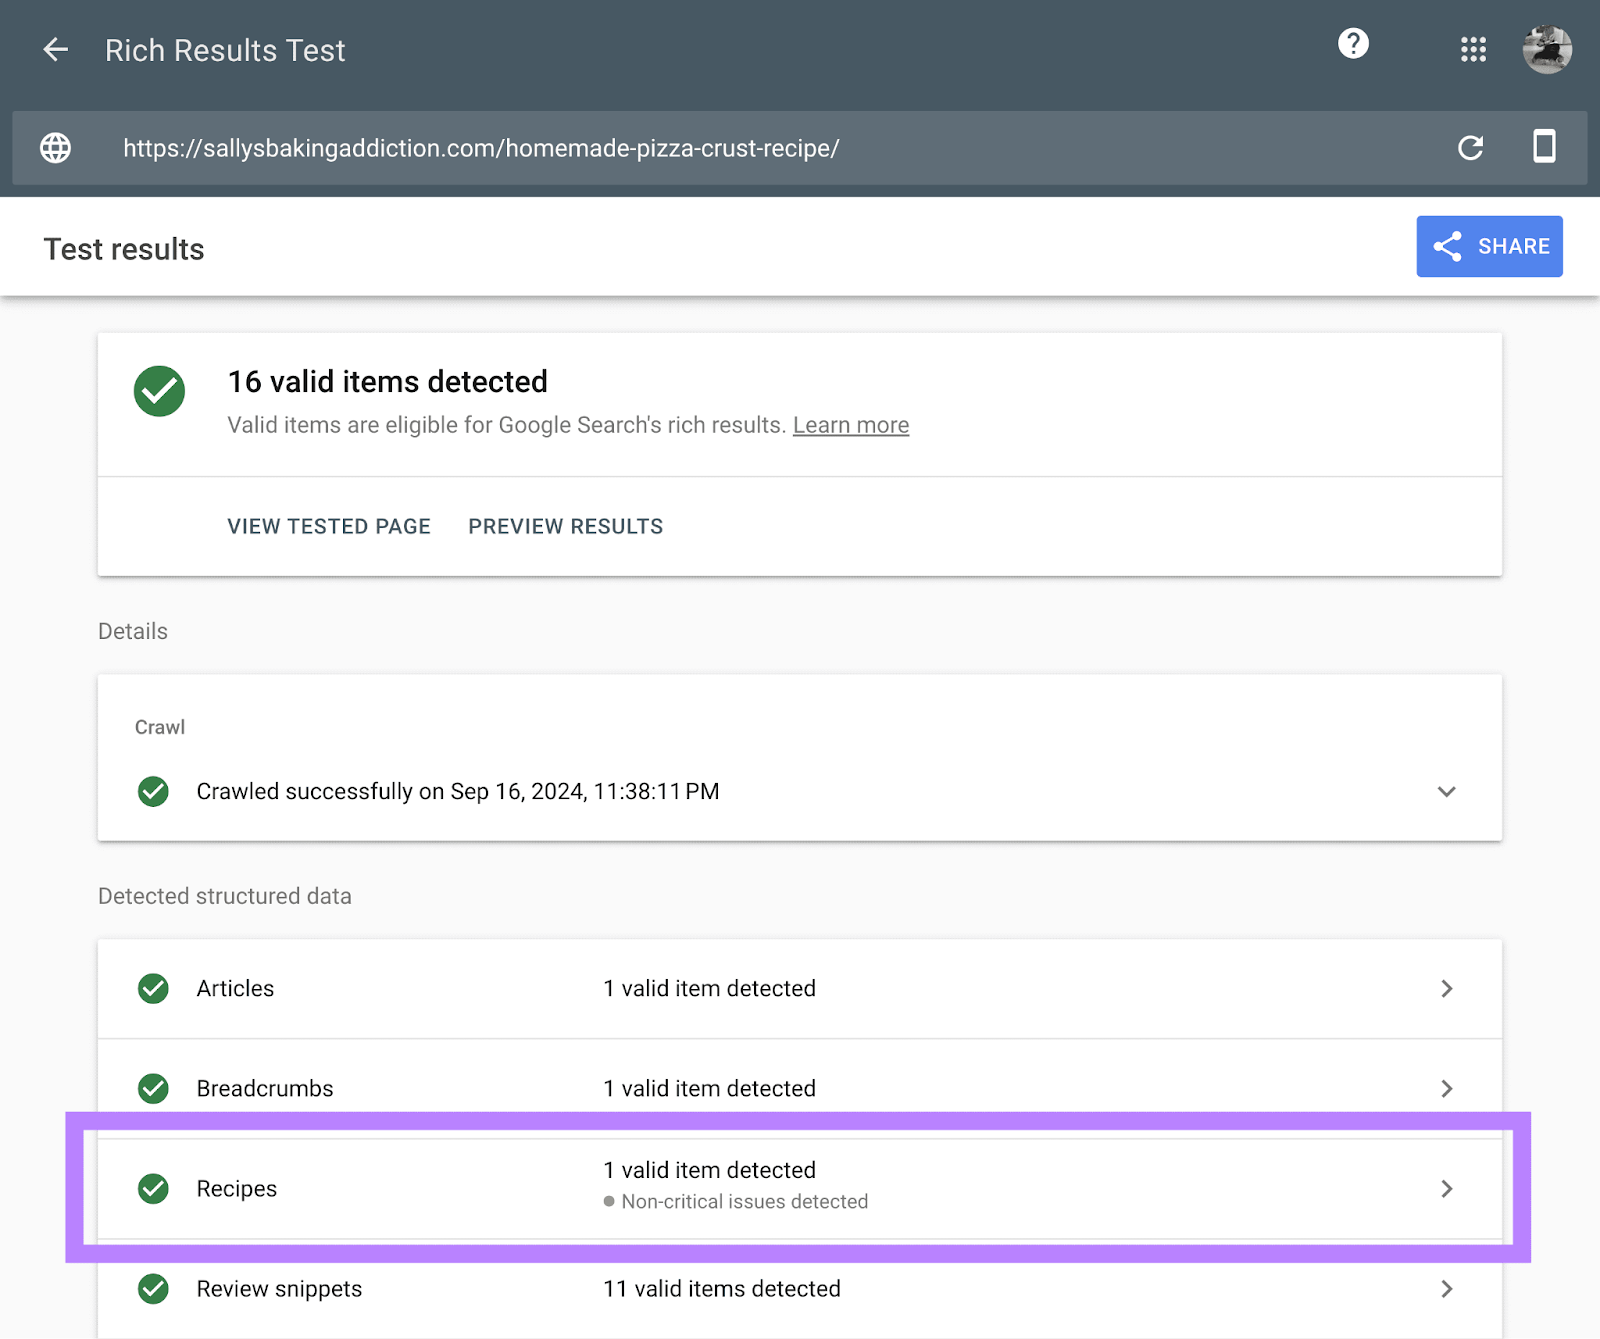
If there’s an issue with your existing structured data, you’ll see an error or a warning on the same line. Click on the structured data you’re analyzing to view the list of issues.
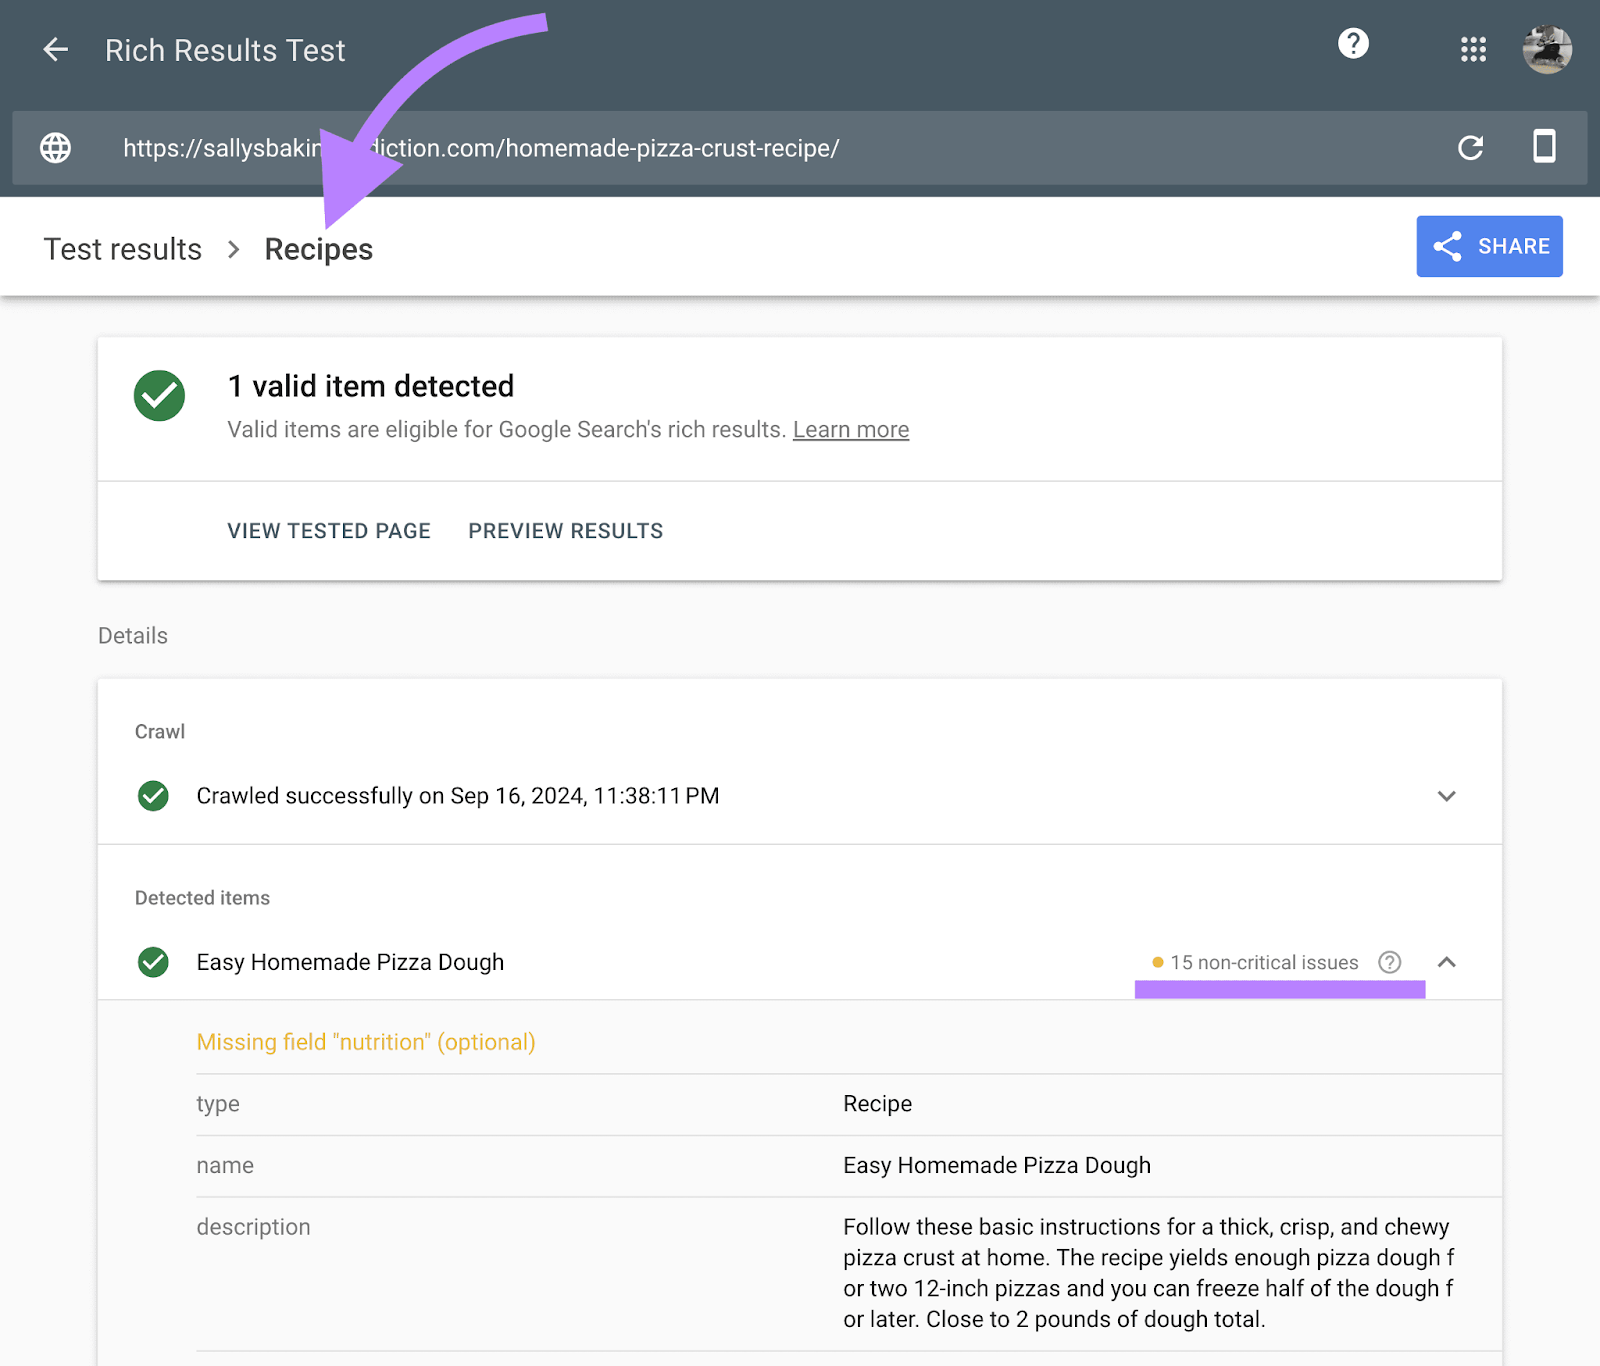
Check out our article on how to generate schema markup for a step-by-step guide on adding structured data to your site.
14. Use Hreflang for International Pages
Hreflang is a link attribute you add to your website's code to tell search engines about different language versions of your webpages.
This way, search engines can direct users to the version most relevant to their location and preferred language.
Here’s an example of an hreflang tag on Airbnb’s site:
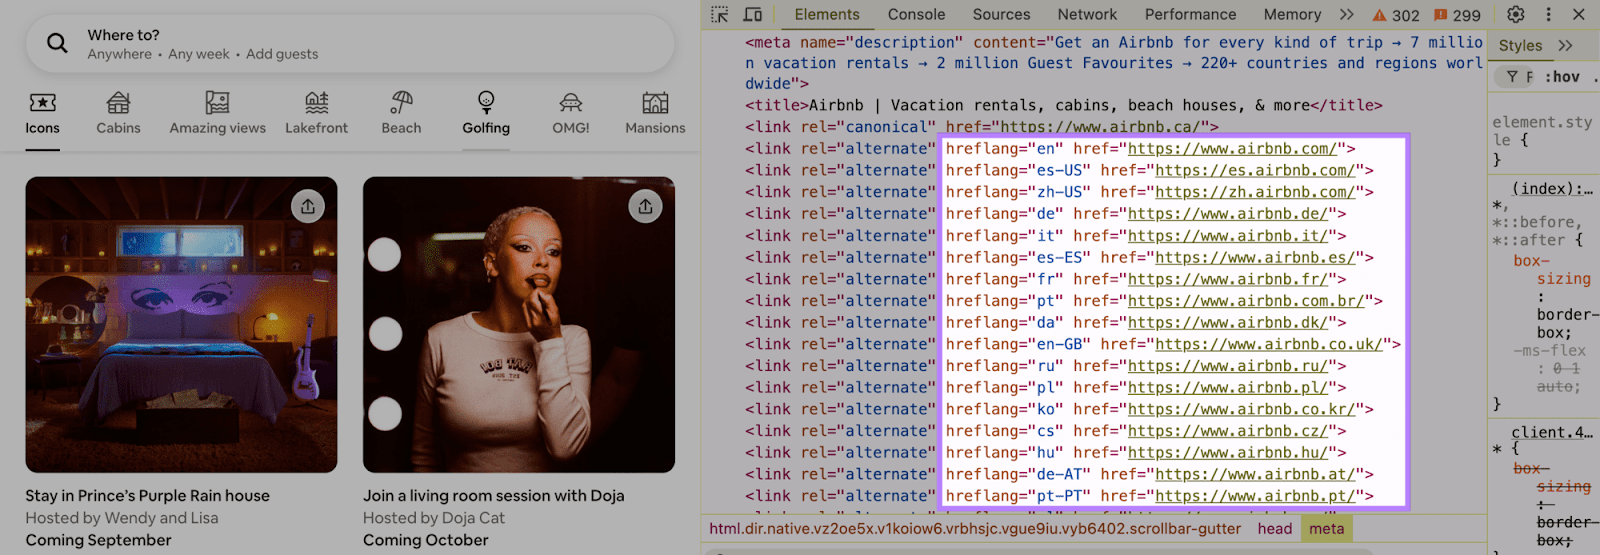
Note that there are multiple versions of this URL for different languages and regions. Like “es-us” for Spanish speakers in the USA. And “de” for German speakers.
If you have multiple versions of your site in different languages or for different countries, using hreflang tags helps search engines serve the right version to the right audience.
This can improve your international SEO and boost your site's UX.
Speed and Performance
Page speed is a ranking factor for both desktop and mobile searches. Which means optimizing your site for speed can increase its visibility. Potentially leading to more traffic. And even more conversions.
Here’s how to improve your site’s speed and performance with technical SEO:
15. Improve Your Core Web Vitals
Core Web Vitals are a set of three performance metrics that measure how user-friendly your site is. Based on load speed, responsiveness, and visual stability.
The three metrics are:
- Largest Contentful Paint(LCP): Measures how quickly the largest content element of a page loads
- Interaction to Next Paint (INP): Measures how quickly a site responds to user interactions
- Cumulative Layout Shift (CLS): Measures how much a page’s layout shifts while it’s loading
Core Web Vitals are also a ranking factor. So you should prioritize measuring and improving them as part of your technical SEO checklist.
Measure the Core Web Vitals of a single page using Google PageSpeed Insights.
Open the tool, enter your URL, and click “Analyze.”

You’ll see the results for both mobile and desktop:
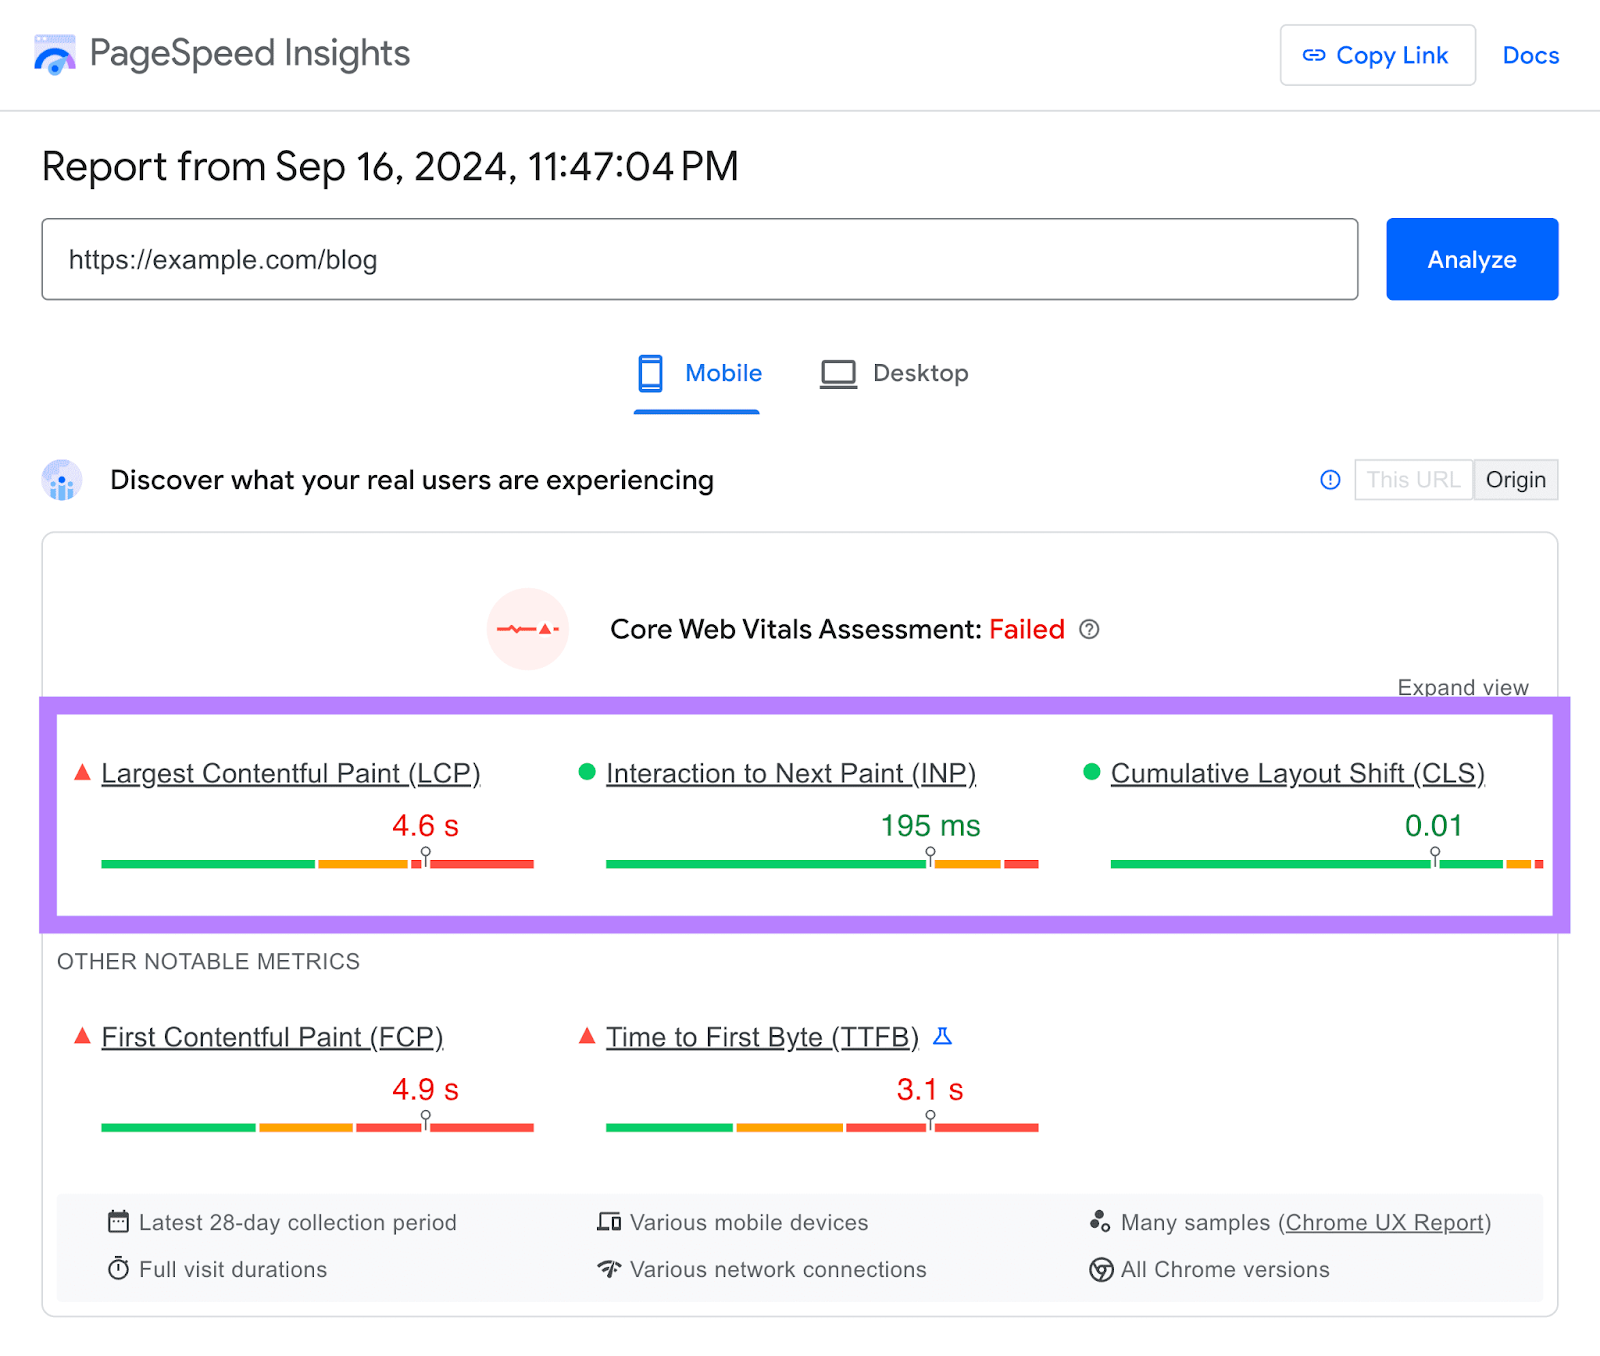
Scroll down to the “Diagnostics” section under “Performance” for a list of things you can do to improve your Core Web Vitals and other performance metrics.
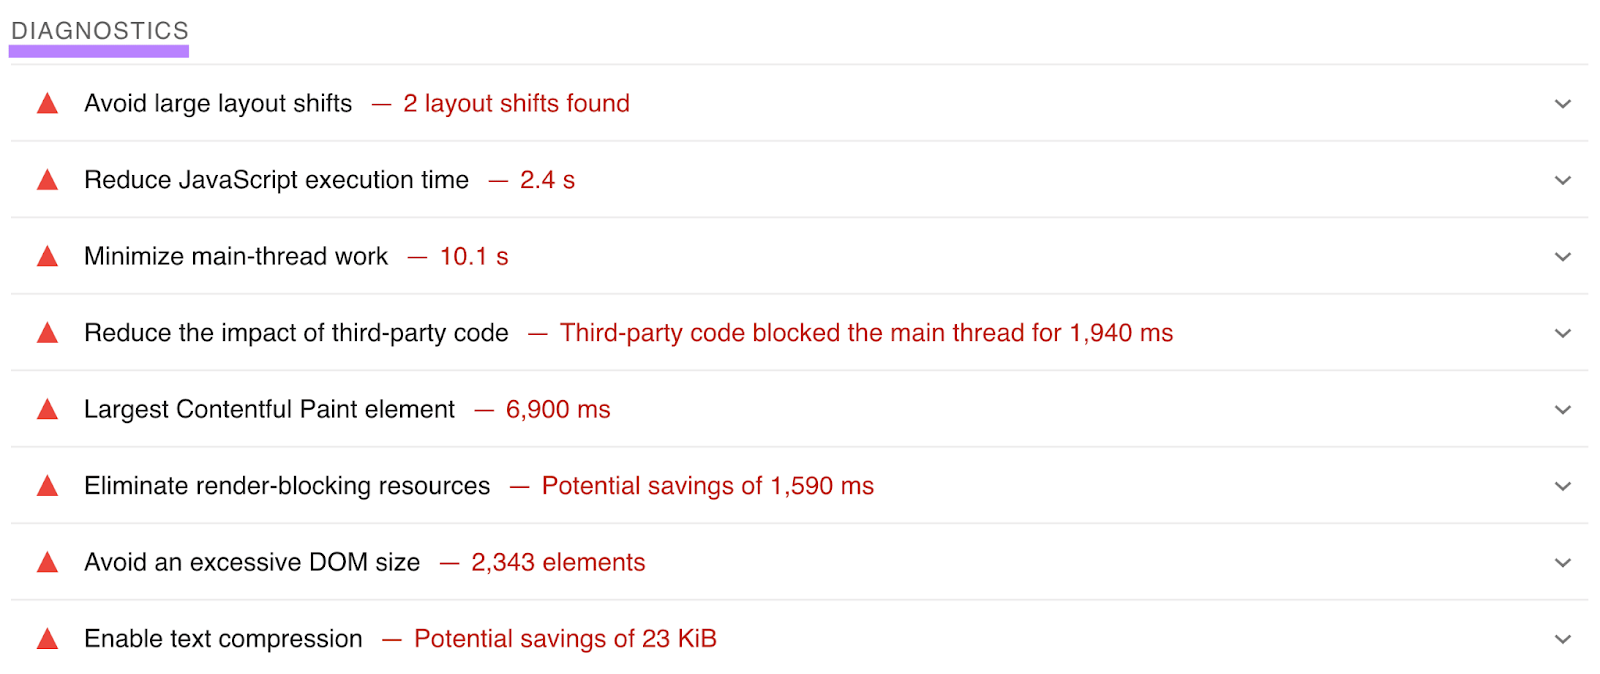
Work through this list or send it to your developer to improve your site’s performance.
16. Ensure Mobile-Friendliness
Mobile-friendly sites tend to perform better in search rankings. In fact, mobile-friendliness has been a ranking factor since 2015.
Plus, Google primarily indexes the mobile version of your site, as opposed to the desktop version. This is called mobile-first indexing. Making mobile-friendliness even more important for ranking.
Here are some key features of a mobile-friendly site:
- Simple, clear navigation
- Fast loading times
- Responsive design that adjusts content to fit different screen sizes
- Easily readable text without zooming
- Touch-friendly buttons and links with enough space between them
- Fewest number of steps necessary to complete a form or transaction
17. Reduce the Size of Your Webpages
A smaller page file size is one factor that can contribute to faster load times on your site.
Because the smaller the file size, the faster it can transfer from your server to the user's device.
Use Site Audit to find out if your site has issues with large webpage sizes.
Filter for “Site Performance” from your report’s “Issues” tab.

Reduce your page size by:
- Minifying your CSS and JavaScript files with tools like Minify
- Reviewing your page’s HTML code and working with a developer to improve its structure and/or remove unnecessary inline scripts, spaces, and styles
- Enabling caching to store static versions of your webpages on browsers or servers, speeding up subsequent visits
18. Optimize Your Images
Optimized images load faster because they have smaller file sizes. Which means less data for the user’s device to download.
This reduces the time it takes for the images to appear on the screen, resulting in faster page load times and a better user experience.
Here are some tips to get you started:
- Compress your images. Use software like TinyPNG to easily shrink your images without losing quality.
- Use a Content Delivery Network (CDN). CDNs help speed up image delivery by caching (or storing) images on servers closer to the user's location. So when a user’s device requests to load an image, the server that’s closest to their geographical location will deliver it.
- Use the right image formats. Some formats are better for web use because they are smaller and load faster. For example, WebP is up to three times smaller than JPEG and PNG.
- Use responsive image scaling. This means the images will automatically adjust to fit the user’s screen size. So graphics won’t be larger than they need to be, slowing down the site. Some CMSs (like Wix) do this by default.
Here’s an example of responsive design in action:

Further reading: Image SEO: How to Optimize Images for Search Engines & Users
19. Remove Unnecessary Third-Party Scripts
Third-party scripts are pieces of code from outside sources or third-party vendors. Like social media buttons, analytics tracking codes, and advertising scripts.
You can embed these snippets of code into your site to make it dynamic and interactive. Or to give it additional capabilities.
But third-party scripts can also slow down your site and hinder performance.
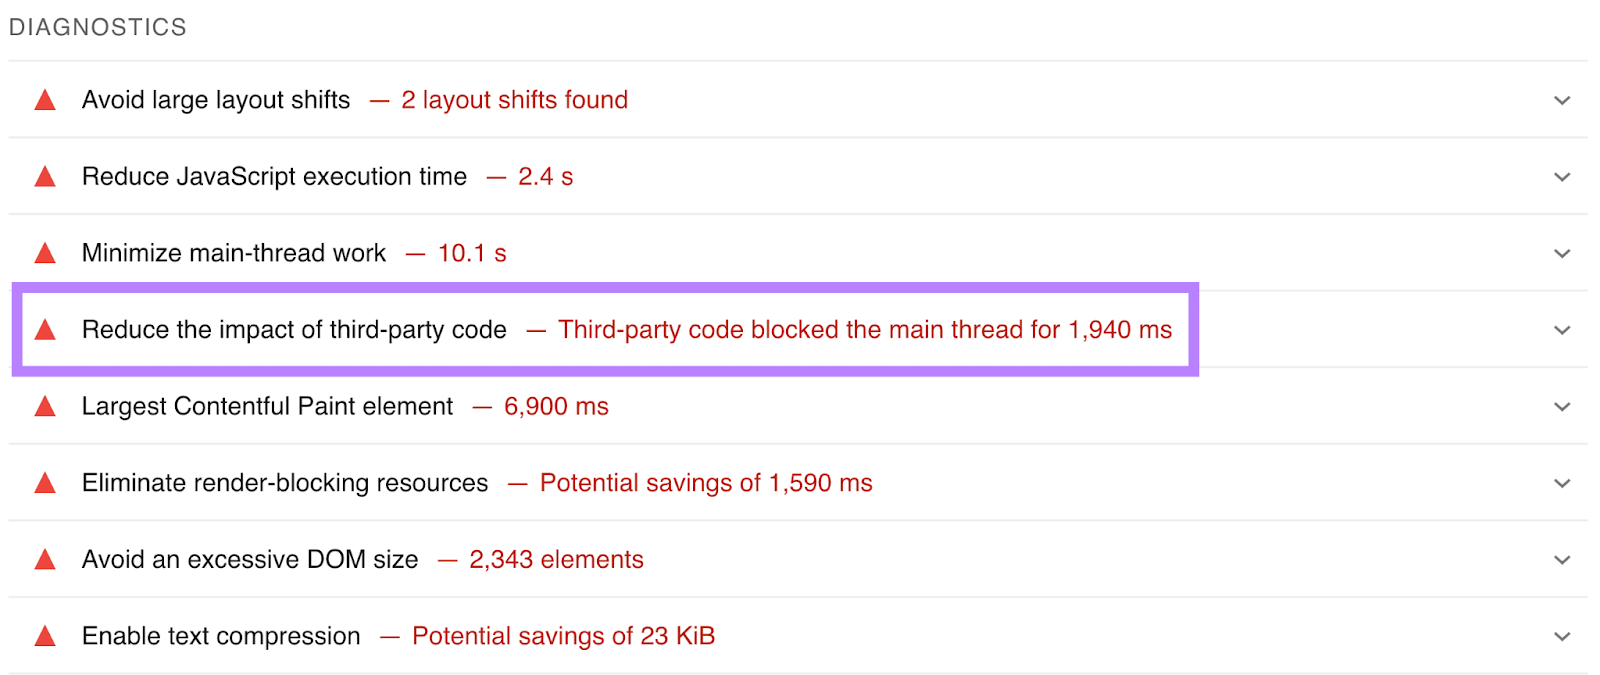
Use PageSpeed Insights to check for third-party script issues of a single page. This can be helpful for smaller sites with fewer pages.
But since third-party scripts tend to run across many (or all) pages on your site, identifying issues on just one or two pages can give you insights into broader site-wide problems. Even for larger sites.
Content
Technical content issues can impact how search engines index and rank your pages. They can also hurt your UX.
Here’s how to fix common technical issues with your content:
20. Address Duplicate Content Issues
Duplicate content is content that’s identical or highly similar to content that exists elsewhere on the internet. Whether on another website or your own.
Duplicate content can hurt your site’s credibility and make it harder for Google to index and rank your content for relevant search terms.
Use Site Audit to quickly find out if you have duplicate content issues.
Just search for “Duplicate” under the “Issues” tab. Click on the “# pages” link next to the “pages have duplicate content issues” error for a full list of affected URLs.
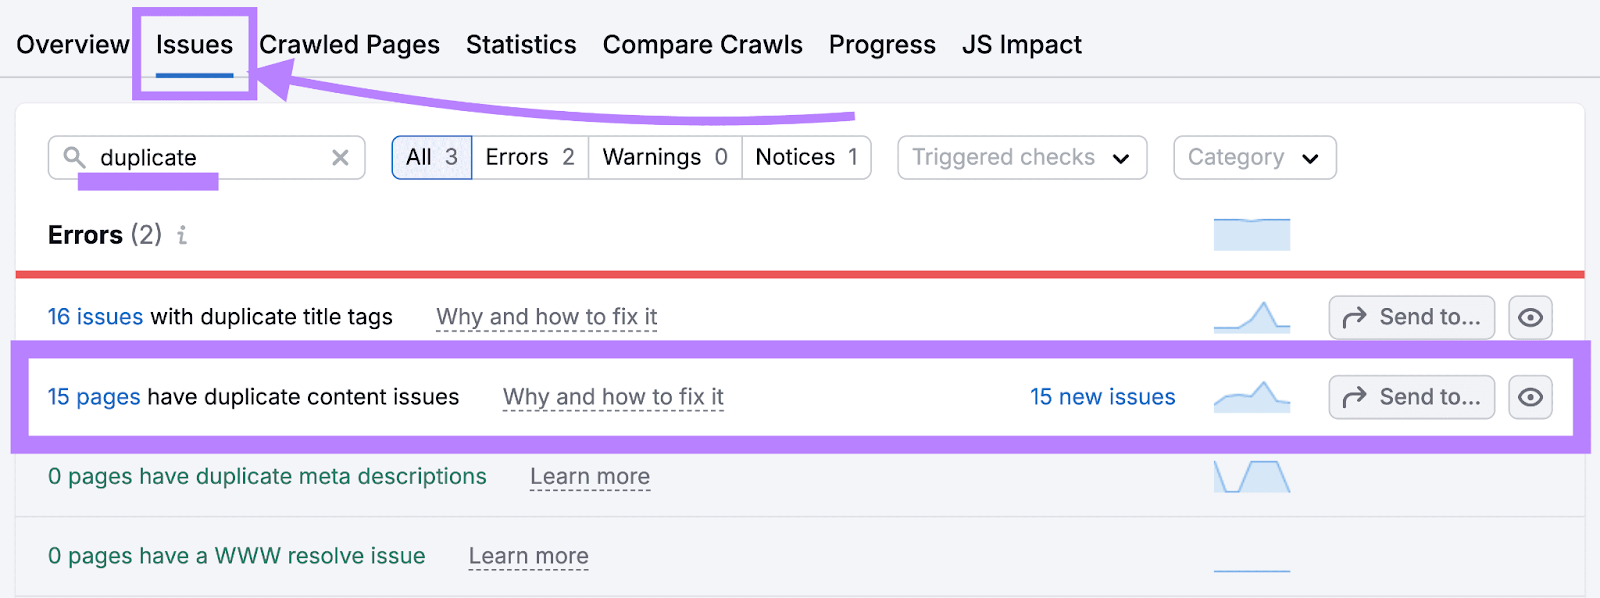
Address duplicate content issues by implementing:
- Canonical tags to identify the primary version of your content
- 301 redirects to ensure users and search engines end up on the right version of your page
21. Fix Thin Content Issues
Thin content offers little to no value to site visitors. It doesn’t meet search intent or address any of the reader’s problems.
This kind of content provides a poor user experience. Which can result in higher bounce rates, unsatisfied users, and even penalties from Google.
To identify thin content on your site, look for pages that are:
- Poorly written and don’t deliver a valuable message
- Copied from other sites
- Filled with ads or spammy links
- Auto-generated using AI or a programmatic method
Then, redirect or remove it, combine the content with another similar page, or turn it into another content format. Like infographics or a social media post.
22. Check Your Pages Have Metadata
Metadata is information about a webpage that helps search engines understand its content. So it can better match and display the content to relevant search queries.
It includes elements like the title tag and meta description, which summarize the page’s content and purpose.
(Technically, the title tag isn’t a meta tag from an HTML perspective. But it’s important for your SEO and worth discussing alongside other metadata.)
Use Site Audit to easily check for issues like missing meta descriptions or title tags. Across your entire site.
Just filter your results for “Meta tags” under the issues tab. Click the linked number next to an issue for a full list of pages with that problem.
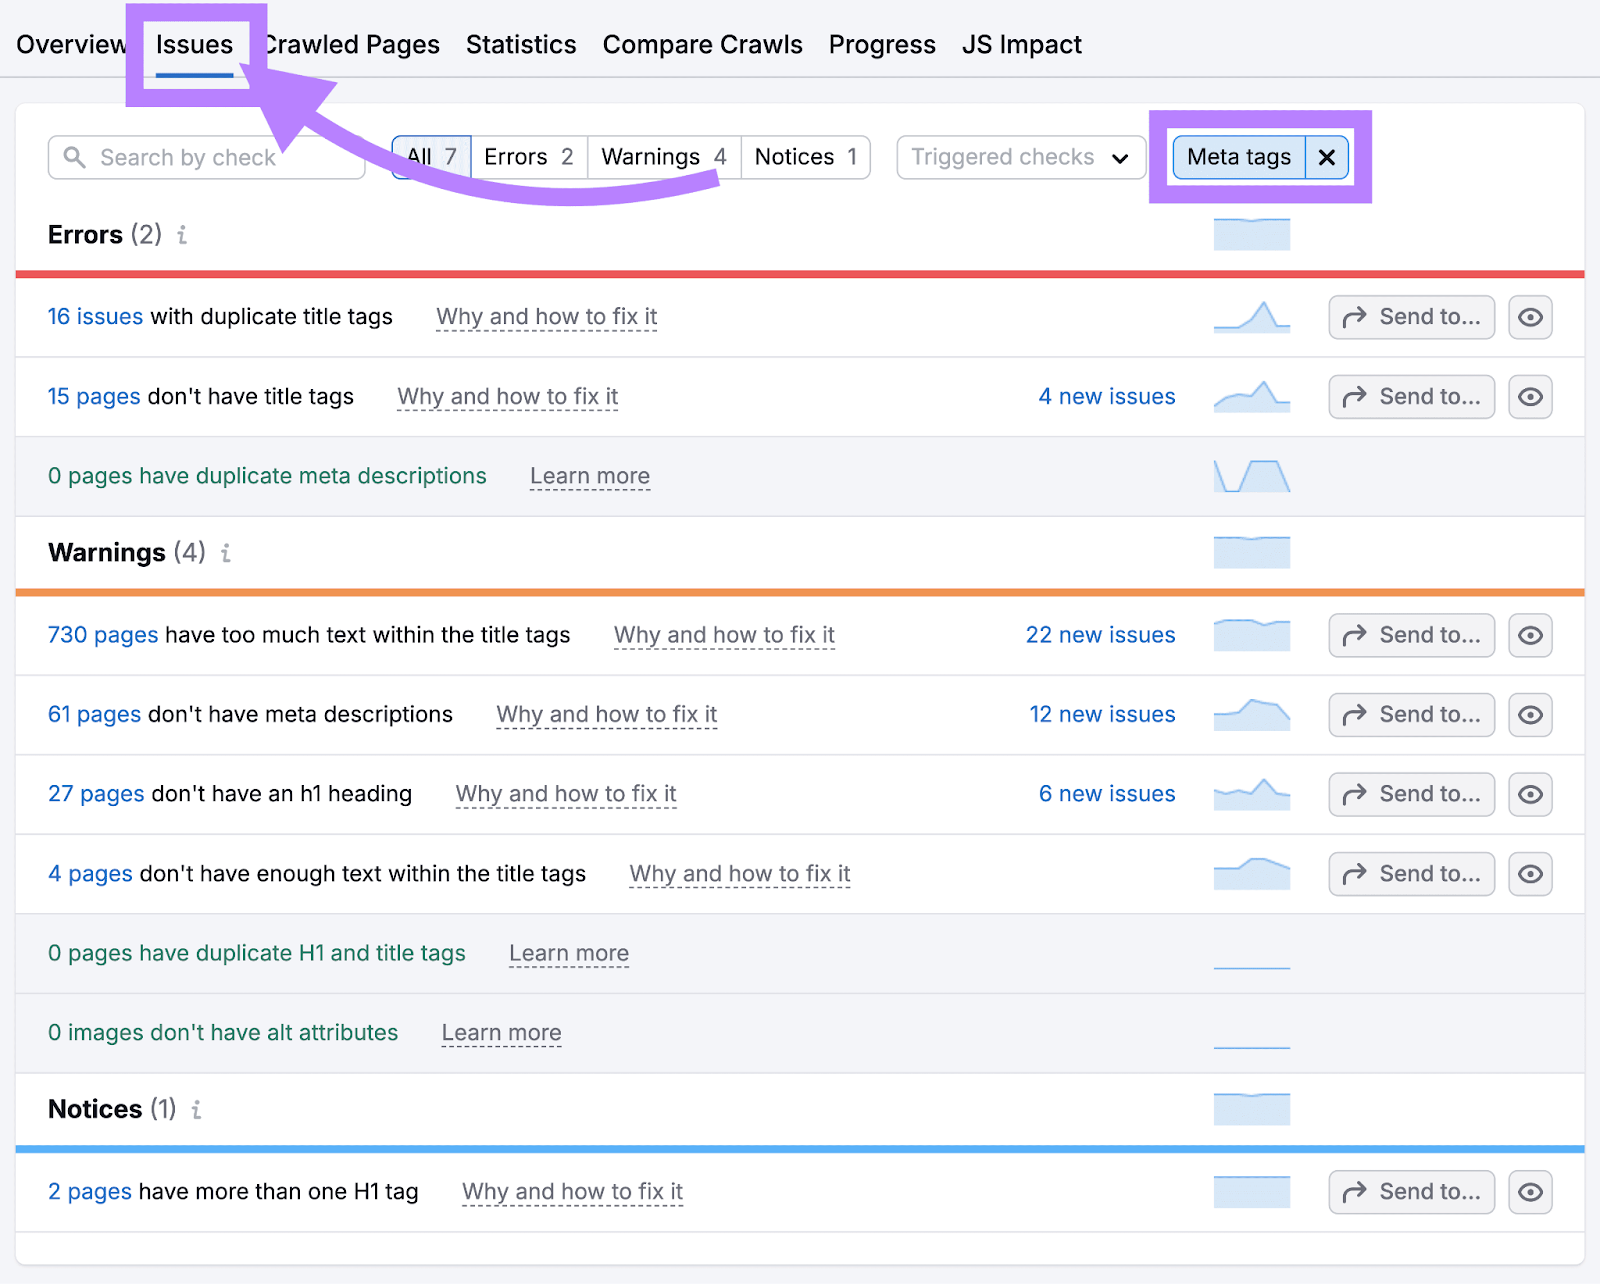
Then, go through and fix each issue. To improve your visibility (and appearance) in search results.
Put This Technical SEO Checklist Into Action Today
Now that you know what to look for in your technical SEO audit, it’s time to execute on it.
Use Semrush’s Site Audit tool to identify over 140 SEO issues. Like duplicate content, broken links, and improper HTTPS implementation.
So you can effectively monitor and improve your site's performance. And stay well ahead of your competition.
